

Real - World ASP .NET—Building a Content Management System - StephenR. G. Fraser
.pdflbStory.Text = String.Format(
Stories[Convert.ToInt16(ddlStories.SelectedItem.Value)].Story, tbUserName.Text, tbNumber.Text);
}
}
Just to make sure you didn't miss anything when you were following along, Listing 6-14 is the complete DCViewer.cs.
Listing 6-14: DCViewer.cs
using System;
using System.Collections;
using System.ComponentModel; using System.Data;
using System.Drawing; using System.Web;
using System.Web.SessionState; using System.Web.UI;
using System.Web.UI.WebControls; using System.Web.UI.HtmlControls; namespace Ch06Example
{
public class WebForm1 : System.Web.UI.Page
{
protected System.Web.UI.WebControls.Label lbStory; protected System.Web.UI.WebControls.Button bnGetStory;
protected System.Web.UI.WebControls.DropDownList ddlStories; protected System.Web.UI.WebControls.RangeValidator rvNumber; protected System.Web.UI.WebControls.RequiredFieldValidator
rfvNumber;
protected System.Web.UI.WebControls.TextBox tbNumber; protected System.Web.UI.WebControls.RequiredFieldValidator

rfvUserName;
protected System.Web.UI.WebControls.TextBox tbUserName;
protected System.Web.UI.WebControls.ValidationSummary
ValidationSummary1;
protected Content[] Stories = new Content[3];
private void Page_Load(object sender, System.EventArgs e)
{
if (!IsPostBack)
{
for (int i = 0; i < Stories.Length; i++)
{
ddlStories.Items.Add(new ListItem(Stories[i].Headline, i.ToString()));
}
}
else
{
lbStory.Text = String.Format
(
Stories[
Convert.ToInt16(ddlStories.SelectedItem.Value)
].Story,
tbUserName.Text, tbNumber.Text
);
}
}
#region Web Form Designer generated code override protected void OnInit(EventArgs e)
{
InitializeComponent();
base.OnInit(e);
Stories[0] = new Content("New Hall of Fame Member",
"{0} was added to the hockey hall of fame due to the {1} MVP trophies."); Stories[1] = new Content("Hacker Located",
"{0} has been arrested on {1} accounts of bad coding."); Stories[2] = new Content("Lottery Winner",
"{0} said all {1} million in lottery winnings is going to charity.");
}
private void InitializeComponent()
{
this.Load += new System.EventHandler (this.Page_Load);
}
#endregion
}

}
Now you're finished. Go ahead and compile and run it from within Visual Studio .NET. Even better, run it from your browser. Go load up your browser and type the following in the Address field:
http://localhost/Ch06Example/DCViewer.aspx
Hey, doesn't that look like Figure 6-1?
Summary
This chapter completed a little refresher on ASP.NET, C#, and Visual Studio .NET by developing the Dynamic Content Viewer. Pat yourself on the back for a job well done.
I bet you're saying that the Viewer doesn't do much. All you did was drag 15 objects in a designer and code 33 lines, 21 of them a helper class. Yes, this doesn't seem like much, but let's see what you got:
§A compiled Web page
§Retained session state
§A colored title
§Two fully client-side and server-side validated input fields
§A dynamic drop-down box
§A personalized dynamic content message
§The HTML and code logic completely separated into two different files
§A helper class to hold your headlines and stories
§Full HTML content formatting (entering <b>your name</b> in the username field)
Not too bad if you ask me. Once you get comfortable with the Visual Studio .NET, it might take all of an hour's worth of work to complete. Try getting this much functionality with as little work from any of the other clientor server-side technologies.
The next chapter tackles the topic of ADO.NET.
Chapter 7: Database Development and
ADO.NET
Overview
An amazing amount of functionality is built into Visual Studio .NET when it comes to Microsoft SQL Server database development. If you combine it with ADO.NET, you don't ever have to leave Visual Studio .NET when it comes to your database efforts.
Visual Studio .NET does not leave you in the cold when it comes to databasedevelopment utilities. It provides you with a way to create a database, table, view, and stored procedure. When combined, these cover almost everything you need to build your database.
ADO.NET takes over where the utilities leave off and enables you to seamlessly join your databases to your Web page code. With little effort, you can connect, extract data, and then load the data into your Web pages.
You don't have to take my word for it. Take a look for yourself.
Visual Studio .NET's Database Utilities
Visual Studio .NET is well equipped when it comes to the design and development of Microsoft SQL Server databases. It provides the functionality to create databases, tables, views, stored procedures, and many other features. This book will cover only these four features, however, because they are all you need to create the content management system that this book is building.
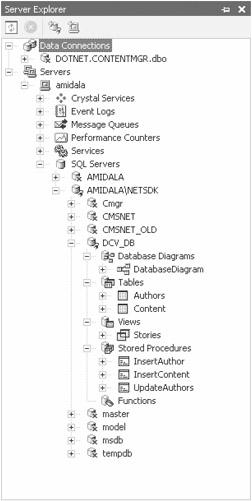
The starting point of all database utilities is the Server Explorer. Select Server Explorer from the View menu to open it; it looks similar to Figure 7-1. You will find your database in one of two places. If the database is Microsoft SQL Server 7.0 or higher, it will be located in the SQL Servers database folder inside your Servers folder. If a supported OLE DB connects the database, it will be found in the Data Connections folder just above the Servers folder.
Figure 7-1: The Server Explorer
The functionality provided to OLE DB-connected databases is mostly restricted to viewing and editing records. On the other hand, Visual Studio .NET provides Microsoft SQL Server databases with much of the functionality that comes with SQL Enterprise Manager. This book focuses on Microsoft SQL Server and will cover the functionality provided by Visual Studio .NET. If you are developing using an OLE DB-connected database, much of the first part of this chapter will not help you because you will have to use the database maintenance tools provided by your database.
Tip I recommend that you install the MSDE 2000 database server provided with the .NET Framework samples to get a feel for the
functionality provided by Visual Studio .NET. You can always uninstall it later.
There is nothing stopping you from building your Microsoft SQL Server databases outside of Visual Studio .NET and then adding the database to the Server Explorer. I will show you how to do this later when you walk through the process of adding the CMSNET database in Chapter 9. First, let's do it the hard way and build a simple content management database that you can integrate into the Dynamic Content Viewer you built in Chapter 6.
Creating a New Database
The first step in database development is not creating one. Obviously, creating the data model, designing the logic database, and designing the physical database should come
first. But hey, I'm a programmer. I'll code first and then go ask questions. (I'm joking— really!)
Visual Studio .NET makes creating databases so easy that it's almost not worth explaining how to do it.
Warning
The following steps will create the database DCV_DB, which you will use throughout the chapter.
1.Select Server Explorer from the View menu.
2.Expand the SQL Servers database folder from within your Servers folder.
3.Right -click the database folder.
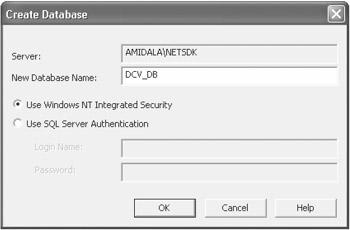
4.Select the New Database menu item, which will display the Create Database dialog box shown in Figure 7-2.
Figure 7-2: The Create Database dialog box
5.Enter DCV_DB in the New Database Name field.
6.Click OK.
Now you should have a new database called DCV_DB in your database folder. You can expand it and see all the default folders built. If you click these folders, however, you will see that there is nothing in them. That's your next job.
Adding and Loading Tables and Views to a Database
An empty database is really quite useless, so let's add a couple of tables to the database to provide a place to store your content.
Note |
The tables and views you are using in this chapter are purposely |
|
very simple (you might even call them minimal) and are not the |
|
best schema around. I did this so that you don't get bogged down |
|
with the details of the database and so it doesn't take much effort |
|
or time for you to build them yourself. |
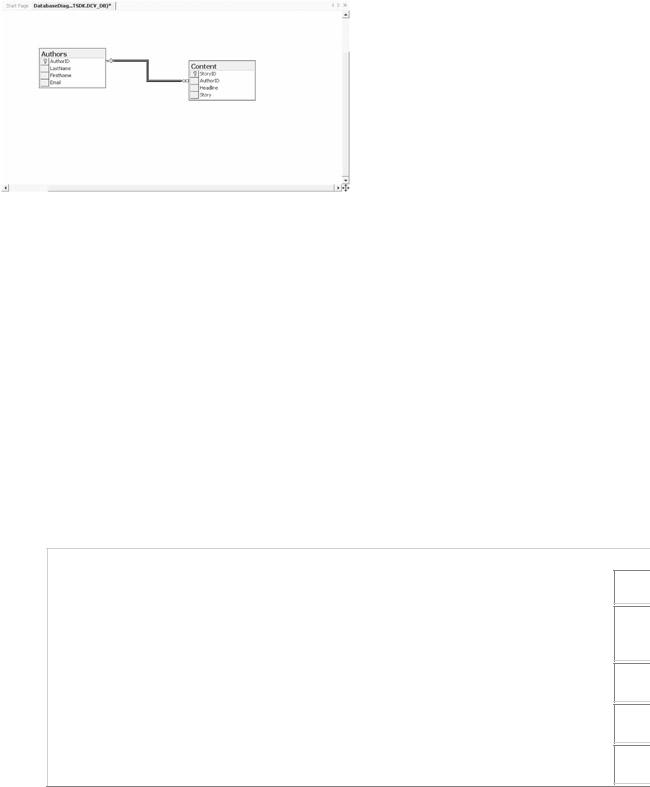
The first table is for storing authors and information about them, and the second table is for storing headlines and stories. The two databases are linked together by a common AuthorID key. Figure 7-3 presents a data diagram of the database.
Figure 7-3: The DCV_DB data diagram
Having this separation means you only have to store one copy of the author information, even though the author may have written many stories. If you had created only one table to contain all the information, a lot of duplicated author information would have to be rekeyed each time a story is added to maintain the database. It also, conveniently, enables me to show you how to create a relationship between tables.
The process of building a new table is only slightly more difficult than creating a database. The hard part is figuring out what columns are needed and the format for each table in the database. It's nice to know you can spend most of your time designing the ultimate database schema instead of figuring out how to implement it.
Creating Tables
To create the first table, follow these steps:
1.Navigate down to the database folder as you did in the previous section.
2.Expand the database folder.
3.Expand the DCV_DB folder.
4.Right -click the Tables folder.
5.Select the New Table menu item. You should now have an entry form
in which to enter the database columns found in Table 7-1.
Table 7-1: Authors Database Column Descriptions
COLUMN |
|
DATA |
|
LENGTH |
|
DESCRIPTION |
|
IDENTITY |
NAME |
|
TYPE |
|
|
|
|
|
|
|
|
|
|
|
|
|
|
|
AuthorID |
|
int |
|
4 |
|
Autogenerated |
|
Yes |
|
|
|
|
|
|
|||
|
|
|
|
|
|
ID number for |
|
|
|
|
|
|
|
|
author |
|
|
|
|
|
|
|
|
|
|
|
LastName |
|
char |
|
32 |
|
Last name of |
|
No |
|
|
|
|
|
|
|||
|
|
|
|
|
|
the author |
|
|
|
|
|
|
|
|
|
|
|
FirstName |
|
char |
|
32 |
|
First name of |
|
No |
|
|
|
|
|
|
|||
|
|
|
|
|
|
the author |
|
|
|
|
|
|
|
|
|
|
|
|
char |
|
64 |
|
E-mail address |
|
No |
|
|
|
|
|
|
|
|||
|
|
|
|
|
|
of the author |
|
|
6. Select Save Table1 from the File menu.
KE
Yes
No
No
No

7.Enter Authors into the edit field in the dialog box.
8.Click OK.
Go ahead and repeat this for the second table, but use the information in Table 7-2 and save the table as Content.
Table 7-2: Content Database Column Descriptions
COLUMN |
|
DATA |
|
LENGTH |
|
DESCRIPTION |
|
IDENTITY |
|
KEY |
NAME |
|
TYPE |
|
|
|
|
|
|
|
|
|
|
|
|
|
|
|
|
|
|
|
StoryID |
|
int |
|
4 |
|
Autogenerated |
|
Yes |
|
Yes |
|
|
|
|
|
|
|
||||
|
|
|
|
|
|
ID number for |
|
|
|
|
|
|
|
|
|
|
author |
|
|
|
|
|
|
|
|
|
|
|
|
|
|
|
AuthorID |
|
int |
|
4 |
|
Foreign key to |
|
No |
|
No |
|
|
|
|
|
|
|
||||
|
|
|
|
|
|
author |
|
|
|
|
|
|
|
|
|
|
database |
|
|
|
|
|
|
|
|
|
|
|
|
|
|
|
Headline |
|
char |
|
64 |
|
Headline for |
|
No |
|
No |
|
|
|
|
|
|
|
||||
|
|
|
|
|
|
the content |
|
|
|
|
|
|
|
|
|
|
|
|
|
|
|
Story |
|
text |
|
16 |
|
Story portion |
|
No |
|
No |
|
|
|
|
|
|
|
||||
|
|
|
|
|
|
of the content |
|
|
|
|
This book will not go into what all the data types mean, but if you are interested, many good books on Microsoft SQL Server and SQL cover this topic in great detail.
The Identity field, when set to Yes, will turn on autonumber generation for the column. Why you call the field Identity (instead of Autonumber) is a mystery to me. I'm an application programmer, though, and not a database person. It's probably some special database term.
Okay, you now have your tables. The next step is to build a relationship between them. In this database, it is fairly obvious —AuthorID is the column that should link these two tables.
Creating a Relationship
To create a relationship between your tables, follow these steps:
1.Right -click the Content table in the Server Explorer.
2.Select Design Table from the menu items.
3.Right -click anywhere on the Table Designer.
4.Select Relationships from the menu items. This will bring up a
Relationships property page similar to Figure 7-4.
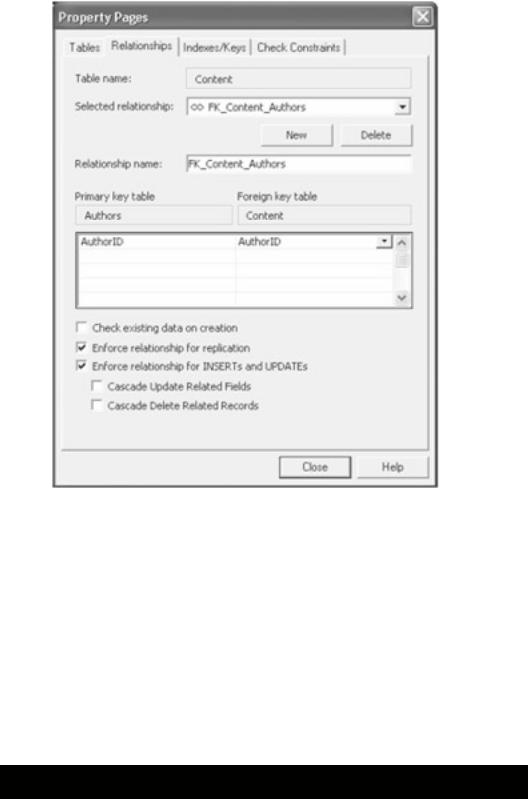
Figure 7-4: The Relationships property page
5.Click the New button.
6.Select Authors as the primary key side of the relationship from the Primary Key Table drop-down list.
7.Select AuthorID as the primary key in the grid beneath the Primary Key Table drop-down list.
8.Select Content as the foreign key side of the relationship from the Foreign Key Table drop-down list.
9.Select AuthorID as the foreign key in the grid beneath the Foreign Key Table drop-down list.
10.Click Close.
Now you have two tables and a relationship between them. Quite often, when you want to get data from a database, you need information from multiple tables. For example, in this case, you want to get all stories with each author's first and last name. As mentioned previously, you could have created the Content table that way, but then you would have a lot of duplicate data floating around. There is nothing stopping you from executing a SQL statement that gets this information, as shown in Listing 7-1.
Listing 7-1: Getting Data from Two Tables
SELECT FirstName,
LastName,
Headline,
Story
FROM Authors,
Content
WHERE Authors.AuthorID = Content.AuthorID
ORDER BY StoryID ASC
Personally, I prefer to be able to write something like this instead:
SELECT * FROM Stories
This is exactly what you can do with database views. Basically, you might think of a view as a virtual table without any data of its own, based on a predefined query. If you know you are going to use the same set of data based on a query, you might consider using the view instead of coding.
Note Those of you who are knowledgeable about SQL and views might have noticed the ORDER BY clause. Microsoft SQL Server supports the ORDER BY clause in its views, unlike some other database systems.
Creating a View
Follow these steps to create a view:
1.Right -click the Views table from within the DCV_DB folder in the Server Explorer.
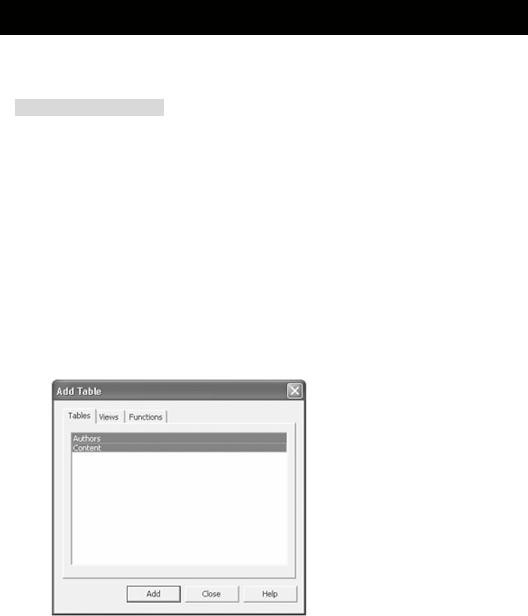
2.Select New View from the menu items. This will bring up an Add Table dialog box similar to Figure 7-5.
Figure 7-5: The Add Table dialog box
3.Select both Authors and Content and click the Add button.
4.Click Close. This should generate a window similar to Figure 7-6.

Figure 7-6: The View Design window
5.Click the check boxes for FirstName and LastName in the Authors table.
6.Click the check boxes for StoryID, Headline, and Story in the Content table.
7.Right -click StoryID and select Sort Ascending from the menu items.
8.Select Save View1 from the File menu.
9.Enter Stories into edit field.
10.Click OK.
Pretty painless, don't you think? You have the option of testing your view right there, too. Click the Run Query button on the main toolbar. (It is the button that has an exclamation point on it.) The View Design window is pretty powerful. If you play with it for a while, you will see what I mean.
Did you try the Run Query button and get nothing? Oops ... I forgot to tell you to load some data into the database. You can do this with Visual Studio .NET as well. Simply double-click either of the tables you created, and an editable table will appear.
First enter the data for the authors. If you don't, you will not have an Author ID to enter into the AuthorID column in the Content view. Enter the data found in Table 7-3. Notice that there are no Author IDs to enter; this field is automatically created. In fact, Visual Studio .NET will yell at you if you try to enter something in the AuthorID column.
|
Table 7-3: Author Data |
|
|
|
|
|
|
|
|
|
|
|
|
|
LASTNAME |
|
FIRSTNAME |
|
|
|
|
|
|
|
|
|
|
|
Doors |
|
Bill |
|
<bill@contentmgr.com> |
|
|
|
|
|
|
|
|
|
Ellidaughter |
|
Larry |
|
<larry@contentmgr.com> |
|
|
|
|
|
|
|
|
|
Fraser |
|
Stephen |
|
<stephen@contentmgr.com> |
|
|
|
|
|
|
|
|
Now enter the data found in Table 7-4. Notice that StoryID cannot be entered. It, too, is an autogenerated number. You do have to enter AuthorID, though, because it is not automatically generated in this table.
|
Table 7-4: Content Data |
|
|
|
|
|
|
|
|
|
|
|
|
|
AUTHORID |
|
HEADLINE |
|
STORY |
|
|
|
|
|
|
|
|
|
1 |
|
.NET Is |
|
According |
|
|
|
|
the Best |
|
to my |
|
|
|
|
|
|
research, |
|
|
|
|
|
|
the .NET |
|
|
|
|
|
|
product |
|
|
|
|
|
|
has no |
|
|
|
|
|
|
competiti |
|
|
|
|
|
|
on, |
|
|
|
|
|
|
though I |
|
|
|
|
|
|
|
|