

Real - World ASP .NET—Building a Content Management System - StephenR. G. Fraser
.pdfSqlDataAdapter DAdpt = new SqlDataAdapter(Cmd, ConnectStr);
DataSet ds = new DataSet();
DAdpt.Fill (ds, "Authors");
DataTable dt = ds.Tables["Authors"];
foreach (DataRow dr in dt.Rows)
{
ListBox1.Items.Add(dr["LastName"] + ", "+ dr["FirstName"] + ": "+ dr["Email"]);
}
}
}
#region Web Form Designer generated code override protected void OnInit(EventArgs e)
{
InitializeComponent();
base.OnInit(e);
}
private void InitializeComponent()
{
this.Load += new System.EventHandler (this.Page_Load);
}
#endregion
}
}
Okay, let's move on to the next example.
Building an ASP.NET DataGrid
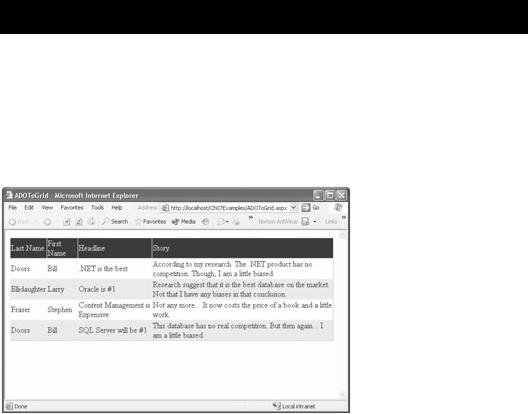
The previous example had a pretty boring display, don't you think? I think the authors of ADO.NET thought so, too, and decided to provide a standard intrinsic control called the DataGrid to provide a simple and elegant way of displaying data on a Web page. When you are finished, you will have a Web page that looks similar to Figure 7-9.
Figure 7-9: The ADOToGrid DataGrid
This example is actually simpler than the previous one when it comes to the code. The design is more difficult, but hey, it's an intrinsic control, how hard can that be?
Take my word for it, an intrinsic control can be tough, especially the DataGrid because it has quite a few different options available. In fact, this example will not even skim the surface. If you want more information about the DataGrid, you might want to check out the Microsoft documentation.
Let's not create a new project. Instead, you will add a new Web page to the existing project.
Adding a Web Page to a Project
Follow these steps to add a Web page to your project:
1.Right -click Ch07Examples.
2.Select Add Web Form from the Add submenu item. This will display a
dialog box similar to the one shown in Figure 7-10.
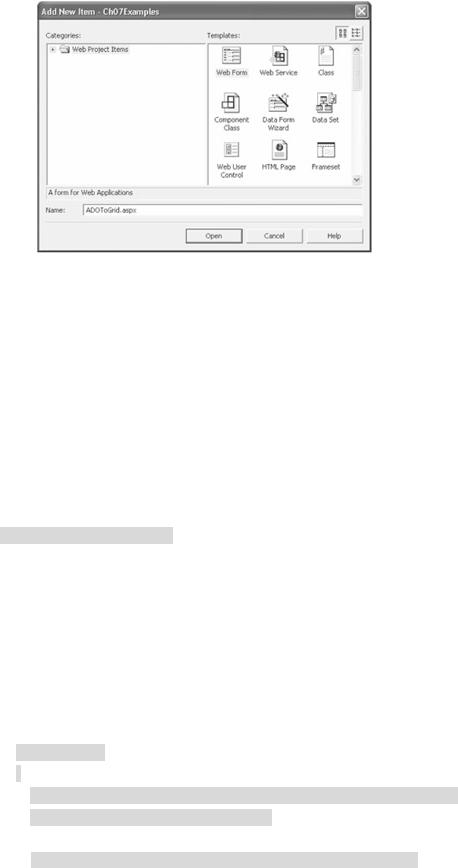
Figure 7-10: The Add New Item dialog box
3.Enter ADOToGrid.aspx in the Name field.
4.Click Open.
The best part is that everything has the name ADOToGrid, so now you don't have to do any renaming.
Coding the Connection of a Database to a DataGrid
Now that you have your new Web page, drag a DataGrid from the Toolbox to it. Leave it in its default state to start with and then come back and fix it up slightly after you have finished connecting it to the database. Save the design and then change the edit window to the Web page code ADOToGrid.cs.
First, remember to add the namespace of the managed provider you are using. As before, this book will use the SqlClient namespace, so the code should look like this:
using System.Data;
using System.Data.SqlClient;
using System.Drawing;
As in the previous example, the next thing you have to do is connect to the managed provider. Note that once you know the connection string for the database to which you are connecting, you will be able to continually use it without having to do a single change ever again (unless you change your database server configuration).
Just for grins and giggles, you are going to get your data out of the database using the Stories view previously created. So, with this minor change, the code will look like this:
protected void Page_Load(object sender, EventArgs e)
{
if (!IsPostBack)
{
string ConnectStr = "server=localhost;uid=sa;pwd=;database=DCV_DB";
string Cmd = "SELECT * FROM Stories";
SqlDataAdapter DAdpt = new SqlDataAdapter(Cmd, ConnectStr);
Next, you create a DataSet and fill it with the data gathered by the managed provider. The only difference between this example and the previous one is that the second parameter of the Fill() method will change to the Stories view.

DataSet ds = new DataSet();
DAdpt.Fill (ds, "Stories");
The last thing you need to do is place the data from the DataSet into the DataGrid designed earlier. Do you remember from Chapter 6 that you can load a drop-down list using its DataSource property? You can do the exact same thing with a DataGrid. All you need to find is an object that implements the IEnumerable interface. Fortunately, the DataTable has a property called DefaultView that provides a (what a coincidence!) default view of the table. This property also happens to implement the IEnumerable interface. After you load the DataSource, you must DataBind() it to the DataGrid, as shown in the following code:
DataGrid1.DataSource = ds.Tables["Stories"].DefaultView;
DataGrid1.DataBind();
Just to make sure you coded correctly, Listing 7-6 shows the entire ADOToGrid.cs.
Listing 7-6: ADOToGrid.cs
using System;
using System.Collections;
using System.ComponentModel;
using System.Data;
using System.Data.SqlClient;
using System.Drawing;
using System.Web;
using System.Web.SessionState;
using System.Web.UI;
using System.Web.UI.WebControls;
using System.Web.UI.HtmlControls;
namespace Ch07Examples
{
public class ADOToGrid : System.Web.UI.Page
{
protected System.Web.UI.WebControls.DataGrid DataGrid1;
private void Page_Load(object sender, System.EventArgs e)
{
if (!IsPostBack)

{
string ConnectStr = "server=localhost;uid=sa;pwd=;database=DCV_DB";
string Cmd = "SELECT * FROM Stories";
SqlDataAdapter DAdpt = new SqlDataAdapter(Cmd, ConnectStr);
DataSet ds = new DataSet();
DAdpt.Fill(ds, "Stories");
DataGrid1.DataSource = ds.Tables["Stories"].DefaultView; DataGrid1.DataBind();
}
}
#region Web Form Designer generated code override protected void OnInit(EventArgs e)
{
InitializeComponent();
base.OnInit(e);
}
private void InitializeComponent()
{
this.Load += new System.EventHandler (this.Page_Load);
}
#endregion
}
}
Now you can save, compile, and execute it. Notice in Figure 7-11 that the headings used by the DataGrid are the actual column names from the database and that the grid is quite boring. Let's change it to something more pleasant.
Figure 7-11: The ADOToGrid DataGrid before facelift
Change the edit window back to the Web page ADOToGrid.aspx and select the HTML view.
Changing DataGrid Layout
Perform the following steps to change the DataGrid layout:
1.Select the DataGrid control in Design editor.
2.Select False in the AutoGenerateColumns property.
3.Click the ellipsis in the Columns property. This will display a DataGrid Properties dialog box, as shown in Figure 7-12.
Figure 7-12: The DataGrid dialog box
4.Click Columns in left selection list.
5.Select Bound Column in the Available Columns list.
6.Click the Add arrow button to add a bound column to selected
columns list.
7.Enter Last Name in the Header Text box.
8.Enter LastName in the Data Field box.
9.Repeat steps 5 through 8 for the following three columns:
|
|
|
|
|
|
HEADER |
|
DATA |
|
|
TEXT |
|
FIELD |
|
|
|
|
|
|

|
|
|
|
|
|
HEADER |
|
DATA |
|
|
TEXT |
|
FIELD |
|
|
|
|
|
|
|
First |
|
FirstName |
|
|
Name |
|
|
|
|
|
|
|
|
|
Headline |
|
Headline |
|
|
|
|
|
|
|
Story |
|
Story |
|
|
|
|
|
|
10.Click the OK button.
11.Expand the AlternatingItemStyle property.
12.Enter Gainsboro in the BackColor property of AlternatingItemStyle.
13.Expand the HeaderStyle property.
14.Enter Navy in the BackColor property of HeaderStyle.
15.Enter White in the ForeColor property of HeaderStyle.
If you get sets of columns in the DataGrid—the first with the new heading and the second with the default heading—you forgot to set the AutoGenerateColumns property to False. (It took me a while to find it. Guess I should read the manual first before I use something.) After you do this, be warned: The DataGrid no longer generates all the columns in the table, only the ones you specify.
Listing 7-7 presents the finished HTML code of ADOToGrid.aspx, just in case you missed something when entering your own code.
Listing 7-7: ADOToGrid.aspx
<%@ Page language="c#" Codebehind="ADOToGrid.aspx.cs" AutoEventWireup="false"
Inherits="Ch07Examples.ADOToGrid" %>
<!DOCTYPE HTML PUBLIC "-//W3C//DTD HTML 4.0 Transitional//EN" >
<HTML>
<HEAD> <title>ADOToGrid</title>
<meta name="GENERATOR" Content="Microsoft Visual Studio 7.0"> <meta name="CODE_LANGUAGE" Content="C#">
<meta name=vs_defaultClientScript content="JavaScript"> <meta name=vs_targetSchema
content="http://schemas.microsoft.com/intellisense/ie5"> </HEAD>
<body >
<form id="ADOToGrid" method="post" runat="server">
<asp:DataGrid id=DataGrid1 runat="server" AutoGenerateColumns="False"> <HeaderStyle ForeColor="White" BackColor="Navy">
</HeaderStyle>
<AlternatingItemStyle BackColor="Gainsboro"> </AlternatingItemStyle>
<Columns>
<asp:BoundColumn DataField="LastName" HeaderText="Last Name"> </asp:BoundColumn>
<asp:BoundColumn DataField="FirstName" HeaderText="First Name"> </asp:BoundColumn>
<asp:BoundColumn DataField="Headline" HeaderText="Head Line">
</asp:BoundColumn>
<asp:BoundColumn DataField="Story" HeaderText="Story">
</asp:BoundColumn>
</Columns>
</asp:DataGrid>
</form>
</body>
</HTML>
Inserting Data Using a Stored Procedure
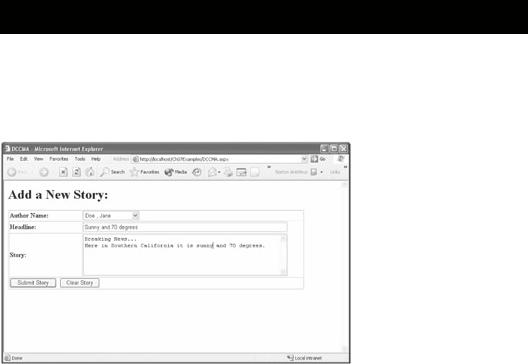
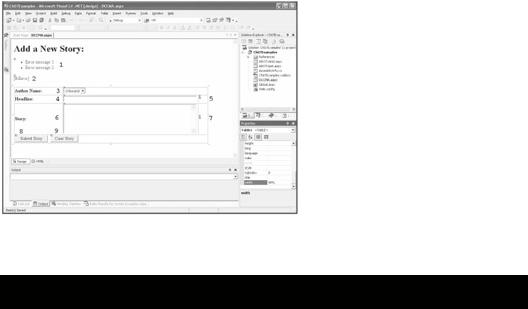
Do you remember from Chapter 1 the term "content management application (CMA)"? Figure 7-13 shows the building of a (very) rudimentary one for the Dynamic Content Viewer that you started in Chapter 6.
Figure 7-13: A Dynamic Content CMA
When I developed the Dynamic Content CMA Web page (which I shortened to DCCMA.aspx), I created it within the CH07Examples project. You can do this as well, or you can separate it out into its own project.
The first thing, as always, is to design your Web page. Figure 7-14 shows what I came up with as a simple design. Table 7-5 describes all the intrinsic controls so that you can build a similar Web page.
|
Table 7-5: Dynamic Content CMA Design |
|
|
|
|
|
||
|
|
|
|
|
|
|
|
|
|
NUMBER |
|
CONTROL TYPE |
|
ID |
|
OTHER |
|
|
|
|
|
|
|
|
DETAI |
|
|
|
|
|
|
|
|
LS |
|
|
|
|
|
|
|
|
|
|
|
1 |
|
ValidationSummary |
|
ValSum |
|
Default |
|
|
|
|
|
|
|
|
values. |
|
|
|
|
|
|
|
|
|
|
|
2 |
|
Label |
|
lbError |
|
Set |
|
|
|
|
|
|
|
|
ForeCol |
|
|
|
|
|
|
|
|
or to |
|
|
|
|
|
|
|
|
Red |
|
|
|
|
|
|
|
|
and |
|
|
|
|
|
|
|
|
blank |
|
|
|
|
|
|
|
|
out all |
|
|
|
|
|
|
|
|
text. |
|
|
|
|
|
|
|
|
|
|
|
3 |
|
DropDownList |
|
ddlAuthor |
|
Default |
|
|
|
|
|
|
|
|
|
|

Table 7-5: Dynamic Content CMA Design |
|
|
||
NUMBER |
|
CONTROL TYPE |
|
ID |
|
|
|
|
|
|
|
|
|
|
|
|
|
|
|
|
|
|
|
|
4 |
|
TextBox |
|
tbHeadline |
|
|
|
|
|
|
|
|
|
|
5 |
|
RequiredFieldValidator |
|
rfvHeadline |
|
|
|
|
|
6 |
|
TextBox |
|
tbStory |
|
|
|
|
|
7 |
|
RequiredFieldValidator |
|
rfvStory |
|
|
|
|
|
8 |
|
Button |
|
bnSubmit |
OTHER DETAI LS
values.
Set Width to 100%.
Set Display to Dynami c, Error Messag e to
You must enter a Headlin e, Text to *, and Control To Validate to tbHeadl ine.
Set Rows to 6, Text Mode to MultiLin e, and Width to 100%.
Set Display to Dynami c, Error Messag e to
You must enter a Story, Text to *, and Control To Validate to tbStory.
Set
|
Table 7-5: Dynamic Content CMA Design |
|
|
|
|
|
||
|
|
|
|
|
|
|
|
|
|
NUMBER |
|
CONTROL TYPE |
|
ID |
|
OTHER |
|
|
|
|
|
|
|
|
DETAI |
|
|
|
|
|
|
|
|
LS |
|
|
|
|
|
|
|
|
|
|
|
|
|
|
|
|
|
Text to |
|
|
|
|
|
|
|
|
Submit |
|
|
|
|
|
|
|
|
Story. |
|
|
|
|
|
|
|
|
|
|
|
9 |
|
Button |
|
bnClear |
|
Set |
|
|
|
|
|
Text to |
|
|||
|
|
|
|
|
|
|
|
|
|
|
|
|
|
|
|
Clear |
|
|
|
|
|
|
|
|
Story. |
|
|
|
|
|
|
|
|
|
|
Figure 7-14: A Dynamic Content CMA design
Listing 7-8 shows the finished HTML code of DCCMA.aspx, just in case you missed something when entering your own code.
Listing 7-8: DCCMA.aspx
<%@ Page language="c#" Codebehind="DCCMA.cs" AutoEventWireup="false"
Inherits="Ch07Examples.DCCMA" %>
<html>
<head>
<meta name="GENERATOR" Content="Microsoft Visual Studio 7.0">
<meta name="CODE_LANGUAGE" Content="C#">
<meta name="vs_defaultClientScript" content="JavaScript">
<meta name="vs_targetSchema"
content="http://schemas.microsoft.com/intellisense/ie5">
</head>
<body >
<form id="DCCMA" method="post" runat="server">
<h1>Add a new story:</h1>
<p>
<asp:ValidationSummary id=ValSum runat="server" >
</asp:ValidationSummary>
</p>
<p>
<asp:Label id=lbError runat="server" ForeColor="Red" >
</asp:Label>