

Real - World ASP .NET—Building a Content Management System - StephenR. G. Fraser
.pdfAfter you have updated all the values, go through and append any missing key/value attribute pairs.
XmlDocumentFragment newAppSetting = doc.CreateDocumentFragment();
if (!issetup)
{
// will be set to true later newAppSetting.InnerXml =
("\n <add key=\"setup\" value=\"false\" />"); ((XmlElement)(nodes.Item(i))).AppendChild(newAppSetting);
}
if (!isdatabase)
{
newAppSetting.InnerXml =
("\n <add key=\"database\" value=\"" + database + "\" />"); ((XmlElement)(nodes.Item(i))).AppendChild(newAppSetting);
}
if (!isdatasource)
{
newAppSetting.InnerXml =
("\n <add key=\"datasource\" value=\"" + datasource + "\" />"); ((XmlElement)(nodes.Item(i))).AppendChild(newAppSetting);
}
if (!isuserid)
{
newAppSetting.InnerXml =
("\n <add key=\"userid\" value=\"" + userid + "\" />"); ((XmlElement)(nodes.Item(i))).AppendChild(newAppSetting);
}
if (!ispassword)
{
newAppSetting.InnerXml =
("\n <add key=\"password\" value=\"" + password + "\" />"); ((XmlElement)(nodes.Item(i))).AppendChild(newAppSetting);
}
if (!istimeout)
{
newAppSetting.InnerXml =
("\n <add key=\"timeout\"value=\"" + timeout + "\" />"); ((XmlElement)(nodes.Item(i))).AppendChild(newAppSetting);
}

}
}
The final steps are to save a copy of the previous version of web.config, delete the original, open the web.config file for writing, and then save it.
File.Copy(Server.MapPath("..\\web.config"),
Server.MapPath("..\\web.config.001"),
true);
File.Delete(Server.MapPath("..\\web.config"));
StreamWriter sr = new
StreamWriter(File.OpenWrite(Server.MapPath("..\\web.config")));
doc.Save(sr);
sr.Close();
}
It's all fine and dandy to store it in the web.config file, but how do you get it out when you need it? Funny you should ask, because ASP.NET provides a simple solution. Let's say you want to find out the value for the setup key in Listing 10-4. All you need to code is the following:
string setup = (string)
((NameValueCollection)Context.GetConfig("appSettings"))["setup"];
After this line is executed, the string setup contains the value true. It's pretty easy, if you ask me.
Context is a copy of the HttpContext provided by System.Web.UI.Page, from which your Web form is derived. HttpContext encapsulates all HTTP -specific context used to process Web requests, including the web.config file. By using the simple GetConfig() method, you now have access to your user-defined application information.
The Common/AppEnv.cs Helper Class
One of the most important and most used classes in CMS.NE T is Common/AppEnv.cs. This class is a common helper class to much of the CMS.NET application. Not only does this class provide access to web.config, but it also generates an SqlConnection, which you will always use to connect to the CMSNET database.
The AppEnv constructor (see Listing 10-5) is simple enough and just takes in a copy of HttpContext (easily provided by the inherited Context member variable found in every Web page) so that it can be used later in the GetAppSetting() method. The only unusual namespace to be added is System.Collections.Specialized. This namespace will be used by the NameValueCollection typecast in the
GetAppSetting() method.
Listing 10-5: The Namespaces and AppEnv Constructor Method
using System;
using System.Collections.Specialized;
using System.Web;
using System.Data.SqlClient;

...
public AppEnv(HttpContext Context)
{
context = Context;
}
The GetAppSetting() method (see Listing 10-6) provides a simplified interface to the Context.GetConfig() method. Now you don't have to worry about all the type casting from the NameValueCollection to string, nor the weird string inside of an
array—syntax, for you C++ and Java developers.
Listing 10-6: The AppEnv.GetAppSetting Method
public string GetAppSetting (string setting)
{
string val; try
{
val = (string)((NameValueCollection)context.GetConfig("appSettings"))[setting];
}
catch (NullReferenceException)
{
val = "";
}
if (val == null) val = "";
return val;
}

The real star of this class is the GetConnection() method (see Listing 10-7). This method returns an SqlConnection, which you will use to connect to the database from now on. No more hard-coding of the database connection string. The beauty of this method is that after you run the setup procedure, you never have to worry about where your database is again.
Listing 10-7: The AppEnv.GetConnection Method
public SqlConnection GetConnection()
{
SqlConnection myConnection = new SqlConnection();
myConnection.ConnectionString =
"server=" + GetAppSetting("datasource") +
";database=" + GetAppSetting("database") +
";uid=" + GetAppSetting("userid") +
";pwd=" + GetAppSetting("password") +
((GetAppSetting("timeout").Length > 0) ?
";Connection Timeout=" + GetAppSetting("timeout") : "");
return myConnection;
}
Setting Up the All-Powerful Administrator
Now that you have your database connection string conveniently available, the next Web page in the setup procedure doesn't waste any time using it as it sets up a unique administrator account into the CMSNET database.
The Setup/setup3.aspx Web Page
Setup/setup3.aspx is a very simple Web form (see Figure 10-4) designed to capture all the information needed for the administrative account. All the edit fields except the optional Administrator Name are validated to make sure they exist before being submitted. Also, the Email Address edit field is validated to make sure it contains a valid e-mail-formatted entry, and the Password Confirm edit field is validated to make sure it contains the same value as the Password edit field.
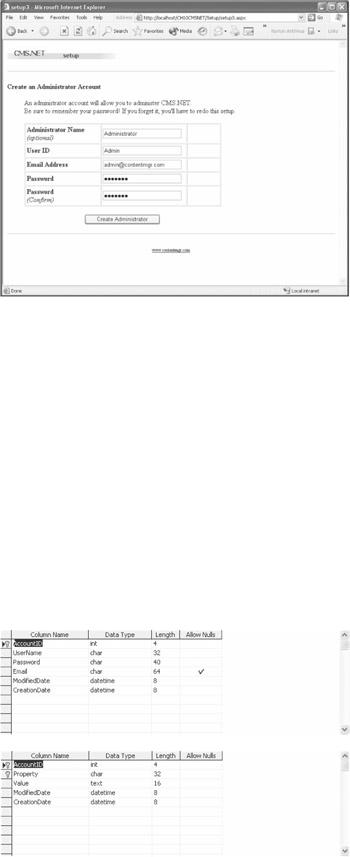
Figure 10-4: Setup/setup3.aspx
The Setup/setup3.cs Codebehind
Just like the previous Web page in the setup procedure, all the interesting things happen in the Codebehind file.
As you see in Figure 10-4, CMS.NET does not require much information about the administrator, but your implementation can be as detailed as you want. Believe it or not, you will not have to change the database schema to store any additional information about the administrator.
How is this done? Basically, the account where all user accounts are stored is actually split into two tables. The first, called the Account table (see Figure 10-5), holds the information needed by CMS.NET to function. The second, called the AccountProperty table (see Figure 10-6), stores information in key/value pairs, very
similar to <appSettings> in the web.config. Now, if you want to add the administrator name as you do in setup3, just add the key of AdministratorName and its value. When you want to retrieve it back, just select the AccountProperty table with AccountID and Key. The neat thing about this is that if a user doesn't enter optional information about herself, no wasted space is placed in the database. This can be a good thing if you have a lot of optional information that you are requesting from your users.
Figure 10-5: The CMSNET Account table
Figure 10-6: The CMSNET AccountProperty table
The process that setup3 follows is fairly easy because all the details are hidden in database helper classes. In fact, the first thing setup3 does in its Page_Init() method

(see Listing 10-8) is create an instance of an Account and AccountProperty database helper class.
Listing 10-8: The Setup3.Page_Init Method
override protected void OnInit(EventArgs e)
{
InitializeComponent();
base.OnInit(e);
SqlConnection connection = new AppEnv(Context).GetConnection();
account = new Account(connection);
property = new AccountProperty(connection);
}
After the Page_Load() method (see Listing 10-9) receives a valid Web form, it uses the Account helper class created in the Page_Init() method to check whether the Administrator account already exists. The Administrator account always has an AccountID of 1. When the Administrator account does not exist, you insert a new account with the information provided by the Web form. When the account does exist, you update it again with the information provided by the Web page. You then call the ProcessAdministratorName() method to add or update the optional administrator name to the AccountProperty table. Finally, you call the last Web page in the setup process: Setup/setup4.aspx.
Listing 10-9: The Setup3.Page_Load Method
private void Page_Load(object sender, System.EventArgs e)
{
if (IsPostBack)
{
Page.Validate();
if (Page.IsValid)
{
try
{

if (!account.Exist(1))
{
account.Insert(txtUserName.Text, txtPassword.Text,
txtEmail.Text);
}
else
{
account.Update(1, txtUserName.Text, txtPassword.Text,
txtEmail.Text);
}
ProcessAdministratorName();
Response.Redirect("setup4.aspx");
}
catch (Exception err)
{
lblError.Text = "Sorry, the following error occurred: "+
err.Message;
}
}
}
}
Setup3 relies on exception handling to handle all errors created by the Account database helper and ProcessAdminstratorName() method. When an error occurs, it is captured and then placed on the Web form in intrinsic label control lblError.
The ProcessAdministratorName() method (see Listing 10-10) handles the insertion of AccountProperty rows differently than Load Page() does Accounts. The reason is that there is no autogenerated key in AccountProperty as there is in Account.
Because there is no key, the method can try to insert an AccountProperty row every time, and when a duplicate key exception occurs, it knows that the key is already present. Thus, the method can go ahead and update the row instead.
Listing 10-10: The Setup3 ProcessAdministratorName Method

private void ProcessAdministratorName()
{
if (txtAdministratorName.Text.Length > 0)
{
try
{
property.Insert(1, "AdministratorName", txtAdministratorName.Text);
}
catch (SqlException sqlerr)
{
if (sqlerr.Message.IndexOf("duplicate key") >= 0)
{
property.Update(1, "AdministratorName", txtAdministratorName.Text);
}
else
throw sqlerr;
}
}
}
Database Helper Classes and Stored Procedures
Let's take a look at these database helper classes. By the time you finish building CMS.NET, every table in CMSNET will have a helper class. The purpose of these classes is to provide a simple, consistent interface to the database table they are supporting. They also allow developers for the rest of the application to not worry about SQL because these should be the only classes for which someone with SQL knowledge is needed.
DataAccess/Account.cs
The first helper class is DataAccess/Account.cs (see Listing 10-11), which handles all transactions in the Account table of the CMSNET database. As you progress through this book more methods will be added, but for now, these four are all that are needed:
§Constructor
§Insert()
§Update()
§Exist()
Listing 10-11: The Account Constructor Method
public class Account
{
private SqlConnection m_Connection; private SqlCommand m_InsertCommand; private SqlCommand m_UpdateCommand;
public Account(SqlConnection Connection)

{
m_Connection = Connection;
}
This class has a simple constructor that stores the SqlConnection passed to it. The Account class has an Insert() method (see Listing 10-12) that configures the
parameters for the Account_Insert stored procedure. The configuration is stored in a member variable so that, the next time it is called, it doesn't have to repeat the process. It then places the values to be inserted into the stored procedure parameters. Finally, it opens a connection to the database, calls the stored procedure, and then closes the connection. To guarantee the closing of the database connection, the call to the close method is placed inside a finally clause of an exception handler.
Listing 10-12: The Account.Insert() Method
public void Insert(string UserName, string Password, string Email)
{
SqlParameterCollection Params;
if (m_InsertCommand == null)
{
m_InsertCommand = new SqlCommand("Account_Insert", m_Connection);
m_InsertCommand.CommandType = CommandType.StoredProcedure;
Params = m_InsertCommand.Parameters;
Params.Add(new SqlParameter("@UserName", SqlDbType.Char, 32));
Params.Add(new SqlParameter("@Password", SqlDbType.Char, 40));
Params.Add(new SqlParameter("@Email", |
SqlDbType.Char, 64)); |
Params.Add(new SqlParameter("@ModifiedDate", SqlDbType.DateTime));
Params.Add(new SqlParameter("@CreationDate", SqlDbType.DateTime));
}
Params = m_InsertCommand.Parameters;

Params["@UserName"].Value = UserName;
Params["@Password"].Value = Password;
Params["@Email"].Value = Email;
Params["@ModifiedDate"].Value = DateTime.Now;
Params["@CreationDate"].Value = DateTime.Now;
try
{
m_Connection.Open();
m_InsertCommand.ExecuteNonQuery();
}
finally
{
m_Connection.Close();
}
}
The Update() method (see Listing 10-13) is virtually the same as the Insert() method, except that it calls the UpdateAccount stored procedure and passes slightly different parameters.
Listing 10-13: The Account.Update() Method
public void Update(int AccountID, string UserName, string Password,
string Email)
{
SqlParameterCollection Params;
if ( m_UpdateCommand == null)
{
m_UpdateCommand = new SqlCommand("Account_Update", m_Connection);
m_UpdateCommand.CommandType = CommandType.StoredProcedure;