

Real - World ASP .NET—Building a Content Management System - StephenR. G. Fraser
.pdf</TR>
</TABLE>
</TD >
</TR >
</TABLE >
</form>
The Codebehind for Login.aspx (see Listing 12-4) has some interesting code located in the Page_Load() method. First, the code verifies that the user has entered both a UserName and a Password, and then it executes a new Account database helper method Authenticate(). This code, as you will see shortly, authenticates the user against the account in the database. If the user is authentic, ASP.NET's long-winded
FormsAuthentication.RedirectFromLoginPage() method is executed to create an authentication cookie using the UserName.
Listing 12-4: The Login Codebehind Page_Load Method
private void Page_Load(object sender, System.EventArgs e)
{
if (IsPostBack)
{
Page.Validate();
if (Page.IsValid)
{
Account account = new Account(new AppEnv(Context).GetConnection());
if (account.Authenticated(tbUsername.Text, tbPassword.Text))
{
FormsAuthentication.RedirectFromLoginPage(tbUsername.Text,
cbPersist.Checked);
}
else
ErrorMsg.Text = account.Message;
}

}
}
I originally wondered why a cookie was even needed for authentication because a session object could be used. I had forgotten that it is possible for an authentication cookie to persist after the session has ended. This is what the second Boolean parameter of RedirectFromLoginPage() is for.
You might have noticed that nowhere in the code is the challenge for the authentication cookie. ASP.NET handles that code for you. The only way you know it is there is that you mysteriously jump to the login Web page instead of the restrict Web page you were expecting.
The Account.Authentication Method
ASP.NET provides a built-in facility to handle authentications. First, you add a
<credentials> element to your web.config file, as follows:
<credentials passwordFormat="None">
<user name="Admin" password="CMS.Net" />
<user name="sfraser" password="Agr8pswd" />
</credentials>
Then you call the following:
FormsAuthentication.Authenticate(tbUsername.Text, tbPassword.Text);
It is even possible to encrypt the passwords in the web.config file. (Encryption is covered later in this chapter.) The problem with this method of authentication is that you have to continually update the web.config file for every new user. For some Web sites, that could be hundreds of thousands of users. This could make for a very big web.config file. Plus, having all the users in a well-known file is just begging for a hacker to figure out how to get in.
CMS.NET places all its users in a database. This method is more secure and, at the same time, easier to maintain. Listing 12-5 shows the Account database helper method Authenticate() without encryption. (You will come back to this file after I cover encryption.) It is a very simple method. Simply get the user out of the database that has the same UserName as was entered and then see if the Password matches. Nothing could be easier.
Listing 12-5: The Account.Authenticated Database Helper Method
public bool Authenticated(string username, string password)
{
//SELECT Password
//FROM Account
//WHERE UserName=@username

bool ret = false;
SqlCommand Command = new SqlCommand("Account_Authenticated", m_Connection); Command.CommandType = CommandType.StoredProcedure;
Command.Parameters.Add(new SqlParameter("@username", SqlDbType.Char, 32)); Command.Parameters["@username"].Value = username;
try
{
m_Connection.Open();
SqlDataReader dr = Command.ExecuteReader();
if (dr.Read())
{
if(dr["Password"].ToString().Trim().Equals(password.Trim()))
{
ret = true;
}
else
{
m_ErrorMsg = "Invalid password.";
}
}
else
{
m_ErrorMsg = "User Name not found."; ret = false;
}
}
finally
{
m_Connection.Close();
}
return ret;
}
NavBar Logout
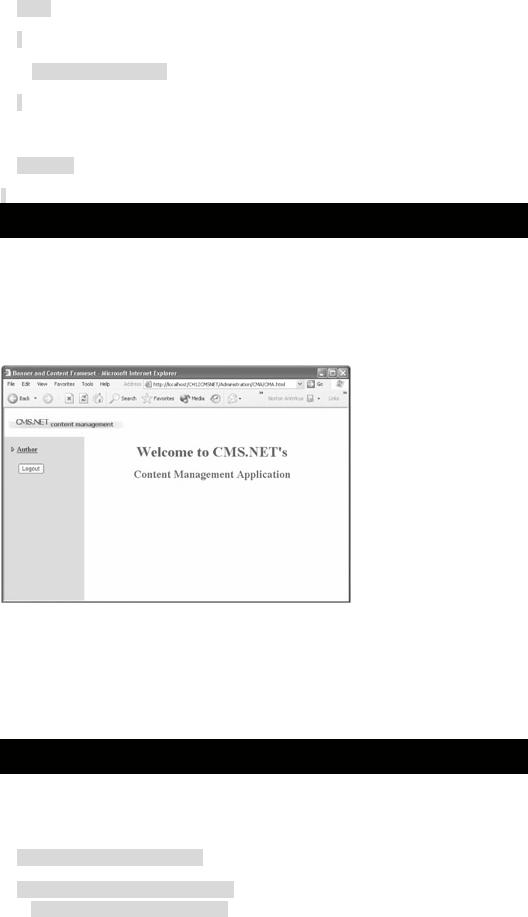
Because CMS.NET provides the capability for a user to keep an authentication cookie available indefinitely, it is a good idea to provide a way for the user to log out or, as ASP.NET puts it, SignOut(). The NavBar is always available to the user, so placing the Logout button on it only seems logical (see Figure 12-3).
Figure 12-3: The Logout button on the NavBar
Signing out deletes the persistent authorization cookie, thus forcing the user to log in again to do anything in the administration system. You will even find that the Back history button does not access anything.
As you can see in Listing 12-6, signing out is a breeze. Getting rid of the frames of the administration system and placing the login Web page on a full screen of its own requires a little bit of magic and a whole lot of pixie dust.
Listing 12-6: The NavBar Codebehind bnLogout_Click Method
private void bnLogout_Click(object sender, System.EventArgs e)
{
FormsAuthentication.SignOut();
this.Controls.Add(new LiteralControl( "<script language=javascript>" +

" window.parent.location='../admin.aspx';" +
"</script>")
);
}
I couldn't find an elegant way of doing this in C#, so I had to revert to JavaScript. When the Logout button is clicked, the Codebehind method embeds JavaScript directly into the HTML, which is then sent over to the client. When the browser interprets this HTML, the JavaScript is immediately executed because it is in the body of the HTML and is not part of a function. Thus, when the Logout button is clicked, the user is signed out and a fullscreen login Web page displays. Pretty spiffy, don't you think?
Authorization
ASP.NET provides two ways to authorize a user on the system: file authorization and URL authorization.
File authorization uses Windows itself to authorize a user's access to a particular file. The authorization process is hidden from ASP.NET because Windows has an access control list (ACL) check on the Web page to see if the user has access.
The URL authorization process is similar to file authorization except that the user is authorized over a URI namespace as opposed to a particular file. URL authorization uses a positive/negative approach, meaning you can both allow and deny different sets of users.
Determining which users have (or don't have) access is handled by the
<authorization> element in the, you guessed it, web.config file. The elements within
the <authorization> element, I feel, are quite self-evident. You can either <allow>
or <deny> a role, a user, or a group of users. You can list all your roles and users individually or comma separated, as shown in Listing 12-7.
Listing 12-7: The web.config Authorization Element
<authorization>
<allow roles="Administrator, Author, Editor, Authorizer, Deployer" />
<allow user="Dick, Jane, Spot" />
<deny users="?" />
</authorization>
Authorizations to a Web page can be given to individual users or to user roles. Grouping users into roles simplifies the authorization process considerably. If you authorize by user only, then any time that user's role changes, you have to find all occurrences of the user in each web.config file, delete the authorization of her old role, and then add authorizations for the new role. For large sites, this could be a long and error-prone exercise.
With roles, all you have to do is make changes in one place. You just have to delete the old role, add the new one, and you are done.

ASP.NET Role-Based Authorization
When I first heard that ASP.NET did role-based authorization, I was very excited—until I found out that the only way to implement it was using Windows authentication. This
requires all users and their roles to be placed in the IIS database—not the solution I had in mind.
This solution causes a lot of duplicated effort because I already had all my users in the CMS.NET Account table. It also is not as secure and is harder to maintain because you have to maintain a separate database outside of the CMS.NET environment. The duplicated effort is the responsibility of the user administrator. The major problem is that the duplicate effort is an ongoing thing.
CMS.NET Role-Based Authorization
I decided to implement my own role-based authorization. I hope that, in the future, Microsoft will see the merits of an implementation such as this and add it to ASP.NET. The solution is simple. Get the <allow roles=""> elements out of the web.config file's current directory and the username from Page.User.Identity.Name. Check the roles allowed, as specified by the web.config file, against the roles of the user. A match allows the user access. Obviously, if no match occurs, the user gets the boot.
To be fair, the CMS.NET solution also requires a little bit of duplicate effort. Unlike ASP.NET, however, CMS.NET's duplicated effort is strictly on the part of the developer and is done once for each restricted Web page.
Role-Based Authorized Web Page Modifications
Let's take a look at an example of the authorization code you will need to add to every restricted Web page. Listing 12-8 shows all the changes needed to add authorization to Admin.aspx.
Listing 12-8: Changes to Admin.aspx to Add Authorization
namespace CMSNET.Administration
{
public class admin : CMSNET.Common.AuthorizedPage
{
...
}
}
Yep, that's it—one line.
All you need to do is change the base class of the Codebehind's class (in this case, admin) from System.Web.UI.Page to CMSNET.Common.AuthorizedPage. Of course, all the magic happens in the AuthorizedPage class with the help of inheritance. So, let's take a look behind the curtain.

System.Web.UI.Page Replacement—AuthorizedPage
Due to inheritance, you are able to plug in the AuthorizedPage class wherever the Page class was. AuthorizedPage is really just Page with a couple of methods and a property tacked on. Anything you can do with Page you can also do with
AuthorizedPage (see Listing 12-9).
Listing 12-9: CMSNET.Common.AuthorizedPage
public class AuthorizedPage : System.Web.UI.Page
{
private AppEnv m_appenv;
public AuthorizedPage()
{
m_appenv = new AppEnv(Context);
}
public AppEnv appEnv
{
get
{
return m_appenv;
}
}
public void Page_Error(string error)
{
Response.Redirect("/CMSNET/Error.aspx?errmsg=" +
HttpUtility.UrlEncode(error));
}
public ArrayList Roles()
{

ArrayList rolelist = new ArrayList();
XmlReader xtr =
new XmlTextReader(File.OpenRead(Server.MapPath("web.config")));
XmlDocument doc = new XmlDocument();
doc.Load(xtr);
xtr.Close();
XmlElement root = doc.DocumentElement;
XmlNodeList nodes = root.GetElementsByTagName("authorization");
if (nodes.Count > 0)
{
for (int i = 0; i < nodes.Count; i++)
{
XmlNodeList allowNodes = ((XmlElement)(nodes.Item(i))).GetElementsByTagName("allow");
for (int j = 0; j < allowNodes.Count; j++)
{
XmlAttributeCollection roleColl = allowNodes.Item(j).Attributes;
XmlAttribute role = (XmlAttribute)roleColl.GetNamedItem("roles");
string[] temp = role.Value.Split(',');
for (int k = 0; k < temp.Length; k++) rolelist.Add(temp[k]);
}
}
}
return rolelist;
}
override protected void OnInit(EventArgs e)
{
base.OnInit(e);
AccountRoles accountRoles = new AccountRoles(appEnv.GetConnection()); if (!accountRoles.Authorization(Roles(), User.Identity.Name))
{
Page_Error(accountRoles.Message);
}
}
}

Because nearly every class in CMS.NET uses the AppEnv utility class, I decided to make it a property of AuthorizedPage so that it will be readily available. Plus, many of the Web pages redirect to an error page, so I added a simple method to handle this as well.
The Roles() method is the majority of the class. All it does is open, into an XMLDocument, the version of web.config in which the current Web page resides. Then it
navigates to the <authorization> element and grabs all the <allow roles=""> elements. Finally, it places all the roles in an ArrayList to be grabbed by whoever needs them.
The last method, OnInit(), is an override method for the base class Page. First, it calls the base class' method and then it simply takes the roles and the current UserID and sends them to the AccountRoles database table helper method Authorization(). You might have noticed that this method uses all the other methods and the property in
AuthorizedPage.
The key to the simplicity of this change is that the OnInit() is already called within the autogenerated code. This saves you from having to add this function call yourself.
AccountRoles Database Table
Basically, all the AccountRoles database (see Table 12-1) does is store a list of all the roles that an account can have.
Table 12-1: AccountRoles Database Table Design
COLUMN NAME |
|
DATA |
|
LENGTH |
|
KEY |
|
DESCRIPTION |
|
|
TYPE |
|
|
|
|
|
|
|
|
|
|
|
|
|
|
|
AccountID |
|
int |
|
4 |
|
true |
|
The Account |
|
|
|
|
|
|
|
||
|
|
|
|
|
|
|
|
ID for which |
|
|
|
|
|
|
|
|
this role is |
|
|
|
|
|
|
|
|
being set |
|
|
|
|
|
|
|
|
|
Role |
|
char |
|
32 |
|
true |
|
The role that |
|
|
|
|
|
|
|
||
|
|
|
|
|
|
|
|
the Account ID |
|
|
|
|
|
|
|
|
will fulfill |
|
|
|
|
|
|
|
|
|
CreationDate |
|
datetime |
|
8 |
|
false |
|
The date that |
|
|
|
|
|
|
|
||
|
|
|
|
|
|
|
|
the account |
|
|
|
|
|
|
|
|
role was |
|
|
|
|
|
|
|
|
created |
AccountRoles is a very simple database table. All it contains is the AccountID, the Role, and the date that the record was created. The key is both the AccountID and the
Role.
AccountRoles.Authorization Method
The final piece of the actual authorization process happens within the AccountRoles database helper method authorization. Listing 12-10 shows the AccountID being selected from the Account database using the username. With the AccountID, it is now possible to select all roles out of the AccountRoles database table.
Listing 12-10: The AccountRoles.Authorization Method
public bool Authorization(ArrayList roles, string username)
{

int AccountID;
try
{
Account account = new Account(m_Connection);
AccountID = account.GetAccountID(username);
}
catch (Exception e)
{
m_ErrorMsg = e.Message; return false;
}
//SELECT Role
//FROM AccountRoles
//WHERE AccountID=@AccountID
SqlCommand Command = new SqlCommand("AccountRoles_GetRolesForID", m_Connection);
Command.CommandType = CommandType.StoredProcedure;
Command.Parameters.Add(new SqlParameter("@AccountID", SqlDbType.Int));
Command.Parameters["@AccountID"].Value = AccountID;
try
{
m_Connection.Open();
SqlDataReader dr = Command.ExecuteReader();
while (dr.Read())