

Conclusion
The cool thing about shaders is that you can manipulate images on a per-pixel basis in real time because of the immense parallel processing capabilities of your graphics card. It is no surprise that newer versions of software like Photoshop use the graphics card to accelerate image manipulation operations! There are many more complex e ects like HDR, motion blur and SSAO (screen space ambient occlusion), but those involve a little more work than a single shader, so they’re beyond the scope of this chapter.
Exercises
•Try implementing the two-pass Gaussian blur e ect by adding another framebu er. (Solution)
•Try adding a panel in the 3D scene displaying that very scene from a di erent angle. (Solution)
Geometry shaders
So far we’ve used vertex and fragment shaders to manipulate our input vertices into pixels on the screen. Since OpenGL 3.2 there is a third optional type of shader that sits between the vertex and fragment shaders, known as the geometry shader. This shader has the unique ability to create new geometry on the fly using the output of the vertex shader as input.
Since we’ve neglected the kitten from the previous chapters for too long, it ran o to a new home. This gives us a good opportunity to start fresh. At the end of this chapter, we’ll have the following demo:
That doesn’t look all that exciting. . . until you consider that the result above was produced with a single draw call:
glDrawArrays(GL_POINTS, 0, 4);
Note that everything geometry shaders can do can be accomplished in other ways, but their ability to generate geometry from a small amount of input data allows you to reduce CPU -> GPU bandwidth usage.
Setup
Let’s start by writing some simple code that just draws 4 red points to the screen.
// Vertex shader
const char* vertexShaderSrc = R"glsl(
82
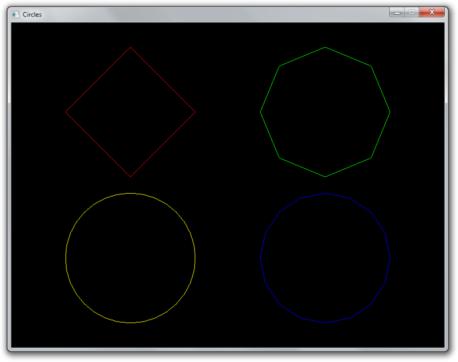
Figure 45:
83
in vec2 pos;
void main()
{
gl_Position = vec4(pos, 0.0, 1.0);
}
)glsl";
// Fragment shader
const char* fragmentShaderSrc = R"glsl( out vec4 outColor;
void main()
{
outColor = vec4(1.0, 0.0, 0.0, 1.0);
}
)glsl";
We’ll start by declaring two very simple vertex and fragment shaders at the top of the file. The vertex shader simply forwards the position attribute of each point and the fragment shader always outputs red. Nothing special there.
I’ve made use here of a very convenient C++11 feature, known as raw string literals. It is a lot more convenient to use than the multiline string syntax we’ve used before.
Let’s also add a helper function to create and compile a shader:
GLuint createShader(GLenum type, const GLchar* src) { GLuint shader = glCreateShader(type); glShaderSource(shader, 1, &src, nullptr); glCompileShader(shader);
return shader;
}
In the main function, create a window and OpenGL context with a library of choice and initialize GLEW. The shaders and compiled and activated:
GLuint vertexShader = createShader(GL_VERTEX_SHADER, vertexShaderSrc); GLuint fragmentShader = createShader(GL_FRAGMENT_SHADER, fragmentShaderSrc);
GLuint shaderProgram = glCreateProgram(); glAttachShader(shaderProgram, vertexShader); glAttachShader(shaderProgram, fragmentShader); glLinkProgram(shaderProgram); glUseProgram(shaderProgram);
After that, create a bu er that holds the coordinates of the points:
GLuint vbo;
84