

-0.5f, 0.5f, 1.0f, 0.0f, 0.0f, // Top-left 0.5f, 0.5f, 0.0f, 1.0f, 0.0f, // Top-right 0.5f, -0.5f, 0.0f, 0.0f, 1.0f, // Bottom-right -0.5f, -0.5f, 1.0f, 1.0f, 1.0f // Bottom-left
};
...
GLuint elements[] = { 0, 1, 2, 2, 3, 0
};
...
glDrawElements(GL_TRIANGLES, 6, GL_UNSIGNED_INT, 0);
The element bu er still specifies 6 vertices to form 2 triangles like before, but now we’re able to reuse vertices! This may not seem like much of a big deal at this point, but when your graphics application loads many models into the relatively small graphics memory, element bu ers will be an important area of optimization.
If you run into trouble, have a look at the full source code.
This chapter has covered all of the core principles of drawing things with OpenGL and it’s absolutely essential that you have a good understanding of them before continuing. Therefore I advise you to do the exercises below before diving into textures.
Exercises
•Alter the vertex shader so that the triangle is upside down. (Solution)
•Invert the colors of the triangle by altering the fragment shader. (Solution)
•Change the program so that each vertex has only one color value, determining the shade of gray. (Solution)
Textures
Texture objects and parameters
Just like VBOs and VAOs, textures are objects that need to be generated first by calling a function. It shouldn’t be a surprise at this point what this function is called.
35
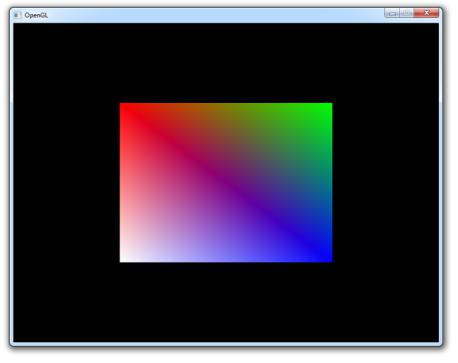
Figure 8:
36
GLuint tex; glGenTextures(1, &tex);
Textures are typically used for images to decorate 3D models, but in reality they can be used to store many di erent kinds of data. It’s possible to have 1D, 2D and even 3D textures, which can be used to store bulk data on the GPU. An example of another use for textures is storing terrain information. This article will pay attention to the use of textures for images, but the principles generally apply to all kinds of textures.
glBindTexture(GL_TEXTURE_2D, tex);
Just like other objects, textures have to be bound to apply operations to them. Since images are 2D arrays of pixels, it will be bound to the GL_TEXTURE_2D target.
The pixels in the texture will be addressed using texture coordinates during drawing operations. These coordinates range from 0.0 to 1.0 where (0,0) is conventionally the bottom-left corner and (1,1) is the top-right corner of the texture image. The operation that uses these texture coordinates to retrieve color information from the pixels is called sampling. There are di erent ways to approach this problem, each being appropriate for di erent scenarios. OpenGL o ers you many options to control how this sampling is done, of which the common ones will be discussed here.
Wrapping
The first thing you’ll have to consider is how the texture should be sampled when a coordinate outside the range of 0 to 1 is given. OpenGL o ers 4 ways of handling this:
•GL_REPEAT: The integer part of the coordinate will be ignored and a repeating pattern is formed.
•GL_MIRRORED_REPEAT: The texture will also be repeated, but it will be mirrored when the integer part of the coordinate is odd.
•GL_CLAMP_TO_EDGE: The coordinate will simply be clamped between 0 and
1.
•GL_CLAMP_TO_BORDER: The coordinates that fall outside the range will be given a specified border color.
These explanations may still be a bit cryptic and since OpenGL is all about graphics, let’s see what all of these cases actually look like:
The clamping can be set per coordinate, where the equivalent of (x,y,z) in texture coordinates is called (s,t,r). Texture parameter are changed with the glTexParameter* functions as demonstrated here.
glTexParameteri(GL_TEXTURE_2D, GL_TEXTURE_WRAP_S, GL_REPEAT); glTexParameteri(GL_TEXTURE_2D, GL_TEXTURE_WRAP_T, GL_REPEAT);
37
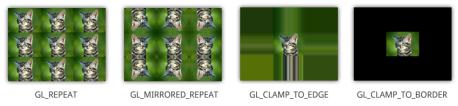
Figure 9:
As before, the i here indicates the type of the value you want to specify. If you use GL_CLAMP_TO_BORDER and you want to change the border color, you need to change the value of GL_TEXTURE_BORDER_COLOR by passing an RGBA float array:
float color[] = { 1.0f, 0.0f, 0.0f, 1.0f }; glTexParameterfv(GL_TEXTURE_2D, GL_TEXTURE_BORDER_COLOR, color);
This operation will set the border color to red.
Filtering
Since texture coordinates are resolution independent, they won’t always match a pixel exactly. This happens when a texture image is stretched beyond its original size or when it’s sized down. OpenGL o ers various methods to decide on the sampled color when this happens. This process is called filtering and the following methods are available:
•GL_NEAREST: Returns the pixel that is closest to the coordinates.
•GL_LINEAR: Returns the weighted average of the 4 pixels surrounding the given coordinates.
•GL_NEAREST_MIPMAP_NEAREST, GL_LINEAR_MIPMAP_NEAREST, GL_NEAREST_MIPMAP_LINEAR,
GL_LINEAR_MIPMAP_LINEAR: Sample from mipmaps instead.
Before discussing mipmaps, let’s first see the di erence between nearest and linear interpolation. The original image is 16 times smaller than the rectangle it was rasterized on.
While linear interpolation gives a smoother result, it isn’t always the most ideal option. Nearest neighbour interpolation is more suited in games that want to mimic 8 bit graphics, because of the pixelated look.
You can specify which kind of interpolation should be used for two separate cases: scaling the image down and scaling the image up. These two cases are identified by the keywords GL_TEXTURE_MIN_FILTER and GL_TEXTURE_MAG_FILTER.
glTexParameteri(GL_TEXTURE_2D, GL_TEXTURE_MIN_FILTER, GL_LINEAR); glTexParameteri(GL_TEXTURE_2D, GL_TEXTURE_MAG_FILTER, GL_LINEAR);
38