

You can clean up the image data right after you’ve loaded it into the texture.
As mentioned before, OpenGL expects the first pixel to be located in the bottom-left corner, which means that textures will be flipped when loaded with SOIL directly. To counteract that, the code in the tutorial will use flipped Y coordinates for texture coordinates from now on. That means that 0, 0 will be assumed to be the top-left corner instead of the bottom-left. This practice might make texture coordinates more intuitive as a side-e ect.
Alternative options
Other libraries that support a wide range of file types like SOIL are DevIL and FreeImage. If you’re just interested in one file type, it’s also possible to use libraries like libpng and libjpeg directly. If you’re looking for more of an adventure, have a look at the specification of the BMP and TGA file formats, it’s not that hard to implement a loader for them yourself.
Using a texture
As you’ve seen, textures are sampled using texture coordinates and you’ll have to add these as attributes to your vertices. Let’s modify the last sample from the previous chapter to include these texture coordinates. The new vertex array will now include the s and t coordinates for each vertex:
float vertices[] = {
// Position |
Color |
Texcoords |
-0.5f, 0.5f, 1.0f, 0.0f, 0.0f, 0.0f, 0.0f, // Top-left 0.5f, 0.5f, 0.0f, 1.0f, 0.0f, 1.0f, 0.0f, // Top-right 0.5f, -0.5f, 0.0f, 0.0f, 1.0f, 1.0f, 1.0f, // Bottom-right -0.5f, -0.5f, 1.0f, 1.0f, 1.0f, 0.0f, 1.0f // Bottom-left
};
The vertex shader needs to be modified so that the texture coordinates are interpolated over the fragments:
...
in vec2 texcoord;
out vec3 Color; out vec2 Texcoord;
...
void main()
41
{
Texcoord = texcoord;
Just like when the color attribute was added, the attribute pointers need to be adapted to the new format:
glVertexAttribPointer(posAttrib, 2, GL_FLOAT, GL_FALSE, 7*sizeof(float), 0);
glVertexAttribPointer(colAttrib, 3, GL_FLOAT, GL_FALSE, 7*sizeof(float), (void*)(2*sizeof(float)));
GLint texAttrib = glGetAttribLocation(shaderProgram, "texcoord"); glEnableVertexAttribArray(texAttrib); glVertexAttribPointer(texAttrib, 2, GL_FLOAT, GL_FALSE,
7*sizeof(float), (void*)(5*sizeof(float)));
As two floats were added for the coordinates, one vertex is now 7 floats in size and the texture coordinate attribute consists of 2 of those floats.
Now just one thing remains: providing access to the texture in the fragment shader to sample pixels from it. This is done by adding a uniform of type sampler2D, which will have a default value of 0. This only needs to be changed when access has to be provided to multiple textures, which will be considered in the next section.
For this sample, the image of the kitten used above will be loaded using the SOIL library. Make sure that it is located in the working directory of the application.
int width, height; unsigned char* image =
SOIL_load_image("sample.png", &width, &height, 0, SOIL_LOAD_RGB); glTexImage2D(GL_TEXTURE_2D, 0, GL_RGB, width, height, 0, GL_RGB,
GL_UNSIGNED_BYTE, image); SOIL_free_image_data(image);
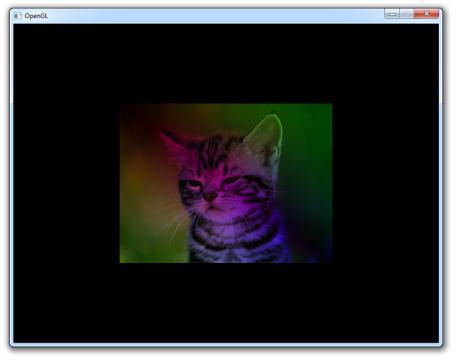
To sample a pixel from a 2D texture using the sampler, the function texture can be called with the relevant sampler and texture coordinate as parameters. We’ll also multiply the sampled color with the color attribute to get an interesting e ect. Your fragment shader will now look like this:
#version 150
in vec3 Color; in vec2 Texcoord;
out vec4 outColor;
uniform sampler2D tex;
void main()
42
{
outColor = texture(tex, Texcoord) * vec4(Color, 1.0);
}
When running this application, you should get the following result:
Figure 11:
If you get a black screen, make sure that your shaders compiled successfully and that the image is correctly loaded. If you can’t find the problem, try comparing your code to the sample code.
Texture units
The sampler in your fragment shader is bound to texture unit 0. Texture units are references to texture objects that can be sampled in a shader. Textures are bound to texture units using the glBindTexture function you’ve used before. Because you didn’t explicitly specify which texture unit to use, the texture was bound to GL_TEXTURE0. That’s why the default value of 0 for the sampler in your shader worked fine.
The function glActiveTexture specifies which texture unit a texture object is
43
bound to when glBindTexture is called. glActiveTexture(GL_TEXTURE0);
The amount of texture units supported di ers per graphics card, but it will be at least 48. It is safe to say that you will never hit this limit in even the most extreme graphics applications.
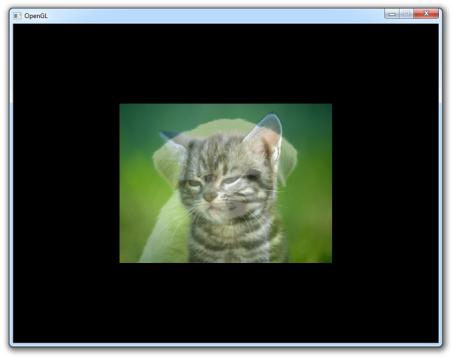
To practice with sampling from multiple textures, let’s try blending the images of the kitten and one of a puppy to get the best of both worlds! Let’s first modify the fragment shader to sample from two textures and blend the pixels:
...
uniform sampler2D texKitten; uniform sampler2D texPuppy;
void main()
{
vec4 colKitten = texture(texKitten, Texcoord); vec4 colPuppy = texture(texPuppy, Texcoord); outColor = mix(colKitten, colPuppy, 0.5);
}
The mix function here is a special GLSL function that linearly interpolates between two variables based on the third parameter. A value of 0.0 will result in the first value, a value of 1.0 will result in the second value and a value in between will result in a mixture of both values. You’ll have the chance to experiment with this in the exercises.
Now that the two samplers are ready, you’ll have to assign the first two texture units to them and bind the two textures to those units. This is done by adding the proper glActiveTexture calls to the texture loading code.
GLuint textures[2]; glGenTextures(2, textures);
int width, height; unsigned char* image;
glActiveTexture(GL_TEXTURE0); glBindTexture(GL_TEXTURE_2D, textures[0]);
image = SOIL_load_image("sample.png", &width, &height, 0, SOIL_LOAD_RGB); glTexImage2D(GL_TEXTURE_2D, 0, GL_RGB, width, height, 0, GL_RGB,
GL_UNSIGNED_BYTE, image); SOIL_free_image_data(image); glUniform1i(glGetUniformLocation(shaderProgram, "texKitten"), 0);
glActiveTexture(GL_TEXTURE1);
44
glBindTexture(GL_TEXTURE_2D, textures[1]);
image = SOIL_load_image("sample2.png", &width, &height, 0, SOIL_LOAD_RGB); glTexImage2D(GL_TEXTURE_2D, 0, GL_RGB, width, height, 0, GL_RGB,
GL_UNSIGNED_BYTE, image); SOIL_free_image_data(image); glUniform1i(glGetUniformLocation(shaderProgram, "texPuppy"), 1);
The texture units of the samplers are set using the glUniform function you’ve seen in the previous chapter. It simply accepts an integer specifying the texture unit. This code should result in the following image.
Figure 12:
As always, have a look at the sample source code if you have trouble getting the program to work.
Now that texture sampling has been covered in this chapter, you’re finally ready to dive into transformations and ultimately 3D. The knowledge you have at this point should be su cient for producing most types of 2D games, except for transformations like rotation and scaling which will be covered in the next chapter.
45