


same row and column dimensions.
Figure 14:
The values in the matrices are individually added or subtracted from each other.
Scalar product
The product of a scalar and a matrix is as straightforward as addition and subtraction.
Figure 15:
The values in the matrices are each multiplied by the scalar.
Matrix-Vector product
The product of a matrix with another matrix is quite a bit more involved and is often misunderstood, so for simplicity’s sake I will only mention the specific cases that apply to graphics programming. To see how matrices are actually used to transform vectors, we’ll first dive into the product of a matrix and a vector.
Figure 16:
47

To calculate the product of a matrix and a vector, the vector is written as a 4-by-1 matrix. The expressions to the right of the equals sign show how the new x, y and z values are calculated after the vector has been transformed. For those among you who aren’t very math savvy, the dot is a multiplication sign.
I will mention each of the common vector transformations in this section and how a matrix can be formed that performs them. For completeness, let’s first consider a transformation that does absolutely nothing.
Figure 17:
This matrix is called the identity matrix, because just like the number 1, it will always return the value it was originally multiplied by.
Let’s look at the most common vector transformations now and deduce how a matrix can be formed from them.
Translation
To see why we’re working with 4-by-1 vectors and subsequently 4-by-4 transformation matrices, let’s see how a translation matrix is formed. A translation moves a vector a certain distance in a certain direction.
Figure 18:
Can you guess from the multiplication overview what the matrix should look like to translate a vector by (X,Y,Z)?
48

Figure 19:
Without the fourth column and the bottom 1 value a translation wouldn’t have been possible.
Scaling
A scale transformation scales each of a vector’s components by a (di erent) scalar. It is commonly used to shrink or stretch a vector as demonstrated below.
Figure 20:
If you understand how the previous matrix was formed, it should not be di cult to come up with a matrix that scales a given vector by (SX,SY,SZ).
Figure 21:
If you think about it for a moment, you can see that scaling would also be
49
possible with a mere 3-by-3 matrix.
Rotation
A rotation transformation rotates a vector around the origin (0,0,0) using a given axis and angle. To understand how the axis and the angle control a rotation, let’s do a small experiment.
Figure 22:
Put your thumb up against your monitor and try rotating your hand around it. The object, your hand, is rotating around your thumb: the rotation axis. The further you rotate your hand away from its initial position, the higher the rotation angle.
In this way the rotation axis can be imagined as an arrow an object is rotating around. If you imagine your monitor to be a 2-dimensional XY surface, the rotation axis (your thumb) is pointing in the Z direction.
Objects can be rotated around any given axis, but for now only the X, Y and Z axis are important. You’ll see later in this chapter that any rotation axis can be established by rotating around the X, Y and Z axis simultaneously.
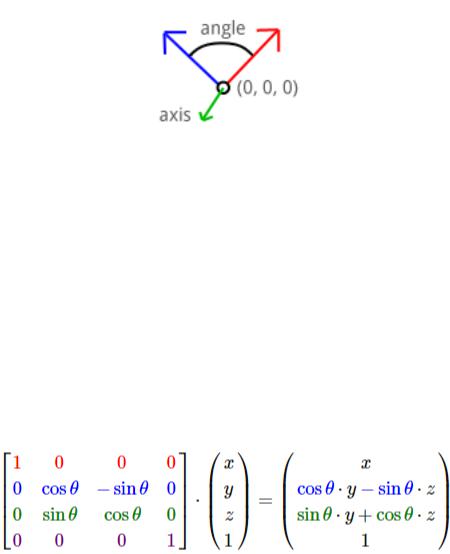
The matrices for rotating around the three axes are specified here. The rotation angle is indicated by the theta (θ).
Rotation around X-axis:
Figure 23:
50