

stencil test no longer determines whether a fragment is drawn or not, but these fragments can still a ect values in the stencil bu er!
To get a bit more acquainted with the stencil bu er before using it, let’s start by analyzing a simple example.
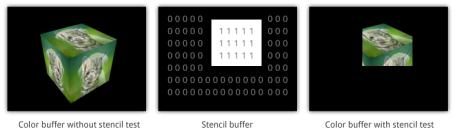
Figure 39:
In this case the stencil bu er was first cleared with zeroes and then a rectangle of ones was drawn to it. The drawing operation of the cube uses the values from the stencil bu er to only draw fragments with a stencil value of 1.
Now that you have an understanding of what the stencil bu er does, we’ll look at the relevant OpenGL calls.
glEnable(GL_STENCIL_TEST);
Stencil testing is enabled with a call to glEnable, just like depth testing. You don’t have to add this call to your code just yet. I’ll first go over the API details in the next two sections and then we’ll make a cool demo.
Setting values
Regular drawing operations are used to determine which values in the stencil bu er are a ected by any stencil operation. If you want to a ect a rectangle of values like in the sample above, simply draw a 2D quad in that area. What happens to those values can be controlled by you using the glStencilFunc,
glStencilOp and glStencilMask functions.
The glStencilFunc call is used to specify the conditions under which a fragment passes the stencil test. Its parameters are discussed below.
•func: The test function, can be GL_NEVER, GL_LESS, GL_LEQUAL, GL_GREATER, GL_GEQUAL, GL_EQUAL, GL_NOTEQUAL, and GL_ALWAYS.
•ref: A value to compare the stencil value to using the test function.
•mask: A bitwise AND operation is performed on the stencil value and reference value with this mask value before comparing them.
65
If you don’t want stencils with a value lower than 2 to be a ected, you would use:
glStencilFunc(GL_GEQUAL, 2, 0xFF);
The mask value is set to all ones (in case of an 8 bit stencil bu er), so it will not a ect the test.
The glStencilOp call specifies what should happen to stencil values depending on the outcome of the stencil and depth tests. The parameters are:
•sfail: Action to take if the stencil test fails.
•dpfail: Action to take if the stencil test is successful, but the depth test failed.
•dppass: Action to take if both the stencil test and depth tests pass.
Stencil values can be modified in the following ways:
•GL_KEEP: The current value is kept.
•GL_ZERO: The stencil value is set to 0.
•GL_REPLACE: The stencil value is set to the reference value in the glStencilFunc call.
•GL_INCR: The stencil value is increased by 1 if it is lower than the maximum value.
•GL_INCR_WRAP: Same as GL_INCR, with the exception that the value is set to 0 if the maximum value is exceeded.
•GL_DECR: The stencil value is decreased by 1 if it is higher than 0.
•GL_DECR_WRAP: Same as GL_DECR, with the exception that the value is set to the maximum value if the current value is 0 (the stencil bu er stores unsigned integers).
•GL_INVERT: A bitwise invert is applied to the value.
Finally, glStencilMask can be used to control the bits that are written to the stencil bu er when an operation is run. The default value is all ones, which means that the outcome of any operation is una ected.
If, like in the example, you want to set all stencil values in a rectangular area to 1, you would use the following calls:
glStencilFunc(GL_ALWAYS, 1, 0xFF); glStencilOp(GL_KEEP, GL_KEEP, GL_REPLACE); glStencilMask(0xFF);
In this case the rectangle shouldn’t actually be drawn to the color bu er, since it is only used to determine which stencil values should be a ected.
glColorMask(GL_FALSE, GL_FALSE, GL_FALSE, GL_FALSE); glDepthMask(GL_FALSE);
The glColorMask function allows you to specify which data is written to the color bu er during a drawing operation. In this case you would want to disable all color channels (red, green, blue, alpha). Writing to the depth bu er needs to
66
be disabled separately as well with glDepthMask, so that cube drawing operation won’t be a ected by leftover depth values of the rectangle. This is cleaner than simply clearing the depth bu er again later.
Using values in drawing operations
With the knowledge about setting values, using them for testing fragments in drawing operations becomes very simple. All you need to do now is re-enable color and depth writing if you had disabled those earlier and setting the test function to determine which fragments are drawn based on the values in the stencil bu er.
glStencilFunc(GL_EQUAL, 1, 0xFF);
If you use this call to set the test function, the stencil test will only pass for pixels with a stencil value equal to 1. A fragment will only be drawn if it passes both the stencil and depth test, so setting the glStencilOp is not necessary. In the case of the example above only the stencil values in the rectangular area were set to 1, so only the cube fragments in that area will be drawn.
glStencilMask(0x00);
One small detail that is easy to overlook is that the cube draw call could still a ect values in the stencil bu er. This problem can be solved by setting the stencil bit mask to all zeroes, which e ectively disables stencil writing.
Planar reflections
Let’s spice up the demo we have right now a bit by adding a floor with a reflection under the cube. I’ll add the vertices for the floor to the same vertex bu er the cube is currently using to keep things simple:
float vertices[] = {
...
-1.0f, -1.0f, -0.5f, 0.0f, 0.0f, 0.0f, 0.0f, 0.0f, 1.0f, -1.0f, -0.5f, 0.0f, 0.0f, 0.0f, 1.0f, 0.0f, 1.0f, 1.0f, -0.5f, 0.0f, 0.0f, 0.0f, 1.0f, 1.0f, 1.0f, 1.0f, -0.5f, 0.0f, 0.0f, 0.0f, 1.0f, 1.0f, -1.0f, 1.0f, -0.5f, 0.0f, 0.0f, 0.0f, 0.0f, 1.0f, -1.0f, -1.0f, -0.5f, 0.0f, 0.0f, 0.0f, 0.0f, 0.0f
}
Now add the extra draw call to your main loop: glDrawArrays(GL_TRIANGLES, 36, 6);
67

To create the reflection of the cube itself, it is su cient to draw it again but inverted on the Z-axis:
model = glm::scale(
glm::translate(model, glm::vec3(0, 0, -1)), glm::vec3(1, 1, -1)
);
glUniformMatrix4fv(uniModel, 1, GL_FALSE, glm::value_ptr(model)); glDrawArrays(GL_TRIANGLES, 0, 36);
I’ve set the color of the floor vertices to black so that the floor does not display the texture image, so you’ll want to change the clear color to white to be able to see it. I’ve also changed the camera parameters a bit to get a good view of the scene.
Figure 40:
Two issues are noticeable in the rendered image:
•The floor occludes the reflection because of depth testing.
•The reflection is visible outside of the floor.
The first problem is easy to solve by temporarily disabling writing to the depth bu er when drawing the floor:
68
glDepthMask(GL_FALSE); glDrawArrays(GL_TRIANGLES, 36, 6); glDepthMask(GL_TRUE);
To fix the second problem, it is necessary to discard fragments that fall outside of the floor. Sounds like it’s time to see what stencil testing is really worth!
It can be greatly beneficial at times like these to make a little list of the rendering stages of the scene to get a proper idea of what is going on.
•Draw regular cube.
•Enable stencil testing and set test function and operations to write ones to all selected stencils.
•Draw floor.
•Set stencil function to pass if stencil value equals 1.
•Draw inverted cube.
•Disable stencil testing.
The new drawing code looks like this: glEnable(GL_STENCIL_TEST);
// Draw floor
glStencilFunc(GL_ALWAYS, 1, 0xFF); // Set any stencil to 1 glStencilOp(GL_KEEP, GL_KEEP, GL_REPLACE); glStencilMask(0xFF); // Write to stencil buffer glDepthMask(GL_FALSE); // Don't write to depth buffer
glClear(GL_STENCIL_BUFFER_BIT); // Clear stencil buffer (0 by default)
glDrawArrays(GL_TRIANGLES, 36, 6);
// Draw cube reflection
glStencilFunc(GL_EQUAL, 1, 0xFF); // Pass test if stencil value is 1 glStencilMask(0x00); // Don't write anything to stencil buffer glDepthMask(GL_TRUE); // Write to depth buffer
model = glm::scale(
glm::translate(model, glm::vec3(0, 0, -1)), glm::vec3(1, 1, -1)
);
glUniformMatrix4fv(uniModel, 1, GL_FALSE, glm::value_ptr(model)); glDrawArrays(GL_TRIANGLES, 0, 36);
glDisable(GL_STENCIL_TEST);
I’ve annotated the code above with comments, but the steps should be mostly clear from the stencil bu er section.
Now just one final touch is required, to darken the reflected cube a little to make
69

the floor look a little less like a perfect mirror. I’ve chosen to create a uniform for this called overrideColor in the vertex shader:
uniform vec3 overrideColor;
...
Color = overrideColor * color;
And in the drawing code for the reflected cube
glUniform3f(uniColor, 0.3f, 0.3f, 0.3f); glDrawArrays(GL_TRIANGLES, 0, 36); glUniform3f(uniColor, 1.0f, 1.0f, 1.0f);
where uniColor is the return value of a glGetUniformLocation call.
Figure 41:
Awesome! I hope that, especially in chapters like these, you get the idea that working with an API as low-level as OpenGL can be a lot of fun and pose interesting challenges! As usual, the final code is available here.
70