

Success! You can find the full code here if you get stuck.
Exercises
•Make the rectangle with the blended image grow bigger and smaller with sin. (Solution)
•Make the rectangle flip around the X axis after pressing the space bar and slowly stop again. (Solution)
Depth and stencils
Extra bu ers
Up until now there is only one type of output bu er you’ve made use of, the color bu er. This chapter will discuss two additional types, the depth bu er and the stencil bu er. For each of these a problem will be presented and subsequently solved with that specific bu er.
Preparations
To best demonstrate the use of these bu ers, let’s draw a cube instead of a flat shape. The vertex shader needs to be modified to accept a third coordinate:
in vec3 position;
...
gl_Position = proj * view * model * vec4(position, 1.0);
We’re also going to need to alter the color again later in this chapter, so make sure the fragment shader multiplies the texture color by the color attribute:
vec4 texColor = mix(texture(texKitten, Texcoord), texture(texPuppy, Texcoord), 0.5);
outColor = vec4(Color, 1.0) * texColor;
Vertices are now 8 floats in size, so you’ll have to update the vertex attribute o sets and strides as well. Finally, add the extra coordinate to the vertex array:
float vertices[] = {
// X |
Y |
Z |
R |
G |
B |
U |
V |
-0.5f, 0.5f, 0.0f, 1.0f, 0.0f, 0.0f, 0.0f, 0.0f, 0.5f, 0.5f, 0.0f, 0.0f, 1.0f, 0.0f, 1.0f, 0.0f, 0.5f, -0.5f, 0.0f, 0.0f, 0.0f, 1.0f, 1.0f, 1.0f, -0.5f, -0.5f, 0.0f, 1.0f, 1.0f, 1.0f, 0.0f, 1.0f
};
61
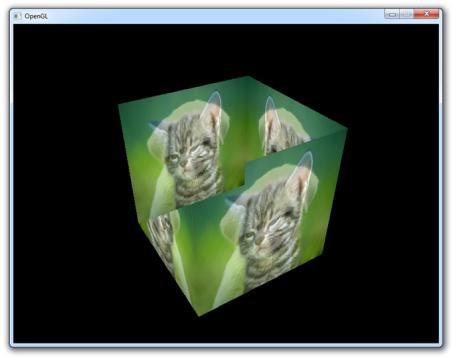
Confirm that you’ve made all the required changes by running your program and checking if it still draws a flat spinning image of a kitten blended with a puppy. A single cube consists of 36 vertices (6 sides * 2 triangles * 3 vertices), so I will ease your life by providing the array here.
glDrawArrays(GL_TRIANGLES, 0, 36);
We will not make use of element bu ers for drawing this cube, so you can use glDrawArrays to draw it. If you were confused by this explanation, you can compare your program to this reference code.
Figure 37:
It immediately becomes clear that the cube is not rendered as expected when seeing the output. The sides of the cube are being drawn, but they overlap each other in strange ways! The problem here is that when OpenGL draws your cube triangle-by-triangle, it will simply write over pixels even though something else may have been drawn there before. In this case OpenGL will happily draw triangles in the back over triangles at the front.
Luckily OpenGL o ers ways of telling it when to draw over a pixel and when not to. I’ll go over the two most important ways of doing that, depth testing and stencilling, in this chapter.
62
Depth bu er
Z-bu ering is a way of keeping track of the depth of every pixel on the screen. The depth is proportional to the distance between the screen plane and a fragment that has been drawn. That means that the fragments on the sides of the cube further away from the viewer have a higher depth value, whereas fragments closer have a lower depth value.
If this depth is stored along with the color when a fragment is written, fragments drawn later can compare their depth to the existing depth to determine if the new fragment is closer to the viewer than the old fragment. If that is the case, it should be drawn over and otherwise it can simply be discarded. This is known
as depth testing.
OpenGL o ers a way to store these depth values in an extra bu er, called the depth bu er, and perform the required check for fragments automatically. The fragment shader will not run for fragments that are invisible, which can have a significant impact on performance. This functionality can be enabled by calling
glEnable. glEnable(GL_DEPTH_TEST);
If you enable this functionality now and run your application, you’ll notice that you get a black screen. That happens because the depth bu er is filled with 0 depth for each pixel by default. Since no fragments will ever be closer than that they are all discarded.
The depth bu er can be cleared along with the color bu er by extending the glClear call:
glClear(GL_COLOR_BUFFER_BIT | GL_DEPTH_BUFFER_BIT);
The default clear value for the depth is 1.0f, which is equal to the depth of your far clipping plane and thus the furthest depth that can be represented. All fragments will be closer than that, so they will no longer be discarded.
With the depth test capability enabled, the cube is now rendered correctly. Just like the color bu er, the depth bu er has a certain amount of bits of precision which can be specified by you. Less bits of precision reduce the extra memory use, but can introduce rendering errors in more complex scenes.
Stencil bu er
The stencil bu er is an optional extension of the depth bu er that gives you more control over the question of which fragments should be drawn and which shouldn’t. Like the depth bu er, a value is stored for every pixel, but this time you get to control when and how this value changes and when a fragment should be drawn depending on this value. Note that if the depth test fails, the
63

Figure 38:
64