

Remote Controller
Remote Controller Profile
The Phantom 3 Professional remote controller is a multi-function wireless communication device that integrates the video downlink system and aircraft remote control system. The video downlink and aircraft remote control system operate at 2.4 GHz. The remote controller features a number of camera control functions, such as taking and previewing photos and videos, as well as controlling gimbal motion. The remote controller is powered by a 2S rechargeable battery. The battery level is displayed via LED indicators on the front panel of the remote controller.
 Compliance Version: The remote controller is compliant with both CE and FCC regulations.
 Operating Mode: Control can be set to Mode 1 or Mode 2, or to a custom mode.
 Mode 1: The right stick serves as the throttle.
  Mode 2: The left stick serves as the throttle.
To prevent transmission interference, do not operate more than three aircrafts in the same area.
Using the Remote Controller
Turning the Remote Controller On and Off
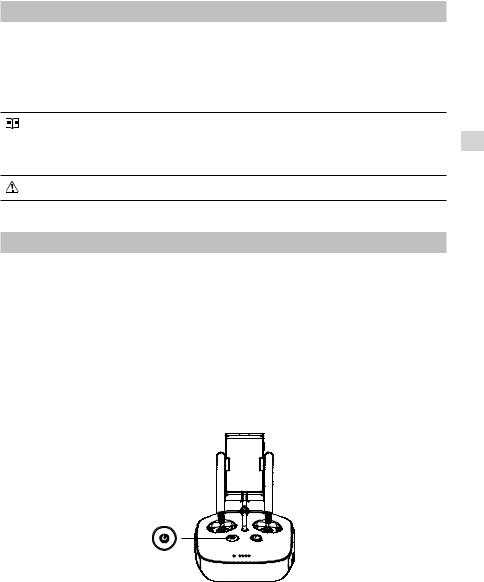
The Phantom 3 Professional remote controller is powered by a 2S rechargeable battery that has a capacity of 6000 mAh. The battery level is indicated via the Battery Level LEDs on the front panel. Follow the steps below to turn on your remote controller:
1. When the remote controller is turned off, press the Power Button once. The Battery Level LEDs will display the current battery level.
2. Press and hold the Power Button to turn on the remote controller.
3. The remote controller will beep when it is turned on. The Status LED will rapidly blink green, indicating that the remote controller is linking to the aircraft. The Status LEDs will glow solid green when linking is complete.
4. Repeat Step 2 to turn off the remote controller.
Charging the Remote Controller
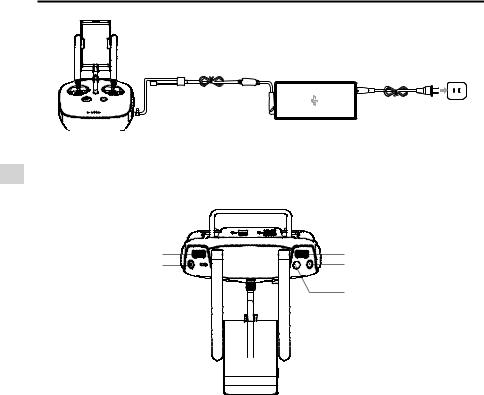
Charge the remote controller using the included charger. Refer to the figure on next page below for more details.
Controller Remote
© 2015 DJI. All Rights Reserved. 23
Phantom 3 Professional User Manual
Controller Remote
Power Outlet


 Charger Power Button
Controlling the Camera
Shoot videos/pictures, view recorded images, and adjust camera settings via the Shutter Button, Camera Settings Dial, Playback Button, and Video Recording Button on the remote controller.
[5] |
[1] |
[4] |
[2] |
|
[3] |
[1] Camera Settings Dial
Turn the dial to adjust camera settings such as ISO, shutter speed, and aperture without letting go of the remote controller. Move the dial to left or right to scroll through pictures and videos in playback mode. Press down on the dial to toggle between these settings.
[2] Playback Button
Press to view images and videos that have already been captured.
[3] Shutter Button
Press to take a photo. If burst mode is activated, multiple photos will be taken with a single press.
[4] Video Recoding Button
Press once to start recording video, then press again to stop recording.
[5] Gimbal Dial
Use this dial to control the tilt of the gimbal.
Controlling Aircraft
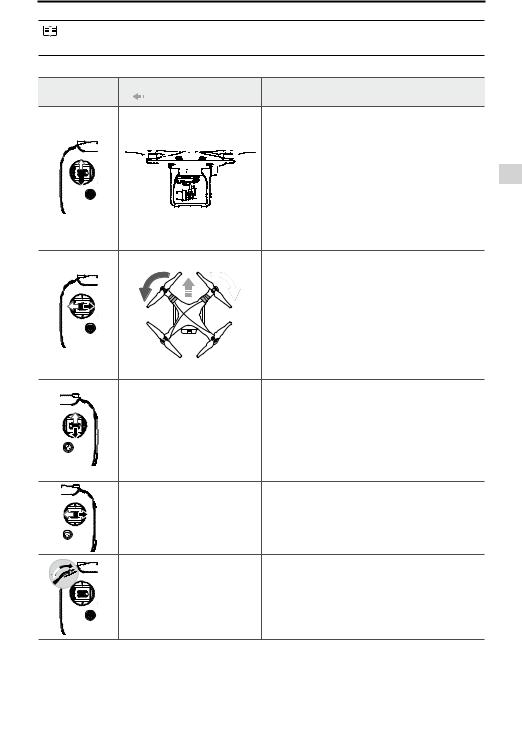
This section explains how to control the orientation of the aircraft through the remote controller. The Remote Control is set to Mode 2 by default.
24 © 2015 DJI. All Rights Reserved.
Phantom 3 Professional User Manual
Stick Neutral/Mid-Point: Control sticks are in the center position.
Moving the Control Stick: The control stick is pushed away from the center position.
Remote Controller |
Aircraft |
Remarks |
|
(Mode 2) |
( Indicates Nose Direction) |
||
|
Moving the left stick up and down changes the aircraft’s elevation.
Push the stick up to ascend and down to descend. When both sticks are centered, the Phantom 3 Professional will hover in place.
The more the stick is pushed away from the center position, the faster the Phantom 3 Professional will change elevation. Always push the stick gently to prevent sudden and unexpected elevation changes.
Moving the left stick to the left or right controls the rudder and rotation of the aircraft.
Push the sick left to rotate the aircraft counterclockwise, push the stick right to rotate the aircraft clockwise. If the stick is centered, the Phantom 3 Professional will maintain its current orientation.
The more the stick is pushed away from the center position, the faster the Phantom 3 Professional will rotate.
Moving the right stick up and down changes the aircraft’s forward and backward pitch.
Push the stick up to fly forward and down to fly backward. Phantom 3 Professional will hover in place if the stick is centered.
Push the stick further away from the center position for a larger pitch angle (maximum 30˚) and faster flight.
Moving the right stick control left and right changes the aircraft’s left and right pitch.
Push left to fly left and right to fly right. The Phantom 3 Professional will hover in place if the stick is centered.
Gimbal Dial: Turn the dial to the right, and the camera will shift to point upwards. Turn the dial to the left, and the camera will shift to point
downwards. The camera will remain in its current position when dial is static.
Controller Remote
© 2015 DJI. All Rights Reserved. 25
Controller Remote
Phantom 3 Professional User Manual
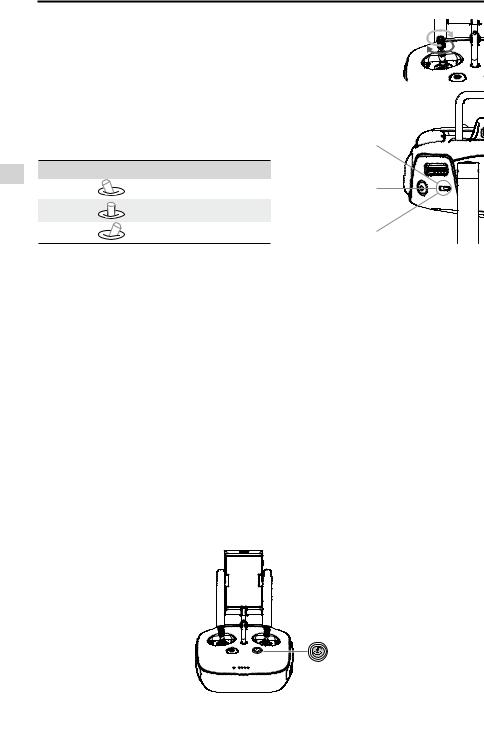
Adjusting Controller Sticks
Hold and twist the controller sticks clockwise or counter clockwise to adjust the length of the controller sticks. A proper length of controller sticks can improve the controlling accuracy.
Flight Mode Switch
Toggle the switch to select the desired flight mode. You may choose between; P-mode, F-mode and A- mode.
Position Figure |
Flight Mode |
Position 1 |
F-mode |
Position 2 |
A-mode |
Position 3 |
P-mode |
Position 1 
Position 2 
Position 3 
P-mode (Positioning): P-mode works best when the GPS signal is strong. There are three different versions of P-mode, which will be automatically selected by the Phantom 3 Professional depending on GPS signal strength and the Vision Positioning sensors:
P-GPS: GPS and Vision Positioning both are available; the aircraft is using GPS for positioning.
P-OPTI: Vision Positioning is available but a sufficient GPS signal is not available. Aircraft is using only Vision Positioning for position holding.
P-ATTI: Neither GPS nor Vision Positioning is available, the aircraft is using only its barometer for positioning, so only altitude is maintained.
A-mode (Attitude): GPS and Vision Positioning System are not used for stabilization. The aircraft uses only its barometer to stabilize. The aircraft can automatically return to the Home Point if remote controller signal is lost and the Home Point was recorded successfully.
F-mode (Function): Intelligent Orientation Control (IOC) is activated in this mode. For more information about IOC, refer to the IOC section in the Appendix.
By default, the Flight Mode Switch is locked to P-mode. To unlock other flight modes, launch the DJI GO app, enter the “Camera” page, and tap “Mode”, then activate “Multiple Flight Mode”.
RTH Button
Press and hold the RTH button to start the Return-to-Home (RTH) procedure. The LED ring around the RTH Button will blink white to indicate that the aircraft is entering RTH mode. The aircraft will then return to the last recorded Home Point. Press this button again to cancel the RTH procedure and regain control of the aircraft.
26 © 2015 DJI. All Rights Reserved.