Electronics_Projects_For_Dummies
.pdf
160 Part II: Sounding Off!
The steps that we provide here are just an introduction to programming the SpeakJet. The SpeakJet user guide is available at www.speakjet.com, under the Documentation heading.
If you need more information, we suggest you try the SpeakJet discussion forum at
http://groups.yahoo.com/group/speakjet
You can get the PhraseALator software that you use to program the chip at
http://magnevation.com/software/PhraseALator.zip
The manufacturer assures us that it is creating a manual for the PhraseALator. Go to www.speakjet.com and check under Documentation to see whether it’s been posted.
By using this chip and software to program it, you can get some pretty neat functionality. For example, at your disposal is a built-in set of 72 speech elements, 43 sound effects, 3 octaves of musical notes, and 12 touch tones. By mixing and matching these and controlling the pitch, rate, bend, and volume settings, you can produce just about any sound, phrase, or musical tones you want.
After you install the software on your computer, you can simply assign preloaded sounds to the circuit of this project, which we cover in the next set of steps. Or, you can get fancy and start programming sounds or even words of your choosing. If you want to get fancy, it will take some playing around to learn the software (which is beyond the scope of this book). As we said, not much extensive documentation is available for it at this point, but with a little trial and error, you can get the hang of it.
For our purposes, we used the sounds that the manufacturer preloaded. Here are the steps involved in this procedure:
1.Open the PhraseALator software and click the Event Configuration button.
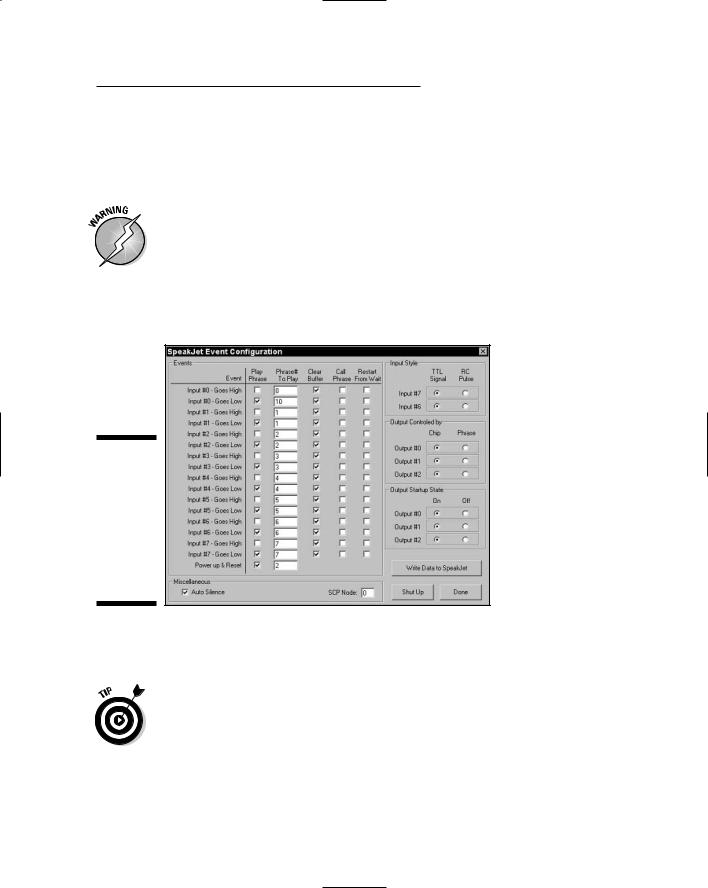
The upcoming Figure 7-19 shows the SpeakJet Event Configuration that we loaded onto our chip. The items in the Phrase# to Play column in this figure indicate phrases that the manufacturer has preloaded.
2.Select the check boxes in the Play Phrase column only for input events listed as Goes Low.

Chapter 7: Murmuring Merlin 161
You do this so that the SpeakJet activates when you first press and then release the switch. See the note and table after these steps for help in choosing which check boxes you must select. (The simple route is to just select all the Goes Low inputs, as shown in Figure 7-19.)
3. Connect the box to your computer by using a serial port cable to program the SpeakJet.
Check over your circuit to make sure that no wires are loose or touch another wire — which could cause a short — before hooking them up to your computer.
4.With the box connected to your computer, simply click the Write Data to SpeakJet button in the Event Configuration screen of the SpeakJet program (as shown in Figure 7-19).
Figure 7-19:
The Event Configuration screen of the PhraseALator software program.
5.After you finish programming the chip, disconnect the box with the electronics from the computer.
The event number in the SpeakJet software Event Configuration window doesn’t always match the pin number in the SpeakJet IC — that would be too easy. Here’s a list of event numbers and corresponding pin numbers. We wired switches to Pins 2, 4, and 7, so we use Events 6, 4, and 2.

162 Part II: Sounding Off!
Event Pin
09
18
27
36
44
53
62
71
Hooking up the puppet
Merlin is just bursting to have his say at this point, so it’s time to take the final steps to activate the newly loquacious puppet.
Making sounds
We know you’re the inquiring kind who will want to program custom phrases before long, so here’s an overview of the process to get you started:
1.Open the EEPROM Editor screen.
2.Select the check box for the Phrase# that you wish to use for a custom sound.
3.In the Phrase Editor screen that opens, select the sounds that you wish to include in a phrase.
Be sure to check out words available from the library.
4.After you make a custom phrase, click Done in the bottom right of the screen.
This takes you back to the EEPROM Editor screen, where you can see that the selected sounds have been added to the phrase.
5.Close the EEPROM Editor screen and open the Event Configuration screen.
6.Enter the phrase number that you created in the Phrase# to Play box for one of the input #s.
See the nearby table to see how input numbers correspond to pin numbers.
7.Connect the serial cable and then click the Write Data to SpeakJet button to program the chip.

Chapter 7: Murmuring Merlin 163
Follow these steps to hook up and operate the puppet:
1. Plug the phono plugs from one of the tactile switches into the box and press the switch.
If the sound is too soft or too loud, adjust the potentiometer to get the sound level right.
2.Unplug the phono plugs and insert the electronics box in the puppet, taking care not to move the tactile switches out of position.
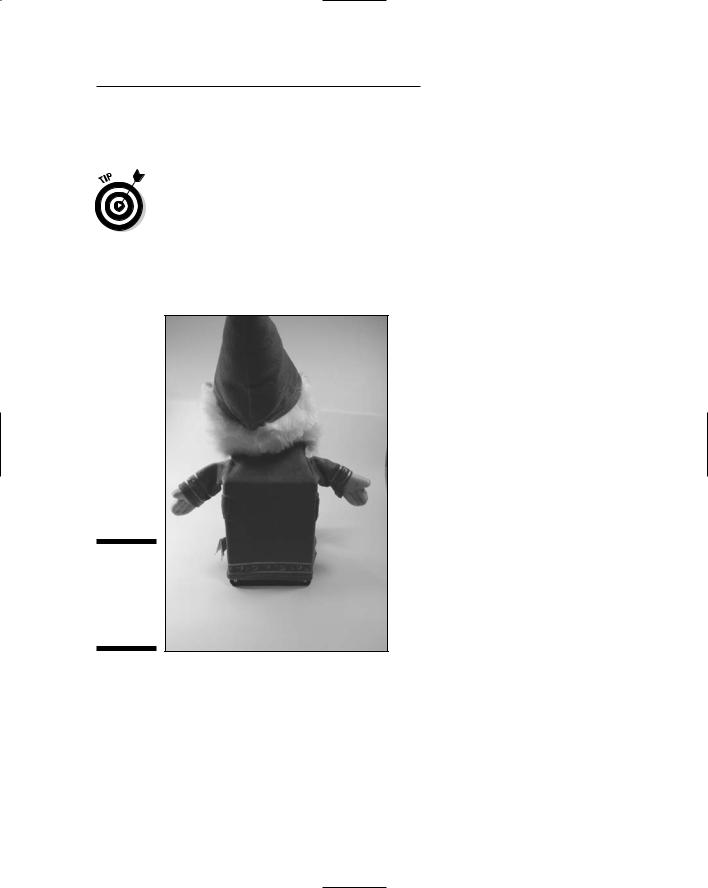
3.Insert each phono plug in a phono jack and tuck the wires out of site, as shown in Figure 7-20.
Figure 7-20:
The electronics concealed in the puppet.
Trying It Out
At this point, the puppet is ready to go. Press a hand or the little guy’s nose, and listen to what he has to say.

164 Part II: Sounding Off!
If something doesn’t work, here are the obvious things to check out:
Check that all the batteries are fresh, tightly inserted in the battery pack, and all face the right direction.
Check to see that no wires or components have come loose.
Taking It Further
Adding sound to objects has endless potential, as manufacturers of stuffed toys and dolls have discovered. If you like this project, here are some ways to vary it or take it further:
You can use a different puppet or stuffed animal or plastic toy in which to put the project.
Create a music box that plays when you press a switch.
Add more switches for people to push.
You can use up to eight of the event pins for sound.
Add light to sound.
For example, you might want to put a light on Merlin’s head that lights up every time he speaks. See Chapter 5 for some ideas about working with LEDs.
If you want to program the SpeakJet only once, you don’t need to keep the MAX232 with your project. Instead, you can move the SpeakJet to a smaller breadboard. That way, you can fit the board into a smaller puppet or toy.

Chapter 8
Surfing the Airwaves
In This Chapter
Taking a close look at the radio’s circuit
Checking off the parts list
Putting the radio circuit on a breadboard
Assembling the radio box
Tuning in!
For years, people attracted to electronics have been drawn to radios. In olden days, radios had big tubes and were the size of a bookcase; today, you can create a small radio yourself by using common electronics
components.
The radio in this project involves a simple circuit, speaker, and a coil and variable capacitor combo that you use to tune into your favorite station.
By working on this project, you discover how to work with radio frequency and amplification to grab radio signals out of the air.
The Big Picture: Project Overview
After you complete this project, you’ll have an AM radio. We know, our favorite stations are on FM, too, but AM (amplitude modulation) was the first method of modulating frequencies used in radio. Building an AM radio is a bit easier to do, so that’s where we start you off.
If you’re dying to discover more about creating an FM (frequency modulation) radio, check out Basic Radio: Understanding the Key Building Blocks, by Joel Hallas, published by the American Radio Relay League (www.arrl.org).
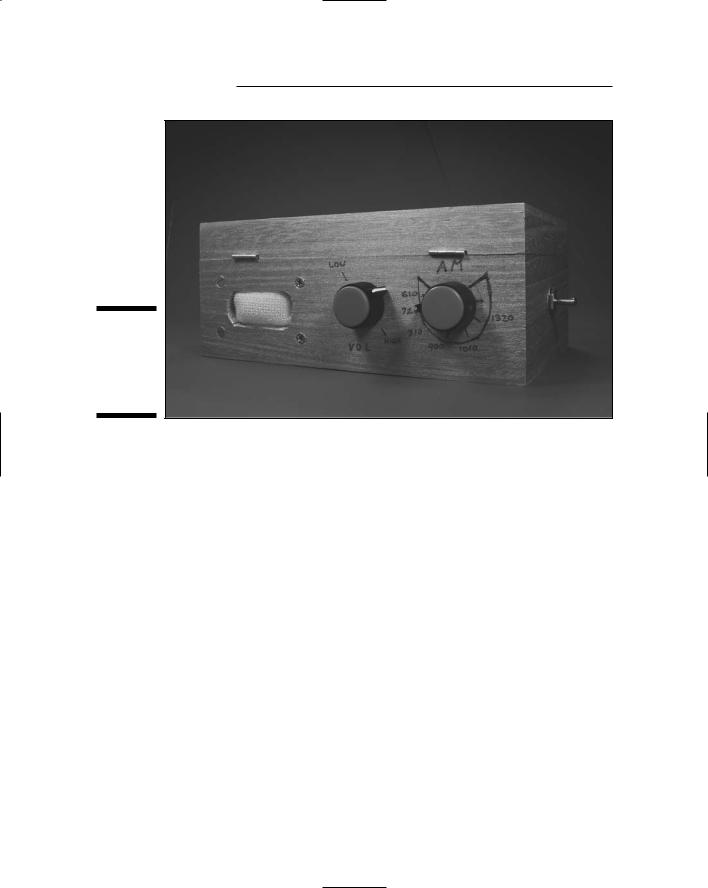
You can see the finished radio in Figure 8-1.

166 Part II: Sounding Off!
Figure 8-1:
Painted a shiny silver, we think our radio is cool.
Here are the types of activities you’ll be doing to create your own radio.
You will
1.Put together an electronic circuit containing a coil and variable capacitor that you use to tune to your favorite stations, an IC that separates the voice signal from the radio frequency carrier and an IC that amplifies the voice signal enough to power a speaker.
2.Install the circuit, speaker, on/off switch, volume control, and tuner in a handy box.
Scoping Out the Schematic
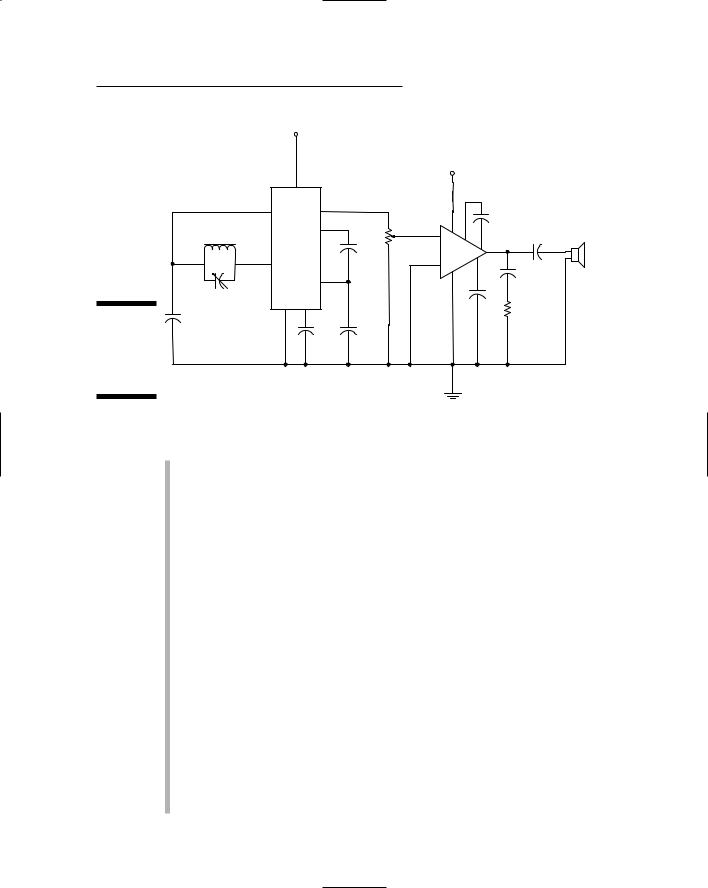
Imagine all that music and talk floating around out there in the air. Time to get to work on a circuit that lets you capture those sounds and pump them through a speaker. There is only one breadboard to put together for this project. You can see the schematic for the board in Figure 8-2.

Chapter 8: Surfing the Airwaves 167
|
|
+1.5 V |
|
|
|
|
|
|
|
|
|
|
|
+6 V |
|
|
|
|
|
6 |
|
|
|
|
|
|
|
|
8 |
5 |
|
|
|
+ |
|
|
|
|
|
|
C6 |
|
||
|
|
|
|
|
6 |
|
|
|
|
|
|
3 |
|
|
|
|
|
|
L1 |
|
|
1 |
|
|
C8 |
|
|
|
R1 |
3 + |
8 |
+ |
|||
|
|
|
C4 |
|
IC2 |
|
|
|
|
|
|
|
|
|
5 |
|
|
|
|
1 |
|
|
- |
7 |
|
|
|
|
|
2 |
C9 |
|
|||
|
|
|
|
4 |
|
SPEAKER |
||
|
|
|
2 |
|
|
|||
|
|
|
|
|
+ |
|||
|
|
|
|
|
|
|||
|
|
|
|
|
|
|
|
|
|
C2 |
4 |
7 |
|
|
|
C7 |
|
|
|
|
|
|
R2 |
|
||
Figure 8-2: |
C1 |
|
IC1 |
|
|
|
|
|
|
|
|
|
|
|
|||
|
|
|
|
|
|
|
||
The
C3 C5
schematic
of the radio circuit.
The following is a list of the schematic elements for your radio:
L1 is a coil, or inductor. You make this by wrapping wire around a ferrite rod. This coil is both the antenna and half the tuning circuit needed to tune the radio to a particular station. The value of the inductor, given in Henrys, is determined by the number of coils of wire you wrap around the rod.
C2 is a variable capacitor that forms a tuning circuit along with L1. When you have a capacitor and inductor in parallel, the value of the capacitor and inductor determine the resonance frequency, which is the frequency of the radio station you tune in on your radio. As you change the value of C2 by turning the knob connected to the capacitor, you change the resonance frequency, therefore tuning in to a different radio station.
IC1 is a ZN416E integrated circuit that is designed to separate the voice signal from the radio frequency carrier and amplify the signal to a level sufficient to power headphones.
C1 is a capacitor that allows nonresonant radio frequency signals to conduct to ground.
C3, C4, and C5 are suggested by the manufacturer of IC1; they shunt high-frequency signals to ground, preventing them from causing noise in certain parts of the circuit inside of IC1.
IC2, an audio amplifier named LM386N-1, takes the audio frequency electrical signal generated by IC1 and amplifies it to provide sufficient power to drive the speaker.

168 Part II: Sounding Off!
Picking up the right signal
Ferrite, used for the coil core in this project, is composed of crystalline iron oxide and is typically used at radio frequencies. For coils used at low frequencies, such as in power transformers, you can use iron as the core; however, at high frequencies, the high conductivity of iron allows eddy currents to be created in the core. These eddy currents can decrease the level of signal induced to the coil, thus weakening the signal. Because these eddy currents don’t occur in the lower conductivity ferrite core, you get a much more efficient coil at radio frequencies.
When a radio signal comes across a ferrite rod, the radio signal creates a magnetic field in the rod. When you wrap a coil of wire around the ferrite rod, this magnetic field — which is changing direction at high frequency (the frequency of the radio signal) — induces (hence the name inductor) an electric current in the wire coil. A magnetic or electric field can cause electrons to flow in a wire; if the field is changing direction frequently, like one created by a radio signal does, the direction of the electrons changes with the magnetic field. Voilà! You now
have a radio frequency signal traveling through your wire coil.
Because the inductor and capacitor are connected, this radio frequency signal also travels through the capacitor. When you have an inductor and capacitor in parallel, like in our AM radio circuit, the values of the inductor and capacitor determine a resonance frequency. A signal at the resonance frequency is then blocked from moving through the inductor/ capacitor circuit. This resonance frequency is the frequency of the radio station that you tune into when you change the value of the variable capacitor by turning the knob on your radio.
Signals from other radio stations that aren’t at the resonance frequency flow through the inductor/capacitor circuit and through C1 to ground; basically, these signals are thrown away.
Only the signal at the resonance frequency doesn’t go to ground through C1; rather, that signal is available to your circuit to be processed back into the music your radio station sends out.
R1 is a potentiometer that controls the sound volume.
C6 sets the voltage gain of IC2 to 200. (Therefore, the voltage out will be 200 times the voltage in.)
C7 improves the stability of the LM386 amplifier to prevent problems such as oscillation, which can turn your signal into an unintelligible garble of sound.
C8 removes any DC offset from the output of the LM386 amplifier.
C9 acts as a current bank for the output. This capacitor drains when sudden surges of current occur and refills with electrons when the demand for current is low.

Chapter 8: Surfing the Airwaves 169
Building Alert: Construction Issues
The ferrite rod that you wrap wires around to make a coil is brittle. If you drop it or knock it against something, it could easily break, so be careful!
If you place your radio in a wooden box (as we did), check the thickness of the wall of the box against the length of the threads on the potentiometer. Because the wall on our box was 1⁄4" thick (the same thickness as the threads on the potentiometer), we just put some glue between the body of the potentiometer and the wall of the box (making sure not to get glue on the rotating shaft). You might want to use a chisel to reduce the thickness of the wall so that the rotating shaft sticks out a little farther; that way, the knob doesn’t end up too close to the face of the box.
The variable capacitor has very small holes in its metal body that you can use to mount it on small pins. Again, we found it easiest to glue this to the wall of the box after chamfering (cutting a furrow in) the edge of the hole to fit the metal knuckle around the shaft. In this way, the wall of the capacitor fits flush against the wall of the box.
Perusing the Parts List
Get ready to turn on your computer or head to the electronics supply store to shop for the parts for your radio project (several of which are shown in Figures 8-3 and 8-4). Here’s what you’ll need:
10 kohm potentiometer (R1)
10 ohm resistor (R2)
Two 0.01 microfarad ceramic capacitors (C1, C3)
One 0.1 microfarad ceramic capacitor (C5)
Two 0.047 microfarad ceramic capacitor (C4, C9)
10 microfarad electrolytic capacitors (C7, C6)
100 microfarad electrolytic capacitor (C8)
LM386N-1 amplifier IC2
You’ll find many versions of the LM386 amplifier. We chose the LM386N-1 because it works with the supply voltage of 6 volts used by this circuit.
Battery pack for 1 AA battery
