


Chapter 7
Avoiding Sniffing
Attacks through
Encryption
Solutions in this chapter:
■Understanding Network Encryption
■Capturing and Analyzing Unencrypted Network Traffic
■Using OpenSSH to Encrypt Network Traffic between Two Hosts
■Installing OpenSSH
■Configuring SSH
■Implementing SSH to Secure Data Transmissions over an Insecure Network
■Capturing and Analyzing Encrypted Network Traffic
;Summary
;Solutions Fast Track
;Frequently Asked Questions
353

354 Chapter 7 • Avoiding Sniffing Attacks through Encryption
Introduction
You now understand how it is possible to enhance authentication using thirdparty open source software.You also understand some of the pitfalls involved in deploying such software in various systems. For example, in the last chapter you discovered how to deploy authentication using one-time passwords and Kerberos. These authentication implementations enable systems to verify the identity of a user logging on to them, and the integrity of data.
In this chapter, you will learn about solutions to deploy strong encryption to enhance network security. Encryption ensures data confidentiality by using algorithms to encrypt data before it is sent over a network.The receiving host then decrypts the data to a readable format.The solutions in this chapter combine both authentication and encryption, and include a step-by-step guide to implementing encryption over an insecure network.
Understanding Network Encryption
Network encryption ensures that data sent across a network from one host to another is unreadable to a third party. If a sniffer intercepts the data, it finds the data unusable because the data is encrypted.Therefore, a hacker cannot view any usernames or passwords, and any information sent across the network is safe.The requirement is that all communicating systems must support the same network encryption technique, such as Secure Shell (SSH).
Network encryption is used for any data transfer that requires confidentiality. Since the Internet is a public network, network encryption is essential. E-com- merce transactions must ensure confidentiality to protect credit card and personal information. Personal banking Web sites and investment companies often require extremely sensitive information to be sent, such as bank account numbers and tax identification numbers. If these usernames, passwords, and personal information fell into the wrong hands, the information could be used for a front-door attack, since the hacker could pose as a legitimate user.
Rlogin, remote shell (rsh), and Telnet are three notoriously unsafe protocols. They do not use encryption for remote logins or any type of data transmission. For example, if you are an administrator and you want to log in to a system via Telnet, your username and login are sent in clear text. Rsh and rlogin send all data between two hosts in clear text as well (but a password is not required).
www.syngress.com

Avoiding Sniffing Attacks through Encryption • Chapter 7 |
355 |
If a packet sniffer captured the packets destined for the administrator’s system, it would eventually capture the packets containing the username and password, and the attacker could then enter the system as a legitimate user.
Capturing and Analyzing
Unencrypted Network Traffic
To view an unencrypted login session, you must capture packets during a login session. In the following steps, you will Telnet into a host and capture the unsecured session with the open source packet sniffer Ethereal.
Note that in order for the following example to work properly, you must have two systems: the Telnet client and the Telnet remote host. All Linux installations include Telnet, so no additional program is required for this example.
1. Verify that Ethereal is installed on your system by entering:
rpm –qa | grep ethereal
2.If you do not receive a reply, you need to download and install Ethereal. Ethereal (ethereal-0.8.9-4.i386.rpm) is included on the CD accompanying this book.
3.Once you have verified that Ethereal is installed, you are ready to capture packets.
4.To add filters to Ethereal without using host names, open a command interface and enter:
ethereal -n
5.Select the Edit menu and choose Filters.The Ethereal: Filters screen appears. Since no filters have been configured, the configuration screen is blank.
6.To create a filter that allows only traffic between your host and another host, you must add a filter name and a filter string. For example, to create a filter between your host and a host at 24.130.10.35, enter the filter name and filter string shown in Figure 7.1. Please note that your IP addresses will not be the same.You need to select your system’s IP address and the IP address of the system you wish to log in to via Telnet.
www.syngress.com

356 Chapter 7 • Avoiding Sniffing Attacks through Encryption
Figure 7.1 Creating a Filter between Two Hosts
7.After the two fields are complete, you must click Save, and then click New. Click OK to exit the Filter screen.
8.To start a packet capture, simply select the Capture menu and choose Start.The Capture Preference screen appears. Click Filter and choose the “Telnet Login” filter that you created. Click OK twice and the capture starts.
9.To generate the Telnet login packets,Telnet into the Telnet host. For example, if you wanted to Telnet to a host at 24.130.10.35, you would enter:
telnet 24.130.10.35
10.Enter a username and password to log in to the system. If you do not have a username and password on the Telnet host, create a user telnet with the password telnet on the Telnet host by entering:
useradd telnet
Create a password for user telnet by entering:
passwd telnet
Changing password for user telnet
New UNIX password:
Retype new UNIX password:
passwd: all authentication tokens updated successfully
11.After you log in as user telnet on the Telnet host, exit the Telnet session.
12.Stop the Ethereal packet capture by clicking Stop.
www.syngress.com

Avoiding Sniffing Attacks through Encryption • Chapter 7 |
357 |
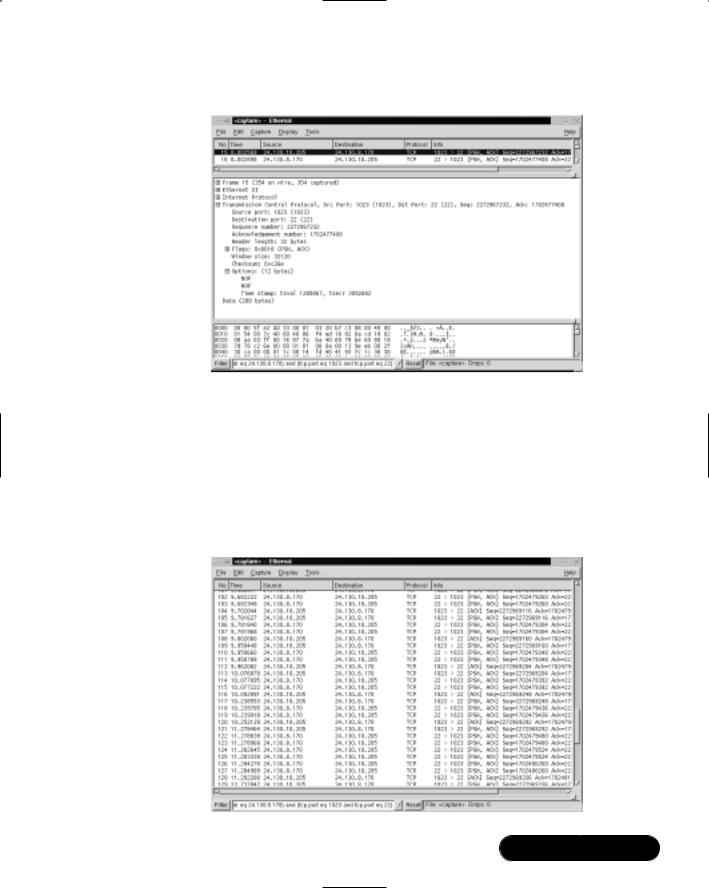
13.The packet capture appears in Ethereal. Locate the Telnet data packet that includes the data: password field.Your screen will resemble Figure 7.2, which highlights the first password packet.
Figure 7.2 Capturing a Telnet Login Session
14.Scroll to the second password packet.The password field contains the first character of the telnet password. In this case, the character is the letter “t,” as shown in Figure 7.3.
Figure 7.3 Identifying the First Character in the Telnet Password
www.syngress.com

358Chapter 7 • Avoiding Sniffing Attacks through Encryption
15.Telnet sends each password character as a separate packet. If you continue to scroll down the packet capture and view each Telnet data packet, you will discover the password.
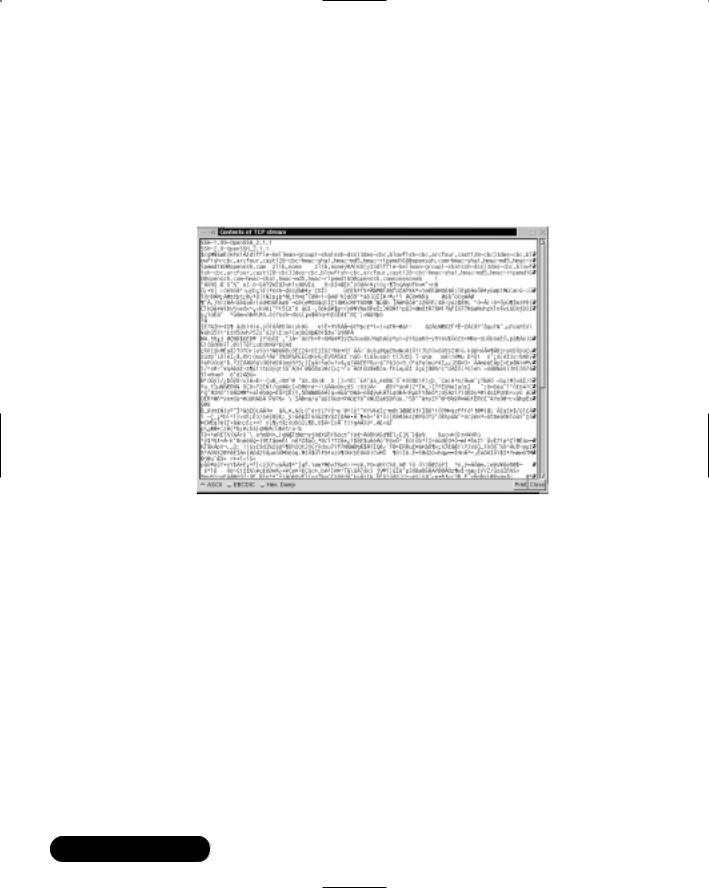
16.An easier way to discover the Telnet password is to follow the TCP stream.To do this, simply select any packet involved in this Telnet connection. It can be a TCP or Telnet packet, as long as it is part of the Telnet session.
17.Once a corresponding packet is selected, select the Tools menu and select Follow TCP Stream. The contents of the TCP stream appear, as shown in Figure 7.4.
Figure 7.4 Following a TCP Stream to Discover the Username and Password
18.The username and password are displayed in clear text. Please note the echo in the login name. By default, the system distinguishes client keystrokes with brown, and system text as blue.You can see the brown and blue text if you are reading the electronic file on this book’s accompanying CD; even if you can’t see the brown client text on this printed page, you can see that the packet sniffer has discovered the username and password.
19.Save the packet capture as unsectel, and quit Ethereal.
www.syngress.com
Avoiding Sniffing Attacks through Encryption • Chapter 7 |
359 |
As you can see, it is possible to intercept a login session and discover a username and password. In this case, a hacker could now log in to the Telnet host with the same privileges as user telnet. Telnet is a legitimate user, even though the impersonator is not.The Telnet host is now the victim of a front-door attack.
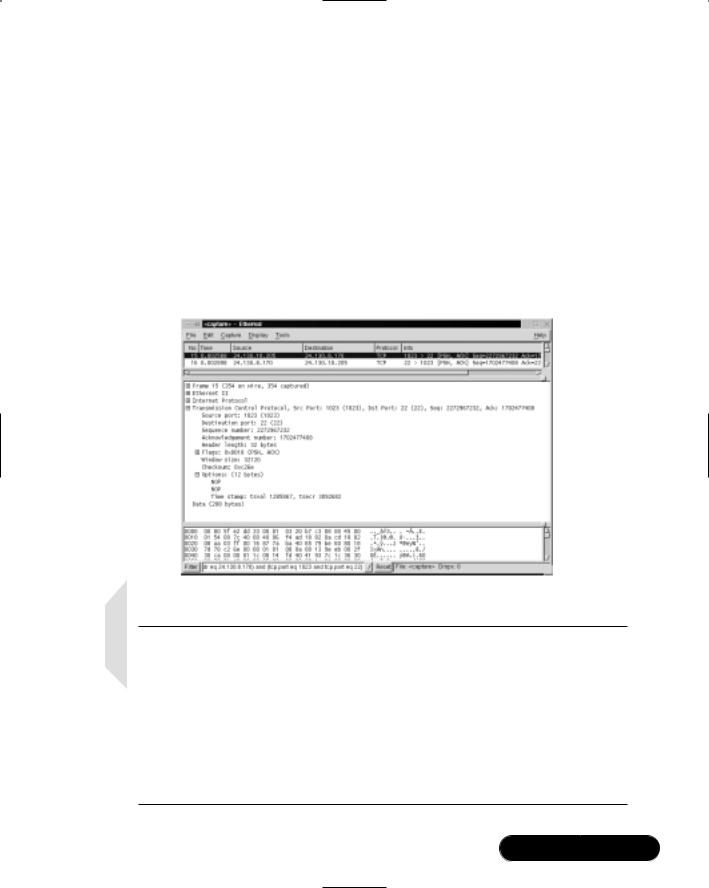
If network encryption is implemented on the network, the login session will be encrypted. All of the information passed between the two hosts is rendered useless because no application data (such as a Telnet packet) is displayed because it is encrypted, as shown in Figure 7.5.
If the hacker attempts to view the TCP stream to discover the username and password, it will also render useless information, as shown in Figure 7.6.
Figure 7.5 Login Session with Network Encryption
NOTE
Hackers do not capture all Internet traffic in hopes that they will find sensitive information. There is simply too much traffic on the Internet, so this technique would be similar to finding the proverbial needle in a haystack. Instead, they either focus their packet sniffing on one server or client interface, or try to hack into a server that contains the sensitive information they seek. For example, they may attempt to hack into a bank’s database server that contains client credit card numbers and personal information. In the steps described in this section, a packet filter was created on the sniffer to focus on the Telnet host.
www.syngress.com
360 Chapter 7 • Avoiding Sniffing Attacks through Encryption
Figure 7.6 Following a TCP Stream When Network Encryption Is Enabled
Damage & Defense…
Securing E-Commerce Transactions
If hackers were alerted to an unsecure server, they could capture packets going in and out of the server to gain the data they sought. For example, if an e-commerce server does not use any type of network encryption for transactions, there is a great deal of data to be gained by a hacker. Unfortunately, many small companies or entrepreneurs set up their own Web servers, unaware of potential security problems, and set up simple scripts to process payment forms. Although the transaction takes place, it takes place in an unsecured manner. Every packet may contain valuable information that is very easy to observe over the wire. Secure Sockets Layer (SSL) is ideal for implementing secure e-commerce transactions.
If a hacker intercepts a credit card number, the number may be used or sold. When the Web site customer backtracks to determine where his or her number was stolen, he or she may realize that it occurred shortly after an Internet transaction. This will tarnish the Web site’s reputation, since you have lost at least one customer, and eventually put the site out of business. This is particularly troublesome if the Web server is under surveillance by a hacker.
www.syngress.com

Avoiding Sniffing Attacks through Encryption • Chapter 7 |
361 |
The lesson demonstrated in the following sections demonstrates how to implement an important network encryption system: Open Secure Shell (OpenSSH).This system will ensure that all data transmitted between your hosts is secure, and is useless for hackers.
Using OpenSSH to Encrypt Network Traffic between Two Hosts
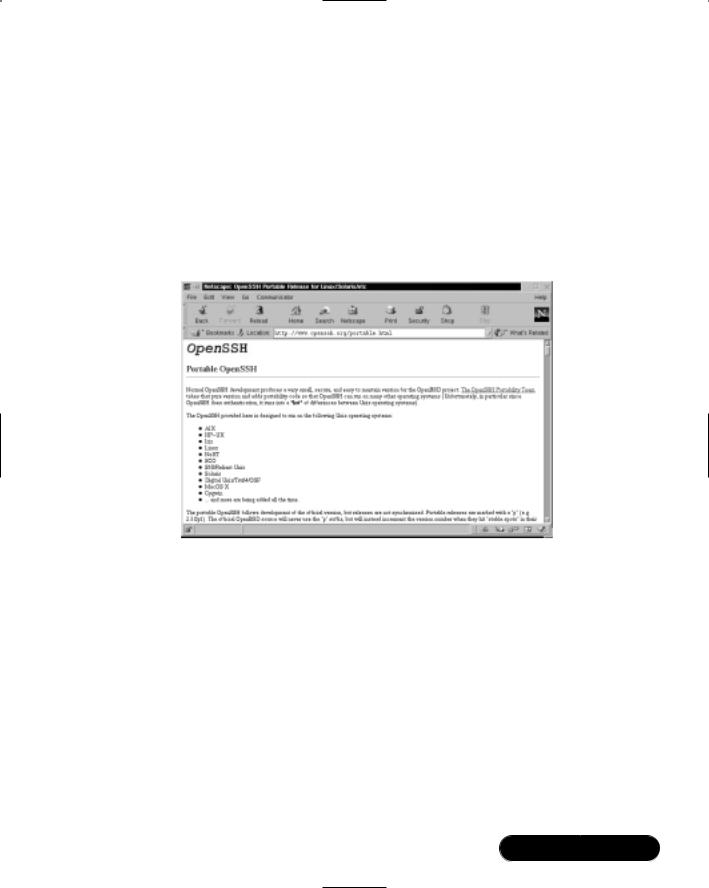
OpenSSH (www.openssh.org) is an open source program that encrypts all traffic between hosts using secure shell (SSH). It is a secure replacement for common Internet programs used for remote connectivity, such as Telnet, rlogin, and rsh. Because it encrypts all traffic, it always hides usernames and passwords used for remote logins. After the login occurs, it continues to encrypt all data traffic between the hosts. Open SSH is a free version of the SSH Communications Security Corporation’s SSH suite (www.ssh.org). As with most open source software, the tradeoff is that vendor support is not available. Do not confuse OpenSSH with the fee-based SSH suite.The OpenSSH home page is shown in Figure 7.7.
Figure 7.7 OpenSSH Home Page
The OpenBSD Project (www.openbsd.org) develops OpenSSH and the Unix operating system, OpenBSD. OpenBSD is a free 4.4BSD-based OS that is designed with security in mind. It uses strong encryption techniques to ward off
www.syngress.com

362 Chapter 7 • Avoiding Sniffing Attacks through Encryption
hackers. OpenBSD claims that the default installation has not experienced a remote hole in over three years.The OpenBSD Project has ported OpenSSH to other operating systems, including Linux, HP-UX, AIX, Irix, SCO, MacOS X, Cygwin, Digital Unix/Tru64/OSF, SNI/Reliant Unix, NeXT, and Solaris.The OpenBSD home page is shown in Figure 7.8.
Figure 7.8 OpenBSD Home Page
The OpenSSH Suite
OpenSSH is a suite of secure networking connectivity programs.The OpenSSH suite includes the following programs:
■OpenSSH SSH client (SSH) Remote login program, used for secure remote logins and session encryption. Secure alternative for rlogin and Telnet.
■Secure copy program (SCP) Remote file copy program, used to securely copy files between network hosts. Supports usernames and passwords.
■Secure file transfer program (SFTP) Used for secure interactive file transfers. Secure alternative for FTP.
■OpenSSH SSH daemon (SSHD) The daemon for SSH.
www.syngress.com

Avoiding Sniffing Attacks through Encryption • Chapter 7 |
363 |
Many features are included in the OpenSSH suite that ensure secure transmissions across a network, and extend the usefulness of the program.Table 7.1 lists several of the OpenSSH features.
Table 7.1 OpenSSH Features
Feature |
Description |
|
|
Strong Encryption using |
The 3DES and Blowfish encryption algorithms |
Triple Data Encryption |
are patent free in all countries. 3DES is time |
Standard (3DES) and |
proven, and Blowfish provides faster encryption |
Blowfish |
by using fast block cipher. Either encryption |
|
algorithm can be used. They are applied before |
|
authentication to ensure that all usernames |
|
and passwords are encrypted, as well as the |
|
session data. |
Strong Authentication using Public Keys, One-Time Passwords (OTPs) and Kerberos Authentication
Protects against authentication vulnerabilities such as IP and Domain Name System (DNS) spoofing and fake routes. There are four types of authentication methods used with OpenSSH:
■Public key authentication only
■Public key-based host authentication along with .rhosts
■One-time passwords with s/key
■Kerberos authentication
X11 Forwarding for |
Encrypts X Windows traffic between remote |
encrypting X Windows |
systems. Protects against remote xterm |
Traffic |
snooping and hijacking. |
Encrypted Port Forwarding |
Allows TCP/IP ports to be forwarded to another |
|
system over an encrypted channel. This is ideal |
|
for Internet protocols that do not inherently |
|
support encryption, such as POP or SMTP. |
Agent Forwarding for Single |
A user’s authentication keys can be stored on |
Network Login |
the user’s local machine, which becomes the |
|
authentication agent. When the user accesses |
|
the network from another system, the connec- |
|
tion is forwarded to this authentication agent. |
|
This prevents the authentication keys from |
|
being installed on any network system, and |
|
allows the user to securely access the network |
|
from any system. |
Interoperability |
Complies with multiple SSH protocol versions |
|
(SSH 1.3, 1.5 and 2.0). |
|
|
|
Continued |
www.syngress.com

364 Chapter 7 • Avoiding Sniffing Attacks through Encryption
Table 7.1 Continued
Feature |
Description |
Data Compression
Passes Kerberos and Andrew File System (AFS) Tickets to Remote Systems
Allows data compression to occur before data encryption. This is important for networks with slow connections.
Allows users to access AFS and Kerberos services by entering their password only one time.
NOTE
OpenSSH 2.0 supports the SSH 1.3, 1.5, and 2.0 protocol. It is important to know that SSH 2.0 does not use the Rivest, Shamir, Adleman (RSA) algorithms, but does support it. Because RSA algorithms still had an effective patent, the SSH 2.0 developers decided to use the DiffieHellman (DH) and Digital Signature Algorithm (DSA) algorithms instead. Therefore, if your SSH client and servers use SSH 1.3, 1.5, or 2.0, they will be compatible. Most commercial implementations for Unix, Windows, and others use these versions.
Installing OpenSSH
OpenSSH implementations are significantly different between operating systems because of authentication. In fact, the developers split development into two categories:
■OpenBSD-based development Produces secure, clean, and simple OpenSSH code for the OpenBSD operating system.
■OpenSSH Portability Team Uses the OpenBSD OpenSSH code to develop portable versions for other operating systems. Each portable version is indicated with a “p” to differentiate it from the OpenBSD version. Portable versions are not released at the same time as the OpenBSD versions.They usually take longer to release, since more time is required for the additional code.
www.syngress.com
Avoiding Sniffing Attacks through Encryption • Chapter 7 |
365 |
Make sure that you are downloading the specific version for your operating system.To determine if your operating system is supported, visit the Portable OpenSSH Web page at www.openssh.org/portable.html.The download links for each version are located at the bottom of the Web page. Simply scroll down to locate the download site nearest you, and then identify your particular operating system.The OpenSSH installation files required for Linux are included on the CD accompanying this book.The portable OpenSSH Web page is shown in Figure 7.9.
Figure 7.9 Operating Systems Supported by Portable OpenSSH
OpenSSH is becoming very popular, and operating systems are now released with OpenSSH installed by default. For example, Red Hat Linux 7 installs OpenSSH 2.1.1p7-1 during the installation process.The following operating systems also include OpenSSH into the base system, as shown in Figure 7.10.These systems include Red Hat, SuSE, Mandrake Linux, FreeBSD, and others.
From the preceding information, you can now determine whether you need to download and install OpenSSH.The examples in this chapter use Red Hat Linux 7. A portable version of OpenSSH has already been created. It is a Red Hat Package Manager (RPM) that is included into the base system of Red Hat Linux 7.These installation files are also located on the CD accompanying this book.Therefore, we are ready to begin configuring OpenSSH after we confirm that OpenSSH is installed.
www.syngress.com

366 Chapter 7 • Avoiding Sniffing Attacks through Encryption
Figure 7.10 Operating Systems That Incorporate OpenSSH
1.To ensure that OpenSSH RPM is installed on your system, enter the following:
rpm –qa | grep ssh
2. You should receive the following response if SSH is installed:
openssh-askpass-gnome-2.1.1p4-1 openssh-clients-2.1.1p4-1
openssh-2.1.1p4-1
openssh-server-2.1.1p4-1 openssh-askpass-2.1.1p4-1
If you receive this response, you are ready to configure OpenSSH.
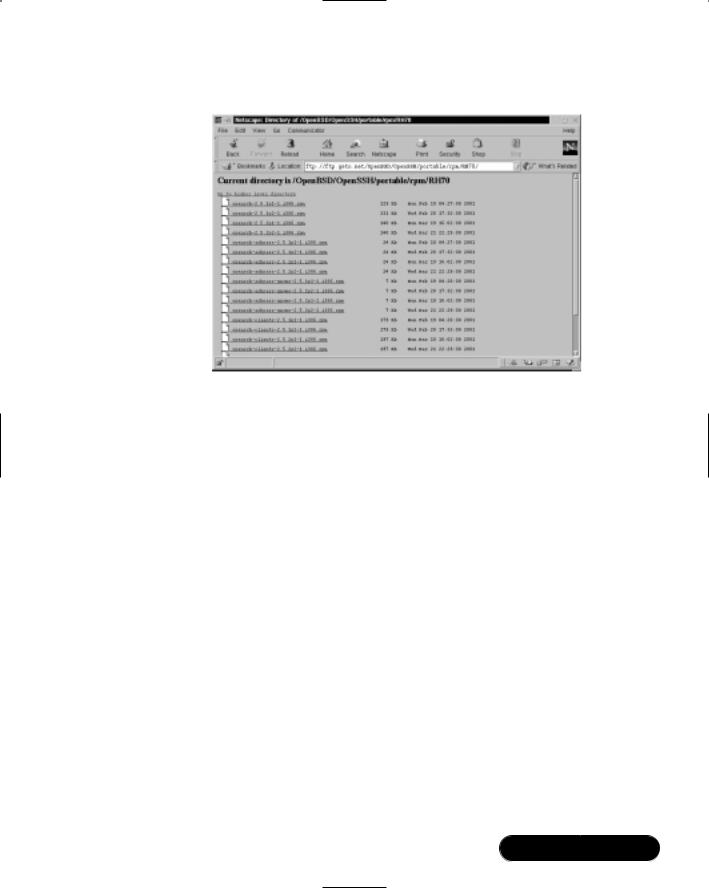
3.If you receive no response, install these files from the accompanying CD, or access www.openssh.org/portable.html to locate a download site nearest you, and download the portable version that matches your operating system. For example, since I am located in Los Angeles, I would locate the Santa Barbara, CA, USA section, and select the “Linux RPMs” link.Then, choose the RH70/ directory (or equivalent), and download the corresponding RPMs from Step #2.The versions will be higher than the versions incorporated into the Red Hat Linux 7 release, as shown in Figure 7.11.
www.syngress.com
Avoiding Sniffing Attacks through Encryption • Chapter 7 |
367 |
Figure 7.11 Downloading OpenSSH RPMs for Red Hat Linux 7
4.Multiple versions will exist for each RPM. Download the latest version of each.
5.Install the RPMs by using the rpm -i command. Once installed, you are ready to configure OpenSSH.
Configuring SSH
SSH is the OpenSSH SSH client, and works with the SSHD (SSH daemon). They work together to replace rlogin and rsh. SSH is also a replacement for Telnet. SSH is used to log in to a remote system and execute commands on the remote system.The difference between SSH and Telnet, rlogin, and rsh is that SSH is secure.
At the beginning of this chapter, you used a Telnet connection to log in to a remote host.The entire session was unsecure because all data was sent in clear text, including the username and password. Using the packet sniffer Ethereal, you were able to capture the Telnet session packets and follow the Transmission Control Protocol (TCP) stream.You discovered the username and password used to establish the connection. Since you now have the username, password, and remote host Internet Protocol (IP) address (in this case), you can now log in as the user whose packets you captured.
www.syngress.com

368 Chapter 7 • Avoiding Sniffing Attacks through Encryption
Using a similar method, you can also capture rlogin and rsh sessions and determine the needed authentication data. For example, because rlogin and rsh use host authentication, you can determine the IP address or fully qualified domain name (FQDN), and the username required to log in to the host. Once the host name and username for authentication are determined, they can be used for IP and Domain Name System (DNS) spoofing.
The SSH client is a replacement for Telnet, rlogin and rsh. It provides a secure data channel between two hosts on a network.These hosts can be untrusted and the network can be unsecured. In order to work, both hosts must support SSH. One host then connects to another host using an encrypted connection. Because the connection is encrypted, any hacker who captures the data will have an extremely difficult time decrypting it.
How SSH Works
The method for implementing SSH combines similar r-command concepts with a private and public key method. In order to understand how SSH works, it is a good idea to understand how the older r-commands work.
Insecure r-command Authentication
The following authentication method is used for r-commands, such as rlogin, rsh, or rcp, in Red Hat Linux 7. For the example, rlogin will be used. Any user logging on to a remote system must have a user account on the remote system. For this example, we will use the account susan. If Susan is logged on locally when she connects to a remote host, no password is needed to access the remote host. No password is needed because her account is authenticated by an entry in the
.rhosts file located in the remote system’s $HOME/susan directory.The .rhosts file must be created in the susan home directory.
The .rhosts file contains the host name and username required for Susan to log in to the system.The host name of Susan’s system is we-24-130-10-205.we
.mediaone.net, and her username is susan. If her rlogin command matches the entry in the .rhosts file, she is allowed access to the system. No password is required.The .rhosts file is formatted as follows:
hostname username
The hostname should be the FQDN of the host, not the short host name. For example, use:
we-24-130-10-205.we.mediaone.net
www.syngress.com

Avoiding Sniffing Attacks through Encryption • Chapter 7 |
369 |
instead of:
we-24-130-10-205
The username must be an account on the system. If a user account exists for this username on the system, the user can access all user accounts except root.
As mentioned earlier, for Susan to log in remotely, the root user of the remote host must create a .rhosts file in the $HOME/susan directory with her host name and username. For example, if Susan’s machine were host name we-24-130-10-205.we.mediaone.net, the root user would enter the following:
we-24-130-10-205.we.mediaone.net susan
When Susan is ready to access the remote host, she would enter the following rlogin command:
rlogin –l susan we-24-130-8-170.we.mediaone.net
where we-24-130-8-170.we.mediaone.net is the remote host.The -l option indicates the account used for the login, which is susan.
This method is not secure because the host name and username are sent to the remote host for authentication in clear text.This method opens the remote host to IP spoofing, DNS spoofing, and routing spoofing.
Because of these security vulnerabilities, it is recommended that you disable the r-command utilities.This process was discussed in Chapter 2,“Hardening the Operating System,” using the /etc/xinetd.d directory and commenting out the associated text files.The /etc/xinetd.d directory makes it simple to disable services that your system is not using. For example, you can disable the rlogin and rsh services by commenting out the rlogin and rsh entries in the respective file and restarting the service. If the service is commented out, it will not restart. Once disabled, no one can access the machine via the r-command utilities.
1.To disable rlogin, you must edit the /etc/xinetd.d/rlogin file. Open the rlogin file, as shown in Figure 7.12, using vi or an editor of your choice.
2.Comment out the service login line by adding a number sign (#) before it:
#service login
3. Write and quit the file.
www.syngress.com
370 Chapter 7 • Avoiding Sniffing Attacks through Encryption
Figure 7.12 Disabling rlogin Using the /xinetd.d/rlogin File
4. Next, you must restart xinetd by entering:
/etc/rc.d/init.d/xinetd |
restart |
|
|
|
Stopping |
xinetd: |
[ |
OK |
} |
Starting |
xinetd: |
[ |
OK |
} |
5.Disable the rsh service using the same method (e.g., edit the /etc/ xinetd.d/rsh and /etc/xinetd.d/rexec files by commenting out the service shell line).
NOTE
The rexec service is another r-command tool that provides authentication based on usernames and passwords for remote execution purposes. It is disabled by default.
6.To provide additional security, disable the Telnet service using the same method (e.g., edit the /xinetd.d/telnet file by commenting out the service telnet line).
7.Restart xinetd.
You have disabled the remote client programs that send information without encryption. Because these programs are vulnerable to attacks, they should be replaced entirely by SSH.The following sections demonstrate how SSH replaces these programs.
www.syngress.com

Avoiding Sniffing Attacks through Encryption • Chapter 7 |
371 |
Secure SSH Authentication
SSH is based on public-key cryptography.Versions before SSH 2.0 use RSAbased authentication.Version SSH 2.0 and later use the unpatented DSA instead. Public-key cryptography uses private and public keys to ensure authentication. The private key is only known by the user, and the public key is available to everyone else, such as the remote host.
SSH can create a DSA private/public key pair for a user by using the ssh-keygen -d command. In SSH 2.0, the private DSA key is stored in the $HOME/.ssh/id_dsa file.The public key is placed in the $HOME/.ssh/id_dsa.pub file.The public key should be renamed and copied to the $HOME/.ssh/ authorized_keys2 file on the remote system.The authorized_keys2 file contains one public key per line.
NOTE
The $HOME/.ssh/authorized_keys2 file on the remote host is the SSH equivalent to the $HOME/.rhosts file used for the r-commands. Earlier in this chapter, you learned how the .rhosts file is configured to allow a user account to log in remotely using rlogin.
In SSH version 1, RSA authentication is used. An RSA private/public key is created in either OpenSSH version by entering the ssh-keygen command without the -d option.The private key is stored in the $HOME/.ssh/identity file, and the public key is stored in the $HOME/.ssh/identity.pub file of the user’s home directory.The public key should be renamed and copied to the user’s home directory on the remote system, to the $HOME/.ssh/authorized_keys file.
SSH offers password authentication if the public-key authentication fails. It also provides password authentication if public-key authentication is not available. This flexibility allows the password to be encrypted and transmitted over the network so that data integrity persists, even if the public-key authentication does not work.Table 7.2 summarizes the locations of the private and public keys used in SSH.
www.syngress.com

372 Chapter 7 • Avoiding Sniffing Attacks through Encryption
Table 7.2 Public-Key Authentication Locations for SSH
SSH Version |
Local System Default |
|
2 Key |
Location |
Remote Host Location |
|
|
|
Private key |
$HOME/.ssh/id_dsa |
Not applicable |
Public key |
$HOME/.ssh/id_dsa.pub |
$HOME/.ssh/authorized_keys2 |
|
|
|
SSH Version |
Local System Default |
|
1 Key |
Location |
Remote Host Location |
|
|
|
Private key |
$HOME/.ssh/identity |
Not applicable |
Public key |
$HOME/.ssh/identity.pub |
$HOME/.ssh/authorized_keys |
Other important files used to identify public keys on a system are listed in Table 7.3.
Table 7.3 Additional Files Used in SSH
|
SSH File |
Description |
|
|
|
|
|
|
$HOME/.ssh/known_hosts |
Lists the public keys for all the hosts to which |
|
|
|
the user has logged in. The host public keys are |
|
|
|
listed here if they are not listed in |
|
|
|
/etc/ssh_known_hosts. |
|
|
/etc/ssh_known_hosts |
Lists the RSA-generated public keys for all the |
|
|
|
hosts that the system knows. For example, any |
|
|
|
host that logs in to the system should have its |
|
|
|
public key listed in this file. Your network admin- |
|
|
|
istrator should configure this file to list all the |
|
|
|
user public keys in your company. It should be a |
|
|
|
world-readable file, with one public key listed |
|
|
|
per line. |
|
|
/etc/ssh_known_hosts2 |
Same as the ssh_known_hosts file, except it lists |
|
|
|
the DSA-generated public keys for all hosts that |
|
|
|
the system knows. |
|
|
$HOME/.ssh/config |
Configuration file for each user. Each user can |
|
|
|
have a specific configuration file (if needed), |
|
|
|
which is used by the SSH client. |
|
|
/etc/ssh/ssh_config |
Configuration file for the entire system. It is |
|
|
|
world readable and provides values for users |
|
|
|
who do not have a configuration file. This file is |
|
|
|
required for SSHD to start, and is automatically |
|
|
|
generated upon OpenSSH installation. |
|
|
|
|
|
|
|
Continued |
|
www.syngress.com

|
Avoiding Sniffing Attacks through Encryption • Chapter 7 |
373 |
Table 7.3 Continued |
|
|
|
|
|
SSH File |
Description |
|
|
|
|
$HOME/.ssh/rc |
Lists commands that will be executed during |
|
|
user login. These commands are run immediately |
|
|
prior to the opening of the user’s shell. Used to |
|
|
run any required routines (if needed) before the |
|
|
home directory of the user is accessible. For |
|
|
example, AFS may be needed for the user. |
|
/etc/sshrc |
Similar to the $HOME/.ssh/rc file, except it |
|
|
specifies commands that must be run |
|
|
immediately prior to systemwide. It should be |
|
|
world readable. |
|
|
|
|
Implementing SSH to Secure Data Transmissions over an Insecure Network
Before you implement SSH, you need to make sure both the local system and the remote system have SSH installed. It is also a good idea to use SSH 2.0 or later on each system.This ensures that the DSA algorithm is used instead of the RSA algorithm, which is patented in some countries. In the following examples, both systems are running Red Hat Linux 7 with SSH 2.1 installed.Therefore, the DSA algorithm will be used, and no SSH installation is necessary because SSH is built into the operating system.
The ssh-keygen command is used to generate and manage SSH authentication keys.To implement SSH, you must first use ssh-keygen to create a private and public key on the client using either RSA or DSA authentication.The following steps demonstrate how to implement SSH to securely access a remote system.
1.Create a user on the client system. For example, create the user dilbert. Enter:
useradd dilbert
2. Create a password for user dilbert by entering:
passwd dilbert
Changing password for user dilbert
New UNIX password:
Retype new UNIX password:
passwd: all authentication tokens updated successfully
www.syngress.com

374Chapter 7 • Avoiding Sniffing Attacks through Encryption
3.Log on as user dilbert.
4.Generate a public and private key (key pair) for dilbert by entering the following command.
ssh-keygen –d
NOTE
By default, SSH generates an RSA key for SSH 1.3 and 1.5. To generate a DSA key for SSH 2.0, you must specify the -d option when generating the key pair.
5. You will receive the following response:
Generating DSA parameter and key.
Enter file in which to save the key (/home/dilbert/.ssh/id_dsa):
6.Press ENTER to save the key to the default directory and filename (/home/dilbert/.ssh/id_dsa).You will then receive the following response:
Created directory '/home/dilbert/.ssh'.
Enter passphrase (empty for no passphrase):
7.The program requests a passphrase. For this example, do not enter a passphrase.The passphrase is used by 3DES to encrypt the private portion of the private key. A passphrase must be empty for host keys. If you enter a passphrase, do not use simple sentences. Instead, make it at least 10 to 30 characters with numbers, symbols, and letters. Passphrases can later be changed using the -p option. Press ENTER twice for no passphrase.
SECURITY ALERT!
Passphrases are not recoverable. If you forget your passphrase, a new key must be generated. You must then distribute the new public key to all required systems.
www.syngress.com
Avoiding Sniffing Attacks through Encryption • Chapter 7 |
375 |
8. The key generator summary will appear:
Your identification has been saved in /home/dilbert/.ssh/id_dsa. Your public key has been saved in /home/dilbert/.ssh/id_dsa.pub. The key fingerprint is: ca:3b:f9:80:5a:91:e5:c1:1e:5b:30:02:2f:d5:53:13
dilbert@we-24-130-10-205.we.mediaone.net
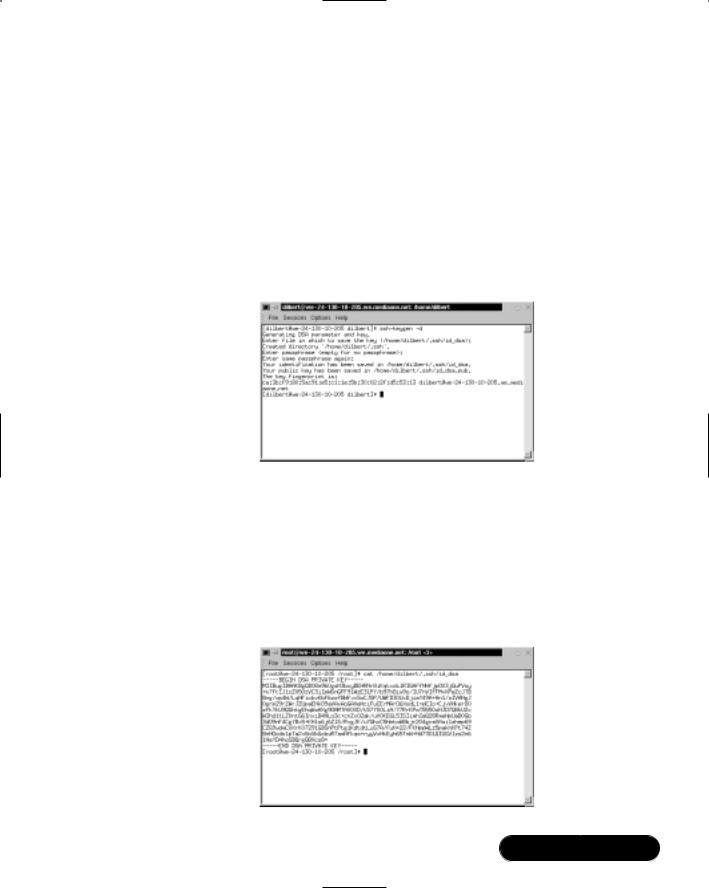
9.The entire key-generation process is shown in Figure 7.13.
Figure 7.13 Generating a Private and Public Key Using the ssh-keygen Command
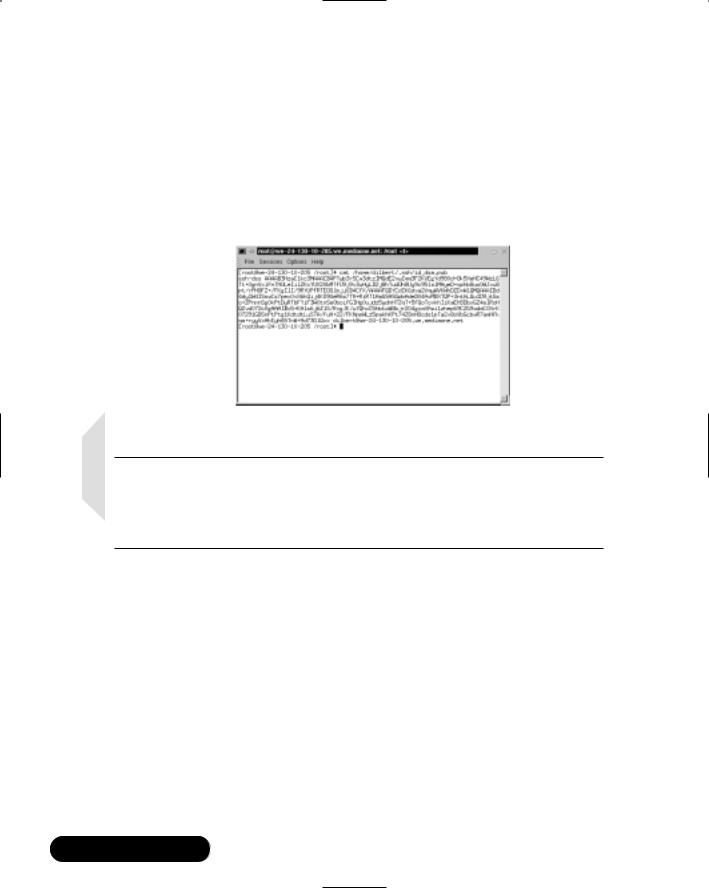
10.You have generated dilbert’s private and public keys.View dilbert’s private key by entering:
cat /home/dilbert/.ssh/id_dsa
The private key will resemble Figure 7.14.The private key must always remain secure on the local system.
Figure 7.14 DSA Private Key for User Dilbert
www.syngress.com
376 Chapter 7 • Avoiding Sniffing Attacks through Encryption
11. View dilbert’s public key by entering:
cat /home/dilbert/.ssh/id_dsa.pub
Dilbert’s public key can be distributed freely. Any system with which dilbert needs to communicate securely will need to obtain his public key. Dilbert’s public key will resemble Figure 7.15.
Figure 7.15 DSA Public Key for User Dilbert
NOTE
You can rename the public key before you distribute it. For example, you can rename it “dilbert.pub.” This is much easier to remember, and will be different from other user public keys created with DSA. You should always rename the public key after you generate a public and private key.
Distributing the Public Key
You must now activate the keys by placing the public key in the proper location on the remote server.The public key can be distributed freely; therefore, you can send it any way you want to the remote host.
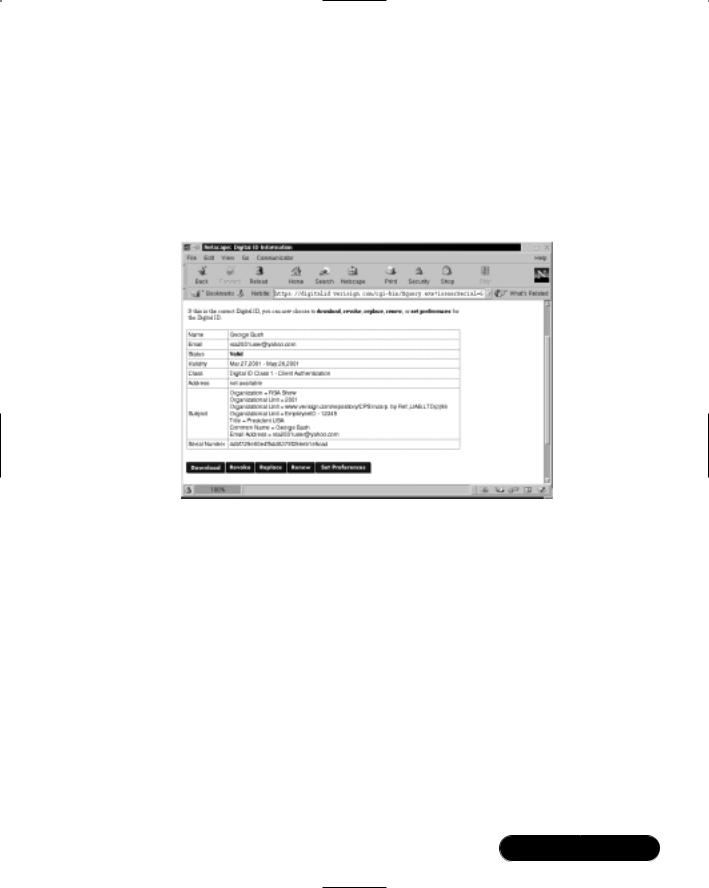
For example,VeriSign offers digital ID services for e-mail clients to transmit e-mail securely.The digital ID is basically a public key with ID information embedded.VeriSign automatically posts the user’s public key on its Web site. Any user who needs to access a public key for a specific user can download the user’s digital ID from the VeriSign Web site at https://digitalid.verisign.com/services/ client/index.html.
Figure 7.16 shows the information for downloading the public key (digital ID) for the user George Bush. It is doubtful that this George Bush is the
www.syngress.com
Avoiding Sniffing Attacks through Encryption • Chapter 7 |
377 |
President of the United States.The U.S. Federal Bureau of Investigations (FBI) would most likely have the President’s public key unlisted, which is an option for all VeriSign users. If you needed to transmit e-mail securely with this user, you would download his public key. He would need to download your public key as well.When both of you had each other’s public keys, you could transmit data to one another securely.
Figure 7.16 Downloading Pubic Keys from the VeriSign Web Site
For this demonstration, you will upload dilbert’s private key to a Web server. The remote host will then download the public key and activate it.The public key is activated when placed into dilbert’s $HOME/.ssh/authorized_keys2 file on the remote system.The following steps demonstrate how to accomplish these tasks.
1.You will upload dilbert’s public key to the Apache Web server on your system. Make sure that Apache is installed by entering:
rpm –qa | grep apache
2.You should receive a response similar to the following if Apache is installed:
apache-manual-1.3.12-25
apache-1.3.12-25
apache-devel-1.3.12-25
www.syngress.com

378Chapter 7 • Avoiding Sniffing Attacks through Encryption
3.If you do not receive a response, you need to download and install Apache.
4.Create a pubkeys directory in the default apache root directory by entering the following:
mkdir /var/www/html/pubkeys
5. Copy and rename dilbert’s public key to this Web directory by entering:
cp /home/dilbert/.ssh/id_dsa.pub
/var/www/html/pubkeys/dilbert.pub
6.You have uploaded the public key to your local Apache server.Verify it is uploaded by opening a browser, such as lynx or Netscape Navigator, and entering:
http://localhost/pubkeys/
The directory contents are listed by default.You should see dilbert.pub listed. If not, confirm the root Web directory in Apache and make sure you copied the public key to the correct directory.
7.Remote Host:You need a second system to be the remote host.We will refer to the first system (the one you just configured) as the client.The remote system in this demonstration is a Red Hat Linux 7 system located on the same network. Log in to the remote host as root.
8.Remote Host:You need to create a dilbert account. Use the same password from the client system. Enter:
useradd dilbert
9. Remote Host: Create a password for user dilbert by entering:
passwd dilbert
Changing password for user dilbert
New UNIX password:
Retype new UNIX password:
passwd: all authentication tokens updated successfully
10.Remote Host: Create a .ssh directory in dilbert’s home directory by entering the following command:
cd /home/dilbert
mkdir .ssh
www.syngress.com
Avoiding Sniffing Attacks through Encryption • Chapter 7 |
379 |
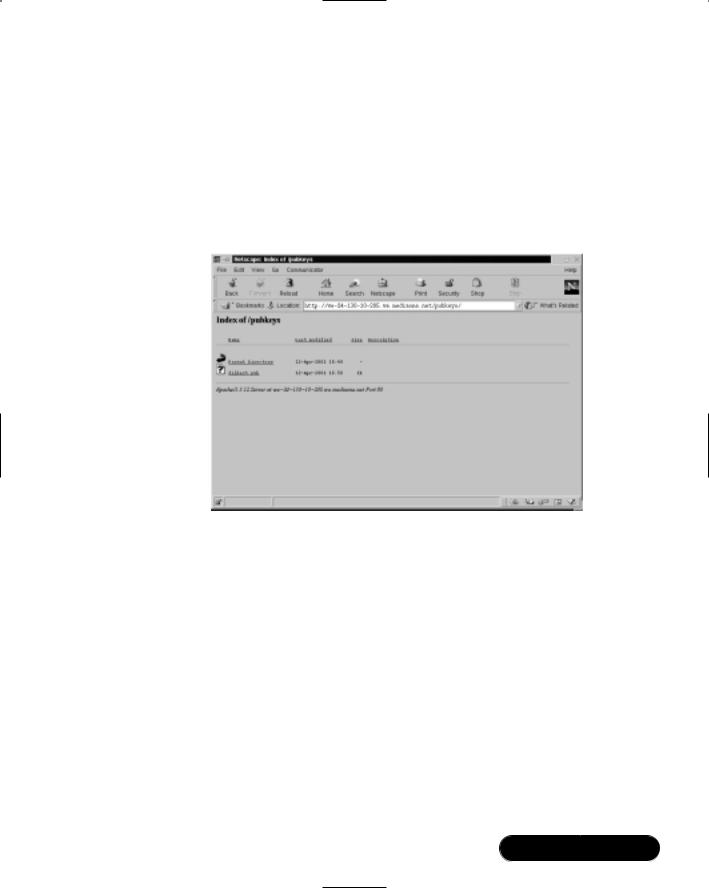
11.Remote Host: Open a Web browser and access dilbert’s public key from the client’s Apache server. Enter the URL of host and the pubkey directory. For example, if you configured Apache on we-24-130-10-205
.we.mediaone.net, you will enter:
http://we-24-130-10-205.we.mediaone.net/pubkey
Your browser window will resemble Figure 7.17 in Navigator.
Figure 7.17 Accessing a Public Key from a Web Site
12.Remote Host: Download the public key to the remote host. For example, save it to the root user directory.
13.Remote Host: Next, you need to copy the contents of dilbert’s public key file to the /home/dilbert/.ssh/authorized_keys2 file.This file does not currently exist.The simplest way to transfer the public key to this file is to copy dilbert.pub and rename it as authorized_keys2. For example, if you downloaded dilbert’s public key to the root user directory, you would enter (from the root user directory):
cp dilbert.pub /home/dilbert/.ssh/authorized_keys2
The authorized_key2 file lists the public DSA keys that can be used for login by the user. Each public key must be listed as one line in the file.The id_dsa.pub file, when viewed in a text editor, is written as one line.Therefore, it is important that the key is copied as only one line when placed in the authorized_key2 file.
www.syngress.com
380Chapter 7 • Avoiding Sniffing Attacks through Encryption
14.Client Host: Physically access the client host.
15.Client Host: Log on as dilbert.
16.Client Host: Log in to the remote host using ssh. If the remote host were we-24-130-8-170.we.mediaone.net, you would enter:
ssh we-24-130-8-170.we.mediaone.net
17. Client Host:You will receive a message similar to the following:
The authenticity of host 'we-24-130-8-170.we.mediaone.net' can't
be established.
DSA key fingerprint is 9a:e6:64:34:d5:fa:f7:e4:e9:fd:b7:e5:95:b0:1e:40.
Are you sure you want to continue connecting (yes/no)?
The message stating “The authenticity of host ‘we-24-130-8- 170.we.mediaone.net’ can’t be established” is a standard message that informs you that a trust relationship has not yet been established.This is standard for the first time a trust is established, and is seen on both the commercial and open versions of SSH.
18.Client Host: Enter Yes to continue connecting.The following warning message appears, indicating that the remote host’s public key is added to the client’s $HOME/.ssh/known_hosts file.You will not receive these warnings when you log in to the remote host in the future, as the trust relationship has been established. It is then followed by a prompt (no password is required due to the key pair):
Warning: Permanently added 'we-24-130-8-170.we.mediaone
.net,24.130.8.170' (DSA) to the list of known hosts.
[dilbert@we-24-130-8-170 dilbert]$
19.Client Host:You will receive a remote host command prompt for dilbert. All data transmitted between your system and the remote host are encrypted.
20.Client Host: Quit the session by entering the exit command.
www.syngress.com

Avoiding Sniffing Attacks through Encryption • Chapter 7 |
381 |
NOTE
If public key authentication fails, or if you are logged on to the client system as a user other that dilbert, ssh will request a password:
dilbert@we-24-130-8-170.we.mediaone.net's password:
Dilbert can securely enter his password for the remote host, since he has an account. His username and password will be encrypted via SSH, so the transmission is still secure. If you are asked for a password, you need to retrace your steps. If public key authentication is set up properly, you will not be asked for a password.
Capturing and Analyzing
Encyrpted Network Traffic
Now that we have created an SSH connection between two hosts, we need to prove that the session is actually encrypted.To prove this, you will capture packets between the hosts during the SSH session.You will attempt to locate any login data, as well as any session data, and then follow the TCP stream.
1.Log in as root to the SSH remote host.
2.Remote Host:To add filters to Ethereal without using host names, open a command interface and enter:
ethereal -n
3.Remote Host: Select the Edit menu and choose Filters.The Ethereal: Filters screen appears.
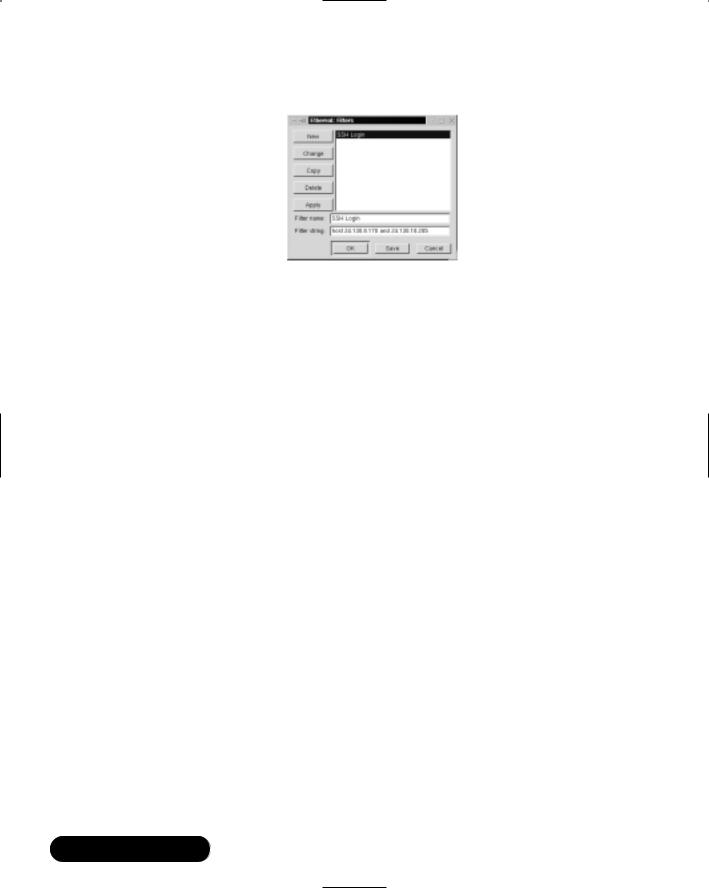
4.Remote Host:To create a filter that allows only traffic between the SSH hosts, you must add a filter name and a filter string. For example, to create a filter between your remote host and a client host at 24.130.10.205, enter the filter name “SSH Login” and filter string shown in Figure 7.18. Please note that your IP addresses will not be the same.You need to select the IP address of your client and remote SSH hosts. After the two fields are complete, you must click Save, and then click New.Your screen will appear similar to Figure 7.18.
www.syngress.com
382 Chapter 7 • Avoiding Sniffing Attacks through Encryption
Figure 7.18 Creating a Filter between SSH Two Hosts
5.Remote Host: Click OK to exit the Filter screen.
6.Remote Host:To start a packet capture, simply select the Capture menu and choose Start.The Capture Preference screen appears. Click Filter and choose the “SSH Login” filter that you created. Click OK twice and the capture starts.
7.Client Host: Physically access the client host and log in as dilbert.
8.Client Host:To generate the SSH login packets, log in into the remote SSH host. For example, to log in to the SSH host at 24.130.8.170, you would enter:
ssh 24.130.8.170
9. Client Host: After you log in as user dilbert (no password is required because of the public key cryptography) on the remote SSH host, enter a simple command to generate data through the connection. For example, enter:
/sbin/ifconfig
10.Client Host: Exit the SSH session by entering the exit command.
11.Remote Host: Physically access the remote host. Stop the Ethereal packet capture by clicking Stop.
12.Remote Host:The packet capture appears in Ethereal. Attempt to locate the SSH data packet that includes the data: password field. Recall the easily identifiable data: password field in the Telnet packet from Figure 7.2.You should not be able to find any Application layer data in the capture.Your screen will appear similar to Figure 7.19.
www.syngress.com
Avoiding Sniffing Attacks through Encryption • Chapter 7 |
383 |
Figure 7.19 Attempting to Locate the SSH Login Session
13.Scroll throughout the packet capture.The only information that can be analyzed is the Layer 1 (Physical) through Layer 4 (Transport) of the OSI reference model.We can discover that the SSH remote host is listening and transmitting on TCP port 22.The SSH client is using TCP port 1023.There are no passwords, usernames, or usable data. Figure 7.20 shows the vast array of worthless TCP packets.
Figure 7.20 Packet Capture of SSH Session
www.syngress.com
384Chapter 7 • Avoiding Sniffing Attacks through Encryption
14.An easier way to discover useful data is to follow the TCP stream.To do this, simply select any packet involved in this SSH connection.
15.Once a packet is selected, select the Tools menu and select Follow TCP Stream. The contents of the TCP stream appear, as shown in Figure 7.21.
Figure 7.21 Following a TCP Stream in SSH
16.The majority of data is encrypted using 3DES (the default symmetric encryption for the session data).The packet sniffer has discovered no useful or usable data by following the TCP stream.
17.Save the packet capture as secssh, and quit Ethereal.
www.syngress.com
Avoiding Sniffing Attacks through Encryption • Chapter 7 |
385 |
Summary
In this chapter, we discussed network encryption, and why it is essential to the security of your network. Network encryption ensures that data sent across a network from one host to another is secure. If a sniffer intercepts the data, it is unusable because the data is encrypted.Therefore, a hacker cannot view any usernames or passwords, and any information sent across the network, such as confidential data, is safe.
To display the problems associated with unencrypted data transmission, you captured unencrypted network traffic and analyzed it for security vulnerabilities. You learned that rlogin, rsh, and Telnet are three notoriously unsafe protocols. They do not use encryption for remote logins or any type of data transmission. You discovered that Telnet sends each password character as a separate packet. If you continue to scroll down the packet capture and view each Telnet data packet, you will discover the password. An easier way to discover the Telnet password is to follow the TCP stream.The username and password are displayed in clear text, as well as all of the data contained in the transmission.
To solve this problem, you learned how to encrypt network traffic with OpenSSH. OpenSSH (www.openssh.org) is an open source program that encrypts all traffic between hosts. It is a secure replacement for common Internet programs used for remote connectivity, such as Telnet, rlogin, and FTP. Because it encrypts all traffic, it always hides usernames and passwords used for remote logins.After the login occurs, it continues to encrypt all data traffic between the hosts.
You implemented secure data transmissions using OpenSSH over an unsecured network.This required ensuring that OpenSSH was installed on two different hosts. One system was the SSH remote host, and the other was the SSH client. SSH provides authentication by creating a private/public key pair for a user by using the ssh-keygen command. In SSH 2.0, the private DSA key is stored in the $HOME/.ssh/id_dsa file.The public key should be copied and stored in the $HOME/.ssh/authorized_keys2 file on the remote system.The authorized_keys2 file contains one public key per line. SSH 2.0 sessions are encrypted using ArcFour, CAST128, Blowfish, or 3DES. Data integrity is ensured using hmac-md5 and hmac-sha1. SSH 2.0 is superior and should be used whenever possible.
Last, you captured an SSH session and analyzed it for security vulnerabilities. The only information that could be analyzed was the Layer 1 (the Physical layer) through Layer 4 (the Transport layer) of the OSI reference model.The login data was unreadable, and the majority of data was encrypted using 3DES (the default
www.syngress.com

386 Chapter 7 • Avoiding Sniffing Attacks through Encryption
symmetric encryption for the session data).The packet sniffer discovered no useful or usable data by following the TCP stream. As you can see, OpenSSH is essential and should be a permanent replacement for Telnet, rsh, and rlogin.
Solutions Fast Track
Understanding Network Encryption
;Network encryption is used for any data transfer that requires confidentiality. Encryption ensures that data sent across a network from one host to another is unreadable to a third party.
;Rlogin, remote shell (rsh), and Telnet are three notoriously unsafe protocols.They do not use encryption for remote logins or any type of data transmission. If a malicious hacker captured this traffic, it would display the data, such as usernames or any passwords, in clear text.
Capturing and Analyzing
Unencrypted Network Traffic
;You can capture packets during a Telnet login session using the open source packet sniffer Ethereal. Once the session is captured, you can locate the Telnet data packet that includes the data: password field.
;Another way to discover the Telnet password is to follow the TCP stream.To do this, simply select any packet involved in this Telnet connection, then select the Tools menu, and select Follow TCP Stream in Ethereal.The username and password are displayed in clear text.
Using OpenSSH to Encrypt
Network Traffic between Two Hosts
;OpenSSH encrypts all traffic between two hosts using Secure Shell (SSH). It is a secure replacement for common Internet programs used for remote connectivity, such as Telnet, rlogin, and rsh.
;It features strong encryption using Triple Data Encryption Standard (3DES) and Blowfish, as well as strong authentication using public keys, one-time passwords (OTPs), and Kerberos Authentication.
www.syngress.com

Avoiding Sniffing Attacks through Encryption • Chapter 7 |
387 |
Installing and Configuring Secure
Shell on Two Network Hosts
;OpenSSH implementations are significantly different between operating systems.The OpenSSH Portability Team uses the OpenBSD OpenSSH code to develop portable versions for other operating systems.You must make sure a specific version exists for your operating system at www.openssh.org.
;The method for implementing SSH combines similar r-command concepts with a private and public key method.
;SSH can create a DSA private/public key pair for a user by using the ssh-keygen -d command. In SSH 2.0, the private DSA key is placed in the $HOME/.ssh/id_dsa file.The public key is placed in the $HOME/.ssh/id_dsa.pub file.The public key should be renamed and copied to the $HOME/.ssh/authorized_keys2 file on the remote system.
Implementing SSH to Secure Data
Transmissions over an Insecure Network
;Both hosts must have SSH installed to transmit data securely, such as the SSH implementation.
;You must first use ssh-keygen to create a private and public key on each host using either RSA or DSA authentication.Then, distribute the public key to the host with which you wish to communicate, and vice versa.
;To establish the connection using SSH, the ssh command is used in the format ssh remotehost. Remotehost is the name of the host you will connect to using SSH.
Capturing and Analyzing Encrypted Network Traffic
;You can capture packets between two hosts using an SSH session to determine if the data is secure. For example, you can attempt to identify any login data, as well as any session data.
;Using Ethereal, or any packet-capturing program, you will find that all Application layer data is encrypted. No passwords, usernames, or usable data is displayed. Following a TCP stream is fruitless. Only the TCP ports are displayed in the capture.
www.syngress.com

388 Chapter 7 • Avoiding Sniffing Attacks through Encryption
Frequently Asked Questions
The following Frequently Asked Questions, answered by the authors of this book, are designed to both measure your understanding of the concepts presented in this chapter and to assist you with real-life implementation of these concepts. To have your questions about this chapter answered by the author, browse to www.syngress.com/solutions and click on the “Ask the Author” form.
Q:I am receiving warning messages regarding key lengths.What do these messages mean, and how can I prevent them?
A:The key-length warning messages you see are sent by OpenSSH when it encounters certain defective RSA or DSA keys that are sometimes generated by a bug in the ssh-keygen program (in commercial SSH).These defective keys are Pubkey Authentication keys whose Most Significant Bit (MSB) is not set.Thus, these keys are frequently half as long as advertised (they advertise as full length).The warning messages alert you that OpenSSH has detected this type of defective key.
You can prevent this type of warning message by editing the known_hosts file. Find the entry listing the incorrect key length value (often 1024), and change the entry to list the correct key length value (generally 1023).
Another solution is to simply create new keys.This approach is preferable because even after correction, the modified keys are generally less secure.
Q: Why did I lose support for SSH2 after I upgraded to OpenSSH 2.5.1?
A:When you upgrade OpenSSH versions, your sshd_config or ssh_config programs may incur some modifications. It is advisable to verify the settings in these files whenever you upgrade OpenSSH. If you are upgrading from OpenSSH 2.3.0 to 2.5.1, you can add:
HostKey /etc/ssh_host_dsa_key
to your sshd_config file.This modification will retain your SSH2 support.
Q: Why does it take so long for SSH to connect with Linux glibc 2.1?
A:The Red Hat Linux 6.1 implementation of glibc offers a universal “IPv6 or IPv4” resolution capability. Although this feature can be convenient, it
www.syngress.com

Avoiding Sniffing Attacks through Encryption • Chapter 7 |
389 |
requires more time to resolve IP addresses from domain names because it must make the IP version determination on a case-by-case basis.
To speed up resolution, you can use the --with-ipv4-default configure option.When you enter this option, OpenSSH will resolve only IPv4 addresses. Similarly, you can use the -6 option to instruct OpenSSH to resolve only IPv6 addresses.
Q:Why does SSHD or “configure” sometimes state they do not have support for RSA or DSA?
A:Your OpenSSH libraries must be constructed to include this support.You can verify that RSA and DSA are supported in your program files by checking internally or by using the RSAref.
Q:The configure file is missing from my distribution, and the make command fails when executed.Why?
A:If you receive a missing separator error when the make command fails, or you are missing the configure file in your downloaded tar.gz, you probably have the same problem:You may be trying to compile the OpenBSD distribution of OpenSSH on a platform other than the one you used to download it.You must use a portable version of OpenSSH in order to do this without error.
Q: OpenSSH hangs when I exit SSH.Why?
A:Linux and HP-UX systems have been noted to hang when exiting OpenSSH.This bug appears in current OpenSSH versions, and occurs primarily when a background process is active.You can enter sleep 20&exit to test for this problem.The man page for your shell should list an option you can use to send a HUP signal to active processes upon exit. Bash users can use the following entry in either /etc/bashrc or ~/.bashrc:
shopt -s huponexit
www.syngress.com