


Chapter 11
Maintaining
Firewalls
Solutions in this chapter:
■Testing Firewalls
■Using Telnet, Ipchains, Netcat, and SendIP to Probe Your Firewall
■Understanding Firewall Logging, Blocking, and Alert Options
■Obtaining Additional Firewall Logging Tools
;Summary
;Solutions Fast Track
;Frequently Asked Questions
543

544 Chapter 11 • Maintaining Firewalls
Introduction
Regardless of the type of firewall you deploy, you will have to test and maintain it carefully.You need to actively monitor your firewall so that you can discover scanning attacks, connection attempts, and general weaknesses. Of course, you will have to scan your firewall to ensure that all extraneous ports and daemons are closed.You can use a scanner such as Nessus (www.nessus.org) to do this. However, even an application such as Nessus cannot implement the specific attacks necessary to truly test your firewall. In this chapter, you will learn about how to properly test and log activity.You will be able to verify that the firewall is working, make intelligent changes on demand, and generate useful reports.
This chapter focuses on applications such as Telnet, Netcat, and SendIP, and Nmap to query the firewall. Doing so will help you determine if your firewall is truly protecting your network. Just one accidental omission of a rule can open a hole that could allow a hacker into your network.
You may never know that a hacker has entered your network unless you carefully monitor your firewall logs. Doing so is sometimes an unglamorous, thankless job. However, using applications such as Firedaemon and Fwlogwatch, both of which are profiled in this chapter, you can receive automatic alerts. Fwlogwatch can even automatically reconfigure your firewall for you in case of a scanning attack. Even if you choose to not automatically block traffic, using the testing and logging tools discussed in this chapter you can maintain your firewall so that it is blocking and allowing the right traffic for your business.
Testing Firewalls
Before you can start logging access to your firewall, you need to ensure that you have configured it correctly in the first place. Even if you have extensive experience configuring firewalls, you will have to test your implementation when you first install it. In fact, experienced professionals know that they have to continually test a firewall to ensure that it is properly configured, and that its current configuration protects the network. It is not enough to just check or read the Ipchains/Iptables rules and then think that you have properly tested the firewall. You need to actively send packets and monitor your firewall and internal network to be sure.
Before you learn about applications that can help you test your firewall, you first need to consider some of the actual attacks, problems, and issues to look for. When testing your firewall, consider the following:
www.syngress.com

Maintaining Firewalls • Chapter 11 |
545 |
■Internet Protocol (IP) spoofing Many hackers outside of the firewall try to imitate internal network hosts in order to bypass authentication.
■Open ports/daemons Many firewalls and/or routers allow unnecessary ports to remain open, which can expose your firewall to threats unnecessarily.
■Monitoring system hard drives, RAM, and processors If your firewall runs out of disk space, or begins to run low on memory, your network may become incapacitated. Check your server’s performance regularly using standard tools (df, vmstat, top, and so forth).
■Suspicious users, logins, and login times Even if you allow only interactive login at your firewall, monitor it carefully to determine who has logged on. It is vital that you know exactly who is controlling the flow of packets on your network.
■Check the rules database One of the common moves by a hacker is to alter the rules database in subtle ways that make it easier for the hacker to gain access to the network. Check your rules and compare them carefully to ensure that no unauthorized changes have occurred.
■Verify connectivity After you have configured or reconfigured your firewall, make sure that these changes do not cause problems for management and employees.
■Remain informed concerning the operating system Bugs may be discovered in the kernel and/or daemons that you are using. If you do not keep current concerning the tools you are using, you may end up exposing yourself to hackers.
■Port scans If you are relatively new to securing firewalls, you will be amazed to find out how many times your firewall will be scanned. Logging all scans can consume an unnecessary amount of hard drive space and processor time. Still, the proper amount of logging will help you remain informed and will help you document scans that may be preludes to an attack.
Following is a more detailed discussion concerning each of these issues.
www.syngress.com

546 Chapter 11 • Maintaining Firewalls
IP Spoofing
Your firewall should not allow any packets to pass from outside the network into your internal network if the source address is the same as any host in your internal network. Suppose, for example, that your external network interface card (NIC) has the IP address of 128.1.2.3.4/16, and your internal NIC has the address of 192.168.1.0/24.You then need to find a way to test your firewall to see if any traffic is passing through the external interface from, say, the 192.168.1.1 IP address.
If such packets are able to traverse your firewall, then a hacker can configure his or her system to use your firewall as a default gateway and participate on your network. Leaving your packet-filtering firewall open to spoofing attacks largely obviates the reason for having a firewall, so you should take every step to test exactly what your firewall drops and allows. If you require, for example, your end users to have access to the World Wide Web, you will find that it is necessary to allow ephemeral ports (any port over 1023) to access the Internet. However, if you are using private IP addresses (e.g., the 192.168.45.0 network), no system outside of the firewall should ever be able to assume this IP address and access your internal network’s ephemeral ports.
Open Ports/Daemons
Your firewall should be as secure as possible. Disable all unused services and configure the used ones with security in mind. If you are running Squid or another proxy server on the firewall, make sure that only this port is open. Daemons such as Telnet, File Transfer Protocol (FTP), Hypertext Transfer Protocol (HTTP) and others should be shut down in almost all situations. In many situations, you may require the ability to remotely administer your firewall. Still, consider disabling all login to the outside interface.
In many situations, it is best to allow only interactive logins at your firewall. This way, you need only secure the firewall’s physical security. If you must, use only a relatively secure login application, such as Secure Shell (SSH).You could also consider Kerberos, although this requires you to open several additional ports. Even using one-time passwords (OTP) at the firewall is a solution, although the use of OTP does not encrypt the data that subsequently passes from your system to the router. If you do need to leave certain ports open, be prepared to conduct regular scans of your firewall to test the daemons listening on these ports. As suggested earlier, applications such as Nessus (www.nessus.org) are ideal in this type of situation.
www.syngress.com

Maintaining Firewalls • Chapter 11 |
547 |
Monitoring System Hard
Drives, RAM, and Processors
Firewall logs can consume hard drive space, especially in busy networks. If you configured your firewall to log both accepted incoming and outgoing access, you will find that your log files will grow very large in a short period of time.You may need to cut back on your log settings. However, if you cannot do this, regularly use the df -h command to discover the total amount of hard drive space you have left.You could, for example, create a simple crontab entry that sends you this information automatically every Monday at 8:05:
5 8 * * mon df -h | mail -s "HDRIVE"
security.manager@yournetwork.com
Of course, keeping the cron daemon enabled on your firewall can present its own problems, because it will require you to ensure that this daemon is not subject to bugs that can cause a security problem. Any daemon, such as Cron, that acts automatically can cause problems if misconfigured, so carefully review all default scripts, and you will be in good shape. It is an additional service, after all. You will have to make the decision yourself.
Following is a quick overview of standard Linux tools that can help you determine if your system is becoming overburdened:
■vmstat Informs you about the amount of random RAM and virtual RAM used on the system.
■top Used to inform you about the processes that occupy the largest percentage of CPU time.The busiest processes rise to the top of the display.The Gtop and Ktop applications, both available from www.rpmfind.net, are graphical versions that are somewhat easier to use than the original.
Suspicious Users, Logins, and Login Times
Use the who and last commands to learn about who has logged in to the firewall. In addition, manually check the /etc/passwd and /etc/shadow files to determine if any users have been added. An application such as Tripwire can be extremely helpful if you wish to remain informed about any changes to such files.
www.syngress.com

548 Chapter 11 • Maintaining Firewalls
Check the Rules Database
Determine if any unauthorized changes have been made to your database.When you first created your firewall, you should have created a backup using either the ipchains-save or iptables-save commands. Use the diff command to compare the two files to see if any changes have occurred.You may also use md5 to generate fingerprints of the configuration files to see whether any unauthorized changes have been made to them.
Truly talented hackers are interested in entering a network and then controlling it without your knowledge. Accordingly, many will deactivate certain logging rules on your firewall, and then activate them again. If you leave the ipchains or iptables commands on your system, this will be very easy.To at least slow down the hacker, try removing these applications from the system.This way, the hacker will at least be forced to install these applications on your system before he or she can manipulate it. If you have Tripwire installed, you will then be informed of massive changes to the hard drive.
Verify Connectivity with Company
Management and End Users
After you install your firewall, check with various managers and employees to ensure that your firewall rules are working properly.You may have to further adjust your firewall to ensure that the right services are available to the company. You may have to inform people about certain services that are no longer available by design. Otherwise, you will receive help desk calls informing you that service has been interrupted.
Employee education is often necessary whenever you make any changes to the firewall. Otherwise, you will receive complaints that the network is “down,” when in fact it is behaving according to your design. In order to cut down on ill will and employee frustration, find ways to carefully and tactfully inform employees concerning changes. Consider the following suggestions:
■Contact management and make sure that they understand and agree with the changes you are making.
■Many times, upper management will ask for certain changes and not quite understand how this will affect the end user. Decisions to cut off certain services (e.g.,Web traffic, or access to outside Post Office Protocol v3 [POP3] accounts) may negatively affect the company’s ability to conduct business, or may cause unnecessary problems with
www.syngress.com

Maintaining Firewalls • Chapter 11 |
549 |
employee morale. Make sure that upper management understands the ramifications of any suggestions they make.
■Warn employees before any changes to the security policy/firewall rules will occur.
■Remind employees that changes have occurred.
■Use e-mail, word of mouth, and employee area bulletin boards to remind people about changes.
Remain Informed Concerning the Operating System
New bugs are found every day in any operating system. It is possible that a bug may be found in Ipchains/Iptables or the kernel that could be exploited. If you do not subscribe to the appropriate mailing lists (see www.cert.org and www.sans.org), you should. It is also likely that the version of Linux you are using has a newsgroup associated with it.
The following are some additional strategies:
■Join mailing lists associated with your operating system.
■Carefully consider upgrades. Update only when you are certain that an upgrade enhances both your system’s security and functionality. Do not
upgrade simply because an upgrade exists. Just because an upgrade offers a new feature does not mean that this upgrade will allow your system to remain secure. Added features often add complexity to your system, and such changes open a security hole unless you take the time to properly study the changes and alter your system’s configuration.
■Network with fellow systems administrators. Share your concerns and solutions with others.You will find that doing so will greatly increase your awareness of the many security solutions that exist.
Port Scans
Ipchains/Iptables-based firewalls are classic examples of packet-filtering firewalls. This type of firewall has traditionally been vulnerable to scanning attacks; they can simply allow scans to occur without informing anyone, because packet filters generally do not pay attention to Transmission Control Protocol (TCP)-based connections.They are interested, rather, in filtering out IP addresses and ports
www.syngress.com
550 Chapter 11 • Maintaining Firewalls
(i.e., they pay attention to the Network layer of the Open System Interconnection Reference Model OSI/RM).
The introduction of log analysis software such as Firelogd and Fwlogdaemon have made it possible to detect and block such scans, all the while sending an alert to the systems administrator.This type of software can help reduce a firewall’s exposure to distributed denial-of-service (DDoS) attacks, because it helps the firewall completely drop certain hosts. However, this strategy introduces new problems, because it is possible for attackers to spoof source IP addresses and assume the identity of hosts you trust.The result is that hackers can use your own strategies against you and make your own software conduct a DoS attack against you by blocking your network from its own Domain Name System (DNS) servers, default gateways, and other hosts that you trust implicitly. However, most adjunct software, such as Fwlogwatch, provides ways to exclude trusted hosts from being blocked.You will learn more about this later in this chapter.
NOTE
As long as unencrypted, non-IPsec versions of IPv4 remain the most commonly used version of the Internet Protocol, spoofing will remain a fact of life. If you find that spoofing attacks keep occurring against your network, you can take the following actions:
■Edit the configuration files of your log-watching software and increase thresholds to eliminate false positives.
■Carefully manage any Ipchains/Iptables entries created by your log-scanning software so that sensitive hosts are not blocked.
These strategies are ways that you can mitigate and manage spoofing attacks, as opposed to eliminating them, because until all systems use IPSec or move to IPv6, there is really no way to completely eliminate them. Even when IPSec and/or IPv6 become common, it is likely that hackers will find newer and cleverer ways to spoof these protocols as well.
Using Telnet, Ipchains, Netcat, and SendIP to Probe Your Firewall
Now that you understand what to look for, you can use the following tools to help you:
www.syngress.com

Maintaining Firewalls • Chapter 11 |
551 |
■Rule checkers Although Iptables does not support rule checking, the ipchains -C command allows you to check how your existing rule set
operates. It will return information as to whether the packet is dropped or accepted. It is up to you to act on this information.
■Port scanners A simple port scan can help you determine which ports are left open on your firewall. Using applications such as Telnet and Netcat, you can then determine what daemon is listening behind that port.
■Packet generators Using applications such as SendIP, you can generate packets designed to test whether your firewall rules are working properly.
Following is a discussion of some tools that allow you to quickly test your firewall rules.
Ipchains
The ipchains -C option allows you to send packets to test whether the rules you have created work properly. Iptables does not have the equivalent, as of this writing.When checking Ipchains rules, you simply place -C (make sure you use the uppercase C) in front of the rule.The --check and -C options, by the way, are equivalent.You will be informed if the packet is blocked. For example, suppose you create the following rule in Ipchains:
ipchains -I input -i eth0 -s 0/0 -d 0/0 -p icmp -j DENY
To test this rule, you would issue the following command on the same system:
ipchains -C input -i eth0 -p icmp -s 0/0 1 -d 0/0 1
Ipchains will then inform you that the packet is denied.This tool is handy if you are logged in to the same system as you are testing, and you are becoming familiar with the existing rules and wish to send out packets that test how the rules are working.
Telnet
More universal testing methods exist.The humble Telnet application is still useful when testing a firewall. Do not use it for logging on, however.You can use it to test whether a certain firewall rule is running the way you think it should. For
www.syngress.com

552 Chapter 11 • Maintaining Firewalls
example, suppose that you allow all access but that which is explicitly denied by a rule, and that you have configured the following firewall rule in Iptables:
iptables –A INPUT –i eth0 –s 0/0–p tcp --dport 80 –j LOG
iptables –A INPUT –i eth0 –s 0/0–p tcp --dport 80 –j REJECT
You can use your Telnet client to see whether it is working properly by specifying the port you are blocking and logging:
prompt$ telnet firewall.yournetwork.com 80
You can then view the log by using the tail command to read the file where your system stores kernel messages. For the sake of convenience, use tail’s -f option so that you can view results as they happen:
tail -f /var/log/messages
Using Multiple Terminals
If you have logged in to the firewall interactively, it is often useful to open two terminals.You can use the first terminal to issue the telnet command, and you can use the second terminal to view the results in the /var/log/messages file.
Remember that if you specify more complex logging options, and then send too many packets, the kernel will stop logging traffic after a certain period of time (three logging instances an hour, with only the first five packets logged). If you do not remember this, you may make the mistake of thinking that a certain rule is not working, when in fact it really is.
Netcat
You are not limited to using Telnet. One commonly used firewall testing application is Netcat, available at www.l0pht.com/~weld/netcat/ and packetstorm.securify.com. Netcat is quite versatile, and is the self-described “Network Swiss Army Knife.” Hackers and systems administrators alike use it as a tool to conduct scans, communicate with open ports, and even transfer information between hosts.
Because it is so versatile, it can also be used against you, so if possible, you should install this application only on a client system, rather than on the router.This is because it can be used to open a back door on your system. Still, careful use of the application can allow you to quickly audit your firewall.
Used in the simplest way, Netcat is much like a Telnet client, because it can be used to access any remote host at any port.To connect to the host named fire-
www.syngress.com

Maintaining Firewalls • Chapter 11 |
553 |
wall.yournetwork.com at port 80, you would issue the following command:
./nc firewall.yournetwork.com 80
You will then have to press CTRL+C to exit the program. If the port is open, you can then enter any command you wish. As far as port 80 is concerned, you can just enter some gibberish once a connection is made, and the Web server will return an error message, which usually includes the name of the Web server. Chances are, the port will not recognize your command, but for the purposes of testing a firewall, you usually want to just see if a port is open and listening.The netcat -h command provides a list of all available options, which are listed in Table 11.1 for your reference:
Table 11.1 Netcat Options
|
Option |
Description |
|
|
|
|
|
|
-i value |
Tells Netcat to delay sending packets for a certain number of |
|
|
|
seconds. For example, to have Netcat wait five seconds between |
|
|
|
scanning ports, you would specify -i 5. |
|
|
-n |
Has Netcat report information using only IP addresses. This option |
|
|
|
is helpful when conducting ping scans, or if you do not have any |
|
|
|
DNS support. |
|
|
-p value |
A port spoofing option. Allows you to specify the port number of |
|
|
|
the packet being sent. For example, to have a packet appear as it |
|
|
|
were sent from port 53 of a host, you would enter -p 53. |
|
|
-r |
Allows you to have Netcat scan ports at random, instead of simply |
|
|
|
one after the other. |
|
|
-s value |
Spoofs the source address of a packet. This option does not work |
|
|
|
on all systems, however. |
|
|
-u |
Netcat defaults to sending TCP packets. This option allows you to |
|
|
|
send User Datagram Protocol (UDP) packets, instead. |
|
|
-v |
Verbose mode. Reports additional information about the connec- |
|
|
|
tions you are making. If you specify -v twice (-v -v), you will |
|
|
|
receive twice the amount of information. |
|
|
-w value |
Sets the time (in seconds) that Netcat will wait at a responding |
|
|
|
port. This option is often combined with -z. |
|
|
-z |
Called “zero-I/O mode,” this option has Netcat forbid any i/o from |
|
|
|
the source system. If you do not use this option, Netcat will |
|
|
|
|
|
|
|
Continued |
|
www.syngress.com

554 Chapter 11 • Maintaining Firewalls
Table 11.1 Continued
Option |
Description |
|
|
|
“hang” indefinitely at a port that responds. This option is mostly |
|
applicable when using Netcat as a scanner. |
-l |
Has Netcat open a listening port. Used with additional options, it |
|
is possible to bind a root shell to this listening portlisten mode, |
|
which can lead to security problems. |
|
|
Sample Netcat Commands
To use Netcat in a more sophisticated and helpful way, you must use the following syntax:
nc [-options] hostname port[s] [ports]
For example, if you wish to scan ports 1 through 1023 of your firewall and ensure that Netcat will not “hang” at any ports, you could issue the following command:
./nc –z –w 2 –v –v firewall.yournetwork.com 1-1023
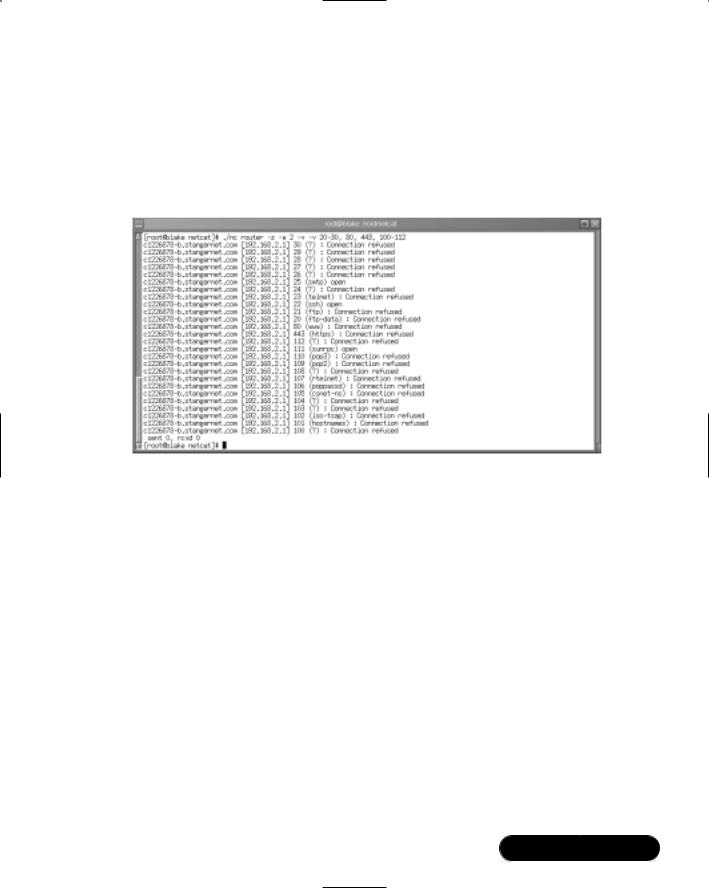
The -z and -w 2 options tell Netcat to not bind a port, and to wait only two seconds in case a connection is accidentally made.The two -v options place Netcat into ultra verbose mode. It is likely, though, that only certain groups of ports will be open on an unsecured firewall. For example, the following command scans only certain ports and groups of ports:
./nc –z –w 2 –v –v firewall.yournetwork.com 20-30, 53, 80, 100-112, 443,
6000-6050
Analysis of Netcat Scan
The preceding scan searches for ports associated with several protocols, including:
■FTP (20 and 21)
■SSH (22)
■Telnet (23)
■DNS (53)
■WWW (both 80 and 443)
www.syngress.com
Maintaining Firewalls • Chapter 11 |
555 |
■X (ports in the 6000 range)
Figure 11.1 shows the results of a scan against a router that has left several ports open.
This firewall, for example, still allows connections to Simple Mail Transfer
Figure 11.1 Scanning an Open Router
Protocol (SMTP), the sunrpc portmapper service (port 111), and X.You can, of course, specify additional ports. For example, the ranges of 20 through 00 and 5900 through 7000 can reveal commonly used ports. Consult your /etc/services file for more ideas.
Additional Netcat Commands
When compiled properly, Netcat can also spoof IP addresses. If you wish to spoof the source IP address, you would use the -s option:
./nc -s 10.100.100.1 –z –w 2 –v –v firewall.yournetwork.com 20-30, 53,
80, 100-112, 443, 6000-6050
However, you should note that the -s option does not work well on some operating systems. Because Netcat defaults to TCP, you can use the -u option to send a UDP packet to a port:
www.syngress.com

556 Chapter 11 • Maintaining Firewalls
UDP Scans
./nc –u –w 2 firewall.yournetwork.com 80, 443
You will have to press ENTER twice to finish the command. Depending on the rules you have set (you will have to explicitly log UDP using either the -l option in Ipchains or the -j LOG target in Iptables), your firewall will log this traffic.
Testing Source Ports
If you have set a firewall rule to deny a particular source port, you can test it with Netcat. For example, if you have prohibited all hosts from accessing ports 1 through 1023 of an interface, you can test this by issuing the following command:
./nc -p 80 –w 2 –v –v firewall.yournetwork.com 1-1023
Tools & Traps…
Additional Netcat Features
If you wish to have Netcat open a shell and listen for inbound connections (this is definitely not recommended in most circumstances), you would use the following syntax:
nc -l -p port [-options] [hostname] [port]
In addition, Netcat ships with several scripts and applications. Some of these are geared toward the hacker community, while others offer quick solutions to common problems. Most of them are less practical than they are interesting. For example, if you want to test port redirection, you can use the webproxy and webrelay applications found in the scripts directory.
You can learn more about using Netcat in this way by reading the README file that comes with the source code. For those who are truly curious about using Netcat to open up listening connections, a patch exists that allows you to authenticate and encrypt traffic that streams between versions of Netcat running on opposite servers. Called aes-netcat, you can download it from packetstorm.security.com and other sites.
www.syngress.com

Maintaining Firewalls • Chapter 11 |
557 |
Testing DNS Connectivity
Many times, you will want to allow UDP and TCP access from and to port 53, in case a domain zone transfer needs to be made.To test whether this port is open, you would issue the following commands:
./nc -p 53 –w 2 –v –v firewall.yournetwork.com 53
./nc –u -p 53 –w 2 –v –v firewall.yournetwork.com 53
You can also scan a range of ports using Netcat. If, for example, you wished to scan ports 1 through 1023, you would issue the following command:
./nc firewall firewall.yournetwork.com 1-1023
Exercise: Using Netcat
1.Create a new directory named netcat and change into it.This step is necessary, because the tarball will deposit many different files into the destination directory.
2.Obtain Netcat version 1.10 from the CD that accompanies this book (the file name is nc110.tgz), or from http://packetstorm.securify.com. Just enter netcat in the search field.When you save the tarball, save it to the netcat directory.
3.Once you have obtained Netcat and saved it to the netcat directory, untar and unzip it:
tar –zxvf nc110.tgz
4. Most versions of Linux do well with the following compile option:
make generic
However, you may want to read the file named Makefile and see if your operating system is specifically listed.
5.Once you have compiled Netcat, the nc binary will be created in the present directory. Copy it to the /bin/ directory. Or, if you prefer, you can just leave it in the present directory and use ./ in front of the command while it is in the same directory. Now that Netcat is ready to be used, create several firewall rules that log port scans.
6.Open a terminal on your firewall and view the /var/log/messages file:
tail –f /var/log/messages
www.syngress.com

558 Chapter 11 • Maintaining Firewalls
7. Now, conduct a sample portscan against your firewall:
./nc–w 2 –v –v firewall 1-1023
You can now use Netcat to conduct tests against your firewall.
SendIP: The Packet Forger
Although Netcat does have the ability to create some packets in certain instances, it is not a true packet generator. SendIP is designed to allow you to create packets of your own choosing.This practice is often called “arbitrary packet generation.” SendIP allows you to create your own IP, Internet Control Message Protocol (ICMP),TCP, and UDP packets. For example, you can generate TCP packets with the FIN, ACK, and SYN bits set according to your testing needs.You can obtain SendIP from several sites, including www.earth.li/projectpurple/progs/ sendip.html and http://packetstorm.securify.com. RPM and tarball files for version 1.5 can be found on the accompanying CD (sendip-1.5-1.i386.rpm and sendip-1.5.tar.gz).
SendIP Syntax
Although there are many options, SendIP syntax is relatively straightforward:
sendip [hostname] -p <type> -d <data> <options>
SendIP Options
The -p option specifies the protocol you wish to generate, and the -d option allows you to enter a random text string.The options, many of which are listed in Table 11.2, allow you to customize the contents of the packets you generate.
Table 11.2 SendIP Options
|
Option |
Description |
|
|
|
|
|
|
-p value |
The option that determines which type of packet SendIP will |
|
|
|
create. Values include ip, icmp, tcp, and udp. |
|
|
-is |
Specifies a source IP address of your own choosing. By default, |
|
|
|
the “true” IP address of the local host is used. |
|
|
-id |
Specifies the destination IP address for the packet you are |
|
|
|
generating. |
|
|
|
|
|
|
|
Continued |
|
www.syngress.com

Maintaining Firewalls • Chapter 11 |
559 |
Table 11.2 Continued
|
Option |
Description |
|
|
|
|
|
|
-ih |
For customizing the length of the IP header. |
|
|
-iy |
Sets the Type of Service (ToS) field for the packet. Consult the |
|
|
|
previous chapter for values that you can enter. The default value |
|
|
|
is to leave all fields blank. |
|
|
-il |
Sets the length of the packet. |
|
|
-it |
Sets the time-to-live (TTL) for the packet you generate. The |
|
|
|
default value is 255 bytes. |
|
|
-ip |
Tells SendIP to create an IP packet. |
|
|
-ct value |
For generating ICMP packet types. The default is echo-request (8), |
|
|
|
but you can specify any other type by entering -ct 03, for |
|
|
|
example. See the previous chapter or RFC 950. |
|
|
-us |
Specifies the source port for UDP packets. The default is the |
|
|
|
random port assigned to the packet when it is sent out. |
|
|
-ud |
The destination port of a UDP packet. You must specify a |
|
|
|
destination port. |
|
|
-ts |
Specifies the source port of a TCP packet. The default is the |
|
|
|
random port assigned to the packet when it is sent out. |
|
|
-td |
Sets the destination port for the TCP packet. You must specify a |
|
|
|
destination port. |
|
|
-tn |
Allows you to specify the TCP sequence number. By default, the |
|
|
|
number will be random. |
|
|
-tfa |
Sets the ACK bit on a TCP packet. By default, the value is not set, |
|
|
|
unless you use the -ta option along with -tfa. This is because an |
|
|
|
ACK packet is used to finish the process of tearing down a |
|
|
|
connection. |
|
|
-ta |
Allows you to request an acknowledgment packet, which is used |
|
|
|
to acknowledge that the TCP connection is ready to end. |
|
|
-tfr |
Creates a RESET packet. |
|
|
-tfs |
Alters the packet so that the SYN bit is set. |
|
|
-tu |
Creates a packet with the URGENT pointer set. This pointer begins |
|
|
|
the process of prioritizing traffic. |
|
|
-tfu |
Sets the URGENT bit in a TCP packet. The default is 0 unless you |
|
|
|
use the -tu option along with -tfu. For more information, consult |
|
|
|
RFC 1122. |
|
|
|
|
|
|
|
Continued |
|
www.syngress.com
560 Chapter 11 • Maintaining Firewalls
Table 11.2 Continued
Option |
Description |
|
|
-tff |
Sets the FIN bit. |
-r |
Randomizes all options. For example, if you specify IP as the |
|
protocol, the -r option automatically creates a random sending IP |
|
address. |
The SendIP man page contains additional options.As you can see, SendIP allows you to forge any part of a TCP session, as well as any element of an IP, UDP, or ICMP packet. SendIP also allows you to forge all elements of IPv6 addresses, and also allows you to forge Routing Information Protocol (RIP) packets.
This tool is useful in regard to firewalls because it allows you to simulate any situation.The ipchains -C command has similar functionality. However, you can install SendIP anywhere, whereas many newer kernels do not support Ipchains.
Besides, using SendIP, you can spend your time learning only one application.
SECURITY ALERT!
Applications such as SendIP and Netcat are often used in the hacker community. Take care that you do not allow all users on your network to access such applications. In fact, even using Telnet in the way shown previously is not recommended unless you own the systems you are scanning, or you have explicit permission from the operator of the system you are going to scan. Educate your IT personnel that they should use this software very carefully, and that they should never assume that they are allowed to scan or otherwise issue packets to a system that is not their responsibility.
To guard against illicit use of such applications, consider placing a note in your security policy to the effect that only certain users are allowed to access scanning and IP spoofing software for security auditing purposes.
Exercise: Using SendIP to Probe a Firewall
1.The source files do not differ from the RPM. Download SendIP RPM from http://www.earth.li/projectpurple/progs/sendip.html or packetstorm.securify.com.
www.syngress.com

Maintaining Firewalls • Chapter 11 |
561 |
2. As root, type the following:
rpm -ivh sendip-1.5-1.i386.rpm
3.Now that you have installed SendIP on this system, it will be known as the “attacking host.”You are now going to use SendIP on this attacking host to check your firewall’s ability to block spoofed packets coming in from the outside interface. If necessary, review Chapter 9 to learn how to create anti-spoofing rules for your firewall.To check your firewall’s configuration, set up a machine outside of your firewall, and then give your firewall’s IP address as the default gateway.
4.Suppose that you have only the internal networks of 192.168.2.0/24 and 10.100.100.0/24, and a simple Linux client using the IP address of 192.168.2.37.You wish to test your firewall to see if spoofed traffic from outside the network can get through your firewall to your Linux client. To test this, configure a system on your internal network (say, with the IP address of 192.168.2.37) to use a packet sniffer such as Tcpdump or Ethereal to view all packets on the 192.168.2.0 network.This will be the internal host. If necessary, review Chapter 5 to learn more about packet sniffers.
5.Put the NIC of the internal host into promiscuous mode so that it can capture the spoofed packet you are about to send. Hopefully, the spoofed packet won’t get through.
6.Issue the following command from the attacking host to the internal host:
sendip 192.168.2.37 -p icmp -is 192.168.2.36
7.You have just issued a spoofing attack against your firewall and internal network. Now, stop your capture of packets on your internal host.Were you able to see an echo request from 192.168.2.36? Did the 192.168.2.37 system issue an echo reply? Did you see any DNS traffic that appears to be an attempt to resolve the 192.168.2.37 IP address? If you did, then review your spoofing rules. If you did not, chances are that you have properly configured anti-spoofing on your firewall.
Remember, if you are on a switched network, you will have to configure a packet sniffer on the victim host, and then ping that victim host directly.This is because a switched network does not use broadcasting as does a standard hub-based network.
www.syngress.com

562Chapter 11 • Maintaining Firewalls
8.If you have enabled logging for such packets, use the tail -f command on your firewall to see if the kernel records capturing the packet.
9.Now, try spoofing with another protocol:
sendip 192.168.2.37 -p tcp -ts 2 -td 80 -tn -is 192.168.2.36
This command sends a tcp packet with the source port of 2 to the 192.168.2.37 host at port 80.Your firewall should block this packet, because it should not allow packets to privileged ports (ports below 1023) to go into the internal network.
10.When you are reasonably sure that your firewall is blocking spoofed packets, issue the following command from your attacking host:
sendip 192.168.2.37 -p tcp -ts 2 -td 80 -tn -is 45.2.5.6
11.This command does much the same thing, but instead, it creates a packet that has a stronger chance of passing through your firewall.Why? Because this packet apparently originates from the 45.2.5.6 host, which is an IP address that could plausibly originate from the Internet. In addition, at least for the purposes of this exercise, this address does not exist inside your network. However, this packet should not be passed through, either, because it originates from a privileged port and is directed at a privileged port (80) on the destination. Finally, issue the following command:
sendip 192.168.2.37 -p tcp -ta 1 -ts 4356 -td 6450 -tn -is
45.2.5.6
12.Depending on your firewall configuration, this packet may be allowed to pass through.This is because the ACK bit has been set using the -ta option. As a result, the firewall rules may allow it through because it is part of an already-established session. In addition, notice that the source and destination ports are ephemeral, and not well known (below 1023). Consider using additional commands to further test your firewall. Make the necessary changes, without affecting the services that you wish to provide.
www.syngress.com

Maintaining Firewalls • Chapter 11 |
563 |
Understanding Firewall Logging,
Blocking, and Alert Options
You have already seen how you can check the kernel messages for log entries using the tail -f /var/log/messages command. However, more elegant ways to capture and view firewall logs exist.Third-party logging applications such as Firewall Log Daemon (Firelogd) and FwLogwatch are available to help you sort and act on the information gathered by the firewall.
Firewall Log Daemon
Firelogd (Firewall Log Daemon) is a relatively simple program that can either be run as an application or (you might have guessed) as a daemon. It does two things:
■It reads the kernel log entries and passes them into a “first in, first out” (FIFO) pipe, which Firelogd can then process.
■Once its buffer is full, it e-mails a report of suspicious traffic to an account of your choosing.You can have it mailed to a local account, or to a remote system of your choice.
The application supports both Ipchains and Iptables. Older versions required you to edit the dmn.h file, and then use the make command to compile the application. Now, however, Firelogd supports command-line arguments.You have various options, which are listed in the following sections.
Obtaining Firelogd
You can obtain Firelogd from the CD that accompanies this book.The RPM package is named firelogd-1.3-5.i386.rpm, and it has an accompanying MD5 signature (firelogdmd5sums.txt).You can download more recent versions from www.speakeasy.org/~roux/dmn/ or from http://packetstorm.securify.com.The RPM file is best for Red Hat systems. As of this writing, the tarball format does not have any special features.
Syntax and Configuration Options
The syntax for using Firelogd is as follows:
/usr/sbin/firelogd [-dmskh] [-b buffersize] [-e email] [-l log]
[-t template] [-]
www.syngress.com

564 Chapter 11 • Maintaining Firewalls
If you install Firelogd using the available RPM, you can also start Firelogd by using its startup script (/etc/rc.d/init.d/firelogd).You will have to edit this script to customize it if you wish to change or add any of the options.
Commonly Used Options
Following is a list of the most often-used options.
■ Daemon mode If used without any options at all, Fwlogwatch runs as a simple application.The -d option has firelogd “fork off ” and run as a daemon.
■E-mail destination The person who receives the e-mail messages. You can specify this either by using the -e option, or by editing the /etc/rc.d/init.d/firelogd script that comes with the RPM.
■Log file The location of the log file that Firelogd reads from. On Red Hat Linux, for example, this is usually /var/log/messages.You can specify a log file by either using the -l option, or by modifying the /etc/rc.d/ init.d/firelogd script.
■Buffer size Tells Firelogd to wait for x number of entries before mailing them.The default is 10, which means a single e-mail will contain 10 entries. A value of 100 may be a more reasonable number. Using the default, you will receive dozens of e-mails in the case of a simple Nmap scanning attack. Experiment with these settings. If 100 gives you too little information about the nature of traffic at your firewall, then decrease the setting.
■Template Firelogd allows you to customize the alert messages.You can have Firelogd send you a great deal of information, or you can configure it to be as sparse as possible.The /etc/firelog.conf file contains the default template.
You can learn more about the additional options by consulting the firelogd man page.
Message Format
The e-mail message you receive will include multiple packet hits giving you the following information:
1.The date and time of the rejected or logged packet.
2.The name of the chain responsible for dropping or logging the packet.
www.syngress.com

Maintaining Firewalls • Chapter 11 |
565 |
3.The input interface.
4.The packet’s TTL.
5.The IP of the firewall host and the number of the port to which the packet was sent (i.e., the destination port).
6.The origin of the IP address. Remember, it is possible to spoof IP addresses.
Here is an example of a default Firelogd log entry:
01:28:37/May-5 ****S* TCP *D* REJECT/input-9 eth0 ***|***** ttl:64
badguy.hackerz.com -> hems(151)
128.37.08.43:4218 -> firewall.goodguys.com:151
Output Example
Here is output from a more extended example:
prompt# /usr/sbin/firelogd
LOG ENTRY:
April 5 09:53:37 firewall kernel: Packet log: input REJECT eth0 PROTO=6 45.128.2.3:2748 128.1.2.3.4:3049 L=60 S=0x00 I=0 F=0x4000 T=64 SYN (#9)
CONTEXT INFORMATION:
Time: April 5 09:53:37
Msg: REJECT/input-9
In: eth0
Out:
Mac:
IP DATAGRAM INFORMATION:
Source: 45.128.2.3 badguy.badguy.com
Dest.: 128.1.2.3.4 firewall.goodguys.com
IPlen: 60
TOS: TOS-0x00, PREC-0x00 -> ***|*****
TTL: 64
FRAG: 0x4000 -> *D*
www.syngress.com

566Chapter 11 • Maintaining Firewalls
ICMP SPECIFIC DATA: Type:
Code:
Info:
Triggering Packet:
TCP SPECIFIC DATA: Window: Reserved Bits:
Flags: SYN -> ****S*
UDP SPECIFIC DATA:
UDP Datagram length:
TCP/UDP SERVICE PORTS:
Source Port: 2748(fjippol-polsvr) -> 3049(nsws)
In the preceding output, the attacking host’s IP address is 45.128.2.3, and the firewall’s IP address is 128.1.2.3.4. In this particular example, ICMP logging is not activated on the kernel. However, you can gather information about the nature of the attack by viewing the logs.This is an example of a simple, full TCP scan.
Customizing Messages
You can customize Firelogd messages by editing the /etc/firelogd.conf file and changing the values to suit your own situation.The default file comes with several suggested templates, which are commented out by using the following two words:
startcomment
endcomment
Firelogd will not read anything within these lines. Firelogd contains three entries.The first, discussed previously, is moderately verbose.The second is described as a “one-liner,” and gives information about the time of the scan, as well as the source and destination IP addresses and ports.The final option is quite verbose, informing you about the details of the connection.You can, of course,
www.syngress.com

Maintaining Firewalls • Chapter 11 |
567 |
create your own entry using the syntax described in the /etc/firelogd file. For example, the following sample code records the source IP address and the destination port address, as well as the interface where the traffic occurred.The text “From the firewall at the company” acts as a header for the information.
tab From the firewall at the company. nl
tab srcip sp r_dstpt sp in sp
The tab, space, and nl entries create tabs, single space, and new lines, respectively.The char srcip field has Firelogd inform you of the source IP address of the packet.The r_dspt field provides the destination port for the packet. Finally, the char in field has Firelogd report the interface.You can, of course, specify your own text and other options.The /etc/firelog.conf file shows you all of the options. Figure 11.2 shows an example of the configuration file.
Figure 11.2 The /etc/firelog.conf File
www.syngress.com

568 Chapter 11 • Maintaining Firewalls
NOTE
Firelogd simply parses the log files generated by either Ipchains or Iptables. It does not generate the log files themselves. Therefore, you must have logging enabled through Iptables or Ipchains in order for Firelogd to operate properly.
Reading Log Files Generated by Other Firewalls
You can read log files generated by other systems, as well. For example, if you downloaded the /var/log/messages file from a remote system, you can read it with the following command:
cat messages | firelogd -
The hyphen allows the application to read the command directly from standard input.
Exercise: Configuring and Compiling Firelogd
1.Obtain Firelogd from www.speakeasy.org/~roux/dmn/ or from packetstorm.securify.com.The RPM file is best for Red Hat systems. The tarball does not provide any special configuration options.
2.Install the RPM. Once you install the RPM, the Firelogd will automatically begin running. Stop Firelogd by issuing the following command:
/etc/rc.d/init.d/firelogd stop
3. Issue the following command:
/usr/sbin/firelogd
4.Use a port scanner such as Gnome Service Scan or Nmap to scan your firewall. Remember that the firewall must have logging enabled at the interface you are scanning.
5.You should see output on your screen.You will not receive any e-mail message, because you have not supplied any arguments.
6.Stop Firelogd by pressing CTRL+C.
www.syngress.com

Maintaining Firewalls • Chapter 11 |
569 |
7.Now, prepare firelogd to run as a daemon. Make a copy of the /etc/ rc.d/init.d/firelogd initialization script file and name it firelogd.bak. Edit the original so that the entries are as follows:
QSIZE=30
#Who is the administrator MAIL=your_address@yourcompany.com
#Where is the output template
You may have to adjust the QSIZE settings to fit your own situation.
8.Make a copy of the /etc/firelogd.conf in case anything goes wrong, and then edit the original file so that verbose logging is enabled.To do this, first comment out the default log entries, which are immediately below the text that reads “I like the look of the one below.” Use the startcomment and endcomment keywords.Then, uncomment the entry that begins with the text that reads “This one is very verbose,” and save the file.
9.Start Firelogd:
/etc/rc.d/init.d/firelogd start
10.Use Gnome ServiceScan or Nmap to conduct an attack that scans multiple ports of your firewall.
11.View the message using your e-mail client.
12.Re-edit the /etc/firelogd file and comment out the verbose entries and
uncomment the entries that are beneath the text that reads “This one is a one-liner.”This entry will send terse messages. If you wish, set the QSIZE value to 100, which means that each e-mail Firelogd sends will have 100 entries in it. It also means that Firelogd will not send you alerts as often; the larger the buffer value, the longer it will take to receive a message. Consequently, Firelogd will be less responsive to attacks, and will not inform you as often. However, one longer message is likely easier to read than several shorter messages.
Fwlogwatch
Fwlogwatch, written by Boris Wesslowski, is a logging and reporting mechanism that also allows you to automatically block all traffic that is identified as an attack. Used in conjunction with Firelogd, it helps create a system that continuously keeps you informed concerning port scans and other network events that surpass the
www.syngress.com
570 Chapter 11 • Maintaining Firewalls
thresholds you set. Fwlogwatch is available at the CERT-RUS Web site (http://cert
.uni-stuttgart.de/projects/fwlogwatch) and Wesslowski’s personal Web site (www.kyb.uni-stuttgart.de/boris/software.shtml). It is available in both tarball and RPM format, and there is no significant difference between the two.The accompanying CD contains both the tarball and RPM versions (fwlogwatch-0.3-bin.tar.gz and fwlogwatch-0.3-1.i386.rpm).Although FwLogwatch is similar to Firelogd, it is far more versatile.You can configure Fwlogwatch to do the following:
■Parse the firewall log file and generate user-friendly HTML reports, which you can read with any Web browser. Fwlogwatch can read log files from any Ipchains or Iptables-enabled system, as well as Cisco firewalls and routers.
■E-mail an alert to you when suspicious activity occurs (e.g., when numerous connection attempts—usually port scans—surpass the threshold you set in /etc/firelogwatch.config, the Fwlogwatch configuration file). As with Fwlogwatch, this option will work only on packets that you decide to log.
■Issue a Windows Messenger Service alert that creates a “pop up” message
to a Windows NT or 2000 server of your choice.
■Deliver summary-based e-mail messages informing management of the scans that have occurred.
■Insert Ipchains or Iptables-based rules that block hosts from connecting to your firewall and/or internal network hosts.
■Execute custom-created commands.You can have Fwlogwatch run any script that you wish to create.
Fwlogwatch Modes
Fwlogwatch operates in one of three modes.Table 11.3 describes each.
Table 11.3 Fwlogwatch Modes
|
Mode |
Description |
|
|
|
|
|
|
Realtime |
Fwlogwatch operates as a daemon and reads the kernel |
|
|
|
messages file (usually /var/log/messages), waiting for |
|
|
|
Ipchains/Iptables-generated packets to occur. When the packets |
|
|
|
surpass the threshold, Fwlogwatch generates an alert. This |
|
|
|
mode is generally not for generating reports. Several Common |
|
|
|
|
|
|
|
Continued |
|
www.syngress.com

Maintaining Firewalls • Chapter 11 |
571 |
Table 11.3 Continued
Mode |
Description |
|
|
|
Gateway Interface (CGI) scripts are available to help you |
|
generate HTML reports. |
Interactive |
Allows you to have Fwlogwatch read the /var/log/messages file |
|
and issue e-mail messages to various destinations. To use this |
|
mode, you must uncomment various lines, such as at least one |
|
e-mail account, in fwlogwatch.conf (or whatever name you are |
|
using). The e-mail messages are formatted according to the |
|
information found in the /etc/fwlogwatch.template file. When |
|
you start Fwlogwatch in interactive mode, it will parse the |
|
/var/log/messages file and then ask you if you wish to send an |
|
e-mail message to your recipient. |
Log Time |
Has Fwlogwatch inform you concerning the total number of |
|
entries in the /var/log/messages file. It also includes the first |
|
and last entries the kernel makes. |
You can also manually generate HTML reports. Figure 11.3 shows the Help menu, which shows all of the command options.You can generate this list by entering fwlogwatch -h.
Figure 11.3 Fwlogwatch Command Options
www.syngress.com

572 Chapter 11 • Maintaining Firewalls
You can also consult the fwlogwatch man page for additional details.This chapter will focus on generating reports and configuring Fwlogwatch to send real-time alerts.
Fwlogwatch Options and Generating Reports
Table 11.4 is a list of the more relevant options, if you choose not to use the /etc/fwlogwatch.config file.
Table 11.4 FwLogwatch Options
|
Option |
Description |
|
|
|
|
|
|
-c <file> |
Allows you to specify your own configuration file. The default is |
|
|
|
/etc/fwlogwatch.config. If you leave this filename at its default, |
|
|
|
you will not be able to manually use Fwlogwatch or use CGI |
|
|
|
scripts to generate automatic reports. |
|
|
-f <file> |
Allows you to read a different kernel log file, rather than the |
|
|
|
default of /var/log/messages. |
|
|
-L |
Has Fwlogwatch give the time of the first and last log entry. |
|
|
-l <time> |
Allows you to specify only certain events in terms of time. |
|
|
|
Arguments to the -l option include seconds (s), hours (h), |
|
|
|
minutes (m), days (d), weeks (w), months (m), and years (y). The |
|
|
|
default is to not have any limit at all, which can result in huge |
|
|
|
HTML log entries. If, for example, you wished to generate a log |
|
|
|
file for only the last two days, you would specify -l 2 at the |
|
|
|
command line. |
|
|
-n |
Resolves host names in the log file. This can slow performance |
|
|
|
considerably. |
|
|
-v |
Places Fwlogwatch into verbose mode. Use it twice to obtain |
|
|
|
more information. |
|
|
-z |
Shows the amount of time between the start of a perceived |
|
|
|
attack and the end. |
|
|
-m value |
Has fwlogwatch ignore all identical packets that number less |
|
|
|
than the value. The result is that you will receive entries that |
|
|
|
have a higher uniqueness value. As far as alerting is concerned, |
|
|
|
you will probably wish to ignore the receipt of multiple packets |
|
|
|
if they are of only one type. For example, if you wish to ignore |
|
|
|
all identical packets unless the firewall receives 15 of them, you |
|
|
|
would specify -m 15 in the command line. |
|
|
-s, -d, |
Informs you concerning the source and destination ports. |
|
|
|
|
|
|
|
Continued |
|
www.syngress.com

Maintaining Firewalls • Chapter 11 |
573 |
Table 11.4 Continued
Option |
Description |
|
|
-t |
If more than one of the same type of packet is logged, then |
|
show the start and end times that they entered the system. |
-z |
Show the total amount of time that elapses between a series of |
|
entries. The series is determined by the threshold. |
-y |
List all elements of the TCP session. |
-p |
Informs you concerning all logged protocols (TCP, ICMP, and |
|
so forth). |
-o |
Allows you to specify the location of an output file. |
-w |
Tells Fwlogwatch that the output file should be in HTML. |
|
|
Generating Reports
As of this writing, if the /etc/fwlogwatch.config file is present, the Fwlogwatch binary automatically ignores any options you specify at the command line.This poses a problem, because if you wish to manually generate a report, you need to specify command-line options.
NOTE
You will need to rename the /etc/fwlogwatch.conf file to some other name if you wish to use Fwlogwatch to generate HTML reports via CGI or cron.
To solve this problem, rename the /etc/fwlogwatch.config to /etc/fwlogwatch
.config.alert.This way, you can still use this file to generate alerts, as discussed later, and still generate manual reports, when necessary.Although many different combinations are available to you, the following command is quite useful:
prompt$./fwlogwatch -v -v -s -d -t -z -y -n -p -w -l 2d -o firewall.html -f /var/log/messages
Resolving firewall-linux.goodguys.com
Resolving 10.100.100.1.1 from cache
Resolving 192.168.2.2 from cache
Resolving sl-gw8-sj-0-3.sprintlink.net
www.syngress.com
574 Chapter 11 • Maintaining Firewalls
Resolving 217.0.54.100
Resolving pD9003664.dip.t-dialin.net
Resolving 192.168.2.2 from cache
Resolving 194.91.224.19
Resolving 10.46.247.251
Resolving pD9003664.dip.t-dialin.net
Resolving adsl-63-206-155-186.dsl.lsan03.pacbell.net
Resolving cpe-24-221-58-193.az.sprintbbd.net
Resolving www.cnn.com
Resolving www.abcnews.com from cache prompt$
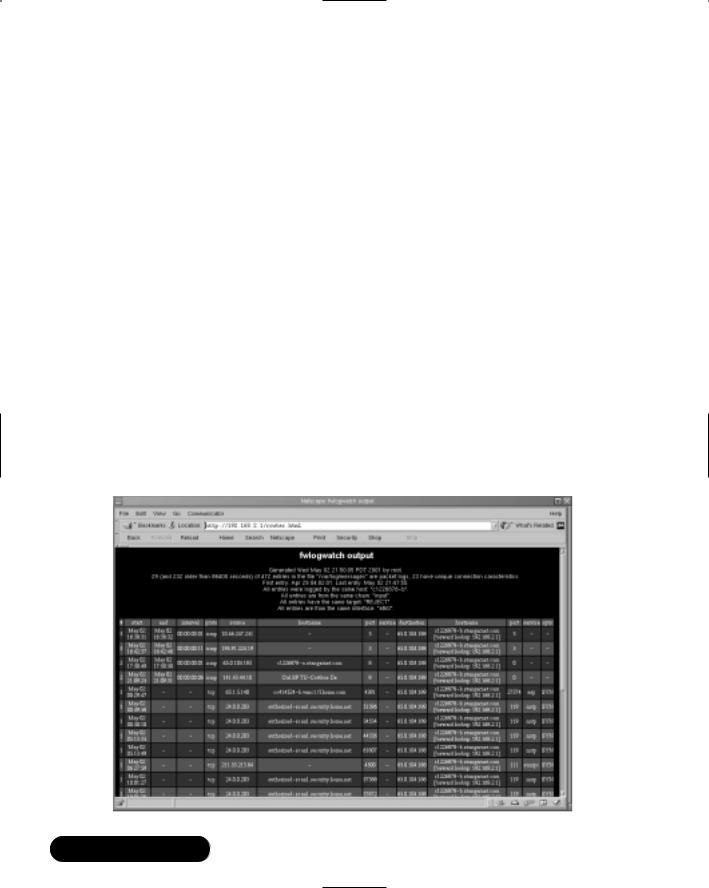
The preceding command has Fwlogwatch read the -f /var/log/messages file and generate a report named firewall.html.The “Resolving . . .” lines indicate that Fwlogwatch has found log entries and is finding the IP address or DNS name for the hosts. Notice that the preceding command reads the firewall entries for the last two days (-l 2d), and that it uses the -w option to generate an HTML file, instead of a plain text file. Figure 11.4 shows an example of the HTML file, which can be viewed with any Web browser.
Figure 11.4 Viewing an Fwlogwatch HTML File
www.syngress.com

Maintaining Firewalls • Chapter 11 |
575 |
Using Fwlogwatch manually is especially useful if you plan to view log file entries from a remote host, such as another Linux system or a Cisco router.You can obtain the log file, copy it to your home directory, and then issue the preceding command, specifying the log file you wish to read.
As long as you have renamed the /etc/fwlogwatch.config file, you can use cron to have Fwlogwatch automatically create HTML reports and place them in your Apache Server home directory (or any other properly aliased directory).
Exercise: Generating an HTML-Based
Firewall Log with Fwlogwatch
1.Make sure that your system is using either Ipchains or Iptables to log packets.
2.Create a user and a group named bw.These groups are necessary to enable Fwlogwatch to run additional processes as a nonroot user.
3.Install the Fwlogwatch RPM.You can, if you wish, copy the fwlogwatch -0.3-1.i386.rpm file from the CD that accompanies this book.The fwlogwatch-0.3-bin.tar.gz file provides the same functionality.
4.Rename the /etc/fwlogwatch.config file to /etc/fwlogwatch
.config.alert.
5.Issue the following command to create a simple HTML report:
fwlogwatch -v -v -s -d -t -z -y -n -p -w -l 2d -o
firewallreport.html -f /var/log/messages
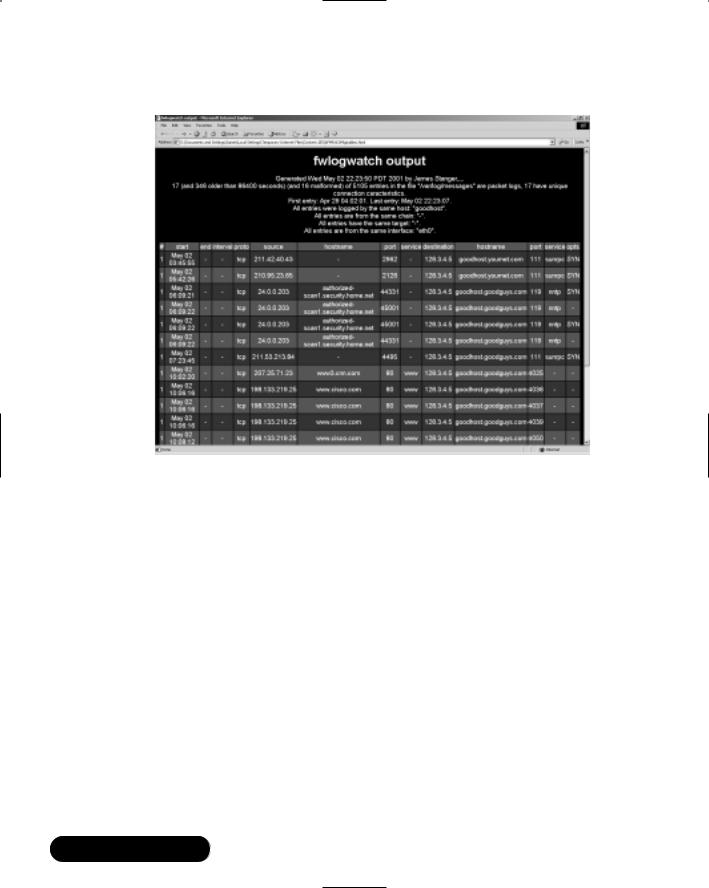
6.Open the firewallreport.html file in any browser.This report is, of course, portable, allowing anyone (even Windows users) to view it. See Figure 11.5.
Automating Fwlogwatch
Perhaps the most intriguing feature of Fwlogwatch is its ability to automatically configure Ipchains/Iptables and issue alerts.The best way to do this is to edit the three configuration files to suit your needs.The three files you will use are:
■/etc/fwlogwatch.config (or whatever you rename it to) The primary configuration file. If you change this filename, then you must use the -c option to specify it when starting Fwlogwatch.
www.syngress.com
576 Chapter 11 • Maintaining Firewalls
Figure 11.5 Viewing a Report in Microsoft Internet Explorer
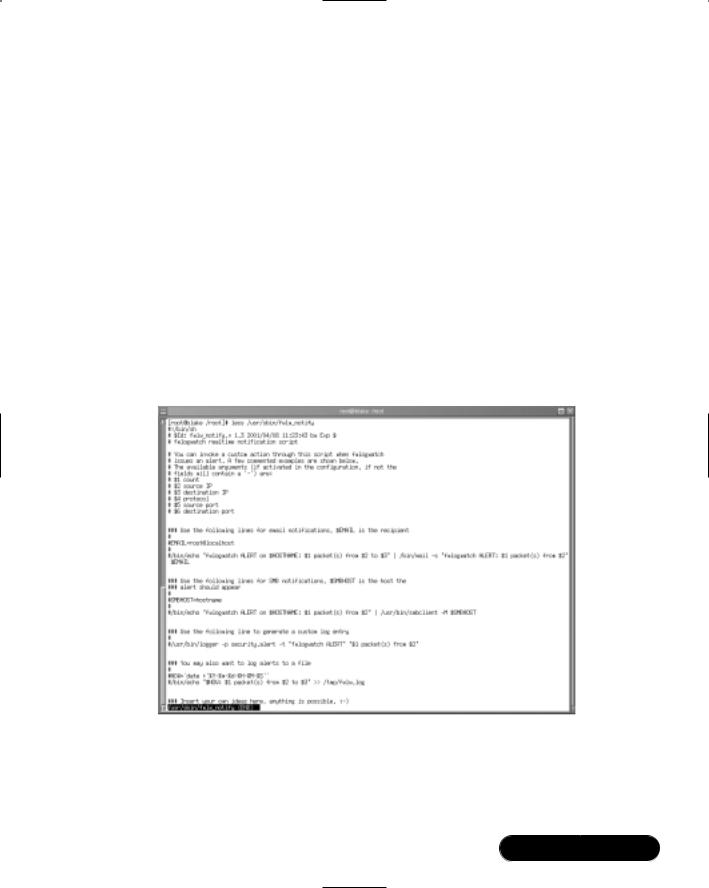
■/usr/sbin/fwlw_notify A script that allows you to configure all alerting options, including where e-mail and Samba/Windows “pop up” messages will be sent. Do not confuse these options with the interactive options, which are mutually exclusive. In other words, if you wish to have Fwlogwatch send you alerts, do not configure the interactive mode, which will ask you if you wish to send each report that Fwlogwatch generates.
■/usr/sbin/fwlw_respond This script determines Ipchains and Iptables behavior.You do not have to edit this file.
The Fwlogwatch Configuration File
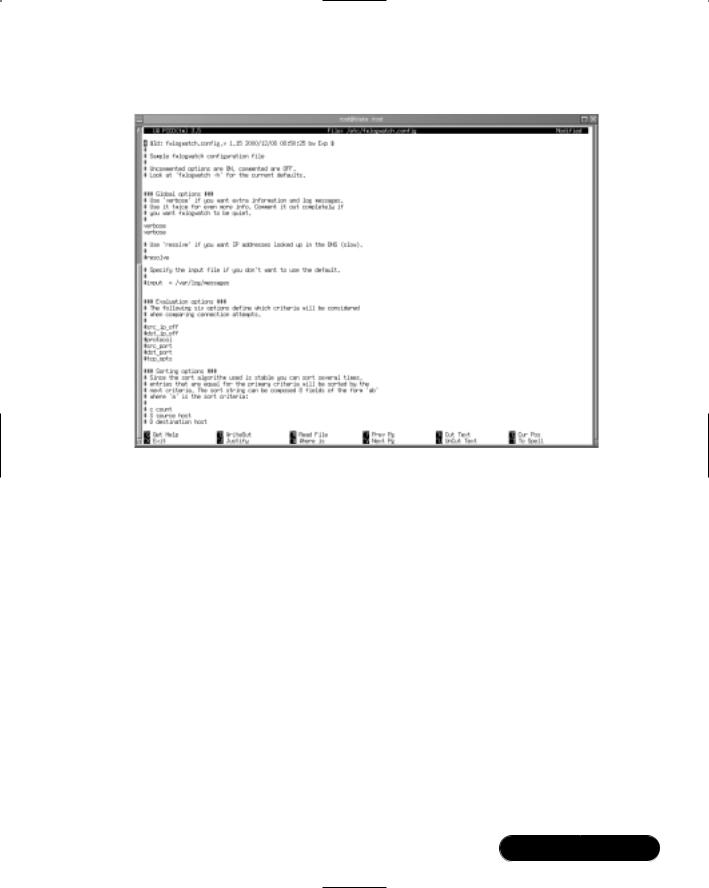
You can customize all Fwlogwatch features by editing the /etc/fwlogwatch
.config file (or /etc/fwlogwatch.config.alert, if you have renamed it in order to use the manual option). Figure 11.6 shows the configuration file.
www.syngress.com
Maintaining Firewalls • Chapter 11 |
577 |
Figure 11.6 The Fwlogwatch Configuration File
This file allows you to automatically invoke the options listed earlier in Table 11.4. For example, this file allows you to:
■Set verbose logging options.
■Create HTML files.
■Customize the alert threshold.
■Specify a different input file from /var/log/messages.
■Exclude hosts and ports.
■Sort host, protocol, port, and IP entries in the HTML files, as well as configure the files to inform you concerning the time the packets were generated, and the duration of a perceived attack.
■Determine how much of the kernel log file to read (e.g., only two minutes, three days, and so forth).
■Set realtime, interactive, and log times mode options.
■Create a proprietary Web server (not recommended).
www.syngress.com

578 Chapter 11 • Maintaining Firewalls
If you change any of these values, you will have to restart Fwlogwatch so that it rereads this file.
Setting the Alert Threshold in fwlogwatch.config
It is likely that you will have to experiment with the ideal alert threshold for your firewall.The default value is 10, and you may find it necessary to increase this value significantly (say, to 100) so that you are not overwhelmed by the data you generate.
Understand, however, that if you receive too much data, you may also need to adjust the logging in Iptables/Ipchains.
Excluding Hosts
Fwlogwatch will monitor all entries that pass through the kernel log file (usually /var/log/messages). Fwlogwatch will block any interface—including its own— that violates the alert threshold value. One of the features found in Fwlogwatch is the ability to exclude certain IP addresses and address ranges from alerts and Ipchains/Iptables rules.This is necessary, because anyone with a port scanner that can spoof IP addresses can conduct a port scan on your firewall and specify an IP address important to your network. Such addresses might include the DNS and e-mail servers necessary to keep your business on a paying basis. It is possible to exclude these addresses from Fwlogwatch by opening the configuration file and finding the following lines:
known_host =
known_host =
Fwlogwatch allows you to get much more granular by using the additional entries shown here:
#exclude_src_host =
#exclude_src_port =
#exclude_dst_host =
#exclude_dst_port =
#include_src_host =
#include_src_port =
#include_dst_host =
#include_dst_port =
These entries allow you to exclude certain source and destination ports, as well as source and destination IP addresses.
www.syngress.com
Maintaining Firewalls • Chapter 11 |
579 |
Notification Options
To configure Fwlogwatch to notify you about attacks, you must first edit the /etc/fwlogwatch.config file and uncomment the following values:
realtime_response
notify
Once these values are uncommented, and once you have restarted Fwlogwatch, it will automatically call the /usr/sbin/fwlw_notify file.These files determine who will be informed, and what will be done, respectively.You will have to restart the Fwlogwatch binary for these changes to take effect.
Thankfully, both the fwlw_notify and fwlw_respond files are even easier to understand than fwlogwatch.config.The /usr/sbin/fwlw_notify script, shown in Figure 11.7, allows you to determine who will receive notification messages, and allows you to determine how this notification will occur.
Figure 11.7 The /usr/sbin/fwlw_notify File
E-Mail Settings
All you have to do is uncomment the lines for any function you wish to enable. Then, enter your own e-mail address in the EMAIL= field.The default setting is
www.syngress.com
580 Chapter 11 • Maintaining Firewalls
for Fwlogwatch to send e-mail to root@localhost. If you are happy with this setting, you don’t have to edit this line.The next entry to edit determines the actual contents of the e-mail message. By default, the message will contain the following information:
■Number of packets (as indicated by the $1 value)
■The source IP address (as indicated by the $2 value)
■The destination IP address (as indicated by the $2 value)
You can, of course, edit any aspect of the e-mail configuration settings. If, for example, you wish to change the subject heading, edit the quoted line after the -s field. Just make sure that you retain the quotation marks, as they allow you to enter multiple words into one subject line. Figure 11.8 shows an example of an e-mail alert.
Figure 11.8 Viewing E-Mail Alerts Generated by Fwlogwatch
Note that Figure 11.8 actually shows two e-mail messages.The first e-mail message is a result of a log entry that blocks and logs all ICMP traffic.The second message has been generated at the same time. It is an alert informing the systems administrator that the loopback interface (127.0.0.1) has generated an attack. As a result, the loopback interface will be added to the Iptables fwlw user-defined chain, and no traffic will be allowed to pass through it. In many cases, this is not a problem, although it is a false positive.This systems administrator needs to add a rule excluding the local host being blocked.
www.syngress.com

Maintaining Firewalls • Chapter 11 |
581 |
Windows Pop-Up Messages
Fwlogwatch uses the smbclient application to send messages to remote Windows hosts. All you have to do is uncomment and edit the SMBHOST= line so that a message is sent to a real host, and then uncomment the next line so that a message is sent. For example, to send a pop-up message to a host named sandi, you would change the SMBHOST= entry and uncomment the following line:
SMBHOST=sandi
/bin/echo "fwlogwatch ALERT on $HOSTNAME: $1 packet(s) from $2" |
/usr/bin/smbclient -M $SMBHOST
You can alter the second line at will. Read the script for additional values to enter. For example, if you wish to be informed of the protocol, you could use the $4 value.
This file also supports the creation of custom log entries through the use of the logger command, as well as the creation of a custom log file. Fwlogwatch also allows you to create your own alerting options. If, for example, your Linux system has a paging application installed, you can have your message sent directly to you. Figure 11.9 shows an example of a pop-up message received by a Windows 2000 Advanced Server system.
Figure 11.9 A Windows 2000 Advanced Server “Pop Up” Message
Response Options
To configure Fwlogwatch to actually respond to attacks, edit the /etc/fwlogwatch
.config file and uncomment the following values:
realtime_response
respond
Then, restart Fwlogwatch.The /usr/sbin/fwlw_respond file is quite straightforward. As with /usr/sbin/fwlw_notify, you can edit this file to enter custom commands.You can, for example, have this script load additional scripts and applications that can reconfigure the local system, as well as remote systems. See Figure 11.10.
www.syngress.com

582 Chapter 11 • Maintaining Firewalls
Figure 11.10 The fwlw_Respond File
How Hosts Are Blocked
By default, Fwlogwatch creates a user-defined Ipchains or Iptables entry for the specific table and/or chain receiving the traffic.You can, of course, edit the script to alter this behavior, although it works quite efficiently as written.
Fwlogwatch and Root Privileges
Real-time response is protected. Only root can initiate Fwlogwatch to use Ipchains/Iptables blockings or e-mail and Samba-based alerts. Once initiated, Fwlogwatch will then run as the user bw. However, if you only require Fwlogwatch to generate reports, you do not need to run it as root.You must still ensure that Fwlogwatch can read the /var/log/messages file.You can do this by placing the user who will execute Fwlogwatch in the same group as the log file.
NOTE
In regard to Fwlogwatch, alerting and reporting are always two separate things. Do not be surprised that the e-mail message you receive is quite terse. You will learn how to automate reports using CGI scripts later in this chapter.
www.syngress.com

Maintaining Firewalls • Chapter 11 |
583 |
NOTE
In order to send pop-up messages, your system must have the sambaclient package installed. If you are using RPM, the following command will tell you if you have the samba-client package installed:
rpm -qa | grep samba
Otherwise, search for the smbclient application. The Samba server is not necessary, and should not be activated at your firewall.
Exercise: Configuring Fwlogwatch to
Send Automatic Alerts and Block Users
1.Make sure that you have Iptables/Ipchains entries that your kernel can log.You must have either the -l or -j LOG entries activated on at least one rule.
2.If you have not already, rename your /etc/fwlogwatch.config file to /etc/fwlogwatch.config.alert.The file named /etc/fwlogwatch.config should no longer exist.
If you do not do this, you will not be able to issue command-line options, nor will you be able to issue alerts.
3.Edit the /etc/fwlogwatch.config.alert file and adjust the following parameters:
■Enable verbose logging by simply uncommenting both lines that read verbose.
■Uncomment the resolve option.
■Enable the times and duration options.The former gives the times of the connections, while the latter gives the entire duration of the session.
■Uncomment the known_host lines, and enter the IP addresses of your DNS and e-mail servers, as well as others that you do not want to block.
■Enable the html line so that the daemon generates HTML pages.
www.syngress.com

584Chapter 11 • Maintaining Firewalls
■Uncomment the recent value and change it from three days (3d) to one day (1d).
■Uncomment the at_least value to 10 may have to change lower.
■Enable and change the alert_threshold setting to 15.
■Activate the notify and respond values by simply uncommenting them.
4.Edit the /usr/sbin/fwlw_notify file and adjust the following parameters:
■Activate the e-mail and Samba settings.
■Enter an e-mail address that you can check.
■In the Samba settings, alter the HOST=line so that Fwlogwatch sends a message to the correct system. Make sure that your Windows NT/2000 system is configured to receive messages.
5.Review the /usr/sbin/fwlw_respond file, but do not make any changes unless you have a very good idea of what to do.
6.Start Fwlogwatch, making sure you tell it where the configuration file is:
/usr/sbin/fwlogwatch -c /etc/fwlogwatch.config.alert
7.Now, using Nmap or Gnome ServiceScan, conduct a scan of your firewall so that your activity matches some of the Ipchains/Iptables rules you have created.
8.You will receive e-mail and Samba “pop up” messages informing you that activity has surpassed established thresholds.
Using Fwlogwatch with CGI Scripts
Fwlogwatch ships with two CGI scripts that, with minor modifications, can allow you to check your logs via a Web server. Although it is often important to shut down all services, activating Apache Web server may be a useful and relatively safe exception to this rule. If you have installed the scripts using the RPMP, you can obtain the raw scripts in the /usr/share/doc/fwlogwatch-0.3/ directory. If you have installed the files using a tarball, they will be in the source directory.
The first CGI script is quite simple. It creates an HTML page and tells Fwlogwatch to place all of the events that have occurred within the last hour inside of it.With some modifications, it can create an HTML file in your Apache Server directory. See Figure 11.11.
www.syngress.com
Maintaining Firewalls • Chapter 11 |
585 |
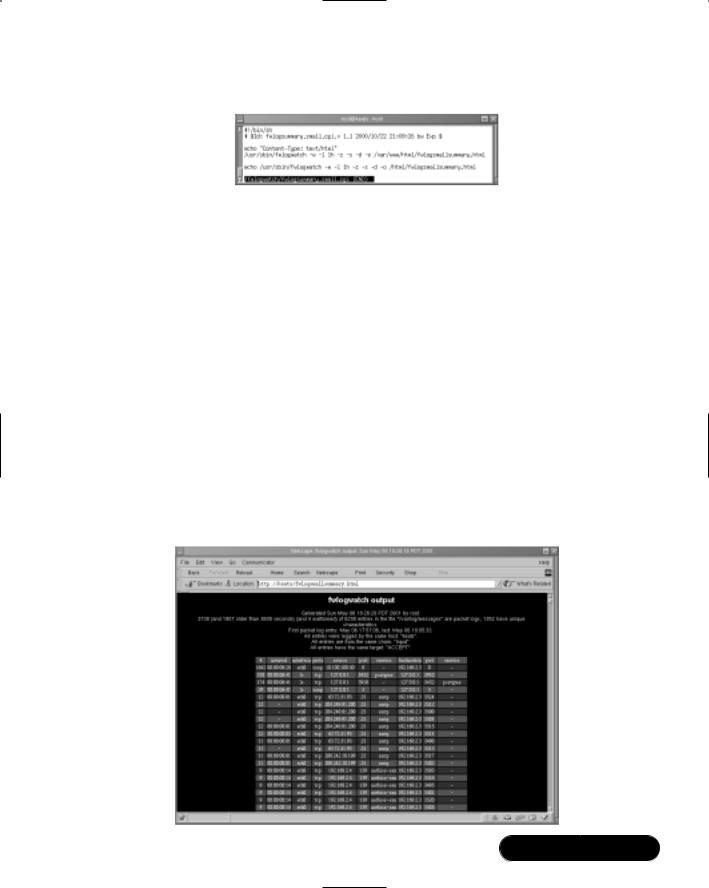
Figure 11.11 The fwlogsummary.small.cgi File
This file first has the command echoed so that if it is run by Cron, a message will be sent to the systems administrator via e-mail, informing him or her that the command has been executed.The actual command is shown here:
/usr/sbin/fwlogwatch -w -l 1h -z -s -d -o
/var/www/html/fwlogsmallsummary.html
You can, of course, alter this script as you wish. For example, if your Web server’s HTML directory is located at /home/httpd/html/, you can edit the file accordingly. If you wish to have a more verbose log entry, you can specify -v -v. However, this file is meant specifically for a quick rundown of the last hour’s traffic.
To automate this file, place the script in the /etc/cron.hourly directory, or create the following crontab owned by root:
1 * * * * /fwlogsummary/fwlogsummary.small.cgi
When this script executes, you will be able to view the HTML file, as long as you have activated Apache Server. See Figure 11.12.
Figure 11.12 Viewing the Results of the fwlogsummary.small.cgi Script
www.syngress.com

586 Chapter 11 • Maintaining Firewalls
Obtaining More Information
For a more detailed view of the file, use the fwlogsummary.cgi file. Before you use this file, however, edit it so that it has the following characteristics:
■The file should point to a directory supported by your Web server.As of this writing, the fwlogsummary.cgi file defaults to using the /home/ httpd/html/ directory, so make sure you specify the correct directory for your Web server. Red Hat 7.1 uses the /var/www/html/ directory, so create a subdirectory named /var/www/html/fwlogdaemon/. Or, you can create an entirely different directory and use an alias. It is up to you. It is important, however, that you create a dedicated directory, because the fwlogsummary.cgi script will create several files inside of it.The most important file is index.html, which contains several links that allow you to view all log entries as defined by the $RECENT value (the default, which you can change, is 1 hour).
■The file should specify the full path of the fwlogwatch binary.
■Remove the line that reads <a href=”/cgi-bin/fwlogwatch
.cgi”>Regenerate summaries now</a>.As of this writing, this feature is not yet supported sufficiently.The edited file is shown in Figure 11.13.
Figure 11.13 The fwlogsummary.cgi File
www.syngress.com
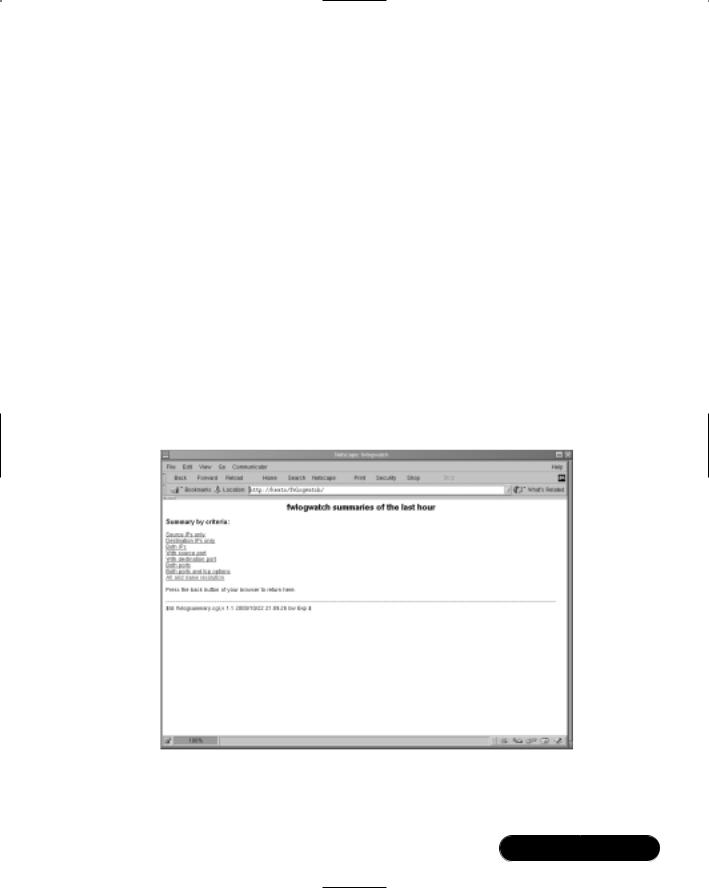
Maintaining Firewalls • Chapter 11 |
587 |
You can make additional trivial changes, such as altering the colors used in the HTML file. Once you have edited the file to your liking, you can place a script in the /etc/cron.hourly file, or create a crontab similar to the one discussed for the fwlogsummary.small.cgi script.
1 * * * * /fwlogsummary/fwlogsummary.cgi
Viewing the Results
Once you have edited the necessary files, created the necessary directories, and started the daemons (Apache Server and Cron), you can use your Web browser to view the index.html file generated by fwlogwatch.cgi.You will have to specify a directory or alias, but you will not have to specify a filename, because most Web servers present index.html by default.Thus, if your firewall Web server’s root directory for HTML pages is /var/www/html/, and you have created a directory named /var/www/html/fwlogwatch/, then you would enter the following URL: http://firewall.goodguys.com/fwlogwatch. Figure 11.14 shows an example for the system named “keats.”
Figure 11.14 Viewing the Index Page Generated by fwlogsummary.cgi
If you click on the All and name resolution link, for example, you will see a report summary similar to that shown in Figure 11.15.
www.syngress.com
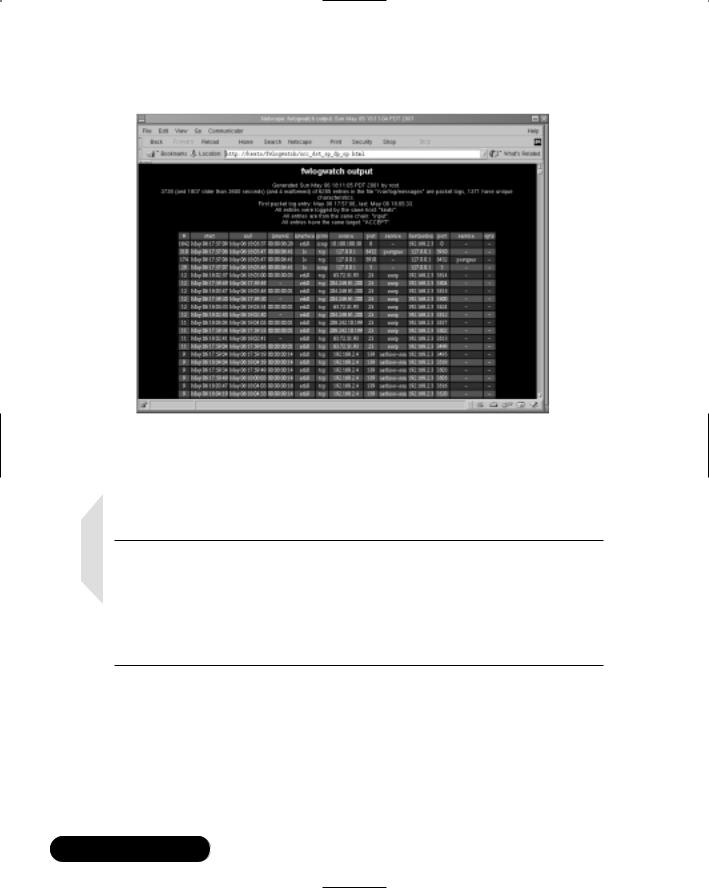
588 Chapter 11 • Maintaining Firewalls
Figure 11.15 Viewing the All and Name Resolution Page
You will see that this particular HTML page is similar to the results of the Fwlogsummary.small.cgi file, except that you will see more hosts listed.The additional links will help you determine what has happened at your firewall.
NOTE
When you capture traffic using the Linux Netscape browser, you may find that it will “hang” for some time before rendering the HTML. You may have to wait for a few minutes to see the Fwlog output. At other times, you may find that the browser has crashed. Lynx, a text-based Web browser, and Windows-based browsers usually do not exhibit this behavior.
Exercise: Using Cron and Fwlogwatch CGI Scripts to Generate an Automatic HTML Report
1.Create the /fwlogsummary directory.This directory will hold your CGI scripts.
www.syngress.com

Maintaining Firewalls • Chapter 11 |
589 |
2.Find and copy the fwlogsummary.small.cgi and fwlogsummary.cgi scripts to the /fwlogsummary directory.
3.Find the directory that contains your Web server’s HTML documents. Create a new subdirectory off of this directory named fwlogwatch.This directory will contain all of the files generated by the fwlogsummary.cgi file.
4.Create another subdirectory off your Web server’s HTML document directory named fwlogwatchshort.This directory will contain the results of the fwlogsummary.small.cgi script.
5.Edit the fwlogsummary.small.cgi and fwlogsummary.cgi scripts so that they reflect your environment. For example, make sure that the both scripts refer to the fwlogwatch subdirectory.The fwlogsummary.small.cgi script should specify the fwlogsmallsummary.html file as an output file. This file should go into the fwlogwatchshort directory. Be especially careful to edit the fwlogsummary.cgi file so that it refers to the correct Web server directory, and that it no longer has the <a href=”/cgibin/fwlogwatch.cgi”>Regenerate summaries now</a> link. Read earlier in this chapter for more details.
6.Now, create crontab entries for each script. Make sure that you specify the correct path of the CGI scripts. For example, if you have created the /fwlogsummary directory, you would create the following crontab entries:
1 * * * * /fwlogsummary/fwlogsummary.small.cgi
1 * * * * /fwlogsummary/fwlogsummary.cgi
You can create these entries by issuing the following command as root:
crontab -e
You can also create scripts in the /etc/cron.hourly directory, if you wish.
7.Now, after 30 minutes, you will see that these scripts have generated several files. Point your Web browser to your firewall’s /fwlogsummary subdirectory, and view the links generated by the fwlogsummary.cgi script.
8.For a more succinct description of the last hour’s activities, point your browser at the /fwlogwatchshort directory.You will have to specify the
www.syngress.com
590 Chapter 11 • Maintaining Firewalls
fwlogsmallsummary.html file, because it is doubtful that your Web browser uses this as a default document. If you wish, you can edit the CGI script to create an index.html file. For the purposes of this exercise, a different name was used to eliminate confusion with the /fwlogsummary directory.
9.Finally, consider the following options:
■If you are using Apache Server, use .htaccess files and htpasswd so that this information is password protected.
■Further secure this directory with Secure Sockets Layer (SSL).You can learn about enabling SSL support with Apache Server at www.openssl.org.
Additional Fwlog Features
Fwlogwatch contains the following features not discussed in this chapter:
■Sorting By editing the /etc/fwlogwatch.conf file, you can determine which events are listed first.This is a very useful feature, which allows you to emphasize information that it is important to you.
■Web server The Web server offered by Fwlogwatch is not as robust as Apache Server, nor is it as well documented. It is advised that you use Apache Server if you wish to use CGI at all.
Obtaining Additional
Firewall Logging Tools
Table 11.5 contains an all-too-brief discussion of additional tools available to you.
Table 11.5 Additional Logging Tools
|
Tool |
Description |
|
|
|
|
|
|
Ipchains logger |
A logging enhancer similar to Fwlogd, but limited to |
|
|
|
Ipchains. It is especially strong in its ability to log |
|
|
|
masqueraded connections. Its home page is at |
|
|
|
http://ipchainslog.sourceforge.net. |
|
|
LogGrep |
This daemon uses the grep utility to read and sort log |
|
|
|
files. It is limited, as of this writing, to Ipchains. With |
|
|
|
this utility, you can sort protocol, date, IP port firewall |
|
|
|
|
|
|
|
Continued |
|
www.syngress.com

Maintaining Firewalls • Chapter 11 |
591 |
Table 11.5 Continued
Tool |
Description |
|
|
|
|
|
log entries to generate custom log files. Currently, it |
|
|
can also discover port scans, and generate HTML pages. |
|
|
The project’s home page is at http://loggrep |
|
|
.sourceforge.net/. |
|
Open Correlation |
Although this project has not produced any files as of |
|
|
this writing, this project hopes to create an all-purpose |
|
|
logging daemon that can scan as many different types |
|
|
of log files as possible. Although it is dangerous to |
|
|
mention the word universal when discussing anything |
|
|
concerning Linux, this promises to be a helpful tool. |
|
|
The project’s home page is at http://sourceforge.net/ |
|
|
projects/opencorrelation/. |
|
Fwlogsum |
This application generates HTML-based reports. The |
|
|
developers aim to create a logging utility that is |
|
|
powerful, yet easy to configure. HTML reports are |
|
|
meant to emulate those created by the popular, com- |
|
|
mercial Checkpoint FW-1 log firewall. The project’s |
|
|
home page is at http://fwlogsum.sourceforge.net/. |
|
IP Firewall |
This logging software is meant to enhance IP |
|
Accounting (IPFA) |
accounting log information. It allows you to gather the |
|
|
following information: |
|
|
■ |
Per month protocol usage |
|
■ |
User monitoring, as long as identd is enabled on |
|
|
client hosts |
|
■ |
Binding of IP addresses to MAC addresses |
|
You can obtain this software at www.tucows.com, or |
|
|
at http://linuxberg.eunet.fi/conhtml/adm_firewall.html. |
|
Appsend |
An application similar to SendIP. However, this applica- |
|
|
tion also allows you to simulate additional attacks, |
|
|
such as SYN floods and additional denial-of-service |
|
|
attacks. http://www.tucows.com, or at http://linuxberg |
|
|
.eunet.fi/conhtml/adnload/58289_31510.html. |
|
IPmeter |
IPmeter monitors network usage, and is designed to |
|
|
help you bill clients for usage. It generates HTML |
|
|
reports with embedded graphics. You can download it |
|
|
at www.ipmeter.com. |
|
Mrtg |
A traffic load monitor that generates HTML reports |
|
|
with embedded graphics. Similar to IPmeter, Mrtg is |
|
|
intended as a network management and monitoring |
|
Continued
www.syngress.com

592 Chapter 11 • Maintaining Firewalls
Table 11.5 Continued
Tool |
Description |
|
|
|
tool, but it can also be very helpful as a security tool, |
|
because network management and security manage- |
|
ment concerns and tools are closely related. You can |
|
obtain Mrtg at www.mrtg.org, or at http://ee-staff.ethz |
|
.ch/~oetiker/webtools/mrtg/. |
Ntop |
The a ccompanying CD contains a version of Ntop |
|
(ntop-1.3.1-2.i386.rpm) that is compatible with most |
|
Linux versions. The latest version is available at |
|
www.ntop.org, Ntop is a powerful tool that allows you |
|
to identify the nature of all egress and ingress traffic. It |
|
is much like the standard top application, in that it |
|
gathers information about hosts, and then places the |
|
most active hosts at the top of the display. It can be |
|
run on a terminal just like the standard top application; |
|
you can run it in Web server mode, or as a Web server. |
|
This mode supports authentication, thus it allows you |
|
to easily limit access to only specific users. |
|
|
www.syngress.com

Maintaining Firewalls • Chapter 11 |
593 |
Summary
This chapter focused on ways for you to gain information from your firewall and take action.You read about ways that you can make your firewall aware of port scans, and enhance its reporting and blocking capacity.
It is vital that you make it as easy as possible to read your firewall log files and respond to new threats. Although the premier reason to create a firewall is to selectively allow traffic in and out of a network, the second most important benefit of a firewall is its ability to log traffic. In this chapter, you learned how to test your firewall by conducting limited attacks against it.You also learned how to remain informed concerning scanning attacks and others designed to crash your firewall.You now have the tools and skills required to receive automatic alerts, and have your firewall automatically drop connections to scanning hosts.
It is vital that you maintain your firewall, and with the tools presented in this chapter, you can gather the information required to maintain it intelligently.You now can receive informative alerts, and comprehensive information concerning your firewall. In regard to logging, both Firelogd and Fwlogwatch can be used together to create a comprehensive information system. Of course, new tools are being developed all the time, and you should work to remain informed about new projects, as well as updates to the tools presented in this chapter.
Solutions Fast Track
Testing Firewalls
;To disallow IP spoofing, your firewall should not allow any packets to pass from outside the network into your internal network if the source address is the same as any host in your internal network. If you are using private IP addresses, no system outside of the firewall should ever be able to assume this IP address and access your internal network’s ephemeral ports.
;Disable all unused services and configure the used ones keeping security in mind. If you are running Squid or another proxy server on the firewall, make sure that only this port is open. Daemons such as Telnet, File Transfer Protocol (FTP), Hypertext Transfer Protocol (HTTP), and others should be shut down in almost all situations. In many situations, it is best to allow only interactive logins at your firewall.
www.syngress.com

594Chapter 11 • Maintaining Firewalls
;Monitor your system hard drives, RAM, and processors.You may need to cut back on your log settings. Standard Linux tools that can help you determine if your system is becoming overburdened are vmstat and top.
;Use the who and last commands to learn about who has logged in to the firewall.
;Check the rules database. Determine if any unauthorized changes have been made to your database. Use the diff command to compare the two files to see if any changes have occurred.You may also use md5 to generate fingerprints of the configuration files to see whether any unauthorized changes have been made to them. If you have Tripwire installed, you will then be informed of massive changes to the hard drive.
;Verify connectivity with company management and end users, and remain informed concerning the operating system.
;The introduction of log analysis software such as Firelogd and Fwlogdaemon have made it possible to detect and block port scans, all the while sending an alert to the systems administrator. Most adjunct software, such as Fwlogwatch, provides ways to exclude trusted hosts from being blocked.
Using Telnet, Ipchains, Netcat, and
SendIP to Probe Your Firewall
;Although Iptables does not support rule checking, the ipchains -C command allows you to check how your existing rule set operates. It will return information as to whether the packet is dropped or accepted. It is up to you to act on this information.This tool is handy if you are logged in to the same system as you are testing, and you are becoming familiar with the existing rules and wish to send out packets that test how the rules are working.
;A simple port scan can help you determine which ports are open on your firewall. Using applications such as Telnet and Netcat, you can then determine what daemon is listening behind that port.
;If you have logged in to the firewall interactively, it is often useful to open two terminals.You can use the first terminal to issue the telnet command, and you can use the second terminal to view the results in the /var/log/messages file.
www.syngress.com

Maintaining Firewalls • Chapter 11 |
595 |
;When compiled properly, Netcat can also spoof IP addresses. If you have set a firewall rule to deny a particular source port, you can test it with Netcat. Because Netcat is so versatile, it can also be used against you to open a back door on your system.Therefore, if possible, you should install this application only on a client system, rather than on the router.
;Although Netcat does have the ability to create some packets in certain instances, it is not a true packet generator. SendIP is designed to allow you to create packets of your own design to test whether your firewall rules are working properly.
;SendIP allows you to forge any part of a Transmission Control Protocol (TCP) session, as well as any element of an IP, User Datagram Protocol (UDP), or Internet Control Message Protocol (ICMP) packet. SendIP also allows you to forge all elements of IPv6 addresses, and also allows you to forge Routing Information Protocol (RIP) packets.This tool is useful in regard to firewalls because it allows you to simulate any situation.
Understanding Firewall Logging,
Blocking, and Alert Options
;Third-party logging applications such as Firewall Log Daemon (Firelogd) and FwLogwatch are available to help you sort and act on the information gathered by the firewall.
;Firelogd, which supports both Ipchains and Iptables, can be run either as an application, or as a daemon. It reads the kernel log entries generated by either Ipchains or Iptables and passes them into a “first in, first out” (FIFO) pipe, which Firelogd can then process. Once its buffer is full, it e-mails a report of suspicious traffic to an account of your choosing.You can have it mailed to a local account, or to a remote system of your choice.
;Fwlogwatch is a logging and reporting mechanism, similar to Firelogd but far more versatile, that allows you to automatically block all traffic that is identified as an attack. Used in conjunction with Firelogd, it helps create a system that continuously keeps you informed concerning port scans and other network events that surpass the thresholds you set.
www.syngress.com

596Chapter 11 • Maintaining Firewalls
;The most intriguing feature of Fwlogwatch is its ability to automatically configure Ipchains/Iptables and issue alerts.The best way to do this
is to edit the three configuration files to suit your needs: /etc/ fwlogwatch.config (or whatever you rename it to), /usr/sbin/ fwlw_notify, and /usr/sbin/fwlw_respond.
Obtaining Additional Firewall Logging Tools
;Additional firewall logging tools include Ipchains logger, LogGrep, Open Correlation, Fwlogsum, IP Firewall Accounting (IPFA), Appsend, Ipmeter, Mrtg, and Ntop.
;Ipchains logger is a logging enhancer similar to Fwlogd, but limited to Ipchains. It is especially strong in its ability to log masqueraded connections.
;The LogGrep daemon uses the grep utility to read and sort log files. It is limited, as of this writing, to Ipchains.With this utility, you can sort protocol, date, IP port firewall log entries to generate custom log files.
Currently, it can also discover port scans, and generates HTML pages.
;Ntop is a powerful tool that allows you to identify the nature of all egress and ingress traffic. It is much like the standard top application, in that it gathers information about hosts, and then places the most active hosts at the top of the display. It can be run on a terminal just like the standard top application; you can run it in Web server mode, or as a Web server.This mode supports authentication, thus allowing you to easily limit access to only specific users.
www.syngress.com

Maintaining Firewalls • Chapter 11 |
597 |
Frequently Asked Questions
The following Frequently Asked Questions, answered by the authors of this book, are designed to both measure your understanding of the concepts presented in this chapter and to assist you with real-life implementation of these concepts. To have your questions about this chapter answered by the author, browse to www.syngress.com/solutions and click on the “Ask the Author” form.
Q:You mention the use of Nmap as a scanner in this chapter.What other ways can I use Nmap to test my firewall?
A:Use Nmap’s “slow scan” feature to map out your firewall’s ports. See if your IDS applications and logging daemons such as Firelogd and Fwlogwatch can recognize and report scans that, for example, take five minutes between sending out packets. If you find that you have to set thresholds too low in order to get satisfactory results for slow scans, consider using the Shadow intrusion detection suite (www.nswc.navy.mil/ISSEC/CID).
Q: Some of the solutions, such as using Fwlogwatch, require the use of Cron, while others require the use of a Web server such as Apache. Isn’t it a bad idea to use Cron and Web servers on your firewall?
A:Sometimes, it is necessary to run services on your firewall. If you require automated logging, you will either have to use Cron or resort to an internal scheduling application found in one of the applications you use. As long as your system’s ports and services are locked down as much as possible, and as long as you keep current concerning the daemons that you do run, you will be both safe and informed. Just to make sure you are on the safe side, use both network-level packet filtering and access control lists (ACLs) in the Web server. If possible, use HTTPS instead of plain HTTP.
Q:I thought packet-filtering routers couldn’t detect port scans.Yet, it seems like they now can. Is this a new feature given by Iptables and the 2.4 kernel?
A:No. Packet-filtering routers generally cannot detect port scans. Applications such as Firelogd and Fwlogwatch add this ability.
Q:What command do I use to create entries in the /etc/cron.hourly and/or /etc/cron.daily directories?
www.syngress.com

598 Chapter 11 • Maintaining Firewalls
A:You simply create a text file in the directory that contains the relevant commands.This file must begin with a “shebang,” which appears as follows:
#/bin/sh
You can then add whatever commands you wish. For example, you can specify the fwlogsummary.cgi file, and it will run hourly or daily, depending on the directory in which it is placed.You do not have to use any of the time fields, as you would if you use the crontab -e command. However, if you place a file in the /etc/cron.d/ directory, you will have to use the time fields, just as if you were creating a crontab entry.
Q:Fwlogwatch once created an Iptables rule blocking a host. I have since deleted this entry because I thought it was a false positive. However, I was wrong and I have noticed that this host is constantly scanning my firewall. Why doesn’t Fwlogwatch add this host again?
A:Because Fwlogwatch already thinks that it has added the host.You can either add the host to the fwlw chain manually, or restart Fwlogwatch. However, if you restart Fwlogwatch, you will lose any existing blocking rules, so save them before you restart.
Q:I am getting flooded by a huge number of e-mails from Fwlogwatch.What do I do?
A:Increase the alert_threshold value in your Fwlogwatch configuration file. Firelogd allows you to set the threshold as well. If you have installed Firelogd from an RPM, just edit the /etc/rc.d/init.d/firelogd file and increase the QSIZE= value. If you do not have access to this file, then start firelogd with the -b value option and argument, and specify the buffer size there.
www.syngress.com