


Chapter 6
Network
Authentication and
Encryption
Solutions in this chapter:
■Understanding Network Authentication
■Creating Authentication and Encryption Solutions
■Implementing One-Time Passwords (OTP and OPIE)
■Implementing Kerberos Version 5
■Using kadmin and Creating Kerberos Client Passwords
■Establishing Kerberos Client Trust Relationships with kadmin
■Logging On to a Kerberos Host Daemon
;Summary
;Solutions Fast Track
;Frequently Asked Questions
299
300 Chapter 6 • Network Authentication and Encryption
Introduction
You have seen in previous chapters how the open source community has created powerful sniffing tools.You have seen how they can be used either to administer your network or to attack it. Because these sniffing tools are open source, and because it is relatively easy to place a Linux host on your company network, you need to consider ways to minimize improper use of packet capturing tools. Encryption solutions, such as Secure Shell (SSH) and enhanced authentication schemes such as one-time passwords (OTP) and Kerberos version 5 (v5), are common solutions to this problem. In this chapter, you will learn about how to implement one-time passwords, as well as how to implement Kerberos v5 realms. These will help you reduce sniffing attacks. In future chapters, you will then learn more about how to encrypt transmissions using SSH and IPSec. But, before you do this, it is important to review the concepts of network authentication and how many current implementations leave themselves open to attack.
Understanding Network Authentication
The traditional way to log on to servers is to provide a username and password pair as authentication tokens (credentials).The client first presents these credentials by sending them across the network to a server.The server then compares this information to its own database, then allows or denies access to system resources, depending upon the results of the comparison. Up until about the last ten years, this process had been considered quite effective and secure. Due to the increased sophistication of network tools (as well as hackers that may use them), this traditional practice has become less tenable.
Still, users very commonly authenticate over the Internet using clear text passwords. Increasing amounts of people are working at home and logging on to remote e-mail and File Transfer Protocol (FTP) servers using passwords, all of which are sent in clear text. Such practices can only invite sniffing attacks that can lead to compromised user accounts and network servers.
Even if employees remain behind the firewall, many system services allow clear text authentication, including the following:
■Telnet
■FTP
■Standard Network Information Service (NIS)
www.syngress.com

Network Authentication and Encryption • Chapter 6 |
301 |
With relatively little expertise, an attacker can obtain authentication information quite simply.About ten years ago, most operating system vendors implemented encryption as a way to thwart sniffing attacks.
Attacking Encrypted Protocols
Encrypting the packets certainly seemed to be the answer to sniffing attacks. It stopped all but the most resourceful users from even trying to decrypt such protocols.Within the past five years, however, even encrypted transmissions such as Windows NT Server Message Blocks (SMBs, also known as the Common Internet File System [CIFS]), have become susceptible to attacks, because many versions of SMB/CIFS still send passwords. Although they are encrypted, the passwords are still sent across the network, which is a problem because attacking encrypted protocols has become much easier. Many tools exist that help hackers wage a sniffing attack, which is a type of “man-in-the-middle” attack, where a “sniffing host” that resides in-between two systems captures the information. All the sniffing host operator has to do is place her Network Interface Card (NIC) into promiscuous mode to be able to capture encrypted information (such as passwords and ensuing transmissions passing between hosts). Figure 6.1 shows how a “sniffing host” can sit in-between two systems and obtain encrypted information.
Figure 6.1 Conducting a Man-in-the-Middle Attack
System A
Sniffing Host
#$@##875l5S,krɏ
(Encrypted -
=383
Data) .
vzpodf9074&@#
The Sniffing Host can obtain passwords as they cross over the network. In some
cases, it does not matter if the passwords are encrypted or not.
System B
www.syngress.com

302 Chapter 6 • Network Authentication and Encryption
After a hacker obtains encrypted data, he can still act on it.The hacker will need more than a simple packet sniffer, of course. Still, it is now possible to cull passwords and other information from these packets.The specific steps of a man- in-the-middle attack, described in Figure 6.2, apply to encrypted packets as much as they do packets sent in clear text.
Figure 6.2 Steps for Obtaining Network Passwords
1: Grab the packets
from the network.
2: Isolate the encrypted password.
3: Run a cracking application against it.
After the packets containing the encrypted passwords are captured, hackers use cracking applications such as L0phtCrack (www.securitysoftwaretech
.com/lc3), John the Ripper (http://packetstorm.securify.com), and others. All of these are designed to crack passwords after they are obtained. Some, such as L0phtCrack, are designed to both capture and crack sniffed encrypted passwords. Hackers create or find new resources and use more powerful computers all of the time. In order to secure your network more fully, you should consider finding a strategy that makes it even more difficult to capture and decrypt passwords.
www.syngress.com

Network Authentication and Encryption • Chapter 6 |
303 |
Tools & Traps…
Man-in-the-Middle Attacks
Man-in-the-middle attacks come in several varieties. Sniffing attacks are simply the most popular form. Other man-in-the-middle attacks include the following:
■Replay Where the attacker captures network packets, stores them, then resends them out onto the network. Sometimes, an attacker can obtain a login sequence, which can then be used repeatedly to log in.
■Insertion When the attacker isolates a data stream and then injects arbitrary packets into it. Most of the time, such attacks are meant to annoy Internet Relay Chat (IRC) and Telnet users, but more sophisticated insertion attacks occur. Some programs are able to insert bogus packets into network transmissions to help evade network-based Intrusion Detection System (IDS) applications. Insertion attacks are not limited to just the network data stream, either. For example, versions of Microsoft Word are susceptible to an attack that allows a malicious user to insert information into a document that can cause Word to execute arbitrary code on the system. For more information, consult the following URL: http://packetstorm.securify.com/0001-exploits/mo2.htm.
Creating Authentication
and Encryption Solutions
When it comes to authenticating safely, you have two options:
■Find a way to authenticate without sending passwords across the network. In modern networks, Kerberos is the best way to do this. Kerberos is a scheme that allows hosts to communicate using public keys. It ensures that no passwords whatsoever traverse the network.
■Find a way to discard any password that is sent across the network. The accepted phrase for this strategy is one-time passwords (OTP).This strategy
www.syngress.com

304 Chapter 6 • Network Authentication and Encryption
requires that the client and the server cooperate to ensure that once a password that traverses the network is used, it is never used again.
You should also understand that it is important to encrypt the transmissions that occur after authentication. Kerberos has the added ability to encrypt transmissions once authentication occurs.The use of OTP, however, does not encrypt subsequent transmissions. OTP is usually much easier to implement than Kerberos, however. Here are some additional ways to encrypt transmissions in addition to avoiding sending passwords across the Internet.
■Secure Sockets Layer (SSL) This protocol is designed to provide “on the fly” encryption by inserting a special layer on top of the transport layer of the Open System Interconnection Reference Model (OSI/RM). It uses public and private keys to establish a session that, the-
oretically at least, is readable only between a client and a server.
■Secure Shell (SSH) This protocol encrypts the data stream, and it also allows for authentication using public keys. Using a server (SSHD) and a client (SSH), users can communicate with hosts much like using Telnet. Unlike Telnet, however, SSH is encrypted and allows users to authenticate without having passwords cross the Internet.
■IPSec (IP Security Architecture) An add-on to IP that provides encryption and authentication at the network layer of the OSI/RM.This encryption occurs “on the fly” between properly configured systems.
Except for one-time passwords, all of these solutions use public key encryption to try to create a secure data pipe in an open, insecure network.
SECURITY ALERT!
Even protocols such as SSH are not immune to attacks. For example, in 1998 the then-current version of SSH was vulnerable to an attack that allows a malicious user to forge and insert invalid packets into the data stream, resulting in decryption of the data stream. Although the problem was corrected, this example shows that even the most secure protocols can be attacked.
Now that you understand some of the ways to secure network data, let’s take a closer look at one-time passwords and Kerberos, the two authentication options discussed earlier.
www.syngress.com

Network Authentication and Encryption • Chapter 6 |
305 |
Implementing One-Time
Passwords (OTP and OPIE)
In the Linux world, the most universal way to implement OTP support in your Linux systems is to install the OPIE. For you Andy Griffith fans, OPIE doesn’t refer to Ronnie Howard’s character. It stands for “one-time passwords in everything.” It’s not a perfect acronym, but as far as OTP is concerned, OPIE is just about as perfect as you can get. OPIE is based on another, older OTP application named S/Key.What makes OPIE different is that it supports the Message Digest 5 (MD5) algorithm, which has become a de facto standard.
What Files Does OPIE Replace?
Once installed, OPIE automatically secures the use of the substitute user (su) application, as well as securing Telnet-based login. In order to do this, OPIE automatically replaces the following applications:
■/bin/su
■/bin/login
By default, OPIE does not enforce OTP whenever you log in interactively. Any user is given the choice of using OTP or the standard login procedure.This is necessary, because the creators of OPIE realized that too many people were locking themselves out of their own systems.Thus, OPIE is not an ideal solution for securing interactive login. However, any Telnet-based connections that come from a remote host will be required to log in using OTP.
OPIE does not currently support OTP for X Window sessions.Therefore, if you allow users to connect to your server through X, you must consider an alternate way to secure these connections (such as SSH or IPSec).
How Does OPIE Work?
OPIE works by generating a list of passwords that can (you guessed it!) be used only once. After a user logs in remotely, OPIE will issue a challenge.This challenge will always contain two elements:
■ Sequence number A number that begins by default at 499. Each time a user logs in, the count will decrement by one. After the count reaches 0, the systems administrator will have to regenerate the password information using opiepasswd.
www.syngress.com

306 Chapter 6 • Network Authentication and Encryption
■Seed number A fixed number for each account. Each account gets a completely random number.
After a user enters his name at a remote server’s login prompt, OPIE will send these two values over the network to the client’s terminal.The user will then enter these two numbers into an OTP generating program, such as opiepasswd (for Linux systems) or WinKey (for Windows 9x, Me, and 2000 systems).
OPIE will issue a challenge in the following situations:
■Using Telnet The login program ensures that Telnet users are always challenged.
■Using su Any nonroot user who uses su will always be challenged.
■Using FTP If configured, OPIE supports FTP as well.
OPIE Files and Applications
Here is a list of the files that the systems administrator will use:
■/usr/local/bin/opiepasswd Used by the administrator to generate passwords for all users.
■/etc/opiekeys Contains the usernames and values used for the server’s request.The additional information is a hash value of the secret password and the date the password was created. It is vital that you secure this file from all users.
■/etc/opielocks/ Contains entries of the users who are locked out.
■*/opieftpd Allows you to use OTP via FTP, and it is meant as a replacement for the in.ftpd daemon.The asterisk represents the OPIE source code directory, which will vary.You will learn more about opieftpd shortly.
■/etc/opieaccess Allows the systems administrator to specify certain hosts that do not have to use OTP.This, of course, means that usernames and passwords will traverse the network.
Users can use the following applications to generate responses:
■/usr/local/bin/opiekey A command-line Linux utility. For security reasons, OPIE will not allow users to execute this application remotely. Otherwise, passwords will traverse the network.
www.syngress.com

Network Authentication and Encryption • Chapter 6 |
307 |
■/usr/local/bin/opieinfo A command-line Linux utility that informs users concerning the next sequence number and seed number they will use. As with opiekey, this application will not allow users to execute this application remotely.
■opie.tk An X Window application written in tcl/tk that does the same thing as opiekey.
■WinKey A Windows 2000/NT/Me/9x utility that does the same thing as opiekey.
Generally, using these applications requires the use of two terminals or windows: one to begin the actual login session and the second to generate the response. Although safeguards are built into these applications, it is vital that you do not first establish an insecure connection, then use these applications.
SECURITY ALERT!
If you install OPIE and then do not run opiepasswd -c on each user, these users will not be able to log into your system remotely. You must use this command on the root account, as well. Otherwise, you will only be able to log in to your system interactively. If you try to log in remotely, all accounts will be forced to use OTP. Because you have not yet generated a password list, your OTP implementation will forever forbid you from remotely accessing the system.
opiepasswd
Although several options exist when using the opiepasswd command, the following is the most important:
opiepasswd -c username
Any user that you add must already belong to the /etc/passwd and /etc/shadow database.The opiepasswd command allows you to create OTP password lists for each user you specify.The -c option allows the systems administrator (root) to simply enter the root password, as opposed to entering an OTP password.Then, opiepasswd will generate a key for each user.This process involves selecting a private key for each user. Consider using passwords of at least ten characters, although OPIE will use any length. After you have added the user,
www.syngress.com

308 Chapter 6 • Network Authentication and Encryption
OPIE will report information about the user.Those who are truly meticulous will write this key down for each user and store it in a safe place.You will have to use this command against every single user in your system, including the root user.
When the count for a specific user reaches 0, you will have to run opiepasswd -c again on the account.Without the -c option, you will have to first use opiekey to generate a password, then enter the response when adding any user. For more information, consult the opiepasswd man page.
SECURITY ALERT!
Do not use the -c option remotely, because using it requires passwords to traverse the network. If you must use opiepasswd over a network, simply use the opiepasswd command. For example, if, as root, you want to change a password for the user named james, you would issue the following command:
opiepasswd james
However, you will have to train your users to never attempt this command while they are using a remote connection. The opiepasswd command will not allow it. Still, naïve users may still try to enter passwords. This results in passwords crossing the network, which can erode your network’s security.
As soon as the opiepasswd command is used against a user, it is then possible for that user to use OTP to log in. However, make sure that you give all users their first passwords, as well as their secret passphrases. If you do not do this, users will not be able to use OPIE. In fact, it is wise to give users at least a small list of passwords so that they can get used to the concept.
Password Format
Each password that is generated will appear similar to the following:
KING MORT GEM WASH STAR SING
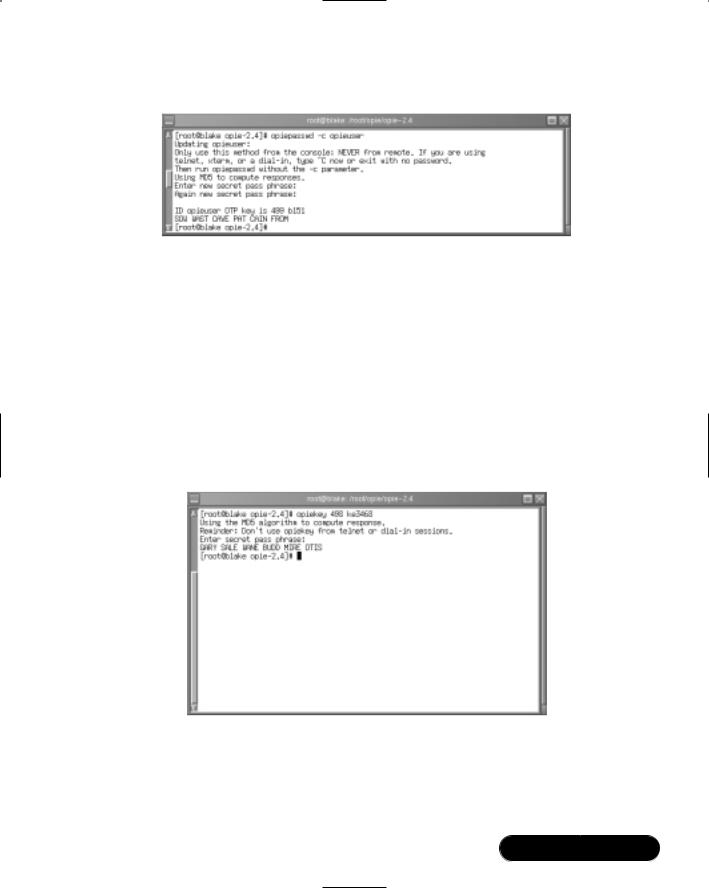
Although this text string appears to be six passwords, it is only one. Inform your users that they should enter these passwords in all caps, just to be consistent. Figure 6.3 shows the addition of a user named opieuser.
www.syngress.com
Network Authentication and Encryption • Chapter 6 |
309 |
Figure 6.3 Using opiepasswd to Add a User
Using opiekey
Any user who receives a request will have to generate a response.The opiekey command generates responses. Users will have to find a way to transfer the server’s challenge into the opiekey command line. Figure 6.4 shows a use of opiekey where the challenge of 498 ke3468 has been entered. Opiekey then requires that you enter your secret passphrase, which the administrator must give to the user in a secure manner.The user must exercise extreme caution with this secret key, because if it is made public, anyone with an OTP application could log on to the server.
Figure 6.4 Using opiekey to Compute a Response
It is vital that you explain to all OPIE users that they cannot reveal their secret keys. If a user reveals his key, then the systems administrator will have to re-create the user’s OTP list using a different secret key.
www.syngress.com
310 Chapter 6 • Network Authentication and Encryption
Using opieinfo and opiekey to Generate a List
When the systems administrator creates an OTP password list, the user can use the opieinfo command to generate a list of passwords for later use.This way, a user can still log in to a system if an OTP calculator is not available.The following command creates a list of the next five passwords and stores it into a file named opiejames.txt:
opiekey -n 5 ‘opieinfo‘ > opiejames.txt
opiekey –n 5 496 ke 7116
492:AGEE NU ORR MIT SALE BOW
493:FUSS SONG MAIL STUB SOIL WARM
494:TENT SMUG JOT WEAN CLAW BIRD
495:BANG SAD OF TORE TALL DUNE
496:ROW PO SPA HEFT CUE QUIT
This command works because it first has opiekey use the opieinfo command to learn about the current sequence and seed number for the user, then print out the next five passwords.You can then e-mail this list to the user, who can then print it out and use it at any terminal. All the user has to do is pay attention to the sequence number given by the server, then enter his secret key and the password. It is really not a problem if a user loses this list, as long as the user does not reveal her secret key.
Installing OPIE
If you are using a mainstream system, such as Red Hat or SuSE, the installation process is simplicity itself.You just do the following in the source directory:
./configure make
make install
Configuration Options
The configure script has several different options, although most people will not find them necessary.You can read about them all by issuing the ./configure --help command.Table 6.1 provides a list of the more important options.
www.syngress.com

|
Network Authentication and Encryption • Chapter 6 |
311 |
Table 6.1 Configuration Options for OPIE |
|
|
|
|
|
Option |
Description |
|
|
|
|
--enable-access-file=FILENAME |
Allows you to create a file that allows |
|
|
hosts to bypass OTP. This file is not |
|
|
installed or supported by default, because |
|
|
it can defeat the purpose of installing |
|
|
OPIE in the first place. Although not |
|
|
necessarily a security hole, this option can |
|
|
cause problems, because once again, |
|
|
passwords will begin to pass over the |
|
|
network. |
|
--bindir=DIR |
This option allows you to determine |
|
|
where the OPIE binaries will be placed, if |
|
|
you do not want them in the /bin/ |
|
|
directory. |
|
--disable-user-locking |
By default, users will be kicked out after a |
|
|
number of failed logins unless you specify |
|
|
this feature. |
|
--enable-user-locking[=DIR]
--enable-retype
--enable-insecure-override
Allows you to specify the location of the user locking directory.
Allows users to retype their secret pass phrases if they make a mistake.
Allows the use of opiepasswd and opiekey over a network. As with the --enable-access option, this option can cause security problems.
Installation Options
It is also possible to install only the OPIE clients.This option is useful, because you may want to disable all login options for a particular client system but still allow this system to log in to remote servers. If you wish to install only the client, you can issue the following command after issuing the ./configure command, complete with any options you desire:
make client install
This option installs only opiekey and opieinfo. Or, if you wish to install only the server, you can issue the following command:
make server-install
www.syngress.com

312 Chapter 6 • Network Authentication and Encryption
You can learn more about configuration features by reading the README and INSTALL files that come with the distribution.
NOTE
The opiekey command requires a seed value that is over five digits. If the opiepasswd -c command generates a value that is too short, opiekey will fail. This often happens after you reinstall OPIE. If you encounter this problem, edit the /etc/opiekeys file and erase the entry of the account having this trouble.
Uninstalling OPIE
Upon installation, OPIE copies the existing /bin/su and /bin/login files su.opie.old and login.opie.old. After installing OPIE, you can use the make uninstall command to return the system back to its original state.The OTP versions of su and login will be removed and replaced with the original versions.
However, the make uninstall command will work only if the installation went well and if you are in the original directory from which you compiled OPIE.This means that you will have to keep the original installation directory handy in case a problem appears. Relying completely upon an uninstallation program to do the right thing every time is usually unwise, so remember the exact permissions of the original files. In Red Hat Linux, these permissions are as follows:
■/bin/su: -rwsr-xr-x
■/bin/login: -rwsr-xr-x
Exercise: Installing OPIE
1.Create a subdirectory off of your home directory named opie.
2.Using a Web browser, download the OPIE 2.4 tarball source code from the CD accompanying this book, or from www.inner.net/opie.
3.After you have obtained the file, place it in the opie directory.
4.Issue the following command:
tar -zxv
www.syngress.com

Network Authentication and Encryption • Chapter 6 |
313 |
5.Change to the source directory (it should be named opie-2.4).
6.Issue the following commands, in order:
./configure
make
make install
You can tell that things are going well when the ./configure script finishes in a way similar to that shown in Figure 6.5.
Figure 6.5 Installing OPIE
7. After running make install, immediately issue the following command:
/usr/local/bin/opiepasswd-c root
Now, follow the instructions given by the opiepasswd command.
8.When opiepasswd completes, write down the resulting sequence number, seed number, and password here:
____________________________________
____________________________________
____________________________________
www.syngress.com

314 Chapter 6 • Network Authentication and Encryption
9.After you have added root, you can now access this account from a remote server by using Telnet. But first, create two new users using the useradd and passwd commands:
opieuser1
opieuser2
Make sure that you use the passwd command to give these users standard passwords in the /etc/shadow directory.
10. Issue the following commands:
/usr/local/bin/opiepasswd-c opieuser1
/usr/local/bin/opiepasswd-c opieuser2
11.Now, issue the following command to generate OTP lists for root, opieuser1, and opieuser2:
opiekey |
-n |
5 |
`opieinfo` > otplistroot.txt |
|||
opiekey |
-n |
5 |
`opieinfo |
opieuser1` |
> |
otplistopieuser1.txt |
opiekey |
-n |
5 |
`opieinfo |
opieuser2` |
> |
otplistopieuser2.txt |
12.You now have a list of the next five challenges OPIE will issue for all of the users you have added, in case they (and you) can’t get to an OTP generator such as opiekey or WinKey.Test your OPIE installation locally. Open another terminal and log in as a normal user. If you are running X, just open another terminal screen and use su to become a nonroot user (if you have a nonroot account named james, use the command su james). If you are at the command line, press CTRL+ALT+F2, or CTRL+ALT+F3, then log in as the nonroot user.
13.Now, as a nonroot user in a new terminal, use the su command:
su
14.Notice that instead of the standard password, you are now given a challenge from OPIE.
15.To create a response, get to any terminal and use the opiekey command as shown earlier in this chapter.That is, enter the following information, substituting the sequence and seed numbers, as shown:
opiekey sequence# seed#
www.syngress.com

Network Authentication and Encryption • Chapter 6 |
315 |
16.The opiekey command will respond by asking you your secret password. Enter this password correctly, because opiekey will use this secret password with the sequence and seed values to calculate the correct password. Remember, the sequence key will look something like “495,” and the seed value will look something like “bl13468.” Enter nothing else.
17.When you enter the correct sequence and seed numbers, opiekey will respond with a password consisting of several uppercase words. Go back to the terminal and carefully enter this password in all capital letters into the Response section in the other terminal, and you will be logged in.
Congratulations.You have installed OPIE on your Linux system. Now, you can install the client portion on a remote server and test your work. See the next exercise for details.
Exercise: Installing the OPIE
Client on a Remote Server
1.On another host than the one you used in the previous exercise, create a subdirectory named opie.This host will be called the OPIE client.
2.Change to the opie subdirectory and obtain the OPIE tarball.
3.Run the following commands:
./configure
make
make client install
4.Telnet to access the original server that has the full OPIE installation. This server will be called the OPIE server.The copy of OPIE on this server will issue you a challenge (the sequence number and the seed number).
5.Now, open another terminal on the OPIE client and run opiekey. Enter the challenge and seed numbers to log in. If you have any questions, follow the instructions given earlier in this chapter.
www.syngress.com

316 Chapter 6 • Network Authentication and Encryption
Exercise: Using opie-tk and Allowing
Windows Users to Deploy OPIE
1.It is very likely that you work with users who use the X Window environment, as well as Microsoft Windows systems. Several OTP generators exist that run right from any modern Windows systems.You can even find clients that run in DOS and Windows 3.11, if you want. Linux GUI clients exist, as well. Download the following files from www.inner.net/opie:
■winkey.exe A self-executable zip file, which contains the WinKey application for Windows 2000, NT, 9x, and Me.This file is available on the CD that accompanies this book.
■opie.tk-v2.3.gz A tarball containing the opie.tk GUI for Linux. This file is also available on the accompanying CD.
If you wish, you can also download additional clients, such as those for Macintosh or HP-UX machines.
2.First, let’s start with using the opie.tk application. Unzip the application, then run it as follows:
./opie.tk-v2.3
3.Begin a telnet session with the OPIE server and enter a login name so that you receive a challenge.
4.Enter this challenge into the opie.tk-v2.3 screen and press Calculate. You will see a response similar to that shown in Figure 6.6.
Figure 6.6 The opie.tk Interface after Calculating a Response
5. Enter this response into the Telnet terminal and log in.
www.syngress.com
Network Authentication and Encryption • Chapter 6 |
317 |
6.Now, unzip the WinKey binary, which is in a self-executing file.
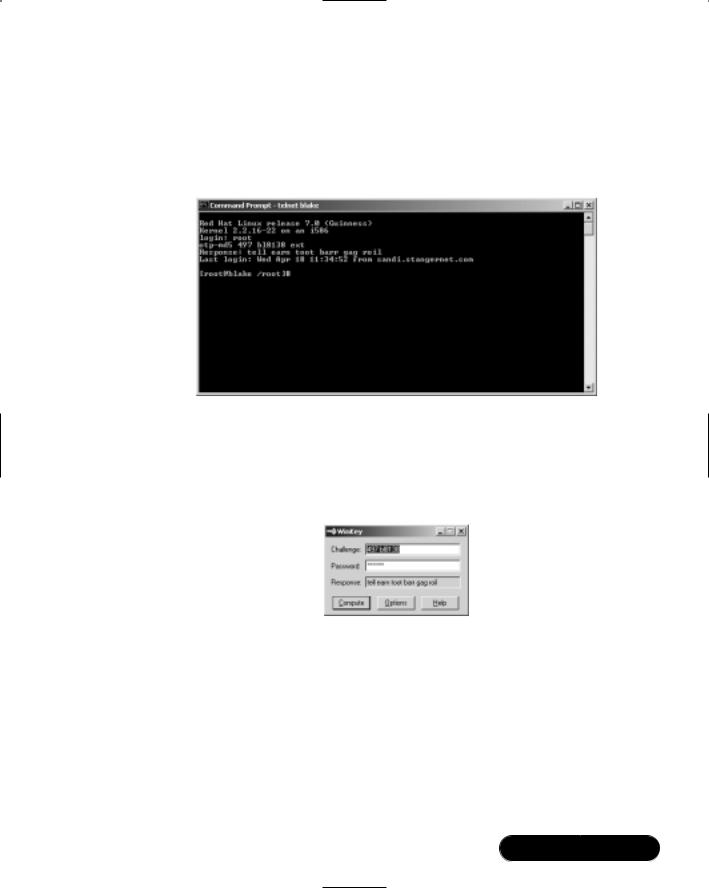
7.Repeat the OPIE login procedure. See Figure 6.7, which shows a user receiving a challenge.
Figure 6.7 Logging On to a Linux System from Windows 2000 Advanced Server
8.Enter the challenge values into the WinKey client and press Compute. You can copy and paste these values, if you wish.You will receive a response similar to that shown in Figure 6.8.
Figure 6.8 Using WinKey to Generate a Response
9.Now, enter the response into the client. Sometimes, the Windows screen will allow you to paste the response right into the proper place. Just rightclick on the screen. If this doesn’t work, just enter the values manually.
10.When you enter the response properly, you will be logged in.
www.syngress.com

318 Chapter 6 • Network Authentication and Encryption
Exercise: Installing opieftpd
1.OPIE does not automatically place the compiled opieftpd file into a standard directory, nor does it program xinetd to recognize and use the binary.The compiled binary will be found in the OPIE source code directory of the OPIE server. Copy this file to the /usr/sbin/ directory.
2.Now, create a simple text file named opieftpd in the /etc/xinetd.d/ directory and enter the following into it:
service ftp |
|
|
{ |
|
|
disable = no |
|
|
socket_type |
= stream |
|
wait |
= |
no |
user |
= |
root |
server |
= /usr/sbin/opieftpd |
|
server_args |
= -l |
|
log_on_success |
+= |
DURATION USERID |
log_on_failure |
+= |
USERID |
nice |
= |
10 |
} |
|
|
3.Now, disable the wu-ftpd daemon by editing its file (it should be in the /etc/xinetd.d/ directory) and change the disable = value to yes. If you have another FTP daemon configured to run from xinetd or any other daemon, disable it now.
4.Restart xinetd:
/etc/rc.d/init.d/xinetd restart
5.Now, FTP to the OPIE server and enter your name to begin the OPIE login sequence. If you don’t see an OTP challenge, then recheck your work.
6.Use any OTP client you wish to generate a response. Make sure that you enter your secret key (password) and sequence/seed numbers accurately.
www.syngress.com

Network Authentication and Encryption • Chapter 6 |
319 |
7.The text you copy in from WinKey, for example, will not echo.Trust that it has been entered and press ENTER.You may have to repeat this process a few times in order to get it correct.
8.When you enter the information correctly, you will be logged in.You now have enabled OTP support for the su command, as well as for Telnet and FTP.
Implementing Kerberos Version 5
Kerberos has become the premier way to allow network authentication. It provides a central login point for a network that allows single sign-on for the network resources the user is allowed to access. Kerberos v5 is a revolutionary step in network authentication, because it allows you to establish a domain that authenticates not only individual hosts and users, but individual daemons, as well. Using Kerberos, it is possible to centrally control which hosts and users can access the daemons on your network. In this sense, Kerberos is revolutionary. It obviates the use of the Network Information Service (NIS), for example, and is a vast improvement upon it. Both NIS and Kerberos allow you to centrally manage users, but NIS does not encrypt transmissions, and it requires passwords to be given across the network. Microsoft now uses its proprietary version of Kerberos for its Windows 2000 products.
After Kerberos is established on a network, passwords do not ever cross the network, not even in encrypted form. It is also possible to configure Kerberos to encrypt, ensuring communications between authenticated hosts. Kerberos is implemented by a Key Distribution Center (KDC), which holds all of the information that allows Kerberos clients to authenticate; the KDC contains the database that makes single sign-on possible.Whenever you have a system of Kerberos clients authenticating with a KDC, you are said to have a Kerberos “realm,” which is shown in Figure 6.9.
Whenever you have a host that joins a Kerberos realm, it is often said to be “Kerberized.”Whenever an application is altered to participate in a Kerberos realm, it is also said to be Kerberized.This chapter discusses Kerberos version 5, which is the most current version as of this writing.
www.syngress.com
320 Chapter 6 • Network Authentication and Encryption
Figure 6.9 A Kerberos Realm
Key Distribution Center (KDC)
Kerberos Host A
Kerberos Host B
Kerberos Realm
Kerberos Host C |
Kerberos Host D |
NOTE
Usually, a Kerberos realm is given the same name as the Domain Name System (DNS) name for the company. Thus, a company with the DNS name of yourcompany.com will likely have the Kerberos realm name of YOURCOMPANY.COM. This practice is not absolutely necessary, however. You will see how you can edit a portion of the /etc/krb5.conf file to map dissimilar DNS domain and realm names to each other later in this chapter.
Why Is Kerberos Such a Big Deal?
The KDC’s database does not work in the traditional way.Traditionally, a standard user database waited for passwords to be sent across the network, and then the authentication mechanisms would present authentication information (a username and a password) to the database, make a comparison, and then access would be granted. In Kerberos, all network information (data about users, services, and hosts) is stored in the Kerberos database.This database contains the public keys of all principals. A principal is the name for any host, service, or user that is allowed to authenticate on a Kerberos network. Any sensitive information, such as pass-
www.syngress.com

Network Authentication and Encryption • Chapter 6 |
321 |
words, always stays on the KDC and on the client. Using public key cryptography, the KDC and the client establish trust relationships that allow the KDC to then determine exactly which services a host and/or user can access.
Kerberos Terms
Table 6.2 provides the terms used when implementing Kerberos.
Table 6.2 Common Kerberos Terms
|
Kerberos Element |
Description |
|
|
|
|
|
|
Key Distribution Center (KDC) |
The system that authenticates principals. The |
|
|
|
KDC is responsible for the storage and |
|
|
|
transmission of principals on a Kerberized |
|
|
|
network. Most of the time, the KDC houses |
|
|
|
the Ticket Granting Server (TGS). The TGS |
|
|
|
provides a special token called a ticket |
|
|
|
granting ticket. The KDC also houses the |
|
|
|
Authentication Server (AS), which grants the |
|
|
|
actual tickets clients use when accessing |
|
|
|
hosts and daemons. |
|
|
Client |
A host that is part of a Kerberos realm. A |
|
|
|
client can house several daemons that can |
|
|
|
be accessed only if a user has properly |
|
|
|
authenticated with a KDC. |
|
|
Ticket Granting Ticket (TGT) |
A special access token obtained from the |
|
|
|
KDC that enables users to obtain additional |
|
|
|
tickets. Every user on a Kerberos realm must |
|
|
|
use the kinit program to obtain a TGT. |
|
|
Authentication Server |
A server that is responsible for granting |
|
|
|
tickets to users, hosts, and host daemons |
|
|
|
(principals). The Authentication Server first |
|
|
|
communicates with the TGT to ensure that |
|
|
|
the principal has been authenticated, and it |
|
|
|
then issues the ticket. In Linux systems, the |
|
|
|
Authentication Server is housed in the same |
|
|
|
system as the KDC. |
|
|
Ticket |
Temporary credentials generated when a |
|
|
|
properly authenticated client accesses |
|
|
|
network service, such as an FTP server, a |
|
|
|
printer, or a router. The ticket authenticates a |
|
|
|
client that wishes to use a remote service in |
|
|
|
a realm. If a client (Host A) wishes to access |
|
|
|
|
|
|
|
Continued |
|
www.syngress.com

322 |
Chapter 6 • Network Authentication and Encryption |
||
|
|
Table 6.2 Continued |
|
|
|
|
|
|
|
Kerberos Element |
Description |
|
|
|
|
|
|
|
a host in a Kerberos realm (Host B), the KDC |
|
|
|
will issue a ticket to Host A, which allows |
|
|
|
access to the service for a certain period of |
|
|
|
time (hours, by default). A ticket is not |
|
|
|
generated by kinit. |
|
|
Principal |
The equivalent of an entry in the /etc/passwd |
|
|
|
and /etc/shadow database in a standard |
|
|
|
Linux system. A principal can be defined as |
|
|
|
either a user, a host, or a host daemon that |
|
|
|
runs on hosts, and is comprised of three |
|
|
|
parts: The primary, the instance, and the |
|
|
|
realm. See Figure 6.10. |
|
|
Credential cache/ticket file |
Usually a file in the /tmp/ directory that |
|
|
|
contains your TGT, host, and host daemon |
|
|
|
keys. Service keys are generated when a |
|
|
|
client attaches to a Kerberized daemon that |
|
|
|
is able to authenticate with the KDC. |
|
|
Keytab (Key table) |
A file on a Kerberos client that includes the |
|
|
|
public keys of the hosts and host daemons |
|
|
|
that this server can access. Whenever a |
|
|
|
connection is made, Kerberos checks the |
|
|
|
contents of the keytab, then checks the |
|
|
|
current user’s credential cache. If these |
|
|
|
elements are approved, Kerberos will allow |
|
|
|
access to the remote server. It is vital that |
|
|
|
you update this file on each client. The file is |
|
|
|
usually named /etc/krb5.keytab. |
|
|
Policy |
A special limit placed upon a Kerberos |
|
|
|
principal that determines the amount of time |
|
|
|
a particular user, host, or host daemon ticket |
|
|
|
remains valid. |
|
|
|
|
Kerberos Principals
You have already read that a principal consists of a primary (also known as a “root”), an instance, and a realm. Figure 6.10 shows an example of a host principal, which uses all of the three elements of a principal. A host principal always has the word “host” as the primary, then has the name of the host as the instance and the realm name in the realm section. A principal can exist for daemons run by hosts, as well.
www.syngress.com

Network Authentication and Encryption • Chapter 6 |
323 |
Figure 6.10 A Kerberos Principal
Principal
Primary |
Instance |
Realm |
Host |
/www.yourcompany.com |
@YOURCOMPANY.COM |
The following is an example of a host daemon principal:
ftp/www.yourcompany.com@YOURCOMPANY.COM
This principal recognizes the FTP service for the www.yourcompany.com service. Any user who properly authenticates with the KDC and who is allowed access to this service will then be able to use the FTP service on the www.yourcompany.com host.
Many times, however, a principal does not have an instance. For example, it is possible to create a user principal, which would appear as follows: james@YOURCOMPANY.COM.This principal would allow a user to log on to any host in a Kerberos realm.You can, of course, specify an instance for a user. For example, the following principal would allow login to only the system named www.yourcompany.com: james/www.yourcompany.com @YOURCOMPANY.COM
The Kerberos Authentication Process
The information in the next couple of paragraphs is greatly simplified, but it is more than enough from a system administrator’s point of view.When a Kerberos client first obtains a TGT from the KDC, this token does not actually provide access to any particular daemon or network service. It is simply a token that informs other hosts that the KDC has authenticated this host, and that this host and user can request services from other hosts. Because the TGT is signed by the user’s password and turned into a hash, the user can use the kinit command and his own password to generate the same hash and make a comparison between the two. If the TGT and password match, then a session key is established and a credential cache is created, usually in a file in the /tmp/ directory.
www.syngress.com

324 Chapter 6 • Network Authentication and Encryption
After the credential cache file is populated with the TGT, the host and user can then use this TGT to actually log on to hosts and request services.When it comes time for a user (a principal) to access a host’s daemon (such as KerberosFTP and rlogin), the user uses his TGT to contact the KDC and ask for an actual ticket, which is the access token for a specific service. If the KDC authenticates this request, the KDC will send a ticket and update the principal’s credential cache with information about the service he or she has requested. If the Kerberos database does not contain the service or host name, then access will be denied.
How Information Traverses the Network
When a ticket is transported across the network, it is signed by the user’s password, which is entered whenever a Kerberos administrator uses the kadmin program to add a principal to the database. Note that the ticket does not actually contain the password. It is only signed by a password, which creates a hash. Not only that, but Kerberos places a time stamp on this ticket, so that even if someone with a supercomputer were to subject this ticket to a brute force attack and then generate a valid hash, the access token would no longer be valid.The Kerberos version in Red Hat Linux defaults to 8 hours. For this reason, time synchronization on networks and systems that use Kerberos is essential. NTP (Network Time Protocol) may be used for this purpose.
NOTE
For a more exhaustive discussion detailing how Kerberos works, go to http://web.mit.edu/kerberos/www/dialogue.html. This URL will take you to a document entitled “Designing an Authentication System: A Dialogue in Four Scenes.” Not only does it explain Kerberos quite well, it is also a well-written parody of a dialogue using the Socratic Method. I know that the document sounds pretty stuffy, but it’s an easy read and will help you learn more about exactly why Kerberos was developed and exactly what it does.
However, understand that this document was originally written for Kerberos version 4. The current version of Kerberos is version 5. The chief alterations between Kerberos v4 and Kerberos v5 is that Kerberos v5 uses public key encryption. So, as clearly written as the dialog is, if you don’t understand public key cryptography well, then you probably won’t understand Kerberos very well.
www.syngress.com

Network Authentication and Encryption • Chapter 6 |
325 |
Creating the Kerberos Database
After installing Kerberos, you will have to create a database where all principals will be stored.You do this by issuing the following command:
/usr/kerberos/sbin/kdb5_util create -s
This command creates the necessary database files in the /var/kerberos/ krb5kdc/ directory. After you have created the database entries, you then edit the /etc/krb5.conf and /var/kerberos/krb5kdc/kdc.acl files to reflect your Kerberos realm and DNS domain names.You must then add an administrative user, as well as additional principals, to the database.
Using kadmin.local
Because you have a new Kerberos realm, you are presented with a logical conundrum:You need to administer Kerberos, but the kadmin command requires that you present a username and a password. However, no administrative user or password exists in the database yet. So, how do you get started? The answer is the /usr/kerberos/sbin/kadmin.local command. It does not require a user to first authenticate. As long as you have created the Kerberos database and edited the proper files, you will then be able to use kadmin.local to add an administrative user:
/usr/kerberos/sbin/kadmin.local –q "addprinc james/admin"
This command has kadmin.local run as a one-time command.You can also use kadmin.local interactively, which means that you begin a session where you get a special prompt that lets you enter Kerberos-specific commands.You can learn more about kadmin.local by reading its man page.
After using kadmin.local, Kerberos will have an administrative user, and you can use the kadmin from any host on the network.
SECURITY ALERT!
Because kadmin.local does not require extensive authentication, consider the importance of making sure that this system runs no other daemons, and is accessible only via the most stringent security requirements. For example, consider allowing only interactive login and making sure that the computer itself is physically secure.
www.syngress.com

326 Chapter 6 • Network Authentication and Encryption
Using kadmin
The kadmin application, also found in the /usr/kerberos/sbin/ directory, is designed to add principals to the Kerberos database. It is much like kadmin.local, except you can issue it from any Kerberos client on your realm. Kadmin is usually used as an interactive command, as shown in the following sequence:
terminal# kadmin
Authenticating as principal james/admin@ YOURNETWORK.COM with password. Enter password:
kadmin: addprinc james
WARNING: no policy specified for james@ YOURNETWORK.COM; defaulting to no policy
Principal "james@YOURNETWORK.COM" created. kadmin: quit
terminal#
This example shows a kadmin session where the Kerberos administrator, james/admin, starts kadmin, enters the administrative password, then uses the addprinc command to add a user named james.This user will then be able to access network daemons and services, as long as the Kerberos administrator takes the additional steps shown in the upcoming example. Notice first that Kerberos automatically adds the realm name. Second, notice that the user
james@yournetwork.com is different than the user james/admin@yournetwork
.com.This is because the first principal (james@yournetwork.com) has an empty instance, whereas the second (james/admin@yournetwork.com), lists the admin instance, which makes the user an administrative user.
Here is another example:
terminal# kadmin
Authenticating as principal root/admin@STANGERNET.COM with password. Enter password:
kadmin: addprinc -randkey host/www.yournetwork.com WARNING: no policy specified for host/www.yournetwork.com@
YOURNETWORK.COM; defaulting to no policy
Principal "host/www.yournetwork.com@YOURNETWORK.COM" created. kadmin: quit
terminal#
www.syngress.com

Network Authentication and Encryption • Chapter 6 |
327 |
This example shows a kadmin session where the Kerberos administrator james/admin starts kadmin, enters the administrative password, then uses the addprinc -randkey command to add a host principal named host/www. yournetwork.com.The -randkey option is unique to host and host daemon principals, because after a principal is created, the password no longer needs to be remembered, because this password will be used to sign tickets for users who are already authenticated.This password is used only to sign tickets. No user will ever have to enter this password. In this case, it is best to let Kerberos create its own difficult password, rather than you taking the time to do so, because you will then have to verify it.
To add a host daemon, you would simply issue the following command from within kadmin:
addprinc -randkey ftp/www.yournetwork.com
This command adds the ftp daemon for the www.yournetwork.com daemon.
NOTE
For the sake of convenience, you may want to make your administrative user the same name as your login name. Although not the most secure option, doing so means that you don’t have to use the following command each time you start kadmin:
/usr/kerberos/sbin/kadmin –p james/admin
Still, it’s important that you know this command, because you will need to use it at least once on every host that belongs to your Kerberos network. This is because, as you will see, each client needs to have its keytab file updated by the systems administrator.
Finally, if you are logged into one Kerberos realm named @othercompany.com, and you wish to use Kerberos to log into @yourcompany.com realm, you can issue the following command:
/usr/kerberos/sbin/kadmin –p james/admin@YOURCOMPANY.COM
This command will also work if you are logging in from the @yourcompany.com realm. Adding the @yourcompany.com is simply redundant in this case, however.
www.syngress.com

328 Chapter 6 • Network Authentication and Encryption
The kadmin command also lists, modifies, and deletes principals.To list present Kerberos users from within kadmin, enter the following command:
kadmin:list_principals
ftp/blake.yourcompany.com.YOURCOMPANY.COM
rlogin/wordsworth.YOURCOMPANY.COM
james.YOURCOMPANY.COM
sandi.YOURCOMPANY.COM
host/blake.yourcompany.com.YOURCOMPANY.COM
kadmin:
To delete any principal, you can issue the following command:
kadmin: delete_principal user1
Are you sure you want to delete the principal "user1@YOURCOMPANY.COM"? (yes/no): yes
Principal "user1@YOURCOMPANY.COM" deleted.
Make sure that you have removed this principal from all ACL's before reusing.
kadmin:
For more information, use the ? command from within kadmin or consult the Kerberos documentation in the /usr/share/krb5*/ directory and the man pages.The asterisk represents the Kerberos version you are using.
Using kadmin on the Client
The kadmin command does not simply add and manage principals to the Kerberos realm. It is also used to populate and update the Key table files for each Kerberos host. It is vital that you understand this kadmin function, because most of the existing Kerberos documentation skims over this step.This is partially because most people who write about Kerberos do not have the knowledge to actually implement Kerberos, or because they know how to implement Kerberos so well that they just assume that you already know this step. Hopefully, the present discussion will bridge the gap between the overly theoretical and overly technical writers and actually show you how to properly configure Kerberos clients. You will learn more about this shortly. Figure 6.11 shows the gkadmin interface.
Although it is a nice interface, the command-line interface is ideal for updating the /etc/krb5.keytab files on clients.
www.syngress.com

Network Authentication and Encryption • Chapter 6 |
329 |
Figure 6.11 The gkadmin Interface
NOTE
If you are running X, you can use the gkadmin GUI utility. Install the gnome-kerberos package for your particular distribution. You can obtain it from www.rpmfind.net, or other sites. It is also available on many distribution CDs, such as the Red Hat Power Tools disk.
Using kadmin and Creating
Kerberos Client Passwords
As a Kerberos administrator, you will have to add user principals.The creators of Kerberos (researchers at the Massachusetts Institute of Technology) have recommended client passwords of at least six characters. Passwords should combine upperand lower-case letters, and they should also include numbers and punctuation marks.
www.syngress.com
330 Chapter 6 • Network Authentication and Encryption
Setting Policies
Kerberos policies are much like standard Unix password policies.They determine password length, whether or not a user’s principal will expire at a certain time, when the password will expire, and so forth. Standard principal policy settings include the following:
■Policy name When you create a policy, you can name it to help differentiate it from other policies.
■Minimum password life (in seconds) How long a user must keep a password before being allowed to change it.
■Maximum password life (in seconds) The longest amount of time a user can keep a password.
■Minimum password length Sets the number of characters a password must have.
When you add a principal using kadmin and do not specify a policy, the default behavior is to establish no policy whatsoever.You can create a policy by using the addpol command from within kadmin:
kadmin: addpol yourdomainpol
kadmin: modpol -maxlife 2/02/2004 -minlength 6 domainpol
This policy means that the principal will expire on the second day of February 2004, and that any subsequent password change must be at least six characters long.You can add this policy to a user named Jacob by using the modprinc command, as follows:
modprinc –policy yourdomainpol
Using Kinit
The kinit command allows a user to obtain a TGT from the KDC. It does not allow a user to get a host or service ticket. A host or service ticket is obtained only when a user is successful logging into the service. Issuing the kinit command has the Kerberos client contact the KDC and obtain a TGT, as shown in Figures 6.12 and 6.13.
www.syngress.com
Network Authentication and Encryption • Chapter 6 |
331 |
Figure 6.12 Using the kinit Command
KDC
kinit Command
Kerberos Client
Figure 6.13 Receiving a TGT from the KDC
KDC
Ticket Granting Ticket
(TGT)
Kerberos Client
www.syngress.com

332 Chapter 6 • Network Authentication and Encryption
Here is an example of a simple kinit session:
terminal# /usr/kerberos/bin/kinit
Password for james@YOURDOMAIN.COM:
terminal#
This session has obtained a TGT from the KDC.This credential is usually stored on the local hard disk, usually in the /tmp/ directory.The file is usually in the following format:
krb5cc_UID
UID is the user identification number of the user who issued the kinit command. For example, if you are root, the credential cache file would be krb5cc_0, whereas the user with the UID of 500 would have the credential file named krb5cc_500.
Suppose, however, that your Kerberos name was james, and that you wished to obtain your credential, but only had access to a terminal owned by another user named sandi.The following command would get you your own TGT:
terminal# /usr/kerberos/bin/kinit sandi
Password for sandi@YOURDOMAIN.COM:
Now, you have begun your own credential cache, which right now holds only your TGT. For more information about using kinit, consult its man page or the Kerberos workstation documentation in the /usr/share/doc/krb5*/ directory.
The kinit Command and Time Limits
Sometimes you may want to obtain a TGT that is valid for a period shorter than the default (eight hours). Suppose that you know you will use this TGT for only one hour.The following command would make the TGT valid for that period of time:
terminal# /usr/kerberos/bin/kinit -l 1h
terminal#
Kinit and most Kerberized clients can also forward the tickets they obtain. This means that you can obtain tickets on one host, then have them sent to another.The following command obtains a ticket for the user named james in the YOURDOMAIN.COM realm for two hours, then allows you to forward them, as well:
www.syngress.com

Network Authentication and Encryption • Chapter 6 |
333 |
terminal# /usr/kerberos/bin/kinit –f -l 1h @YOURDOMAIN.COM
terminal#
For additional details concerning how to customize the TGT and tickets obtained from the KDC, consult the man pages for kinit and additional clients.
Managing Kerberos Client Credentials
After you run kinit, the cache will contain only the TGT. Additional credentials, such as actual tickets to access a daemon such as FTP, will be added only after you access the remote host.This, in addition to properly updating the /etc/krb5.keytab file, is a little-understood part of Kerberos configuration.To list your current credentials, use the following command:
terminal# /usr/kerberos/bin/klist
03/21/01 3:05:53 04/21/01 13:05:53
krbtgt/YOURNETWORK.COM@YOURNETWORK.COM
terminal#
This command shows that a TGT has been issued on March 21st for the YOURNEWORK.COM realm. Additional options exist. Consult the klist man page.
The kdestroy Command
When you log off of your system, you should use the kdestroy command to eliminate your credential cache.This command erases the /tmp/ krb5cc_UID file.You need to use this command when your TGT and other tickets expire.
Many times, a seeming Kerberos problem can be solved by erasing this cache and using kinit over again.
NOTE
The gnome-kerberos package ships with the /usr/bin/krb5/krb5 application, shown in Figure 6.14. It is a combination of the kinit, klist, and kdestroy applications, because you can use it to view, delete, and obtain credentials.
www.syngress.com

334 Chapter 6 • Network Authentication and Encryption
Figure 6.14 The krb5 Interface
WARNING
Credential caches can grow quite large, and can remain valid long after a user walks away from the terminal. To ensure that your Kerberos realm remains secure, encourage and train users to use kdestroy whenever they have finished a session. Otherwise, another user can walk up to the terminal and access network resources.
Exercise: Configuring a KDC
You now have a basic understanding of Kerberos elements. Now, take the following steps to configure a KDC on your Linux system.These steps will allow you to create a Kerberos database, configure the necessary files, and create user, host and host daemon principals.
1.Take the time to plan your DNS domain and Kerberos realm names. If you do not have a proper DNS domain created, take the time to do this now. Enter the following information:
Planned DNS domain name: __________________________________
Planned Kerberos realm name: _________________________________
2.Obtain and install Kerberos using the available RPM files.You can download them from www.rpmfind.net. Make sure that you obtain the packages appropriate for your Linux host:
www.syngress.com

Network Authentication and Encryption • Chapter 6 |
335 |
■krb5-libs-*
■krb5-workstation-*
■krb5-server-*
■krb5-devel-*
The * represents the version appropriate for your Linux host. Also, the krb5-devel package is necessary only if you plan to develop your own Kerberized applications.The 1.2.2-4 versions of these files are on the accompanying CD.
3.Install the packages in the following order:
■krb5-libs-*
■krb5-workstation-*
■krb5-server-*
■krb5-devel-*
4.Now, edit the /etc/krb5.conf and /var/kerberos/krb5kdc/kadm.acl files so that they reflect your planned Kerberos realm information. If you can, simply substitute your DNS domain and Kerberos realm information for all example.com/EXAMPLE.COM entries.Take special note of the [domain_realm] entries, which map DNS domains to Kerberos realms. This section helps you if your DNS domain is not the same as your Kerberos realm. Properly editing the /etc/krb5.conf file ensures that you will be able to use kadmin, kinit, and additional commands to access the database on the KDC.You will see how you will have to do much the same thing for each Kerberos client host.
The /var/kerberos/krb5kdc/kadm5.acl file should appear as follows:
*/admin@YOURDOMAIN.COM *
Now, anyone with the /admin instance has the power to administer all elements of your Kerberos realm.
5.Now that you have installed the correct Kerberos RPM packages and edited the configuration files, create the Kerberos database:
/usr/kerberos/sbin/kdb5_util create -s
You will be asked to create and confirm a password. Make sure that you save this password in a save place.The -s option creates what is
www.syngress.com

336 Chapter 6 • Network Authentication and Encryption
called a “stash file,” which contains the password for the Kerberos database. If you don’t create this stash file, Kerberos will ask you for the password each time you restart it.
6. Start the kadmin, krb5kdc, and krb24 daemons in the following order:
/etc/rc.d/init.d/krb5kdc start
/etc/rc.d/init.d/kadmin start
/etc/rc.d/init.d/krb524 start
7.To ensure that these daemons will start at the next reboot, use ntsysv to mark the Kerberos services to start automatically.
8.Now, populate the database you have just created using the kadmin.local command:
/usr/kerberos/sbin/kadmin.local –q "addprinc
kerberosadministrator/admin"
If you wish to use a name other than kerberosadministrator, substitute your own. However, you must use the /admin instance, because using this instance gives any user you specify the privileges to list, add, modify, and delete users.
9.Check the /var/kerberos/krb5kdc/kdc.conf file and ensure that it reflects the proper realm name.
10.Now that you have created an administrator account and verified all settings, log on using kadmin or gkadmin:
terminal$ /usr/kerberos/sbin/kadmin –p
kerberosadministrator/admin
Authenticating as principal kerberosadministrator/admin@ YOURDOMAIN.COM with password kadmin:
If this command fails, check your /var/kerberos/krb5kdc/kadm5.acl file and make sure that it reads as follows:
*/admin@YOURDOMAIN.COM *
You will, of course, substitute your own realm information. Make sure that the /etc/krb5.conf file is also correct for your Kerberos realm and DNS information, that your system has proper DNS resolution (both forward and reverse), and that this system is a client to the proper DNS server.
www.syngress.com

Network Authentication and Encryption • Chapter 6 |
337 |
11.After you have been able to obtain a kadmin prompt, enter the following command:
addprinc username
Where username is the username you are currently logged in as.
12.When you have added the username user, type quit to exit kadmin.
13.Now, using the username you have just added, use kinit.
14.Use klist or krb5 to verify that you can get and list a TGT. Either client will show only the TGT, because you have not yet tried to authenticate with any of the network hosts.You will obtain actual ticket when you log on to remote hosts daemons. If you see a TGT, congratulations. If you need to troubleshoot Kerberos further, reread the rest of this chapter and consult the Kerberos documentation, which resides in various man pages (kerberos, kadmin, kinit, and so forth), as well as /usr/share/doc/ krb5-server-1.2.2/ and /usr/share/doc/krb5-workstation-1.2.2/ directories.
Establishing Kerberos Client Trust
Relationships with kadmin
A trust relationship in public key cryptography allows two hosts to authenticate each other and to decrypt information.The only way to establish a trust relationship on the Kerberos client host is to use the kadmin command.The systems administrator must extract parts of the Kerberos database and insert them onto each client. Figure 6.15 shows the process of updating the /etc/krb5.keytab file for each client using kadmin ktadd.
The administrator must use the kadmin -ktadd command on each Kerberos client that wishes to participate in the Kerberos realm.The process of extracting records populates the local host’s /etc/krb5.keytab file with the hosts and services that the Kerberos client is allowed to use.The KDC supplies these keys.
The following example shows the kadmin ktadd -k command that gives each client the ability to prove that it has the public keys of the services used.The /etc/krb5.keytab file contains this information.To update the keytab file of a Kerberos client (in this example, a host named wordsworth), you would go through the following sequence on the client itself:
www.syngress.com

338Chapter 6 • Network Authentication and Encryption
terminal# /usr/kerberos/sbin/kadmin
Authenticating as principal james/admin@YOURCOMPANY.COM with password. Enter password:
kadmin: ktadd -k /etc/krb5.keytab host/keats.yournetwork.com
Entry for principal ftp/keats.yournetwork.com with kvno 6, encryption type DES cbc mode with CRC-32 added to keytab WRFILE:/etc/krb5.keytab. Entry for principal host/keats.yournetwork.com with kvno 6, encryption type Triple DES cbc mode raw added to keytab WRFILE:/etc/krb5.keytab. kadmin: quit
terminal#
Figure 6.15 Establishing Trust Relationships Using the kadmin ktadd Command
Client B
Administrator uses kadmin on Client A to update the local /etc/ krb5.keytab file.
Public Keys
Transferred
from KDC
KDC
Public Keys
Transferred
from KDC
Administrator uses kadmin on Client B to update the local /etc/krb5.keytab file.
Client B
www.syngress.com

Network Authentication and Encryption • Chapter 6 |
339 |
Now, this host has the public key of the keats system. It is vital that you give the host principal entry to this client. Otherwise, Kerberos will not be able to compare information to allow the wordsworth access to keats.
Here is another example that adds the ftp/keats.yournetwork.com principal to the wordsworth keytab (/etc/krb5.keytab):
terminal# /usr/kerberos/sbin/kadmin
Authenticating as principal james/admin@YOURCOMPANY.COM with password.
Enter password:
kadmin: ktadd -k /etc/krb5.keytab ftp/keats.yournetwork.com
Entry for principal ftp/keats.yournetwork.com with kvno 6, encryption type DES cbc mode with CRC-32 added to keytab WRFILE:/etc/krb5.keytab. Entry for principal ftp/keats.yournetwork.com with kvno 6, encryption type Triple DES cbc mode raw added to keytab WRFILE:/etc/krb5.keytab.
kadmin: quit
terminal#
Assuming that the user has run kinit, this host can now properly authenticate with keats to access the FTP server.You will have to repeat this process to add the host/keats.yournetwork.com entry, as well. Unless you take these two steps, you will not be able to access any daemon on the host named keats.
Additional Daemon Principal Names
Generally, you must add a principal to the Kerberos database for each service. For example, to add smtp and pop3 principals for the host named blake, you would create the following principals:
■smtp/blake.yourdomain.com For a Kerberized SMTP service.
■pop3/blake.yourdomain.com For a Kerberized POP3 service.
Remember, the text string “yourdomain” represents your DNS domain. Kerberos does not use the word “domain” to represent its authentication space— it uses the word “realm.” Additional Kerberized services exist. Check your xinetd directory (usually /etc/xinetd.d/) for additional service names to add.
www.syngress.com
340 Chapter 6 • Network Authentication and Encryption
Logging On to a Kerberos Host Daemon
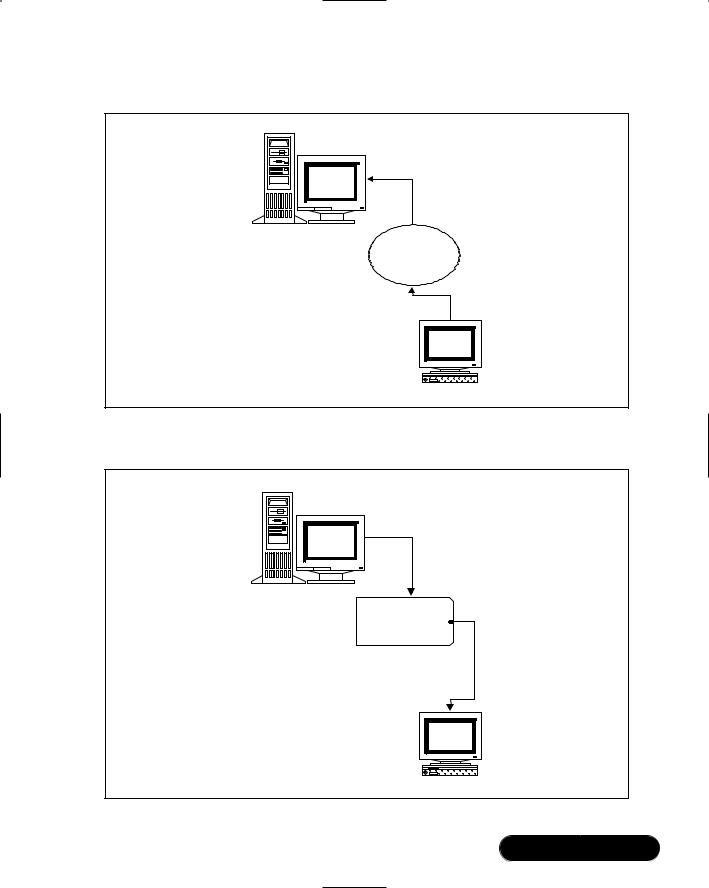
Figure 6.16 shows what occurs when a client with a TGT uses a Kerberized FTP client to log on to a Kerberized FTP daemon. Client A, the Kerberized client, first uses its TGT to request a session ticket.The Kerberos KDC checks to see if Client B has a host principal entry, then also checks to see if Client B has a host daemon entry for FTP.Then, the KDC determines that Client A has the proper host and host daemon keys for client B. If all of these credentials match, then client A can connect to client B’s FTP server.
Figure 6.16 Accessing a Kerberized Network Daemon
Ticket |
Client A |
|
|
Granting |
|
Ticket (TGT) |
|
Client A requests and recieves FTP session ticket, using TGT.
FTP Session
Allowed
KDC
Client B and KDC communicate to determine if access is allowed.
Client B
Common Kerberos Client
Troubleshooting Issues and Solutions
After you are reasonably sure that your Kerberos setup is correct, consider the following issues:
www.syngress.com

Network Authentication and Encryption • Chapter 6 |
341 |
■DNS You will not be able to use Kerberos unless you have a DNS
server in place that has flawless forward and reverse zones. Simply having a forward zone or populated /etc/hosts files is not enough to run Kerberos properly.
■Time skew The tickets issued by Kerberos are time-sensitive.To help reduce authentication problems, Kerberos will not issue tickets to hosts whose clocks are more than five minutes apart from the KDC.The NTP is designed to ensure that all servers have the same time.The server at www.eecis.udel.edu has additional information about NTP, including network daemons you can install.
■Old credentials When you try to administer Kerberos using kadmin, it is important to realize that if you make significant changes to the database concerning a user, you will have to use kdestroy and then kinit to obtain new credentials.
■Unsupported client applications Make sure that the application you use actually supports the Kerberos protocol and that the versions match.
■Unstarted Kerberos client daemons Check your xinetd configuration on your destination server to ensure that this server has the proper Kerberized daemon started. For example, if you wish to test Kerberos by using your Kerberized FTP client to connect to the server named james, make sure that the Kerberized FTP server is started on james.
■Kerberos log files If you encounter problems, use the tail -f command to continuously read the /var/log/kadmind.log and krb5kdc.logfiles.
■Security concerns You must configure your Kerberos client hosts to use only Kerberized clients. In order to use Kerberos properly, no other client applications or server daemons should be used on the network, unless they use OTP, encryption, or a similarly secure protocol. For example, if you have just one Telnet daemon open and accepting connections, you still have passwords crossing the network.
For more information about configuring Kerberos clients, consult the documentation in the /usr/share/doc/krb5-workstation-1.2.2/ directory.
Kerberos Client Applications
The Kerberos clients installed with the workstation package are all in the /usr/ kerberos/bin/ directory. Here is a description of the more popular ones provided:
www.syngress.com

342Chapter 6 • Network Authentication and Encryption
■kpasswd Kerberos daemon clients can use the /usr/kerberos/bin/ kpasswd command to change passwords on the Kerberos KDC.
■ftp A Kerberized FTP client.
■krlogin A Kerberized rlogin client, which allows you to log in to a remote host without providing a password.This version is an improve-
ment to the standard rlogin, because passwords are not sent in the clear.
■krsh A Kerberized rsh client, which allows commands to be executed on the remote host without a password.
■ksu Requires that users contact the KDC before being allowed to become root or any other user.
Kerberos Authentication and klogin
After you have created a principal for klogin (klogin/hostname.domainname.com@YOURREALM.COM) and updated the keytab files for all hosts involved, you can configure your host to allow others to access your home directory without divulging your account password. All you need to do is create a hidden file named .k5login in your home directory.The leading dot (.) makes the file hidden.You must then enter the principal of the user whom you wish to allow access.This user must, of course, be defined on the KDC, and the host from which the user is contacting you from must have an updated keytab file, which contains the host and host daemon name for krlogin.
If you wish to add multiple principals to the .k5login file, you can do so by entering each principal on a separate line, as follows:
patrick@YOURREALM.COM
susan@MYREALM.ORG
These two entries make it possible for patrick and susan to access only the home directory (the home directory of the system that contains the .k5login file), and no other area on your machine or any other area on the network.
Should you then wish to revoke access to your home directory, simply edit the
.k5login file and remove the relevant entry.
Exercise: Configuring a Kerberos Client
In this exercise, you will add user, host, and host daemon principals to your Kerberos realm.This exercise assumes three different systems in the following roles:
www.syngress.com

Network Authentication and Encryption • Chapter 6 |
343 |
■A KDC (host A)
■A Kerberos client running the Kerberized ftp daemon (host B).
■A Kerberos client accessing host B’s ftp daemon (host C).
You can, of course, use fewer systems. For example, you can make the Kerberos KDC server offer up its own FTP service and use a remote client to access it.
1.On the KDC (host A), run kadmin or gkadmin to add the following principals:
kerberosuser1
kerberosuser2
host/hosta.yourdomain.com
host/hostb.yourdomain.com
host/hostc.yourdomain.com
ftp/hostb.yourdomain.com
ftp/hostc.yourdomain.com
2.Install the krb-libs and krb5-workstation packages on hosts B and C.You do not need to install the server package on every host on the network.
3.As root on hosts B and C, create two users named kerberosuser1 and kerberosuser2 using useradd, then use the passwd command to give each of these users a password:
useradd kerberosuser1
useradd kerberosuser2
passwd kerberosuser1
passwd kerberosuser2
If you do not wish to create these local user accounts, you do not have to. However, when it comes time to use kinit, you will have to specify the user (such as kerberosuser1 or kerberosuser2) using the -p option. Read earlier in this chapter for more information on using kinit.
4.Run kadmin on hosts B and C. Make sure that you specify the correct administrative user for your KDC. Issue the following commands on both hosts B and C to the local client (not on the Kerberos KDC) from within to populate the local /etc/krb5.keytab file with the principals of the network hosts and daemons you wish to use:
www.syngress.com

344 Chapter 6 • Network Authentication and Encryption
ktadd –k /etc/kb5.keytab kerberosuser1 ktadd –k /etc/kb5.keytab kerberosuser2
ktadd –k /etc/kb5.keytab host/hosta.yourdomain.com ktadd –k /etc/kb5.keytab host/hostb.yourdomain.com ktadd –k /etc/kb5.keytab host/hostc.yourdomain.com ktadd –k /etc/kb5.keytab ftp/hostb.yourdomain.com ktadd –k /etc/kb5.keytab ftp/hostc.yourdomain.com
These commands will transfer information from the KDC to the /etc/krb5.keytab files on both hosts B and C.
5.Now, you need to activate the FTP daemons on the client hosts.This involves editing the /etc/xinetd.d/gssftp file for hosts B and C. Change the disabled = yes value to disabled = no.
6.Disable any other FTP daemons you may have active. For example, edit the /etc/xinetd.d/wu-ftpd or /etc/xinetd.d/opieftpd so that the disabled entry reads disabled = yes.
7.Restart xinetd:
/etc/rc.d/init.d/xinetd restart
8.Use ping to verify that hosts B and C can access host A.
9.Now, on host B, log on as kerberosuser1 and use /usr/kerberos/bin/kinit to obtain a TGT. Alternatively, log on as any user and specify the Kerberos user (such as kerberosuser1 or kerberosuser2) using the -p option.
10.Use /usr/kerberos/bin/klist to view the TGT.
11.Now, use the /usr/kerberos/bin/ftp client to access host c.
12.You will be allowed access. If a problem occurs, open up two terminals on the KDC and use the tail -f commands to read the /var/log/ kadmind.log and /var/log/krb5kdc.log files to discover the problem. The most common problems are that the proper host and host daemon tickets have not been added either to the KDC, or to the keytabs of hosts B and C.
13.After you have logged on, use /usr/kerberos/bin/klist again to view your credential cache.You will see the host and ftp principal tickets have now been cached. Remember, you are using Kerberos v5, so ignore any Kerberos v4 messages.
www.syngress.com

Network Authentication and Encryption • Chapter 6 |
345 |
Summary
In this chapter, you have been introduced to ways that allow you to avoid sniffing attacks. Encrypting transmissions and ensuring that passwords do not cross the network in plain text are the two strategies.You learned how to implement OTP using OPIE, and then learned how Kerberos allows you to establish a more robust, though involved, authentication scheme.You now know the basic moves to take when implementing OPIE on clients and servers and have been armed with a method for implementing Kerberos. From principal creation to understanding key exchange and credential confirmation, you now know what it takes to implement Kerberos on small networks, as well as enterprise networks that use multiple Kerberos realms.
As you implement Kerberos, you will find that you will have to dedicate additional resources to manage Kerberos principals and secure network daemons. You will also find that it will be necessary to troubleshoot your client/server configuration. Nevertheless, these solutions will help you further secure your network. Now, it is time to learn how to use encryption techniques, such as Secure Shell, to stop sniffing attacks.
Solutions Fast Track
Understanding Network Authentication
;Even if employees remain behind the firewall, many system services allow clear text authentication, including Telnet, File Transfer Protocol
(FTP), and standard Network Information Service (NIS). Even though transmissions can be encrypted, many tools exist that help hackers wage a sniffing attack to capture encrypted information.
;After the packets containing the encrypted passwords are captured, hackers use cracking applications such as L0phtCrack, which are designed to both capture and crack sniffed encrypted passwords.
Creating Authentication and Encryption Solutions
;To authenticate safely, you have two options: Find a way to authenticate without sending passwords across the network, or find a way to discard
www.syngress.com

346 Chapter 6 • Network Authentication and Encryption
any password that is sent across the network. The accepted phrase for this strategy is one-time passwords (OTP).
;Kerberos has the added ability to encrypt transmissions after authentication occurs.The use of OTP, however, does not encrypt subsequent transmissions. OTP is usually much easier to implement than Kerberos, however.
;Other encrypting solutions include Secure Sockets Layer (SSL), Secure Shell (SSH), and IPSec.
Implementing One-Time Passwords (OTP and OPIE)
;In the Linux world, the most universal way to implement one-time password (OTP) support in your Linux systems is to install the One-Time Passwords in Everything (OPIE) application. OPIE supports the Message Digest 5 (MD5) algorithm.
;By default, OPIE does not enforce OTP whenever you log in interactively. Any user is given the choice of using OTP or the standard login procedure.
;Using opiepasswd to create OPIE users. As soon as the opiepasswd command is used against a user, it is then possible for that user to use OTP to log in.The opiekey command generates responses.
;When the systems administrator creates an OTP password list, the user can use the opieinfo command to generate a list of passwords for later use.
Implementing Kerberos Version 5
;Kerberos v5 is a revolutionary step in network authentication, because it allows you to establish a domain that authenticates not only individual hosts and users, but individual daemons, as well. Using Kerberos, you can centrally control which hosts and users can access the daemons on your network.
;After Kerberos is established on a network, passwords do not ever cross the network, not even in encrypted form.You can configure Kerberos to encrypt ensuring communications between authenticated hosts.
www.syngress.com

Network Authentication and Encryption • Chapter 6 |
347 |
;A principal is the name for any host, service, or user that is allowed to authenticate on a Kerberos network. A principal consists of a primary (also known as a “root”), an instance, and a realm.
;The kadmin application, also found in the /usr/kerberos/sbin/ directory, is designed to add principals to the Kerberos database.The kadmin command also lists, modifies, and deletes principals. It is also used to populate and update the Key table files for each Kerberos host.
Using kadmin and Creating
Kerberos Client Passwords
;Standard principal policy settings include policy name, minimum password life (in seconds), maximum password life (in seconds), and minimum password length.
;You can create a policy by using the addpol command from within kadmin.
;The kinit command allows a user to obtain a ticket granting ticket (TGT) from the Key Distribution Center (KDC). Issuing the kinit command has the Kerberos client contact the KDC and obtain a TGT.
;After you run kinit, the cache will contain only the TGT. Additional credentials, such as actual tickets to access a daemon such as FTP, will be added only after you access the remote host.
Establishing Kerberos Client
Trust Relationships with kadmin
;The only way to establish a trust relationship on the Kerberos client host is to use the kadmin command.
;The administrator must use the kadmin -ktadd command on each Kerberos client that wishes to participate in the Kerberos realm.The kadmin ktadd -k command gives each client the ability to prove that it has the public keys of the services used.
www.syngress.com

348 Chapter 6 • Network Authentication and Encryption
Logging On to a Kerberos Host Daemon
;Client A, the Kerberized client, first uses its TGT to request a session ticket.The Kerberos KDC checks to see if Client B has a host principal entry, then also checks to see if Client B has a host daemon entry for FTP.Then, the KDC determines that Client A has the proper host and host daemon keys for client B. If all of these credentials match, then client A can connect to client B’s FTP server.
;When you try to administer Kerberos using kadmin, it is important to realize that if you make significant changes to the database concerning a user, you will have to use kdestroy and then kinit to obtain new credentials.
;You must configure your Kerberos client hosts to use only Kerberized clients. In order to use Kerberos properly, no other client applications or server daemons should be used on the network, unless they use OTP, encryption, or a similarly secure protocol.
Frequently Asked Questions
The following Frequently Asked Questions, answered by the authors of this book, are designed to both measure your understanding of the concepts presented in this chapter and to assist you with real-life implementation of these concepts. To have your questions about this chapter answered by the author, browse to www.syngress.com/solutions and click on the “Ask the Author” form.
Q:When using OPIE, don’t clients have to log on to the same machine in order to generate the response?
A:No.You can use any OTP generator you wish, as long as you enter the sequence and seed numbers correctly.
Q:If I implement OTP, don’t I have to generate a list of passwords and have carry them around with me?
A:Well, yes and no. If users have access to a Linux or Windows computer, they can just use an application such as opiekey or WinKey. However, if no OTP generator is available, you will then have to find a way for users to access their sequence numbers and seed values.This is when a list becomes handy.
www.syngress.com

Network Authentication and Encryption • Chapter 6 |
349 |
Q: Using OTP means that users don’t have to remember passwords, doesn’t it?
A:No, not at all. Users still must remember their secret keys, because they use these keys and the server’s request to generate a response.The nice thing about OPIE is that passwords do not cross the network.
Q: If I use OTP, usernames still cross the network unencrypted, don’t they?
A:This is true unless you use IPsec or SSH. Still, the passwords do not cross the network.
Q:I wish to remove a principal from the keytab of one of my Kerberos clients. How do I do this?
A:Enter kadmin as an administrative user on the Kerberos client (not the KDC) and use the ketremove option. For example, if you wanted to remove the principal for the user named james, you would do the following:
terminal$/usr/kerberos/sbin/kadmin
kadmin: ktremove –p james
kadmin: quit
terminal$
Q:How do I create a backup of the Kerberos database? Also, is it possible to create a backup KDC?
A:As for the first part of the question, you can create a backup of the KDC database as follows:
/usr/kerberos/sbin/kdb5_util dump keatskerberos
You can then read the database using any text editor. Figure 6.17 shows the backup database open in the pico text editor. As far as creating a backup KDC, this is indeed possible and is expected in large networks, or in networks where timely authentication is vital. After all, consider the problems that would occur if users were not able to authenticate. Information for creating a slave KDC is found in the /usr/share/doc/krb5-server*/ directory.
www.syngress.com
350 Chapter 6 • Network Authentication and Encryption
Figure 6.17 Viewing a Kerberos Backup Database
Q:In this chapter, you have discussed both OPIE and Kerberos. I would like to access my Web server from home.Which should I use?
A:If you only have to support one Web server, using Kerberos as a solution would be overkill. Use OPIE along with Secure Shell (SSH), and you will be in great shape.
Q: Can Kerberos authentication cross through firewalls?
A:Yes. As long as you allow your firewall to allow the Kerberos ports, you will have no problem.Table 6.3 provides the most often-used Kerberos ports.
Table 6.3 Kerberos ports
|
Kerberos Daemon |
|
|
|
|
Name |
Port |
Description |
|
|
|
|
|
|
|
krb5 |
88/tcp |
Used to send TGTs to clients |
|
|
krb5 |
88/udp |
Used to send TGTs to clients |
|
|
kerberos_master |
751/udp |
The port Kerberos uses to issue |
|
|
|
|
authentication tickets |
|
|
kerberos_master |
751/tcp |
Used to issue authentication tickets |
|
|
kpasswd |
761/tcp |
For the Kerberos kpasswd |
|
|
|
|
command, used by clients to |
|
|
|
|
change their passwords on the KDC |
|
|
|
|
|
|
|
|
|
Continued |
|
www.syngress.com

|
Network Authentication and Encryption • Chapter 6 |
351 |
|
Table 6.3 Continued |
|
|
|
|
|
|
|
Kerberos Daemon |
|
|
|
Name |
Port |
Description |
|
|
|
|
|
kpop |
1109/tcp |
The standard Pop Kerberos port |
|
krb5_prop |
754/tcp |
Used by the primary KDC to update |
|
|
|
backup KDCs |
|
eklogin |
2105/tcp |
The port for the Kerberos rlogin |
|
|
|
client that allows encryption |
|
klogin |
543/tcp |
The standard Kerberized rlogin |
|
|
|
application for Kerberos version 5 |
|
kshell |
544/tcp |
The port for the Kerberized rsh |
|
|
|
client |
|
kerberos-adm |
749/tcp |
The kadmin port |
|
You may have to allow additional ports, depending upon the clients that you wish to support. Consult the /etc/services file for a more comprehensive list.
Q: Does the Linux version of Kerberos support Microsoft’s implementation.
A:In a word, no. Microsoft implemented several proprietary extensions to its implementation of the Kerberos protocol.
Q:This chapter has focused on a single-realm implementation. Can you have multiple Kerberos realms?
A:Yes. By editing the /etc/krb5.conf file, you can define multiple realms to further organize realms according to your business needs.
www.syngress.com
