


Chapter 5 Advanced Installation 133
The ability to install the Linux operating system in various environments is a valuable skill. This chapter illustrates the text-based — perhaps more appropriately termed shell-based — installation of Linux. In many installation situations,
the installation and configuration of graphical X-windows is not needed, and the operating system can be installed in a simple text mode. This may also be necessary in the event that your video card is not supported in the X-windows environment. After I have demonstrated how to perform a GUI and text-based installation, you will be able to perform virtually any required installation.
The installations that you will be called on to perform may include connecting to a network server to install Linux. You can connect to network servers of all types in order to install Linux. You can use this ability to install Linux over an LAN, intranet, or the Internet to roll out many workstations at once or to supply a remote user with the same interface that the local users have.
After the installation of Linux is complete, it’s time to focus on the use of the tools that come with Linux or that may be added to the installation. Both the installation of Linux and its tools should be tested in the lab and user environment to verify that they are installed correctly. Log files can also be used to verify the accuracy of the installation of Linux and some of its applications.
Finally, documentation of all the settings that are used to install Linux should be filed for future reference. These files should consist of valuable data that may include items such as any preparatory documentation, installation information, any errors or difficulties that were encountered, and packages that were installed or added. This is not only helpful for future reference but sets a pattern for other work, such as upgrades or repairs, to also be documented. These installation techniques provide a skill set that will be very well respected.
Alternative to the GUI Installation
2.2 Describe the different types of Linux installation interaction and determine which to use for a given situation (e.g., GUI, text, network)
The GUI installation is the preferred method for most distributions of Linux. This preference is driven by the popularity of the GUI installation among other operating systems. Although GUI installations can be much simpler to use, they are not always the best method, however. A Linux system that is intended to be a firewall or router needs all the system resources that can be provided, so it may be beneficial to install a minimal video card or no video card at all. And even though this may free up some system resources, it does prevent the installation of Linux in a GUI environment. This is a benefit of installing Linux in text mode — it uses fewer system resources to provide the interface.
134 Part II Installation
A Linux distribution will usually indicate the minimum recommended system requirements for the GUI installation, and you can use this to determine if the system requires a text-based installation.
If the system does not have enough processor power or memory, the GUI interface will provide a message (usually early in the GUI installation) stating that the system is low on resources and suggesting that perhaps a text-based installation is a better option. By selecting a text-based installation, you will experience many differences from the GUI installation. The major differences are usually the customized menus and specialized tools that don’t work in a command-line or shell environment.
Command Line installation
2.5 Select appropriate options for partitions based on pre-installation choices (e.g., FDISK, third party partitioning software)
2.6Partition according to your pre-installation plan using fdisk (e.g., /boot, / , /usr, /var/home, SWAP)
2.7Configure file systems (e.g., (ext2) or (ext3) or REISER)
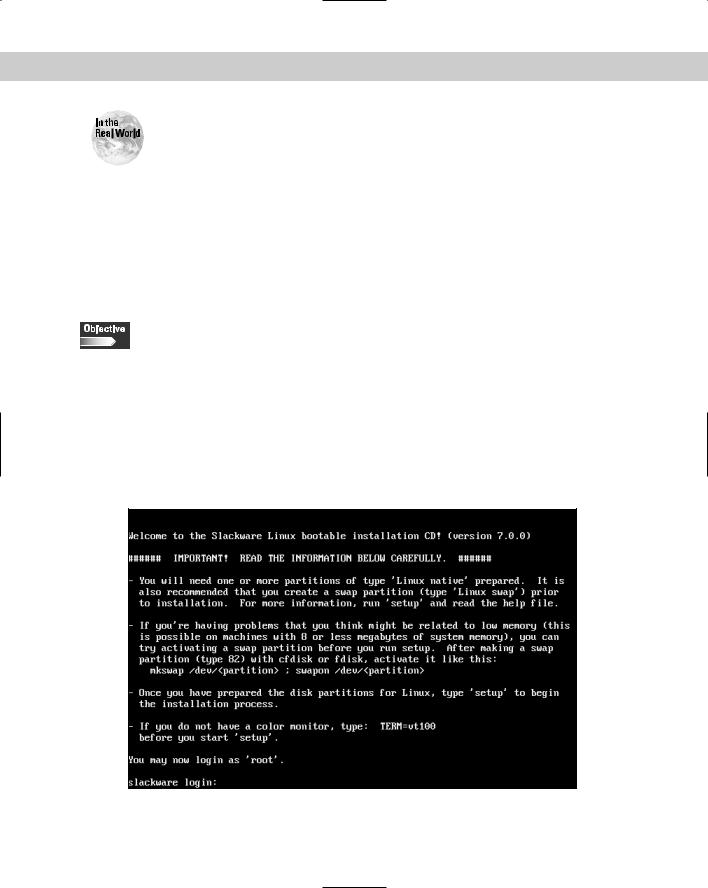
By selecting a text-based installation, you are given one of two alternatives. The command line is one of these alternatives. The bootable diskette or CD-ROM may initiate a minimal kernel to allow the use of a command line interface, as shown in Figure 5-1.
Figure 5-1: The command line interface
Chapter 5 Advanced Installation 135
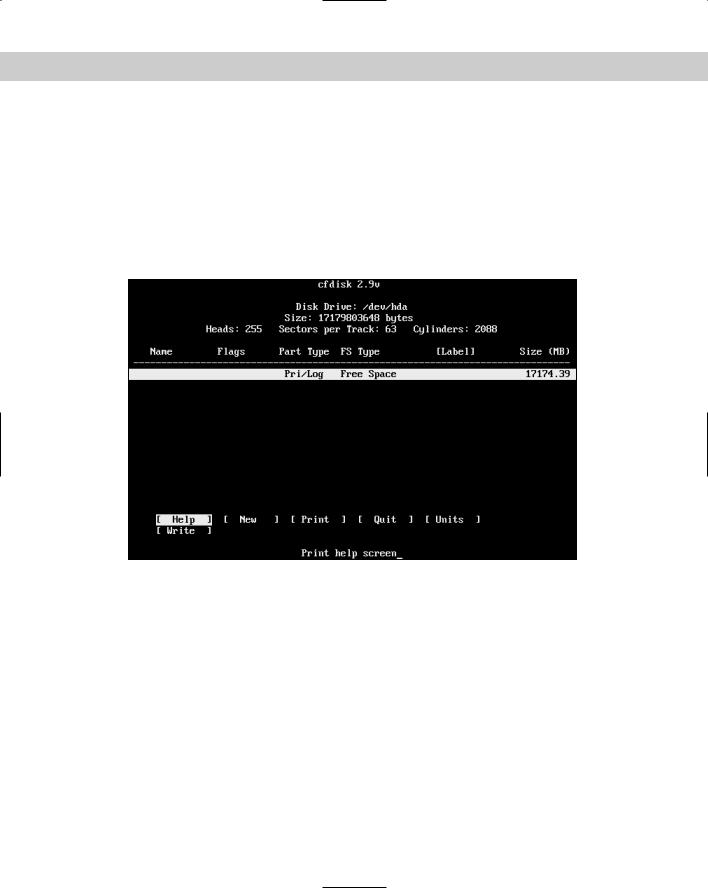
This command line interface usually requires the login of root with no password. After this is completed, the steps required to prepare the system are very similar to the GUI interface; the order, however, may be different. The instructions given in the command line interface are to partition the hard drive and possibly activate a swap partition. To perform these tasks, you should use cfdisk or fdisk for disk partitioning. The command mkswap /dev/<partition>, and then swapon /dev/<partition> can be used to create the swap partition. To proceed, type cfdisk at the command prompt and use cfdisk to partition the hard disk drive. The interface of cfdisk is shown in Figure 5-2.
Figure 5-2: The partitioning tool cfdisk
This interface provides tools for HELP, NEW (partition creation), PRINT (the partition table), QUIT (the program), UNITS (unit of hard drive space in MB or sectors), and WRITE (commit partitions to disk), which will allow the creation of the partition(s) needed for the installation of Linux. Select NEW from the menu to create the first partition; this allows the input of the size of the partition. The menu then displays, as shown in Figure 5-3.
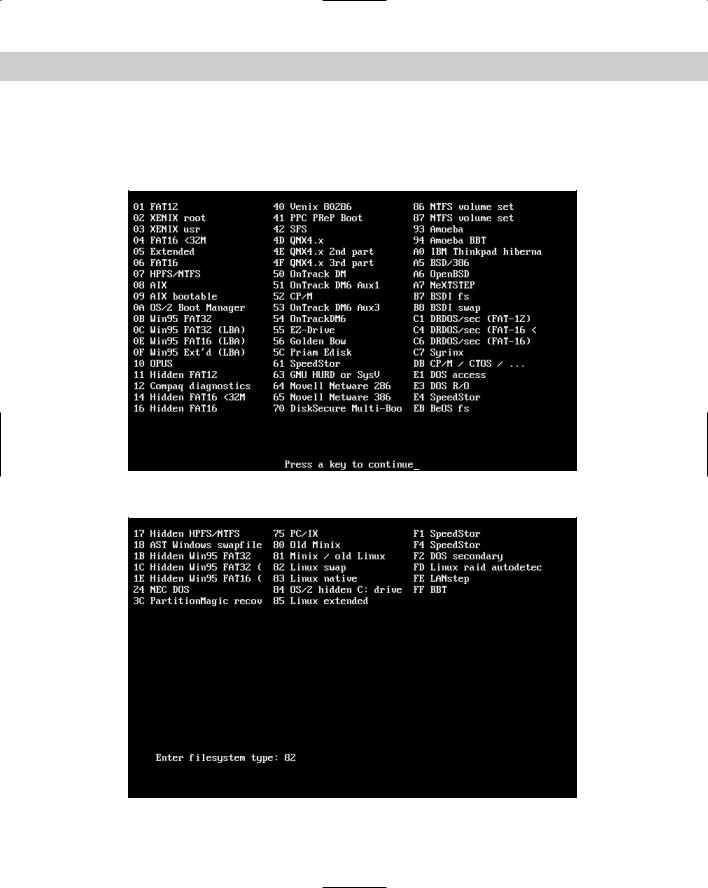
Select TYPE to select the partition type from the menus shown in Figures 5-4 and 5-5.
These are the menus of the possible partitions that can be supported by cfdisk. Notice that the ReiserFS is not supported here — remember that not all Linux distributions support the ReiserFS yet. The creation of partitions continues until all of the requirements of the pre-installation partition plan have been fulfilled. Be sure to create at least one bootable partition — otherwise, the system may be installed but unable to boot. The partitions are then committed to the hard drive with the write
136 Part II Installation
command. Be sure to verify that these partitions are correct because after they have been committed to the hard drive, it will be changed and any data will be lost, as shown in Figure 5-6.
Figure 5-3: The partition submenu of cfdisk
Figure 5-4: Choosing the partition type in cfdisk

Chapter 5 Advanced Installation 137
Figure 5-5: The partition submenu of cfdisk
Figure 5-6: The partitions are committed to the hard drive.
This completes the partitioning of the hard drive and has readied the system for installation of Linux.