- •About the Author
- •Credits
- •How This Book Is Organized
- •Part I: Linux Basics
- •Part II: Installation
- •Part III: Configuration
- •Part IV: Administration
- •Part V: Maintaining the Linux System
- •How Each Chapter Is Structured
- •How to Use This Book
- •Conventions Used in This Book
- •What is Linux?
- •The origin of UNIX
- •Who started Linux?
- •Understanding Open Source
- •Understanding Closed Source
- •Understanding Artistic License
- •Is Freeware really free?
- •Is Shareware never free?
- •A comparison and contrast of licensing methods
- •The Growth of Linux
- •Linux on a Personal Computer
- •Graphical installation
- •Hardware detection
- •Graphical user interface
- •Linux limitations on the PC
- •Linux succeeds on the PC
- •Linux on workstations
- •Linux on servers
- •Summary
- •Assessment Questions
- •Scenarios
- •Answers to Chapter Questions
- •Assessment Questions
- •Scenarios
- •Linux Kernel
- •Kernel versions
- •Kernel availability
- •Linux Distributions
- •Beehive
- •BlueCat
- •Caldera OpenLinux
- •Debian
- •Corel
- •DragonLinux
- •Elfstone
- •Gentoo
- •Hard Hat Linux
- •KRUD
- •LinuxPPC
- •Mandrake
- •Phat Linux
- •Slackware
- •StormLinux
- •SuSE
- •TurboLinux
- •Yellow Dog Linux
- •Mini and Specialty Distributions
- •Astaro
- •KYZO
- •FlightLinux
- •NetMAX
- •Packages and Packaging Solutions
- •Red Hat Package Manager
- •Debian Package Management System
- •Tarball
- •Linux Resources
- •Summary
- •Assessment Questions
- •Scenarios
- •Lab Exercises
- •Answers to Chapter Questions
- •Assessment Questions
- •Scenarios
- •Linux In the Real World
- •Word Processing
- •Spreadsheets and databases
- •Web browsing
- •File transfer
- •More, more, and more applications
- •The Server and DNS
- •A Linux Web server
- •Linux e-mail server
- •File servers
- •Proxy, news, and search servers
- •FTP servers
- •Firewalls
- •Determining Linux Roles and Services
- •Comparing Linux with other operating systems
- •Hardware compatibility
- •Summary
- •Assessment Questions
- •Scenarios
- •Answers to Chapter Questions
- •Assessment Questions
- •Scenarios
- •Installing Linux
- •Final Preparations for Installation
- •Verification
- •Package selection
- •Final hardware verification
- •Pre-installation partitioning planning
- •Installing Linux
- •Text or GUI installation
- •Basic setup of Linux
- •Selecting the machine type
- •Partitioning the hard disk drive
- •Installing a boot manager
- •Creating the Boot Diskette
- •Networking
- •Additional installation information
- •Accounts and passwords
- •Additional packages to install
- •GUI installation
- •Obtaining video card information
- •Configuring the X windows system
- •Selecting the windows manager or desktop environment
- •Summary
- •Assessment Questions
- •Scenarios
- •Lab Exercises
- •Answers to Chapter Questions
- •Chapter Pre-test
- •Answers to Assessment Questions
- •Scenarios
- •Alternative to the GUI Installation
- •Command Line installation
- •Install the Linux system
- •Network installations of Linux
- •Review of a Linux Installation
- •Installation media
- •Initial selections
- •Installation type or class
- •Disk partitioning and formatting
- •Installing LILO
- •Network configuration
- •User accounts
- •Authentication methods
- •Package selection and installation
- •A Dual-Boot Installation of Linux
- •Linux with Microsoft Windows
- •Linux with Microsoft Windows NT and 2000
- •Linux and Solaris
- •Linux and other operating systems
- •Installing Additional Software with gzip and tar
- •Installing Additional Software with RPM
- •Removing software with RPM
- •Upgrading software with RPM
- •Query the RPM software
- •Verify the RPM software
- •Verify the package files
- •Upgrading the Kernel
- •Upgrading a Linux Kernel
- •System Log Files
- •The Final Test of the Installation
- •Summary
- •Assessment Questions
- •Scenarios
- •Lab Exercises
- •Answers to Chapter Questions
- •Chapter Pre-test
- •Assessment Questions
- •Scenarios
- •What is the X Window System?
- •The X Window System
- •X Client and Server communications
- •X Window Manager
- •Configuring X Window Systems
- •Custom X Window System Programs
- •Manual Configuration of the X Window System
- •Documentation
- •Summary
- •Assessment Questions
- •Scenarios
- •Lab Exercises
- •Answers to Chapter Questions
- •Chapter Pre-test
- •Assessment Questions
- •Scenarios
- •Basic Network Services
- •TCP/IP Protocol Suite
- •Connection protocols needed
- •Other network protocols
- •Configuring Basic Network Services
- •Host name
- •IP addressing
- •DHCP
- •Netmask
- •Hardware resources
- •Routing and gateways
- •PPP, SLIP and PLIP connections
- •Server Tasks with
- •IP aliases for virtual hosts
- •Apache Web Server
- •Samba File Server
- •Home directories
- •Disk shares
- •Configuring Client Services
- •SMB/CIFS
- •NIS client configuration
- •NFS client configuration
- •Configuring Internet Services
- •Web browser
- •POP and SMTP
- •TFTP
- •SNMP
- •Remote Access
- •Rlogin
- •Telnet
- •OpenSSH
- •Documentation
- •Summary
- •Assessment Questions
- •Scenarios
- •Lab Exercises
- •Answers to Chapter Questions
- •Chapter Pre-test
- •Assessment Questions
- •Scenarios
- •Adding Hardware
- •Memory
- •Swap
- •Adding a hard drive
- •Video and monitor
- •Printers
- •Configuration files
- •Setting environment variables
- •BASH
- •Documentation
- •Summary
- •Assessment Questions
- •Scenarios
- •Lab Exercises
- •Answers to Chapter Questions
- •Chapter Pre-test
- •Assessment Questions
- •Scenarios
- •Basic User and Group Administration
- •What are users and groups?
- •Creating users
- •Change user information
- •Deleting users
- •Creating groups
- •Getting Around Linux
- •Navigating Linux
- •Common file and directory commands
- •Setting File and Directory Permissions
- •Mounting and Managing File Systems
- •Mount
- •Umount
- •Mounted file systems
- •Summary
- •Assessment Questions
- •Scenarios
- •Lab Exercises
- •Answers to Chapter Questions
- •Chapter Pre-test
- •Assessment Questions
- •Scenarios
- •Multi-User Environment
- •The creation of Virtual Consoles
- •The Linux Terminal Server Project
- •Configurations for remote systems
- •Monitoring remote connections
- •Common Shell Commands
- •Basic shell scripts
- •Caution using root access
- •Navigating the GUI interface
- •Summary
- •Assessment Questions
- •Scenarios
- •Lab Exercises
- •Answers to Chapter Questions
- •Chapter Pre-test
- •Assessment Questions
- •Scenarios
- •Linux Runlevels
- •init
- •Shutting down Linux
- •Managing Linux Services
- •Configuring Linux Printing
- •lpd daemon
- •/etc/printcap
- •Printing management
- •Using the vi Editor
- •vi operation modes
- •Editing text files
- •Using the
- •Summary
- •Assessment Questions
- •Scenarios
- •Lab Exercises
- •Answers to Chapter Questions
- •Chapter Pre-test
- •Assessment Questions
- •Scenarios
- •Disk and File System Management
- •Repairing Partitions
- •System Automation and Scheduling
- •cron
- •Core Dumps
- •Analyzing core dumps
- •GNU Debugger
- •Managing Networking Interfaces
- •Installing System Packages and Patches
- •Compressed archive
- •Debian Package Installer
- •Slackware Package Installation
- •Summary
- •Assessment Questions
- •Scenarios
- •Lab Exercises
- •Answers to Chapter Questions
- •Chapter Pre-test
- •Assessment Questions
- •Scenarios
- •Linux Processes
- •Core services versus non-critical services
- •Process administration
- •Process control
- •Monitoring Log Files
- •Maintaining Documentation
- •Summary
- •Assessment Questions
- •Scenarios
- •Lab Exercises
- •Answers to Chapter Questions
- •Chapter Pre-test
- •Assessment Questions
- •Scenarios
- •Linux Security
- •Securing the Environment
- •Location
- •Environment
- •System Security
- •System/user files
- •Permissions
- •Log auditing
- •Backups
- •Linux Security Best Practices
- •Network security
- •Firewall
- •System security
- •Securing a Web server
- •Securing an FTP server
- •FTP program version
- •FTP configuration files
- •Process security
- •Summary
- •Assessment Questions
- •Scenarios
- •Lab Exercises
- •Answers to Chapter Questions
- •Chapter Pre-test
- •Assessment Questions
- •Scenarios
- •Disaster Recovery Planning
- •Types of data
- •Frequency and Scheduling
- •Storage and media types
- •Recovering data
- •Offsite storage
- •Linux Backup Tools and Commands
- •Third party tools
- •Tape devices
- •Summary
- •Assessment Questions
- •Scenarios
- •Lab Exercises
- •Answers to Chapter Questions
- •Chapter Pre-test
- •Assessment Questions
- •Scenarios
- •Identifying the Problem
- •Methodology and Best Practices
- •Troubleshooting Resources
- •Documentation resources
- •Internet resources
- •System Log Files
- •Tools for Log Files
- •Output to another file
- •Locating files
- •Process Configuration and Management
- •Stopping, Starting, and Restarting Processes
- •Configuration Files
- •Summary
- •Assessment Questions
- •Scenarios
- •Lab Exercises
- •Answers to Chapter Questions
- •Chapter Pre-test
- •Assessment Questions
- •Scenarios
- •Examining the Startup Process
- •Boot process steps
- •Analyzing Boot Process Errors
- •Common Boot Problems
- •Using System Status Tools
- •File System Check
- •System Resource Commands
- •Using the System Boot Disk
- •Types of boot disks
- •Creating a boot disk
- •Creating a rescue/utility disk
- •Summary
- •Assessment Questions
- •Scenarios
- •Lab Exercises
- •Answers to Chapter Questions
- •Chapter Pre-test
- •Assessment Questions
- •Scenarios
- •Common User Problems
- •Login problems
- •File and directory permissions
- •Printing problems
- •Mail problems
- •Software Package Problems
- •Package dependencies
- •Software and version conflicts
- •Backup and Restore Errors
- •Backup hardware
- •Backup software
- •File restore errors
- •Application Failures
- •Log files
- •Process and daemon errors
- •Web server errors
- •Telnet
- •Mail services
- •Basic Networking Troubleshooting
- •Networking connectivity
- •Network hardware problems
- •Summary
- •Assessment Questions
- •Scenarios
- •Lab Exercises
- •Answers to Chapter Questions
- •Chapter Pre-test
- •Assessment Questions
- •Scenarios
- •Mainboard Components
- •BIOS
- •System memory
- •System Resources
- •I/O addresses
- •Direct memory access
- •Laptop Considerations
- •PCMCIA
- •Linux Peripheral Configuration
- •Installing and Configuring SCSI Devices
- •SCSI definitions
- •SCSI technologies
- •SCSI cabling and termination
- •SCSI device configuration
- •Linux SCSI devices
- •ATA/IDE Devices
- •IDE drive configuration
- •Linux ATA/IDE Drive configuration
- •Linux Support for Other Devices
- •IEEE 1394 (Firewire)
- •Summary
- •Assessment Questions
- •Scenarios
- •Answers to Chapter Questions
- •Chapter Pre-test
- •Assessment Questions
- •Scenarios
- •What’s on the CD-ROM
- •System Requirements
- •Using the CD with Microsoft Windows
- •Using the CD with Linux
- •Microsoft Windows applications
- •Linux applications
- •Troubleshooting
- •Sample Exam
- •Exam Questions
- •Exam Answers
- •Taking a CompTIA Exam
- •How to register for an exam
- •What to expect at the testing center
- •Your exam results
- •If you don’t receive a passing score
- •About the Linux + Exam
- •Preparing for the Linux+ Exam
- •For More Information
- •Preamble
- •No Warranty
- •Glossary
- •Index

Chapter 4 Installing Linux 117
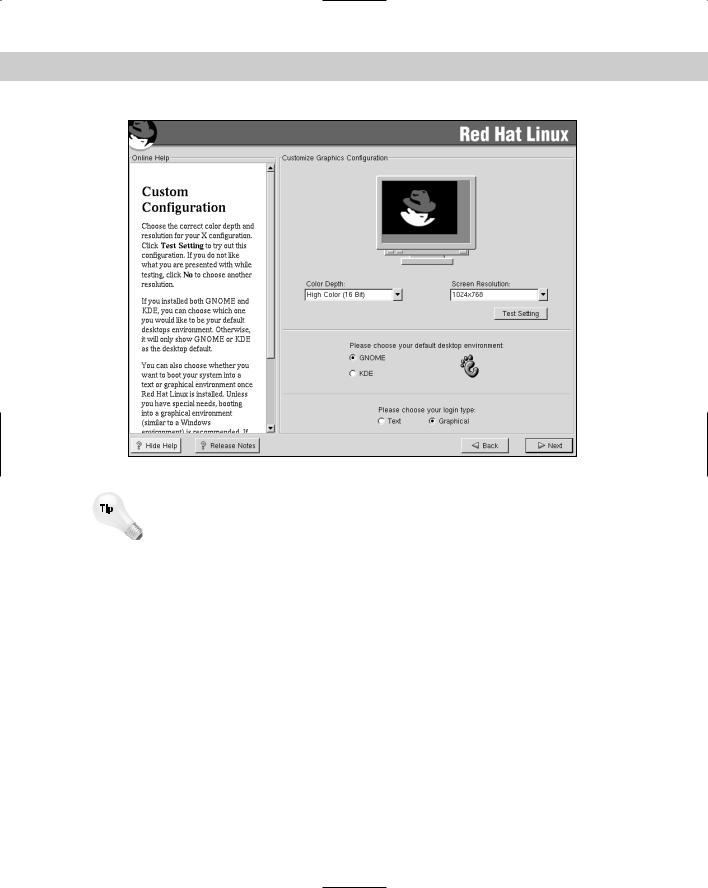
Figure 4-22: The Red Hat customized graphics configuration screen
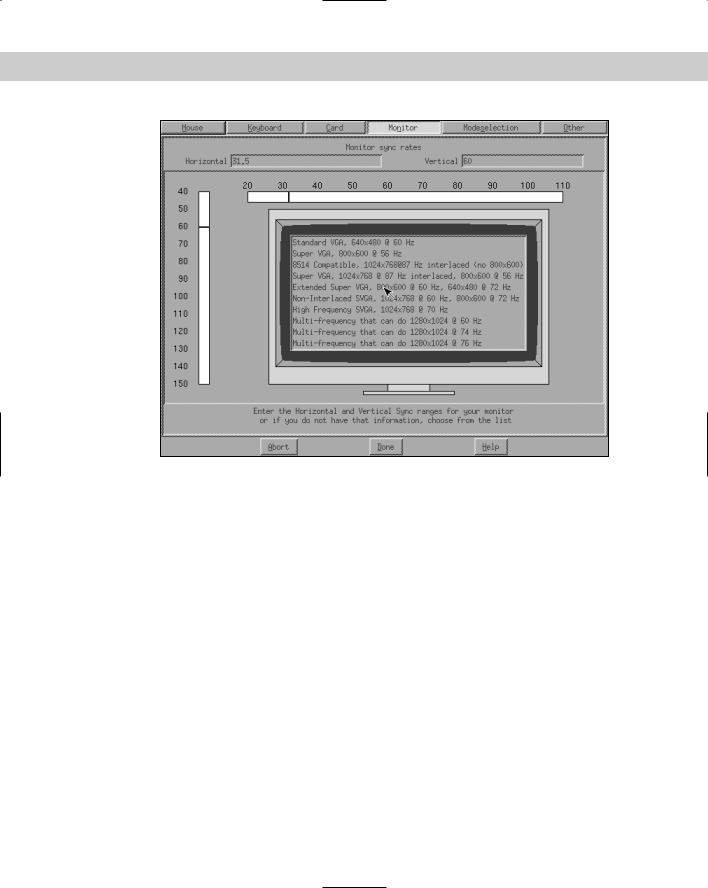
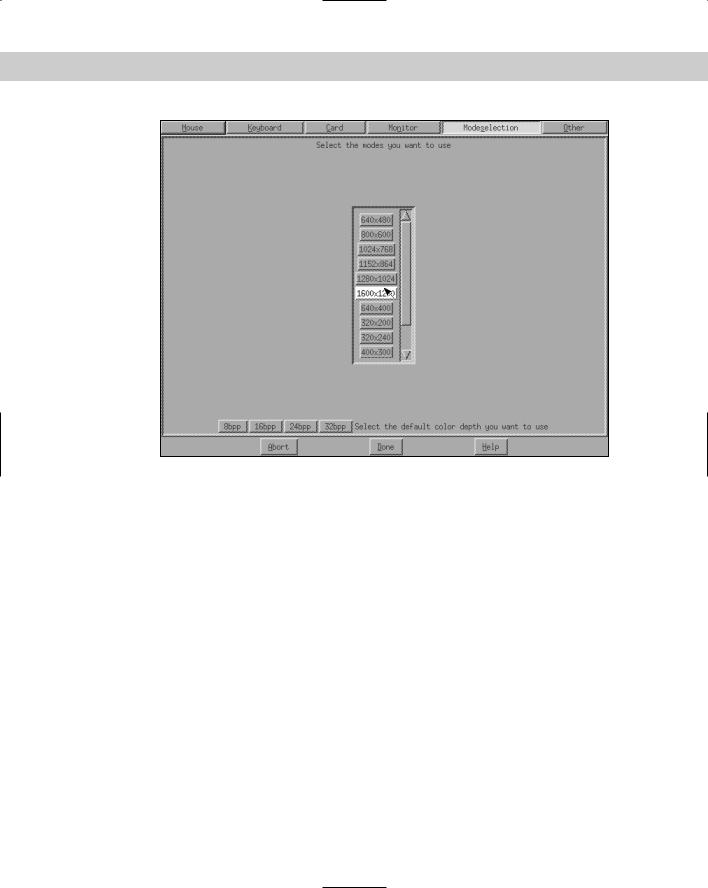
Notice also that the mouse doesn’t move when the installer attempts to select the monitor. If this method of installing the X Windows System is selected, the mouse must be manually configured. On a modern system, the installer manually configures the mouse by tabbing to the mouse menu, pressing enter to select it, selecting the type of mouse attached to the system, and then selecting apply. This will instantly bring the mouse on-line and make it available for the rest of the installation.
Selecting the windows manager or desktop environment
After you have selected the color depth and screen resolution, you must now choose the windows manager, or desktop environment. The Red Hat distribution includes the GNU Network Object Model Environment — or GNOME — which is the default desktop environment for Red Hat, and K Desktop Environment — or KDE — as the choices for windows managers. Here is a brief comparison of the two:
GNOME is more like the X Windows System, and KDE more resembles MAC OS or Microsoft Windows.

118 Part II Installation
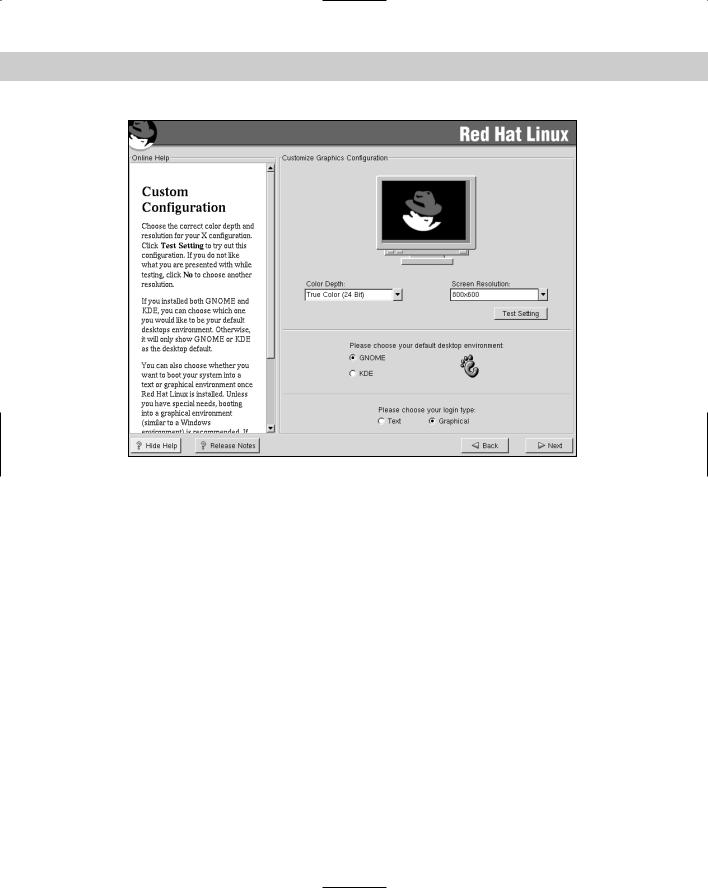
Figure 4-23: The Red Hat customized graphics configuration at 800 × 600 screen.
The KDE environment provides the stability of UNIX, and therefore Linux, with a contemporary desktop environment similar to Mac OS or Microsoft Windows 95/98/NT/2000. GNOME is part of the GNU project and was created as a completely free desktop for the user, as well as a powerful application framework for the software developer.
When choosing your installation packages, the installer was able to select both the GNOME and KDE packages. If the installer selected both, then this selection just sets the active windows. The last choice of this set of screens is to either boot to a command line login or graphical login by starting the selected windows manager and then logging in through the desktop environment. After finalizing these settings, the system will test the selected color depth, screen resolution, and desktop environment with a screen similar to the one shown in Figure 4-26.

Chapter 4 Installing Linux 119
Figure 4-24: The Xfree86 monitor selection screen
Confirming the test is the last step before rebooting the system. This is the end of the installation of Red Hat Linux. Although other distributions don’t follow this pattern step-by-step, they do use similar choices. After the system is rebooted, it is ready for use or further configuration.

120 Part II Installation
Figure 4-25: The Xfree86 mode selection screen
