- •MAPPT80-ENG
- •Table of contents
- •1 Introduction
- •1.1 Manual history
- •1.2 Information about this document
- •1.2.1 Organization of notices
- •1.2.2 Guidelines
- •2 General safety guidelines
- •2.1 Introduction
- •2.2 Intended use
- •2.3 Protection against electrostatic discharge
- •2.3.1 Packaging
- •2.3.2 Regulations for proper ESD handling
- •2.4 Transport and storage
- •2.5 Installation
- •2.6 Operation
- •2.6.1 Protection against contact with electrical parts
- •2.6.2 Ambient conditions - Dust, moisture, aggressive gases
- •2.6.3 Programs, viruses and malicious programs
- •2.7 Cybersecurity disclaimer for products
- •3 System overview
- •3.1 Order number key
- •4 Device description
- •4.1 Type overview
- •4.2 Order overview
- •4.2.1 Content of delivery
- •4.2.2 Optional accessories
- •4.3 Technical information
- •4.3.1 System requirements
- •4.3.2 Projected capacitive touch (PCT)
- •4.3.3 Viewing angles
- •4.3.4 Derating the ambient temperature
- •4.3.5 Derating of the display brightness
- •4.3.6 Surface resistance
- •4.4 Technical data
- •4.4.1 Specific technical data of the display variants
- •4.4.2 Ethernet interfaces
- •4.4.3 B&R ID codes
- •4.4.4 Certifications
- •4.5 Temperature/Humidity diagrams
- •4.5.1 7.0" variants
- •4.5.2 10.1" variants
- •4.5.3 12.1" variants
- •4.5.4 15.6" variants
- •4.6 Dimensions
- •4.6.1 7.0" Power Panel T80
- •4.6.2 10.1" Power Panel T80
- •4.6.3 12.1" Power Panel T80
- •4.6.4 15.6" Power Panel T80
- •4.7 Connection elements
- •4.7.1 Ethernet interface
- •4.7.2 USB interfaces
- •4.7.3 Power supply
- •5 Commissioning
- •5.1 Installation
- •5.1.1 Installation cutout requirements
- •5.1.2 Mounting with retaining clips
- •5.1.3 Installation instructions
- •5.1.4 Mounting orientations
- •5.1.5 Grounding (functional ground)
- •5.1.6 Securing the connecting cables
- •5.1.7 Requirements for the cables used
- •5.1.8 VESA mount
- •5.2 Operating the Power Panel
- •5.2.1 Keyboard
- •5.2.2 Mouse
- •6 Configuration
- •6.1 Service pages
- •6.1.1 Overview
- •6.1.2 Service page Startup
- •6.1.3 Service page Network
- •6.1.3.1 Network configuration without DHCP
- •6.1.4 Service page Time
- •6.1.5 Service page Screen
- •6.1.5.1 Screensaver settings
- •6.1.6 Service page Audio
- •6.1.7 Service page Gesture
- •6.1.8 Service page VNC
- •6.1.9 Service page Web
- •6.1.9.1 Using the developer tools
- •6.1.10 Service page Storage
- •6.1.11 Service page Update
- •6.1.11.1 Configuring the update server
- •6.1.11.1.1 Configuring an update server of type TFTP
- •6.1.11.1.2 Configuring an update server of type FTP
- •6.1.11.1.3 Configuring an update server of type HTTP
- •6.1.12 Service page Backup & Reset
- •6.1.13 Service page Security
- •6.1.14 Service page OPC UA
- •6.1.15 Service page Save & Exit
- •6.1.16 Service page About & Info
- •6.2 Update
- •6.2.1 Updating with Automation Studio and USB flash drive
- •6.2.2 Updating with a downloaded from the website and USB flash drive
- •6.2.3 Duplicating an existing setup using a USB flash drive
- •7 Software
- •7.1 Web browser information
- •7.1.1 Installing certificates in the browser
- •7.1.2 Supported fonts
- •7.1.3 Supported video formats
- •7.1.4 User agent
- •7.2 File formats
- •7.2.1 PPT image
- •7.2.2 System settings
- •7.2.3 Boot logo
- •7.2.4 Boot animation
- •7.3 Access to shared memory areas
- •7.4 RFB extension
- •7.4.1 Temperature monitoring
- •7.4.2 Adjusting display brightness
- •7.4.3 Outputting an audio signal
- •7.5 OPC UA server
- •7.5.1 Information model
- •7.5.1.1 Namespaces
- •7.5.1.2 Symbols for object types
- •7.5.1.3 ParameterSet
- •7.5.1.4 MethodSet
- •7.5.1.5 Device properties
- •7.5.1.6 Alternative paths of nodes
- •7.5.2 Description of the nodes of the information model
- •7.5.2.1 Configuration
- •7.5.2.1.1 Audio
- •7.5.2.1.1.1 EnableBuzzer
- •7.5.2.1.1.2 BuzzerSource
- •7.5.2.1.1.3 BuzzerFrequency
- •7.5.2.1.1.4 BuzzerDuration
- •7.5.2.1.2 Gesture
- •7.5.2.1.2.1 OpenServicePage
- •7.5.2.1.3 Network
- •7.5.2.1.3.1 Hostname
- •7.5.2.1.3.2 NetworkMode
- •7.5.2.1.3.3 ActivateDNS
- •7.5.2.1.3.4 DNSSuffix
- •7.5.2.1.3.5 GetDNSFromDHCP
- •7.5.2.1.3.6 PrimaryDNS / SecondaryDNS / TertiaryDNS
- •7.5.2.1.3.7 IpAddress
- •7.5.2.1.3.8 SubnetMask
- •7.5.2.1.3.9 DefaultGateway
- •7.5.2.1.4 Screen
- •7.5.2.1.4.1 DisplayBrightness
- •7.5.2.1.4.2 ScreenRotation
- •7.5.2.1.4.3 EnableScreensaver
- •7.5.2.1.4.4 ScreensaverIdleTime
- •7.5.2.1.4.5 ScreensaverType
- •7.5.2.1.5 Startup
- •7.5.2.1.5.1 StartMode
- •7.5.2.1.5.2 ShowBootLogoVNC / ShowBootLogoWeb
- •7.5.2.1.6 Storage
- •7.5.2.1.6.1 USBMemoryShare / UserMemoryShare
- •7.5.2.1.7 Time
- •7.5.2.1.7.1 EnableNTPClient
- •7.5.2.1.7.2 NTPServer1
- •7.5.2.1.8.1 VNCServer
- •7.5.2.1.8.2 UseRfbExtension
- •7.5.2.1.8.3 VNCLocalWindowScaling
- •7.5.2.1.9.1 WebServer
- •7.5.2.1.9.2 VirtualKeyboardWeb
- •7.5.2.1.9.3 DisablePinchGesture
- •7.5.2.2 Control
- •7.5.2.2.1 AwakePanel
- •7.5.2.2.2 BuzzerDefault
- •7.5.2.2.3 BuzzerWithPara
- •7.5.2.2.4 LoadConfiguration
- •7.5.2.2.5 SaveConfiguration
- •7.5.2.2.6 SetBrightness
- •7.5.2.2.7 SetBrightnessUnlimited
- •7.5.2.2.8 SetTime
- •7.5.2.2.9 StartUpdate
- •7.5.2.3 Control/ConnectionWatchdog
- •7.5.2.3.1 ConnectionWatchdog - Function description
- •7.5.2.3.2 ConnectionWatchdogTimeout
- •7.5.2.3.3 ConnectionWatchdogTrigger
- •7.5.2.4 Diagnostics
- •7.5.2.4.1 CPUCore0Usage
- •7.5.2.4.2 CPUCore1Usage
- •7.5.2.4.3 CPUUsage
- •7.5.2.4.4 MemoryAvailable
- •7.5.2.4.5 MemoryTotal
- •7.5.2.5 Status
- •7.5.2.5.1 Temperature0
- •7.5.2.5.2 Temperature1
- •7.5.2.5.3 Temperature2
- •7.5.2.5.4 USBFlashDrive0
- •7.5.2.5.5 USBFlashDrive1
- •7.5.2.6 Identification
- •7.5.2.6.1 CompatibilityId
- •7.5.2.6.2 DeviceRevision
- •7.5.2.6.3 HardwareRevision
- •7.5.2.6.4 Manufacturer
- •7.5.2.6.5 Model
- •7.5.2.6.6 ProductCode
- •7.5.2.6.7 RevisionCounter
- •7.5.2.6.8 SerialNumber
- •7.5.2.6.9 SoftwareRevision
- •7.5.2.6.10 VendorId
- •7.5.2.7 Additional device properties
- •7.5.2.7.1 DeviceManual
- •8 Maintenance
- •8.1 Cleaning
- •8.2 Screen burn-in on LCD/TFT monitors
- •9 Accessories
- •9.1 Overview
- •9.2 0TB6102 2-pin power supply connector
- •9.2.1 Order data
- •9.2.2 Technical data
- •9.3 6ACCRPP2.0001-000
- •9.3.1 Order data
- •9.3.2 Technical data
- •9.4 Storage media
- •9.5 Cable accessories
- •10 International and national certifications
- •10.1 Overview of certifications
- •10.2 EU directives and standards (CE)
- •10.2.1 Overview of standards
- •10.2.2 Requirements for immunity to disturbances
- •10.2.3 Emission requirements
- •10.2.4 Mechanical conditions
- •10.2.5 Electrical safety
- •10.3 Underwriters Laboratories (UL)
- •10.4 Offshore/Maritime
- •10.5 Additional certifications
- •11 Environmentally friendly disposal
- •11.1 Separation of materials
- •Publishing information
Configuration
6 Configuration
The Power Panel can be configured in the following ways:
•Via the service page of the Power Panel (see "Service pages" on page 35)
•Via OPC UA (OPC UA server must be enables beforehand)
•Via update:
Updating with Automation Studio and USB flash drive
Updating with a downloaded from the website and USB flash drive
Duplicating an existing setup using a USB flash drive
6.1Service pages
T-Series Power Panels can be configured via the integrated service page. This service page can be opened in various ways:
Opening the service page with a gesture
The service page can be opened with a Gesture if this is configured accordingly (see "Configuring the gesture" on page 49):
Gesture for opening the service page: Use a finger to swipe from the middle of the top edge of the touch screen down over the entire touch screen area.
The setting for Screen rotation on service page Screen is decisive for the swiping direction.
Other ways to open the service page
The following options are also available to open the service page:
•By pressing the left and right buttons of a connected USB mouse simultaneously for at least 2 seconds.
•Opened automatically after restarting the Power Panel if the corresponding Start mode is configured on service page Startup (see service page "Startup" on page 40)
Power Panel T80 User's manual V1.01 |
35 |
Configuration
Entering the service password
If a service password has been configured in the settings (see "Service page Security" on page 64), then this password must be entered each time the service pages are opened before the service page is displayed.
Password
OK |
Cancel |
Update |
The service password must be entered in the corresponding text input field.
Button |
Description |
[OK] |
Confirms password entry |
[Cancel] |
Cancels password entry |
[Update] |
When button "Update" is pressed, the Power Panel attempts to perform an update. This executes |
|
function Update settings / boot logo / system, which can also be opened on service page Update |
|
(see "Service page Update" on page 58). |
|
If an update is found (on a USB flash drive or on the network), it will be loaded and installed. |
|
In the next step, the Power Panel will be started in the configured mode (see "Service page Startup" |
|
on page 40) regardless of whether an update is found. |
Representation of service pages in this documentation
In this documentation, service pages are not represented as original screenshots. For better readability, the service pages are displayed as black text on a white background:
Original Power Panel screenshot |
|
|
Representation in this documentation |
|
|
|
Startup |
|
Hostname |
|
|
|
|
|
|
|
Network |
|
Specify the name of the device on the |
|
|
|
|
network |
|
|
Time |
|
DHCP |
|
|
|
|
|
|
|
Screen |
|
|
|
|
|
Use automatic network configuration |
|
|
|
Audio |
|
Activate DNS |
|
|
|
|
|
|
|
Gesture |
|
Activate DNS service |
|
|
|
|
|
|
|
VNC |
|
DNS suffix |
|
|
Web |
|
|
|
|
|
|
Get DNS from DHCP server |
|
|
Storage |
|
|
|
|
|
|
|
|
|
Update |
|
|
|
|
|
|
|
|
|
Backup & Reset |
|
|
|
|
|
|
|
|
|
Security |
|
|
|
|
|
|
|
|
|
OPC UA |
|
|
|
|
|
|
|
|
|
Save & Exit |
|
|
|
|
|
|
|
|
|
About & Info |
|
|
|
|
|
|
|
Language of the service pages
As can be seen in the previous service page example, all of the content on the service pages for the Power Panel is generally in English.
36 |
Power Panel T80 User's manual V1.01 |
Configuration
Saving the settings
Any settings changed on the service pages are not saved permanently while settings are still being edited. Saving only takes place permanently when one of the following commands is launched from service page Save & Exit:
•Save changes & exit
•Save changes
See "Service page Save & Exit" on page 67.
Information:
Changes only become active after saving and exiting the service pages (command
Save changes & exit).
Information:
All settings on the service pages are saved on the Power Panel in XML file PPT80Config.xml . When backing up or restoring the panel settings, a file with this name is created or expected to be on the storage medium (see "Service page Backup & Reset" on page 63 and "Service page Update" on page 58).
Power Panel T80 User's manual V1.01 |
37 |
Configuration
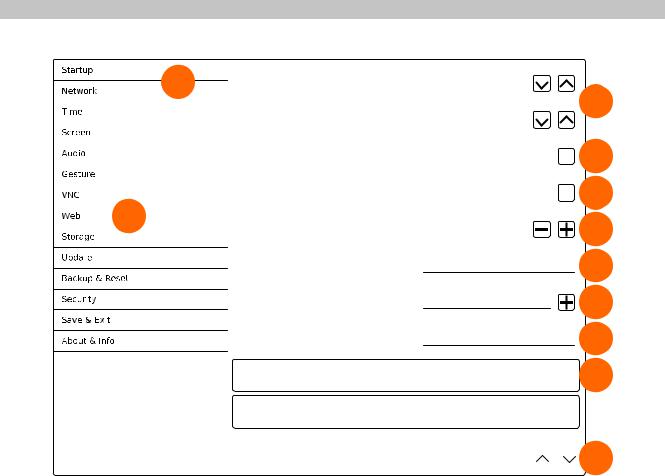
Input elements on the service pages
|
1 |
Selection list |
|
Click up/down button |
|
|
|
to select another option. |
|
|
Selection list |
|
|
Checkbox |
|
|
|
|
|
Checkbox not enabled |
|
|
Checkbox |
|
|
|
|
|
Checkbox enabled |
|
2 |
UpDown input field |
|
|
+/- buttons for range of values |
Text field
Text input...
Text field
Multiple text input...
Text field
Password entry
Button A
Description of button A...
Button B
Description of button B...
Option 1
3
Option C
4
5
50 |
6 |
Enter text here |
7 |
|
Hostname |
8 |
|
|
●●●●●●●● |
9 |
|
|
|
10 |
|
|
|
|
|
11 |
|
|
|
|
|
|
|
|
||||
1 |
Menu for selecting individual service pages "Startup", "Network", "About & Info", etc. |
||||
2 |
The active or selected service page is marked in the menu using a different background color. |
||||
3 |
The selection list indicates the selected option. Pressing the up/down arrows moves between the available |
||||
|
options. |
||||
4 |
Checkbox not activated. |
||||
5 |
Checkbox activated. |
||||
6 |
UpDown input field for entering values within a certain range. The value can be increased/decreased using |
||||
|
the "-" or "+" symbols. The value can also be changed directly using the keyboard. |
||||
7 |
Text field where text can be entered with the keyboard. |
||||
8 |
Text field where text can be entered with the keyboard. The "+" symbol can be used to add the entered |
||||
|
text to a text list. |
||||
9 |
Text field for entering a password. The password will be displayed as plain text or wildcard characters |
||||
|
(●●●●●●) depending on the setting. |
||||
10 |
Button that can be used to trigger a specific function. Under the short title, a more detailed description of |
||||
|
the function is displayed as gray text. |
||||
11 |
If the service page contains more elements than fit on the display, it is possible to scroll through the content |
||||
|
using the up/down buttons. |
To simplify operation, some text fields are enlarged during input (increased readability). The descriptive text to the left of the text field is hidden during this (covered up by the text field).
38 |
Power Panel T80 User's manual V1.01 |