
CCNA_R&S-Student_Lab_Manual
.pdf
Lab 23 – Researching Network Security Threats
Objectives
Part 101: Part 1: Explore the SANS Website
Navigate to the SANS website and identify resources.
Part 102: Part 2: Identify Recent Network Security Threats
Identify several recent network security threats using the SANS site.
Identify sites beyond SANS that provide network security threat information.
Part 103: Part 3: Detail a Specific Network Security Threat
Select and detail a specific recent network threat.
Present information to the class.
Background / Scenario
To defend a network against attacks, an administrator must identify external threats that pose a danger to the network. Security websites can be used to identify emerging threats and provide mitigation options for defending a network.
One of the most popular and trusted sites for defending against computer and network security threats is SysAdmin, Audit, Network, Security (SANS). The SANS site provides multiple resources, including a list of the top 20 Critical Security Controls for Effective Cyber Defense and the weekly @Risk: The Consensus Security Alert newsletter. This newsletter details new network attacks and vulnerabilities.
In this lab, you will navigate to and explore the SANS site, use the SANS site to identify recent network security threats, research other websites that identify threats, and research and present the details about a specific network attack.
Required Resources
Device with Internet access
Presentation computer with PowerPoint or other presentation software installed
Part 104: Exploring the SANS Website
In Part 1, navigate to the SANS website and explore the available resources.
Locate SANS resources.
Using a web browser, navigate to www.SANS.org. From the home page, highlight the Resources menu.
List three available resources.
_____________________________________________________________________________
__________
_____________________________________________________________________________
__________
Locate the Top 20 Critical Controls.
The Twenty Critical Security Controls for Effective Cyber Defense listed on the SANS website are the culmination of a public-private partnership involving the Department of Defense (DoD), National Security Association, Center for Internet Security (CIS), and the SANS Institute. The list was developed to prioritize the cyber security controls and spending for DoD. It has
© 2013 Cisco and/or its affiliates. All rights reserved. This document is Cisco Public. Page 201 of 257

become the centerpiece for effective security programs for the United States government. From the Resources menu, select Top 20 Critical Controls.
Select one of the 20 Critical Controls and list three of the implementation suggestions for this control.
_____________________________________________________________________________
__________
_____________________________________________________________________________
__________
_____________________________________________________________________________
__________
_____________________________________________________________________________
__________
_____________________________________________________________________________
__________
Locate the Newsletters menu.
Highlight the Resources menu, select Newsletters. Briefly describe each of the three newsletters available.
_____________________________________________________________________________
__________
_____________________________________________________________________________
__________
_____________________________________________________________________________
__________
_____________________________________________________________________________
__________
_____________________________________________________________________________
__________
_____________________________________________________________________________
__________
Part 105: Identify Recent Network Security Threats
In Part 2, you will research recent network security threats using the SANS site and identify other sites containing security threat information.
Locate the @Risk: Consensus Security Alert Newsletter Archive.
From the Newsletters page, select Archive for the @RISK: The Consensus Security Alert. Scroll down to Archives Volumes and select a recent weekly newsletter. Review the Notable Recent Security Issues and Most Popular Malware Files sections.
List some recent attacks. Browse multiple recent newsletters, if necessary.
_____________________________________________________________________________
__________
_____________________________________________________________________________
__________
_____________________________________________________________________________
__________
© 2013 Cisco and/or its affiliates. All rights reserved. This document is Cisco Public. Page 202 of 257
Identify sites providing recent security threat information.
Besides the SANS site, identify some other websites that provide recent security threat information.
_____________________________________________________________________________
__________
_____________________________________________________________________________
__________
_____________________________________________________________________________
__________
List some of the recent security threats detailed on these websites.
_____________________________________________________________________________
__________
_____________________________________________________________________________
__________
_____________________________________________________________________________
__________
Part 106: Detail a Specific Network Security Attack
In Part 3, you will research a specific network attack that has occurred and create a presentation based on your findings. Complete the form below based on your findings.
Complete the following form for the selected network attack.
Name of attack:
Type of attack:
Dates of attacks:
Computers / Organizations affected:
How it works and what it did:
Mitigation options:
References and info links:
© 2013 Cisco and/or its affiliates. All rights reserved. This document is Cisco Public. Page 203 of 257

Follow the instructor’s guidelines to complete the presentation.
Reflection
What steps can you take to protect your own computer?
_____________________________________________________________________________
__________
_____________________________________________________________________________
__________
What are some important steps that organizations can take to protect their resources?
_____________________________________________________________________________
__________
_____________________________________________________________________________
__________
© 2013 Cisco and/or its affiliates. All rights reserved. This document is Cisco Public. Page 204 of 257
Lab 24 - Accessing Network Devices with SSH
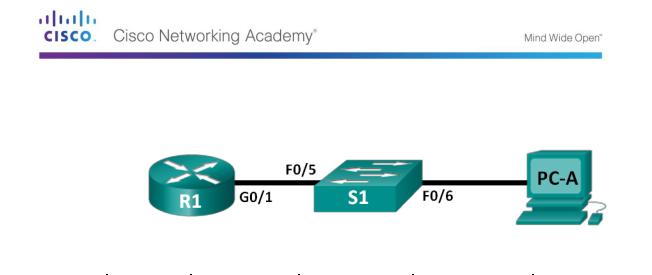
Topology
Addressing Table
Device |
Interface |
IP Address |
Subnet Mask |
Default Gateway |
|
|
|
|
|
R1 |
G0/1 |
192.168.1.1 |
255.255.255.0 |
N/A |
|
|
|
|
|
S1 |
VLAN 1 |
192.168.1.11 |
255.255.255.0 |
192.168.1.1 |
|
|
|
|
|
PC-A |
NIC |
192.168.1.3 |
255.255.255.0 |
192.168.1.1 |
|
|
|
|
|
Objectives
Part 1: Configure Basic Device Settings
Part 2: Configure the Router for SSH Access
Part 3: Examine a Telnet Session with Wireshark
Part 4: Examine a SSH Session with Wireshark
Part 5: Configure the Switch for SSH Access
Part 6: SSH from the CLI on the Switch
Background / Scenario
Part 107: In the past, Telnet was the most common network protocol used to remotely configure network devices. However, protocols such as Telnet do not authenticate or encrypt the information between the client and server. This allows a network sniffer to intercept passwords and configuration information.
Part 108: Secure Shell (SSH) is a network protocol that establishes a secure terminal emulation connection to a router or other networking device. SSH encrypts all information that passes over the network link and provides authentication of the remote computer. SSH is rapidly replacing Telnet as the remote login tool of choice for network professionals. SSH is most often used to log in to a remote device and execute commands; however, it can also transfer files using the associated Secure FTP (SFTP) or Secure Copy (SCP) protocols.
Part 109: For SSH to function, the network devices communicating must be configured to support it. In this lab, you will enable the SSH server on a router and then connect to that router using a PC with an SSH client installed. On a local network, the connection is normally made using Ethernet and IP.
Part 110: In this lab, you will configure a router to accept SSH connectivity, and use Wireshark to capture and view Telnet and SSH sessions. This will demonstrate the importance of encryption with SSH. You will also be challenged to configure a switch for SSH connectivity on your own.
Part 111: Note: The routers used with CCNA hands-on labs are Cisco 1941 Integrated Services Routers (ISRs) with Cisco IOS Release 15.2(4)M3 (universalk9 image). The switches used are Cisco Catalyst 2960s with Cisco IOS Release 15.0(2) (lanbasek9 image). Other routers, switches, and Cisco IOS versions can be used. Depending on the model and Cisco IOS version, the commands available and output produced might vary from what is shown in the labs. Refer to the Router Interface Summary Table at the end of this lab for the correct interface identifiers.
© 2013 Cisco and/or its affiliates. All rights reserved. This document is Cisco Public. Page 205 of 257

Part 112: Note: Make sure that the routers and switches have been erased and have no startup configurations. If you are unsure, contact your instructor.
Required Resources
1 Router (Cisco 1941 with Cisco IOS Release 15.2(4)M3 universal image or comparable) 1 Switch (Cisco 2960 with Cisco IOS Release 15.0(2) lanbasek9 image or comparable)
1 PC (Windows 7, Vista, or XP with terminal emulation program, such as Tera Term, and Wireshark installed)
Console cables to configure the Cisco IOS devices via the console ports Ethernet cables as shown in the topology
Configure Basic Device Settings
Part 113: In Part 1, you will set up the network topology and configure basic settings, such as the interface IP addresses, device access, and passwords on the router.
Cable the network as shown in the topology.
Step 1: Initialize and reload the router and switch.
Step 2: Configure the router.
a.Console into the router and enable privileged EXEC mode.
b.Enter configuration mode.
c.Disable DNS lookup to prevent the router from attempting to translate incorrectly entered commands as though they were host names.
d.Assign class as the privileged EXEC encrypted password.
e.Assign cisco as the console password and enable login.
f.Assign cisco as the vty password and enable login.
g.Encrypt the plain text passwords.
h.Create a banner that will warn anyone accessing the device that unauthorized access is prohibited.
i.Configure and activate the G0/1 interface on the router using the information contained in the Addressing Table.
j.Save the running configuration to the startup configuration file.
Configure PC-A.
Configure PC-A with an IP address and subnet mask.
Configure a default gateway for PC-A.
Verify network connectivity.
Part 114: Ping R1 from PC-A. If the ping fails, troubleshoot the connection.
Configure the Router for SSH Access
Part 115: Using Telnet to connect to a network device is a security risk, because all information is transmitted in a clear text format. SSH encrypts the session data and provides device authentication, which is why SSH is recommended for remote connections. In Part 2, you will configure the router to accept SSH connections over the VTY lines.
© 2013 Cisco and/or its affiliates. All rights reserved. This document is Cisco Public. Page 206 of 257

Configure device authentication.
Part 116: The device name and domain are used as part in the crypto key when it is generated. Therefore, these names must be entered prior to issuing the crypto key command.
Configure device name.
Part 117: Router(config)# hostname R1
Configure the domain for the device.
Part 118: R1(config)# ip domain-name ccna-lab.com
Configure the encryption key method.
Part 119: R1(config)# crypto key generate rsa modulus 1024
The name for the keys will be: R1.ccna-lab.com
%The key modulus size is 1024 bits
%Generating 1024 bit RSA keys, keys will be non-exportable...
[OK] (elapsed time was 1 seconds)
R1(config)#
*Jan 28 21:09:29.867: %SSH-5-ENABLED: SSH 1.99 has been enabled
Configure a local database username.
Part 120: R1(config)# username admin privilege 15 secret adminpass
R1(config)#
*Feb 6 23:24:43.971: End- >Password:QHjxdsVkjtoP7VxKIcPsLdTiMIvyLkyjT1HbmYxZigc
R1(config)#
Part 121: Note: A privilege level of 15 gives the user administrator rights.
Enable SSH on the VTY lines.
Enable Telnet and SSH on the inbound VTY lines using the transport input command.
Part 122: R1(config)# line vty 0 4
Part 123: R1(config-line)# transport input telnet ssh
Change the login method to use the local database for user verification.
Part 124: R1(config-line)# login local
Part 125: R1(config-line)# end
Part 126: R1#
Save the running configuration to the startup configuration file.
Part 127: R1# copy running-config startup-config
Destination filename [startup-config]? Building configuration...
[OK]
R1#
Examine a Telnet Session with Wireshark
Part 128: In Part 3, you will use Wireshark to capture and view the transmitted data of a Telnet session on the router. You will use Tera Term to telnet to R1, sign in, and then issue the show run command on the router.
© 2013 Cisco and/or its affiliates. All rights reserved. This document is Cisco Public. Page 207 of 257
Part 129: Note: If a Telnet/SSH client software package is not installed on your PC, you must install one before continuing. Two popular freeware Telnet/SSH packages are Tera Term (http://download.cnet.com/Tera-Term/3000-20432_4-75766675.html) and PuTTy (www.putty.org).
Note: Telnet is not available from the command prompt in Windows 7, by default. To enable Telnet for use in the command prompt window, click Start > Control Panel > Programs >
Programs and Features > Turn Windows features on or off. Click the Telnet Client check box, and then click OK.
Open Wireshark and start capturing data on the LAN interface.
Part 130: Note: If you are unable to start the capture on the LAN interface, you may need to open Wireshark using the Run as Administrator option.
Start a Telnet session to the router.
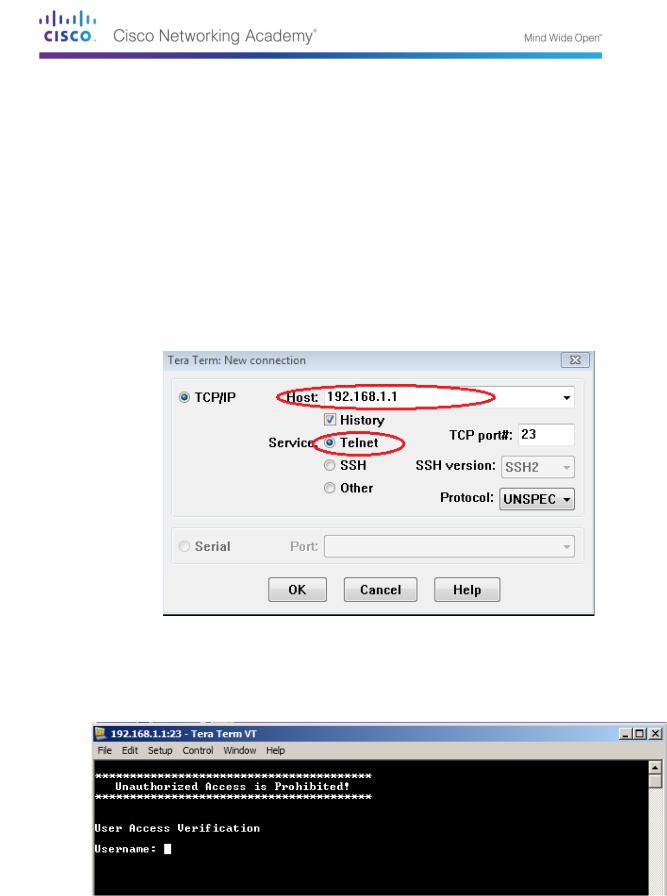
Open Tera Term and select the Telnet Service radio button and in the Host field, enter
192.168.1.1.
What is the default TCP port for Telnet sessions? _________________
At the Username: prompt, enter admin and at the Password: prompt, enter adminpass. These prompts are generated because you configured the VTY lines to use the local database with the login local command.
Issue the show run command.
Part 131: R1# show run
Enter exit to exit the Telnet session and out of Tera Term.
© 2013 Cisco and/or its affiliates. All rights reserved. This document is Cisco Public. Page 208 of 257
Part 132: R1# exit
Stop the Wireshark capture.
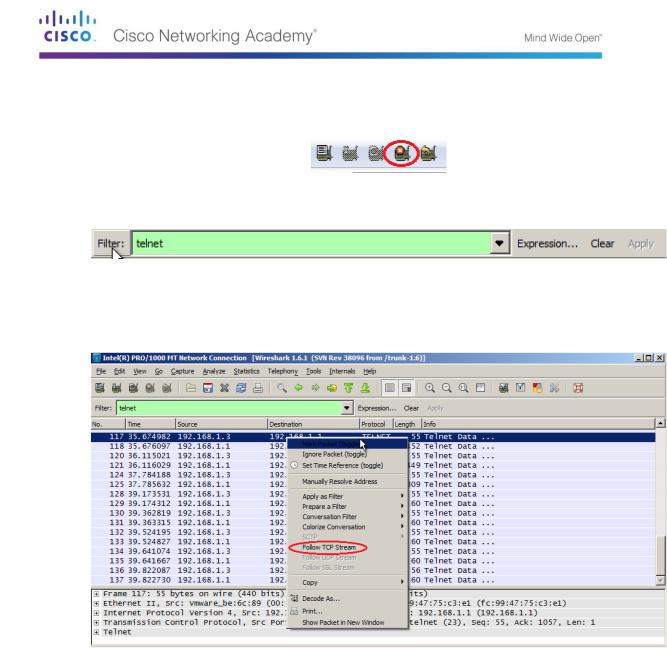
Apply a Telnet filter on the Wireshark capture data.
Use the Follow TCP Stream feature in Wireshark to view the Telnet session.
Right-click one of the Telnet lines in the Packet list section of Wireshark, and in the drop-down list, select Follow TCP Stream.
The Follow TCP Stream window displays the data for your Telnet session with the router. The entire session is displayed in clear text, including your password. Notice that the username and show run command that you entered are displayed with duplicate characters. This is caused by the echo setting in Telnet to allow you to view the characters that you type on the screen.
© 2013 Cisco and/or its affiliates. All rights reserved. This document is Cisco Public. Page 209 of 257
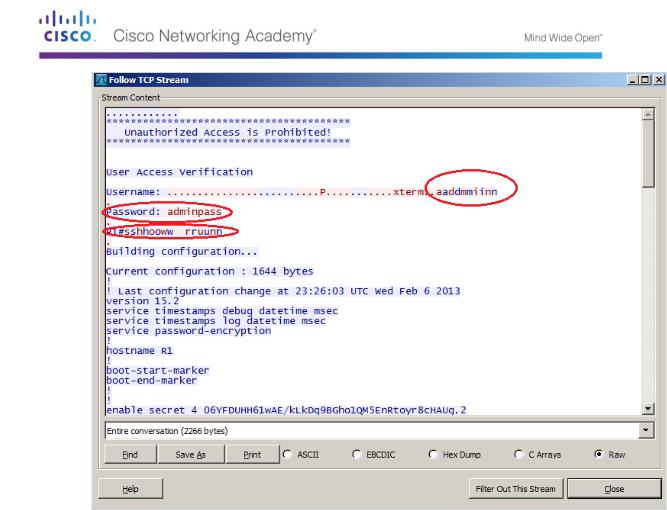
After you have finished reviewing your Telnet session in the Follow TCP Stream window, click
Close.
Examine an SSH session with Wireshark
Part 133: In Part 4, you will use the Tera Term software to establish an SSH session with the router. Wireshark will be used to capture and view the data of this SSH session.
Open Wireshark and start capturing data on the LAN interface.
Start an SSH session on the router.
Open Tera Term and enter the G0/1 interface IP address of R1 in the Host: field of the Tera Term: New Connection window. Ensure that the SSH radio button is selected and then click OK to connect to the router.
© 2013 Cisco and/or its affiliates. All rights reserved. This document is Cisco Public. Page 210 of 257
