Добавил:
Опубликованный материал нарушает ваши авторские права? Сообщите нам.
Вуз: Предмет: Файл:

Beginning Visual Basic 2005 (2006)

.pdf
Скачиваний:
220
Добавлен:
17.08.2013
Размер:
14.97 Mб
Скачать

Chapter 18

separate from the tasks of developing the actual intranet site. What happens is that IIS requires the user either to be logged into the server’s domain to log in with a valid domain account. If the user is already authenticated with a valid domain account, access to the site is seamless with no interruption to the user experience. When the user is not logged into the server’s domain, a valid login is required. This method of authentication is set up via the IIS Management Console.

Forms Authentication

For a public Web site, forms authentication is an easy solution to implement. Users that visit the site must provide credentials to gain authorization to the site. When an unauthorized user requests a Web page, the user is redirected to the login page. From here, a current user can log in, or new users can click a link to create an account. Without a valid user name or password, the visitor cannot browse secured areas of the site. With ASP .NET 2.0, built-in controls make forms authentication quick and easy to implement as a security model.

Web Site Administration Tool (WAT)

ASP .NET 2.0 is driven by web.config files. In the past, developers had to hand-code the XML configuration files to set up functionality such as debugging, security, or tracing. Now, there is an interface to set up these configuration files for Web applications: the Web Site Administration Tool (WAT).

When you use the WAT, you will see five tabs (Home, Security, Profile, Application, and Provider). You will set site security using the Security tab in this chapter, and we will give you a brief summary of the others. The first tab is Home. Home is the main tab and displays info on your other options. Next is the Profile tab. You use this tab to collect and store data on your site’s visitors. Application is another tab, enabling application configuration. Here you can set up site attributes such as counters, tracing, and Simple Mail Transfer Protocol (SMTP). The final tab is Provider. Use this tab to change the default data provider for the site. The default provider is AspNetAccessProvider for Microsoft Access. You will use the WAT to set up the Web site in the next Try It Out.

In this Try It Out, you will set up the files for a new Web site and use the WAT to implement forms authentication.

Try It Out

Forms Authentication Configuration

In this exercise, you will start the Web site that you will work on during this chapter. First, you will add the file structure to the new site. Then you will set up the forms authentication security model.

1.Create a new Web site project named TheClub. Be sure to use the file system for the site location.

2.Make the following changes to the site using Solution Explorer. To add items to a site using Solution Explorer, right-click the root folder or project and choose Add new item. In the dialog box, select the type of item (Web form, text file, etc) and supply the name. When you finish with step 2, your site will look like Figure 18-1. For all of the pages you add, uncheck the box to place code in a separate file.

586

Forms Authentication

Add a master page and name it Main.master. Set all Web Forms you add to use this master page. You will have an option to select a master page when you add the forms by checking a box to Select Master Page.

Add the following regular folders to the site:

Admin

Members

Add the following theme folder to the site: You should right click the project name in Solution Explorer and then choose Add Folder Theme Folder. The folder you add will be placed under

anew App_Themes directory.

MainTheme

Add the following Web Forms to the site’s root folder (and remember to check the box to select a master page):

Login.aspx

ChangePassword.aspx

CreateNewUser.aspx

Set the Login.aspx page to the start page.

Right-click the page in Solution Explorer and choose Set As Start Page.

Add the following Web Forms to the Admin folder (and remember to check the box to select a master page):

Default.aspx

ViewUsers.aspx

Add the following Web Forms to the Members folder (and remember to check the box to select a master page):

Default.aspx

ViewAuthors.aspx

ViewTitles.aspx

Add the following text file to the MainTheme folder:

Main.skin

3.Next, choose Website ASP.NET Configuration under the Main menu to use the WAT. The menu is shown in Figure 18-2.

587

Chapter 18

Figure 18-1

Figure 18-2

588

Forms Authentication

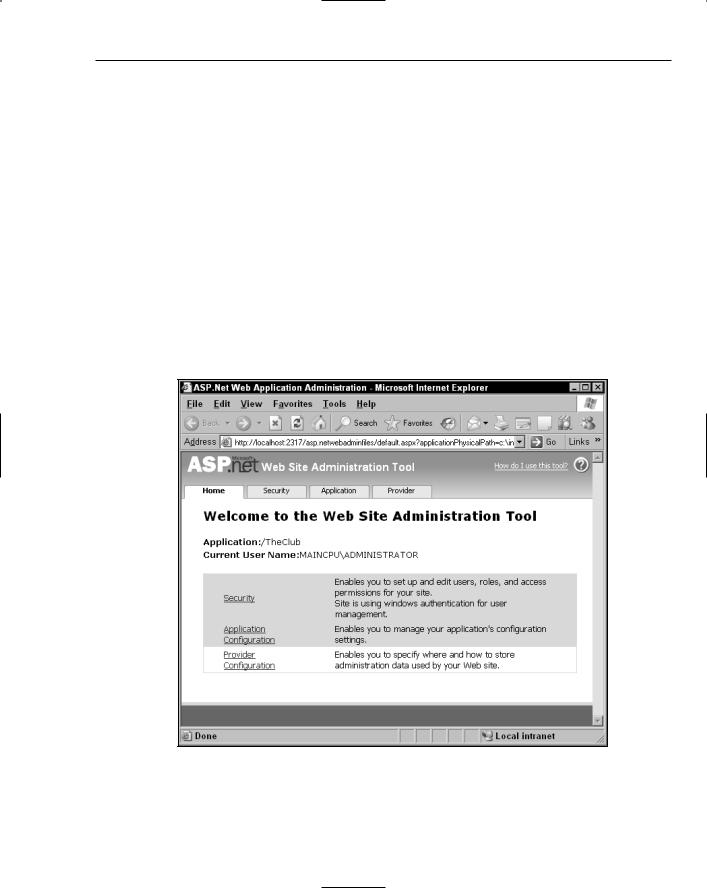
4.The Visual Web Developer Web Server will start and open the Web Site Administration Tool. Figure 18-3 shows the default page for the tool. You will use this tool to set up security for the site.

5.Now, click the Security link to set up the site security.

6.We will walk you through the wizard. Know that you can make any changes using the wizard from the main security page. Click the link on the security home page to use the Security Setup Wizard.

7.The Security Setup Wizard has seven steps. The first is the welcome screen, which gives you an overview of the entire process. At the lower right of each step, you will see options to navigate through the wizard. On the Welcome screen, move to step 2 by clicking Next.

8.Step 2 allows you to select the access method. You have two options here, as shown in Figure 18-4. The first option is “From the internet.” If you choose this option, the wizard will set the site up for forms authentication. This method will use a data source to store user account information and allow the public to access the site. The second option is “From a local area network” and will set the site to use windows authentication. You can use this option for an intranet application within a private network. For TheClub Web site, choose “From the internet” and click Next to move to step 3.

Figure 18-3

589

Chapter 18

Figure 18-4

9.The third step is for data store information. You will see the default data provider for the site. To change this, you have to quit the wizard and make the change on the Provider tab. Just click Next to keep the default and move to step 4. The default data store uses Microsoft Access behind the scenes.

10.You can enable roles-based security on step 4. With roles-based security, you can manage site access for many users in a role quickly. Check the box to enable roles, and then click Next to add a new role. Figure 18-5 shows the Create New Role screen. Type the role name Admin into the text box and click Add Role. On the next screen, you can edit or add roles. For this site, you will have just one role, Admin. To move to step 5, click Next.

11.Step 5 allows you to create new users. You do not have to create users here, but it is an easy interface if you have a few to create. For this project, add the Admin user as shown in Figure 18-6. Set the User Name to Admin. You can set the rest of the fields to any values you can remember. When you finish, click the Create User button. You will see a successful creation note on the next screen. Since you are only adding one user, click Next to go to step 6.

590

Forms Authentication

Figure 18-5

Figure 18-6

591

Chapter 18

12.The last step prior to completing the wizard is step 6, Add New Access Rules. This is where you will set up the users who will have access to areas of the site. You will add three rules. You need to remember that rules are applied to Web folders. Always make sure the correct folder is highlighted when you add a rule.

As shown in Figure 18-7, the default rule is to allow anonymous users to access the site. Now, add a new rule. Make sure the Admin directory is highlighted, and click the radio button beside Role. Select the Admin role and then, under the Permission heading, turn on the radio button for Allow and click Add This Rule. You will add the two other rules after completing the wizard. To finish the wizard, click Next to move to the final confirmation and then click Finish. You will be taken back to the main security page, where you will complete the rest of the rules.

13.From the main security page, click the Manage Access Rules link. On the next screen, click the Admin folder to see the new rule. Now click the Add New Access Rule link. You will add a rule to deny all-user access to this folder. Move the rules up or down so that they match Figure 18-8.

14.Next, click the Members directory and add a rule to deny anonymous users. The rules for the Members folder will look like Figure 18-9.

Figure 18-7

592

Forms Authentication

Figure 18-8

Figure 18-9

15.Now, you will test the security settings. Do not worry that the Web forms are blank. This test is just for the security settings.

593

Chapter 18

Run the Web site and you will be taken to the home page of the root directory. Our URL is http://localhost/TheClub/Login.aspx. You will be prompted to enable debugging. Select Add a New Web.Config File with Debugging Enabled and then click OK to run the site. Once the browser opens, click the View Authors submenu under Members. The security should return you to the Login.asp page. The URL should look like http://localhost/TheClub/ login.aspx?ReturnUrl=%2fTheClub%2fmembers%2fdefault.aspx.

16.Test the Admin directory and you will see the same result.

How It Works

So what did the wizard do? Well, first take a look at the project’s Solution Explorer. Make sure you refresh the view. It will resemble Figure 18-10. Look closely and you will see new web.config files and an Access database. These new additions will manage the security options you set using the wizard.

Figure 18-10

A site can be changed with settings in a web.config file. When you went through the wizard, settings were configured in web.config files per folder. If you opened one of the config files, you would see the settings that were added. Also, an Access database was created to manage the users and roles. That was it. To manage the security of the site, you do not need to know how to manipulate the web.config files manually.

Take a closer look at this URL, which sent you to the login page while testing (http://localhost: 11278/TheClub/login.aspx?ReturnUrl=%2fTheClub%2fmembers%2fdefault.aspx) and you will see a question mark. The question mark represents the beginning of the query string. The query string is

594

Forms Authentication

one way to pass data between the browser and server to maintain state. In this case, a variable (ReturnUrl) has a value from the Web server. The value has some encoded characters that may seem confusing. The forward slash is encoded in the query string and represented by %2f. So if you replace the characters %2f with a forward slash, then the value of ReturnUrl is /TheClub/members/default. aspx. When your login is successful, the sever will use the ReturnUrl to send you back to the place you were trying to visit — in this case, the Members folder.

Okay, so now you have a secure site. Next, you will take a look at the built-in login controls available in ASP.NET 2.0.

Login Controls

The Microsoft ASP team has encapsulated the most common functionality for authentication into a group of login controls that make your job as a developer easier. You can take the default behavior of these controls or customize almost every aspect of the controls functionality and design. The following table lists the login controls available. You are not required to use these controls. If you prefer, you can hand-code your own logic to use the same membership APIs to enforce forms authentication.

Control Name

Description


Login

Contains all of the elements necessary to provide a login area for a


Website.

LoginView

Allows for templates to display the correct information to a user based


on authentication and roles.

LoginStatus

Displays a link to log in or log out based on the users status.

LoginName

Displays the current user’s name.

ChangePassword

Allows users change their password.

CreateUserWizard

Creates an area for new users to create a new account on the web site.

PasswordRecovery

Sends a user’s forgotten or new password via email.


Note: Email is not a secure means of data transmission. The security


risks of this control should be considered before it is implemented on


your Web site.


In the next Try It Out, you will use most of the login controls to implement a membership strategy.

Try It Out

Layout and Login Controls

Now that you have security set up, you need to add the layout and functionality to allow visitors to log in. In this Try It Out, you refresh your layout skills from Chapter 17 and gain knowledge about most of the Login controls in ASP.NET 2.0.

595