

Beginning Visual Basic 2005 (2006)
.pdfChapter 16
If you want to retrieve all rows of authors except those with the last name of Green, you would specify the “not equal to” operator as shown in this example:
‘ Set the DataView object to the DataSet object...
objDataView = New DataView(objDataSet.Tables(“authors”)) objDataView.RowFilter = “au_lname <> ‘Green’”
You can also specify more complex filters, as you could in SQL. For example, you can combine several criteria using an AND operator:
objDataView.RowFilter = “au_lname <> ‘Green’ AND au_fname LIKE ‘D*’”
This returns authors whose last names are not Green and whose first names begin with D.
The Find Method
If you want to search for a specific row of data in a DataView, you invoke the Find method. The Find method searches for data in the sort key column of the DataView. Therefore, before invoking the Find method, you first need to sort the DataView on the column that contains the data that you want to find. The column that the DataView is sorted on becomes the sort key column in a DataView object.
For example, suppose you want to find the author who has a first name of Ann. You would need to sort the DataView by first name to set this column as the sort key column in the DataView, and then invoke the Find method, as shown in the following code fragment:
Dim intPosition as Integer objDataView.Sort = “au_fname” intPosition = objDataView.Find(“Ann”)
If it finds a match, the Find method returns the position of the record within the DataView. Otherwise, the DataView returns a null value, indicating that no match was found. If the Find method finds a match, it stops looking and returns only the position of the first match. If you know there is more than one match in your data store, you could filter the data in the DataView, which is a subject that is covered shortly.
The Find method is not case sensitive, meaning that to find the author who has a first name of Ann, you could enter either the text Ann or the text ann.
The Find method looks for an exact case-insensitive match, so this means that you must enter the whole word or words of the text that you are looking for. For example, suppose you are looking for the author who has the last name of Del Castillo. You cannot enter Del and expect to find a match; you must enter all the words that make up the author’s name. Notice that the following example specifies all lowercase letters, which is perfectly fine:
objDataView.Sort = “au_lname”
intPosition = objDataView.Find(“del castillo”)
You have seen that a DataView can be sorted on more than one column at a time. If you want to sort on more than one column, you need to supply an array of values to the Find method instead of just a single value. For example, you may want to find where Simon Watts appears in the DataView, if at all:
506

Database Programming with SQL Server and ADO.NET
Dim intPosition As Integer Dim arrValues(1) As Object
objDataView.Sort = “au_fname, au_lname”
‘ Find the author named “Simon Watts”. arrValues(0)= “Simon”
arrValues(1) = “Watts”
intPosition = objDataView.Find(arrValues)
The ADO.NET Classes in Action
You’ve now looked at the basics of the ADO.NET classes and how they allow you to retrieve and insert data into SQL Server. No doubt your head is spinning from information overload at this point, so the best way to ensure that you understand how to use all of the objects, methods, and properties that you have been looking at is to actually use them. In the next two Try It Outs, you’ll see how to exploit the power of the DataSet object to expose data to your users. You may find that you’ll want to come back and reread the previous section after you’ve completed the Try It Outs; this will help to clarify ADO.NET in your mind.
The first Try It Out will implement the SqlConnection, SqlDataAdapter, and DataSet classes. You will see firsthand how to use these classes in a simple example in which you need to retrieve read-only data and display that data in a data grid. In fact, what you do here will be very similar to the example in the previous chapter, but you will be doing it in code instead of using wizards.
When writing your programs, you may often use a combination of wizards and coding to create powerful programs quickly and easily. The components created in the previous chapter by drag and drop can be manipulated in code in exactly the same way as objects created in code. In the previous chapter, you used wizards almost all the time. In this chapter you will concentrate on code.
Examining a DataSet Example
Before you dive into the details of creating the program, take a look at the data and the relationships of the data that you want to display. The data that you want comes from the pubs database in SQL Server 2000. However, if you are using SQL Server 7.0, SQL Server 2005 or MSDE you should be seeing the exact same data. Some versions SQL Server 2005 may not come with the pubs database.
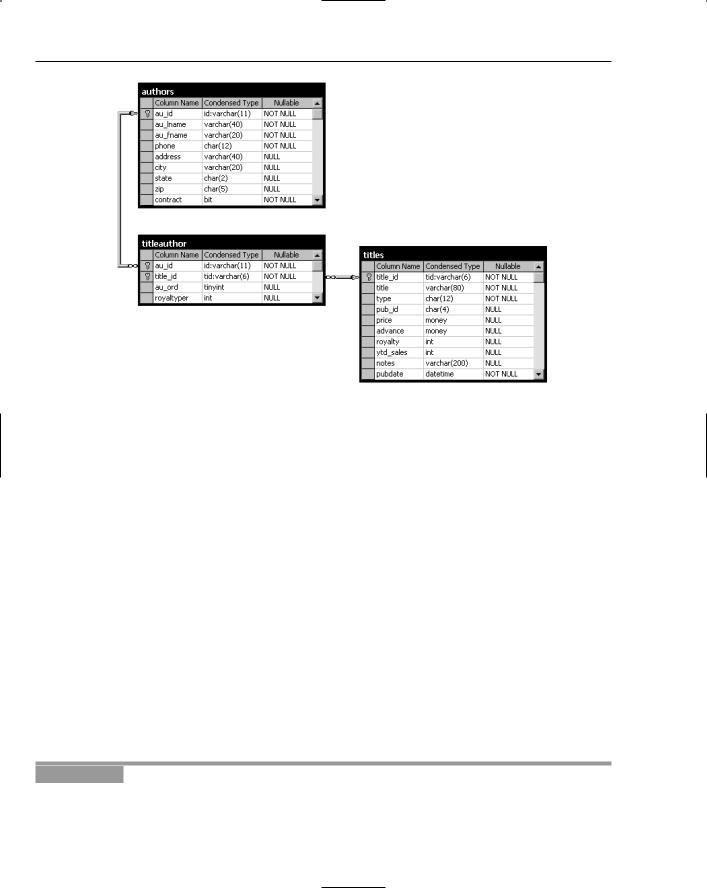
You want to display a list of authors, their book titles, and the price of their books. Figure 16-3 shows the tables that this data resides in and also the relationship of the tables:
You want to display the author’s first and last names, which reside in the authors table, and the title and price of the book, which reside in the titles table. Because an author can have one or more books and a book can have one or more authors, the titles table is joined to the authors table via a relationship table called titleauthor. This table contains the many-to-many relationship of authors to books.
507
Chapter 16
Figure 16-3
Having looked at the relationship of the tables and knowing what data you want, take a look at the SQL SELECT statement that you need to create to get this data:
SELECT au_lname, au_fname, title, price
FROM authors
JOIN titleauthor ON authors.au_id = titleauthor.au_id
JOIN titles ON titleauthor.title_id = titles.title_id
ORDER BY au_lname, au_fname
The first line of the SELECT statement shows the columns that you want to select. The second line shows the main table that you are selecting data from, which is authors.
The third line joins the titleauthor table to the authors table using the au_id column. Therefore, when you select a row of data from the authors table, you will also get every row in the titleauthor table that matches the au_id in the selected row of the authors table. This join returns only authors who have a record in the titleauthor table.
The fourth line joins the titles table to the titleauthor table using the title_id column. Hence, for every row of data that is selected from the titleauthor table, you will select the corresponding row of data (having the same title_id value) from the titles table. The last line of the SELECT statement sorts the data by the author’s last name and first name using the ORDER BY clause. Now, create the project in the next Try It Out.
Try It Out |
DataSet Example |
1.
2.
Create a new Windows Application called DatasetExample.
Set the following properties of the form:
508

Database Programming with SQL Server and ADO.NET
Set Size to 600, 230.
Set StartPosition to CenterScreen.
Set Text to Bound DataSet.
3.From the Toolbox, locate the DataGridView control under the Windows Forms tab and drag it onto your form. Set the properties of the DataGridView as follows:
Set Name to grdAuthorTitles.
Set Anchor to Top, Bottom, Left, Right.
Set Location to 0, 0.
Set Size to 592, 203.
4.First, add references to the System.Data and System.Xml namespaces. Next, you will add the Imports statements for the namespaces you will use. Open the code window for your form and add these namespaces as highlighted at the very top of your code:
‘Import Data and SqlClient namespaces...
Imports System.Data
Imports System.Data.SqlClient
Public Class Form1
End Class
5.Next, you need to declare the objects necessary to retrieve the data from the database, so add the following highlighted code. Ensure that you use a user ID and password that have been defined in your installation of SQL Server:
Public Class Form1
Dim objConnection As New SqlConnection _ (“server=bnewsome;database=pubs;user id=sa;password=!p@ssw0rd!”)
Dim objDataAdapter As New SqlDataAdapter()
Dim objDataSet As New DataSet()
End Class
Notice your connection string in the constructor for this object. You will need to change the server parameter to point to the machine where SQL Server is running if it is not running on your local machine. You will also need to change the user id and password parameters to use a valid login that has been provided or that you set up yourself. If the user id that you use has no password assigned, then specify the password argument but do not enter anything for the actual password. For example, password=;.
6.To add a handler for the form’s Load event, select (Form1 Events) in the Class Name combo box and then select Load in the Method Name combo box. Insert the following highlighted code:
Private Sub Form1_Load(ByVal sender As Object, ByVal e As System.EventArgs) _ Handles Me.Load
‘ Set the SelectCommand properties...
objDataAdapter.SelectCommand = New SqlCommand() objDataAdapter.SelectCommand.Connection = objConnection objDataAdapter.SelectCommand.CommandText = _
509
Chapter 16
“SELECT au_lname, au_fname, title, price “ & _ “FROM authors “ & _
“JOIN titleauthor ON authors.au_id = titleauthor.au_id “ & _ “JOIN titles ON titleauthor.title_id = titles.title_id “ & _ “ORDER BY au_lname, au_fname”
objDataAdapter.SelectCommand.CommandType = CommandType.Text
‘Open the database connection...
objConnection.Open()
‘Fill the DataSet object with data...
objDataAdapter.Fill(objDataSet, “authors”)
‘Close the database connection...
objConnection.Close()
‘Set the DataGridView properties to bind it to our data...
grdAuthorTitles.AutoGenerateColumns = True grdAuthorTitles.DataSource = objDataSet grdAuthorTitles.DataMember = “authors”
‘ Clean up objDataAdapter = Nothing objConnection = Nothing
End Sub
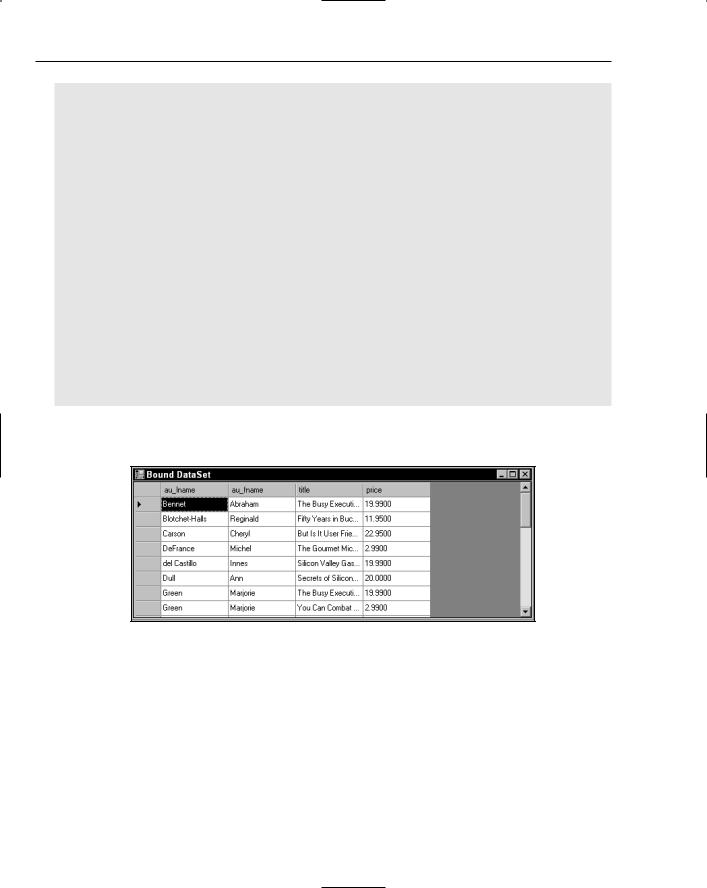
7.Run the project to see what you get. You should see results similar to Figure 16-4.
Figure 16-4
8.Note that the DataGridView control has built-in sorting capabilities. If you click a column header, the data in the grid will be sorted by that column in ascending order. If you click the same column again, the data will be sorted in descending order.
Note that error handling has been omitted from the exercise, to preserve space. You should always add the appropriate error handling to your code. Review Chapter 9 for error-handling techniques.
510

Database Programming with SQL Server and ADO.NET
How It Works
To begin with, you imported the following namespaces:
‘ Import Data and SqlClient namespaces...
Imports System.Data
Imports System.Data.SqlClient
Remember that the System.Data namespace is required for the DataSet and DataView classes, and that the System.Data.SqlClient namespace is required for the SqlConnection, SqlDataAdapter,
SqlCommand, and SqlParameter classes. You will be using only a subset of the classes just mentioned in this example, but you do require both namespaces.
Then you declared the objects that were necessary to retrieve the data from the database. These objects were declared with class-level scope, so you placed those declarations just inside the class:
Public Class Form1
Inherits System.Windows.Forms.Form
Dim objConnection As New SqlConnection _ (“server=bnewsome;database=pubs;user id=sa;password=!p@ssw0rd!”)
Dim objDataAdapter As New SqlDataAdapter()
Dim objDataSet As DataSet = New DataSet()
The first object that you declared was a SqlConnection object. Remember that this object establishes a connection to your data store, which in this case is SQL Server.
The next object that you declared was a SqlDataAdapter object. This object is used to read data from the database and populate the DataSet object.
The last object in your declarations was the DataSet object, which serves as the container for your data. Remember that this object stores all data in memory and is not connected to the data store.
In this particular example, there was no need to give these objects class-level scope. You use them in only one method, and they could have been declared there. However, if your application enabled users to write changes back to the database, you would want to use the same connection and data adapter objects for reading and writing to the database. In that case, having class-level scope would be really useful.
With your objects defined, you placed some code to populate the DataSet object in the initialization section of the form. Your SqlDataAdapter object is responsible for retrieving the data from the database. Therefore, you set the SelectCommand property of this object. This property is a SqlCommand object, so the SelectCommand has all the properties of an independent SqlCommand object:
‘ Set the SelectCommand properties...
objDataAdapter.SelectCommand = New SqlCommand() objDataAdapter.SelectCommand.Connection = objConnection objDataAdapter.SelectCommand.CommandText = _
“SELECT au_lname, au_fname, title, price “ & _ “FROM authors “ & _
“JOIN titleauthor ON authors.au_id = titleauthor.au_id “ & _ “JOIN titles ON titleauthor.title_id = titles.title_id “ & _ “ORDER BY au_lname, au_fname”
511

Chapter 16
First, you initialize the SelectCommand by initializing an instance of the SqlCommand class and assigning it to the SelectCommand property.
Then you set the Connection property to your connection object. This property sets the connection to be used to communicate with your data store.
The CommandText property is then set to the SQL string that you wanted to execute. This property contains the SQL string or stored procedure to be executed to retrieve your data. In this case you used an SQL string, which was explained in detail in the SQLDataAdapter section earlier.
After all of the properties are set, you open your connection, fill the dataset, and then close the connection again. You open the connection by executing the Open method of your SqlConnection object:
‘ Open the database connection...
objConnection.Open()
You then invoke the Fill method of the SqlDataAdapter object to retrieve the data and fill your DataSet object. In the parameters for the Fill method, you specify the DataSet object to use and the table name. You set the table name to authors, even though you are actually retrieving data from several tables in the data store:
‘ Fill the DataSet object with data...
objDataAdapter.Fill(objDataSet, “authors”)
After you fill your DataSet object with data, you need to close the database connection. You do that by invoking the Close method of the SqlConnection object:
‘ Close the database connection...
objConnection.Close()
As you learned earlier, you do not have to open and close the connection explicitly. The Fill method of the SqlDataAdapter executes the SelectCommand and leaves the connection in the same state as when the method was invoked. In this case, the Fill method left the connection open. If you did not explicitly write code to open and close the connection, the SqlDataAdapter.Fill method would open and close the connection for you.
Then you set some properties of the DataGridView to bind your data to it. The first of these properties is the AutoGenerateColumns property. Here you let the control create all of the columns you needed by setting the AutoGenerateColumns property to True. The next property is the DataSource property, which tells the DataGridView where to get its data:
‘ Set the DataGridView properties to bind it to our data...
grdAuthorTitles.AutoGenerateColumns = True grdAuthorTitles.DataSource = objDataSet grdAuthorTitles.DataMember = “authors”
The DataMember property selects the table in the data source, and here you set it to authors, which is the table used in your DataSet object.
512

Database Programming with SQL Server and ADO.NET
Then, to free memory, you clean up the objects that are no longer being used.
‘ Clean up objDataAdapter = Nothing objConnection = Nothing
When you ran the example, the DataGridView control read the schema information from the DataSet object (which the DataSet object created when it was filled) and created the correct number of columns for your data in the DataGridView control. It has also used the column names in the schema as the column names for the grid, and each column had the same default width. The DataGridView also read the entire DataSet object and placed the contents into the grid.
In the next Try It Out, you take a look at some of the DataGridView properties that you can use to make this a more user-friendly display of data.
Try It Out |
Changing the DataGridView Properties |
1.Here are some changes you can make to make your DataGridView more user-friendly:
Add your own column header names
Adjust the width of the column that contains the book titles so that you can easily see the full title
Change the color of every other row so that the data in each one stands out
Make the last column in the grid (which contains the price of the books) right-aligned
You can do all this by making the following highlighted modifications to your code in the
Form1_Load method:
‘Set the DataGridView properties to bind it to our data...
grdAuthorTitles.DataSource = objDataSet grdAuthorTitles.DataMember = “authors”
‘Declare and set the currency header alignment property...
Dim objAlignRightCellStyle As New DataGridViewCellStyle objAlignRightCellStyle.Alignment = DataGridViewContentAlignment.MiddleRight
‘Declare and set the alternating rows style...
Dim objAlternatingCellStyle As New DataGridViewCellStyle() objAlternatingCellStyle.BackColor = Color.WhiteSmoke grdAuthorTitles.AlternatingRowsDefaultCellStyle = objAlternatingCellStyle
‘ Declare and set the style for currency cells ...
Dim objCurrencyCellStyle As New DataGridViewCellStyle() objCurrencyCellStyle.Format = “c”
objCurrencyCellStyle.Alignment = DataGridViewContentAlignment.MiddleRight
‘ Change column names and styles using the column index grdAuthorTitles.Columns(0).HeaderText = “Last Name” grdAuthorTitles.Columns(1).HeaderText = “First Name” grdAuthorTitles.Columns(2).HeaderText = “Book Title” grdAuthorTitles.Columns(2).Width = 225
513
Chapter 16
‘Change column names and styles using the column name grdAuthorTitles.Columns(“price”).HeaderCell.Value = “Retail Price” grdAuthorTitles.Columns(“price”).HeaderCell.Style = objAlignRightCellStyle grdAuthorTitles.Columns(“price”).DefaultCellStyle = objCurrencyCellStyle
‘Clean up
objDataAdapter = Nothing objConnection = Nothing objCurrencyCellStyle = Nothing objAlternatingCellStyle = Nothing objAlignRightCellStyle = Nothing
End Sub
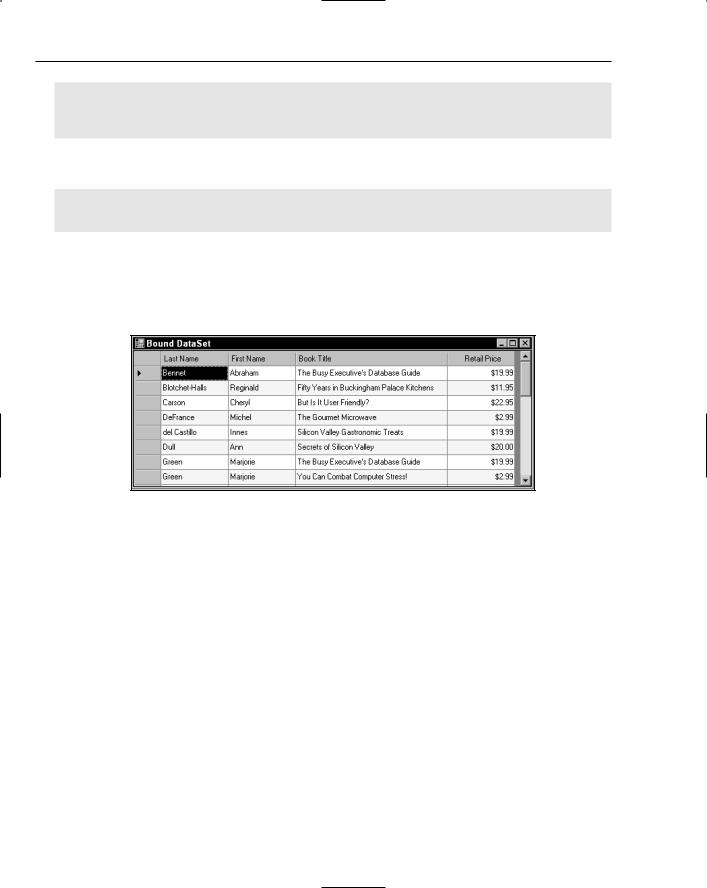
2.Run your project again. You should now see results similar to Figure 16-5. You can compare this figure to Figure 16-4 and see a world of difference. It’s amazing what setting a few properties will do and how it makes this a more user-friendly display:
Figure 16-5
How It Works
The DataGridView uses inherited styles to format the output table the users see. Style inheritance allows you to apply default styles that cascade to all cells, rows, columns, or headers under the parent style. Then, you can change only individual items that do not match the default styles. The architecture of styles is very powerful. You can set individual style properties or create your own DataGridView CellStyle objects to set multiple style properties and reuse them.
To start, you declare a DataGridViewCellStyle object. Then you change the alignment to middle right. (This allows you to align the price column later.)
‘ Declare and set the currency header alignment property...
Dim objAlignRightCellStyle As New DataGridViewCellStyle objAlignRightCellStyle.Alignment = DataGridViewContentAlignment.MiddleRight
The first thing that you do here is alternate the background color of each row of data. This helps each row of data stand out and makes it easier to see the data in each column for a single row. The Color
514

Database Programming with SQL Server and ADO.NET
structure provides a large list of color constants, as well as a few methods that can be called to generate colors:
‘ Declare and set the alternating rows style...
Dim objAlternatingCellStyle As New DataGridViewCellStyle() objAlternatingCellStyle.BackColor = Color.WhiteSmoke grdAuthorTitles.AlternatingRowsDefaultCellStyle = objAlternatingCellStyle
Next, changes to the currency cells for Retail Price are set up. You change the format to currency and right-align the column.
‘ Declare and set the style for currency cells ...
Dim objCurrencyCellStyle As New DataGridViewCellStyle() objCurrencyCellStyle.Format = “c”
objCurrencyCellStyle.Alignment = DataGridViewContentAlignment.MiddleRight
Some changes to the format of the DataGridView are easy to make at the property level. Column titles can simply be changed by accessing the column and setting HeaderText or HeaderCell.Value properties. You set both properties in the code that follows.
You changed the book title column width to 225 to display the title in a more readable format. Next, you set the styles on the price column based on the style objects above. What is great about using style objects is you can apply the same styles to multiple objects. For example, if you have three columns that hold dollar amounts, you would set up one style object and reuse this style on all three columns.
‘Change column names and styles using the column index grdAuthorTitles.Columns(0).HeaderText = “Last Name” grdAuthorTitles.Columns(1).HeaderText = “First Name” grdAuthorTitles.Columns(2).HeaderText = “Book Title” grdAuthorTitles.Columns(2).Width = 225
‘Change column names and styles using the column name grdAuthorTitles.Columns(“price”).HeaderCell.Value = “Retail Price” grdAuthorTitles.Columns(“price”).HeaderCell.Style = objAlignRightCellStyle grdAuthorTitles.Columns(“price”).DefaultCellStyle = objCurrencyCellStyle
You have now seen how to bind the DataSet object to a control, in this case a DataGridView control. In the next Try It Out, you expand on this knowledge by binding several controls to a DataView object and using the CurrencyManager object to navigate the data in the DataView object. However, before you get to that point, read about data binding and how you can bind data to simple controls, such as the TextBox control, and how to navigate the records.
Data Binding
The DataGridView control is a great tool for displaying all your data at one time. You can also use it for editing, deleting, and inserting rows, provided you have the logic to write changes back to the data source. However, you often want to use a control to display a single column value from one record at a time. In cases like these, you need to bind individual pieces of data to simple controls, such as a TextBox, and display only a single row of data at a time. This type of data binding gives you more control over
515