

Beginning Visual Basic 2005 (2006)
.pdfChapter 15
You can click the Database icon for connecting to various databases such as SQL Server, Oracle, and Access, the Web Service icon for connecting to a Web Service, and the Object icon for connecting to your business logic components.
Click the Database icon and click the Next button.
5.In the Choose Your Data Connection screen, click the New Connection button.
6.In the Choose Data Source dialog box, select Microsoft Access Database File in the Data Source list and then click the Continue button.
7.In the Add Connection dialog box, click the Browse button and navigate to the samples folder for Microsoft office. By default, this will be in the folder C:\Program Files\Microsoft Office\Office11\Samples\ for a default installation of Microsoft Office 2003.
Select the Northwind.mdb database in the Select Microsoft Access Database File dialog box and click the Open button to have the path and file name added to the text field on the Add Connection dialog box. Click the OK button when you are done to close the Add Connection dialog box and then click the Next button on the Choose Your Data Connection screen.
You will be prompted with a dialog box that informs you that the data file is not part of your project and asks if you want to add it. Click the Yes button in this dialog box.
8.Click the Next button on the Save the Connection String to the Application Configuration File screen.
9.The Choose Your Database Objects screen allows you to select the data that your application needs. Here you have the option to select data directly from the tables in your database, data generated from the execution of various views and stored procedures or data generated from the execution of functions.
Figure 15-10
486

Accessing Databases
You’ll be using the query that you created in the last Try It Out exercise so expand the Views node in the Database objects list and then check the check box for CustomerQuery as shown in Figure 15-11. If you expand CustomerQuery, you’ll see the columns that are returned from this query. Click the Finish button when you are done.
At this point, the wizard will generate a DataSet object named NorthwindDataSet, a BindingSource object named CustomerQueryBindingSource, and a TableAdapter object named CustomerQueryTableAdapter.
10.Since you will not be adding, editing, or deleting records from this table, uncheck the check box next to these options in the Tasks dialog. You will, however, want to implement sorting in your DataGridView component, so check the check box next to Enable Column Reordering. When you are done, click on the title bar of the form to hide the Actions dialog.
11.Click the DataGridView control and, in the Properties window, set the Dock property to Fill.
12.At this point you can run your project to see the results. Click the Start button on the toolbar, and your form will be displayed with the DataGridView control populated with data.
You can click on the column headers to have the data in the DataGridView sorted in ascending order. Clicking the same column header again will sort the data in descending order. Each sort order will be indicated with an arrow pointing up for ascending and down for descending.
At this point you have not written a single line of code to achieve these results, which just goes to prove how powerful the data wizards in Visual Basic 2005 are.
Figure 15-11
487
Chapter 15
How It Works
The approach you took to creating a data-bound application in this Try It Out exercise is the most straightforward approach and the easiest. You started by adding a DataGridView control to your form, which caused you to be prompted with the Tasks dialog box for the DataGridView.
This dialog box allowed you to create a new Data Source via the Data Source Configuration Wizard, which walked you through a series of steps, the first of which was to identify the type of data source that you wanted to use. You were then allowed to specify the type of database object that you wanted to use to retrieve your data, and in this step you merely chose to use a specific table in your database and selected specific columns from that table.
Once you clicked the Finish button in the Data Source Configuration Wizard, several components were automatically generated and added to your project. These included the TableAdapter, DataSet, and BindingSource. The BindingSource was the actual component that was bound to the DataSource property of the DataGridView control.
Remember that the BindingSource’s job is to communicate the data needs of the control to the data source, which in this case is the DataSet containing all of the data. The DataSet was populated with data by the TableAdapter when your form was loaded.
The most important point of this exercise was the ease with which you were able to create a data-bound application and the simple fact that you did not have to write a single line of code to achieve the end results.
In this next Try It Out exercise, you’ll be using several TextBox controls on your form and will bind each text box to a certain field in your BindingSource. You’ll then be using a BindingNavigator control to navigate through the records in your DataSet.
Try It Out |
Binding Data to TextBox Controls |
1.Create a new Windows Application project called Northwind Customers BindingNavigator.
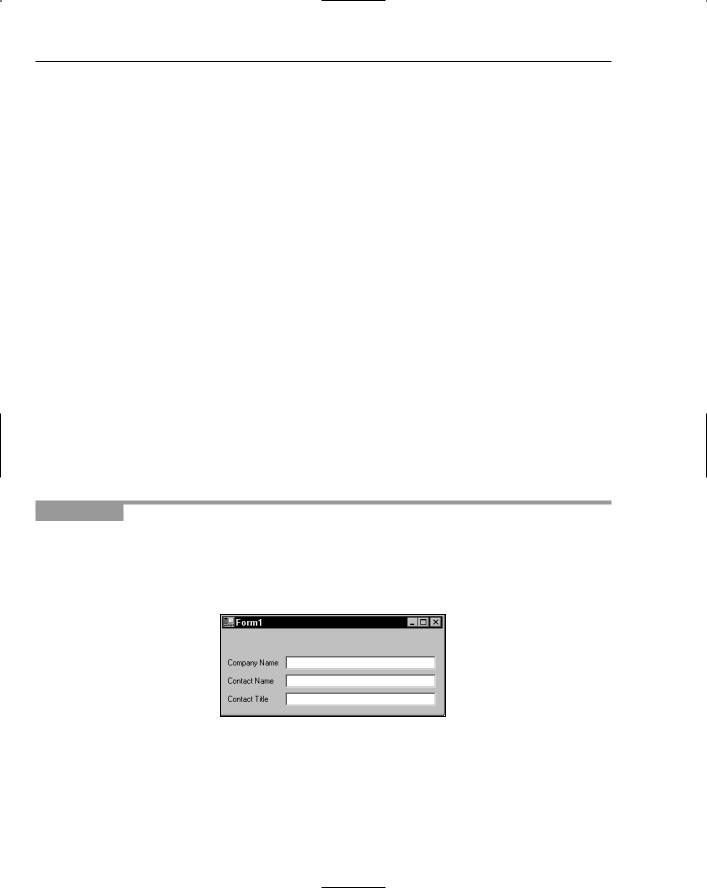
2.Add three Label controls and three TextBox controls to your form. Arrange the controls so that your form looks similar to Figure 15-12, and set the Text properties of the Label controls as shown in the figure.
Figure 15-12
3.Click the first text box on your form and then expand the (DataBindings) property in the Properties window by clicking the plus sign next to it. Then click the Text property under the DataBindings property. Now click the drop-down arrow for the Text property
488

Accessing Databases
At this point you’ll see the Data Source window shown in Figure 15-13. Click the Add Project Data Source link to invoke the Data Source Configuration Wizard, which you saw in the previous Try It Out exercise.
Figure 15-13
4.Select the Database icon in the Choose a Data Source Type screen and click the Next button.
5.In the Choose Your Data Connection screen, click the New Connection button.
6.In the Add Connection dialog box, click the Browse button and navigate to the samples folder for Microsoft office. By default, this will be in the folder C:\Program Files\Microsoft Office\Office11\Samples\ for a default installation of Microsoft Office 2003.
Select the Northwind.mdb database in the Select Microsoft Access Database File dialog box and click the Open button to have the path and file name added to the text field on the Add Connection dialog box. Click the OK button when you are done to close the Add Connection dialog box and then click the Next button on the Choose Your Data Connection screen.
You will be prompted with a dialog box that informs you that the data file is not part of your project and asks if you want to add it. Click the Yes button in this dialog box.
7.Click the Next button on the Save the Connection String to the Application Configuration File screen.
8.In the Choose Your Database Objects screen expand the Tables node in the Database objects list and then expand the Customers table. Check the check box for CompanyName, ContactName, and ContactTitle. Click the Finish button when you are done.
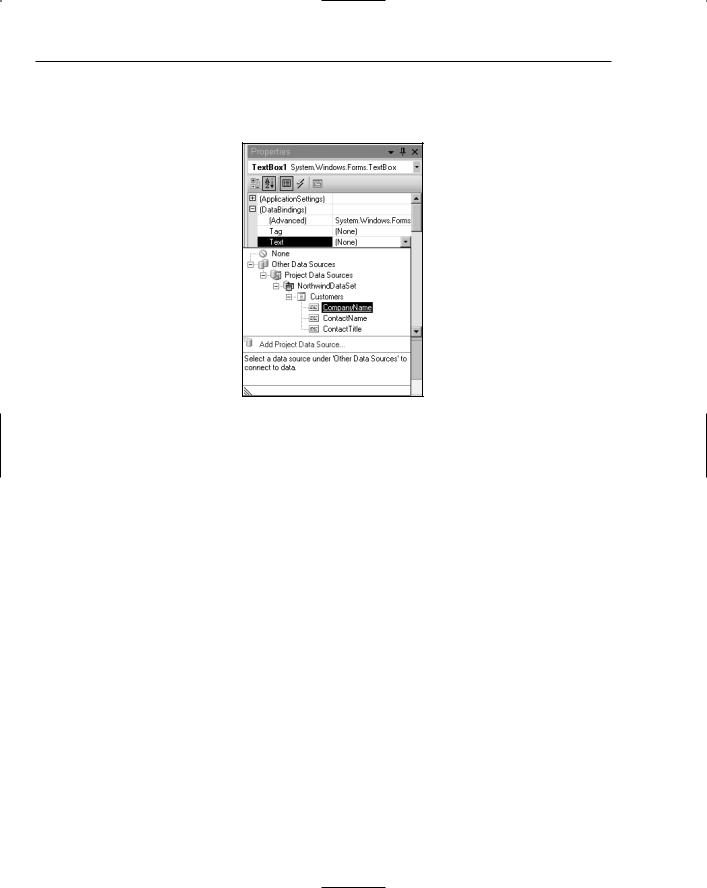
9.Now click the drop-down arrow next to the Text property in the Properties Window. At this point, you’ll see the Data Source window shown in Figure 15-14. Expand the Other Data Sources node, the Project Data Sources node, the NorthwindDataSet node, and finally the Customers node.
Now click the CompanyName field. The window will close, and the Text field under the DataBindings property will be bound to the CompanyName field in your DataSet.
489
Chapter 15
If you look at the bottom of the IDE, you’ll notice that a NorthwindDataSet component, CustomersBindingSource component, and CustomersTableAdapter component have been automatically generated.
Figure 15-14
10.Click the second text box on your form, and then click the Text property under the DataBindings property in the Properties window. Now click the drop-down arrow for the Text property; then expand the CustomersBindingSource node in the Data Source window, and then click the ContactName field.
11.Click the third text box on your form, and then click the Text property under the DataBindings property in the Properties window. Click the drop-down arrow for the Text property; then expand the CustomersBindingSource node in the Data Source window, and then click the ContactTitle field.
12.Now go back to the ToolBox, drag a BindingNavigator control from the Data tab, and drop it on your form. The BindingNavigator control will be automatically docked to the top of the form.
13.In the Properties window, located the BindingSource property, and then click that field. Now click the drop-down arrow for the BindingSource property and choose CustomersBindingSource from the list.
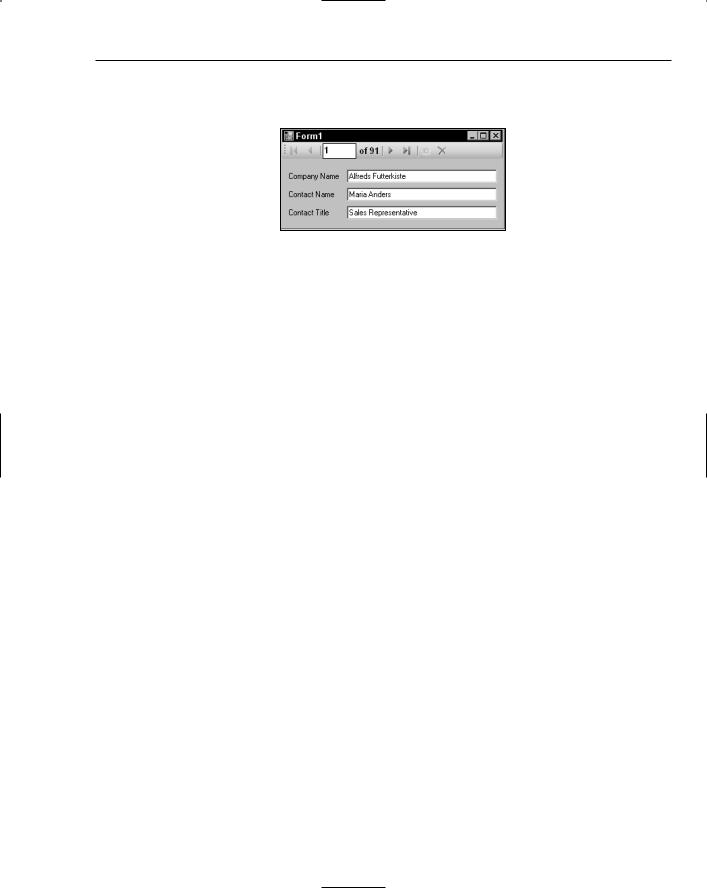
14.Finally, click the Start button on the toolbar to run your project. Your form that is displayed should look similar to the one shown in Figure 15-15. You’ll be able to navigate through the records in your data source, navigating backward and forward as well as being able to go the first and last record.
Clicking the Delete button will delete records from your DataSet but will not delete records from the database. Likewise, clicking the Add button will add an empty record to your DataSet but not to the database. You would need to write some code to actually have the database updated with the changes from your DataSet.
490
Accessing Databases
The beauty of using the DataNavigator control is that you’ve quickly built a form that will navigate through the records of your database without you having to write a single line of code.
Figure 15-15
How It Works
You started this Try It Out exercise by adding three Label and TextBox controls to your form. You then proceeded to set the DataBindings properties of the text boxes. When you chose to set the Text DataBinding property of the first text box, you were prompted to add a new data source, which again invoked the Data Source Configuration Wizard.
You used the Data Source Configuration Wizard in this exercise in the same manner as you did in the last exercise. When you completed the Data Source Configuration Wizard, it automatically generated a TableAdapter, DataSet, and a BindingSource component. You were then able to choose which field in the DataSet to bind to the DataBinding Text property.
Once you added the BindingNavigator control to your form, setting it up was a matter of simply choosing the BindingSource that was generated by the Data Source Configuration Wizard in the BindingSource property in the Properties window.
Again, this exercise has demonstrated the simplicity at which you can create data-bound applications without the need to write any code.
Summar y
You started this chapter by exploring what a database actually is and then looked at the SQL SELECT statement. You put this knowledge to use by creating a query in the Northwind.mdb database to see the SQL statements that Access generated for you.
You then took a look at the basics of binding data to controls on a form, specifically the DataGridView control and TextBox controls. You have examined the necessary basic data access components required to retrieve data from an Access database and bind that data to your controls. You used the components provided in the Data tab of the Toolbox for your data access, and used the wizards to generate the necessary code to connect to the database and retrieve the data.
After working through this chapter, you should know:
What a database is and the basic objects that make up a database
How to use the SQL SELECT statement to select data from a database
491

Chapter 15
How to use the Data Source Configuration Wizard to create the data access components needed to perform data binding
How to bind data to a DataGridView control
How to bind data to TextBox controls and use the BindingNavigator control
While you have seen that the wizards provided in Visual Studio 2005 make it simple to bind data quickly to the controls on a form, you sometimes need more control on how you interact with the data in a database and how you bind the data to the controls on a form. Chapter 16 takes a different approach to data binding by programmatically binding data to controls on a form. You will also be exploring the data access components in more detail and will learn how to set their properties and to execute their methods from your code.
Exercises
Exercise 1
Create a new query in your Northwind database to select FirstName, LastName, and Title from the Employees table. Order the results by the LastName column and save your query as EmployeeQuery. Then create a Windows application with a DataGridView control that uses the EmployeeQuery.
Exercise 2
Using the query created in Exercise 1, create a new Windows application that uses the BindingNavigator control and bind the fields from your query to text boxes on your form.
492

16
Database Programming with SQL Ser ver and ADO.NET
Chapter 15 introduced database programming. You obtained data from a single table in an Access database and displayed it on a grid. You managed to give the user some cool features while writing virtually no code.
You used wizards that wrote most of the code for you – including setting up the connection, configuring the data adapter, and generating a typed dataset. This works great for simple database access using one or two tables, but writing the code yourself can give you a lot more control.
This chapter dives much deeper into the topic of database access. The database access technologies you used in the previous chapter, including components for retrieving data, storing data in memory, and binding data to controls, are collectively called ADO.NET. You will explore how you can use the built-in capabilities of ADO.NET to retrieve and update data from databases. You will also learn to manipulate, filter, and edit data held in memory by the DataSet.
The data you extract will be bound to controls on your form, so you will also need to explore binding more thoroughly. You will see how you can use controls to view one record at a time (for example, using text boxes) and how to navigate between records, using the CurrencyManager object.
In this chapter, you will:
Learn about ADO.NET objects
Bind data to controls
Search for and sort in-memory data using ADO.NET DataView objects
Select, insert, update, and delete data in a database using ADO.NET
You will also use this chapter to see how to access SQL Server databases using the SqlClient data provider. As mentioned in the previous chapter, SqlClient is significantly faster than OleDb, but it will work only with SQL Server databases. To complete the exercises in this chapter, you need to

Chapter 16
have access to a version of MSDE, SQL Server 7, SQL Server 2000, or SQL Server 2005, as well as full access to the pubs database. As of the writing of this chapter, the pubs database was not included in the SQL Server Express version bundled with Visual Studio 2005. When this chapter uses the term SQL Server, the term includes SQL Server 7 and SQL Server 2000, as well as MSDE and SQL Server 2005. The database can reside in SQL Server on your local machine or in SQL Server on a network.
ADO.NET
ADO.NET is designed to provide a disconnected architecture. This means that applications connect to the database to retrieve a load of data and store it in memory. They then disconnect from the database and manipulate the in-memory copy of the data. If the database needs to be updated with changes made to the in-memory copy, a new connection is made and the database is updated. The main in-memory data store is the DataSet, which contains other in-memory data stores, such as DataTable objects. You can filter and sort data in a DataSet using DataView objects, as you will see later in the chapter.
Using a disconnected architecture provides many benefits, of which the most important to you is that it allows your application to scale up. This means that your database will perform just as well supporting hundreds of users as it does supporting ten users. This is possible because the application connects to the database only long enough to retrieve or update data, thereby freeing available database connections for other instances of your application or other applications using the same database.
ADO.NET Data Namespaces
The core ADO.NET classes exist in the System.Data namespace. This namespace, in turn, contains some child namespaces. The most important of these are System.Data.SqlClient and System.Data.OleDb. These provide classes for accessing SQL Server databases and OLE (Object Linking and Embedding) DBcompliant databases, respectively. You’ve already used classes from the System.Data.OleDb namespace in the previous chapter, where you used OleDbConnection and OleDbDataAdapter. In this chapter, you will be using System.Data.SqlClient with its equivalent classes, including SqlConnection and
SqlDataAdapter.
Two other child namespaces also exist in the System.Data namespace: System.Data.OracleClient and System.Data.Odbc. The System.Data.OracleClient namespace is used exclusively for Oracle databases. Just as its SqlClient counterpart provides best results with SQL Server databases, the OracleClient namespace provides optimal performance when accessing Oracle databases. The System.Data.Odbc namespace provides access to older ODBC (Open Database Connectivity) data sources that do not support the OleDb technology.
The System.Data.SqlClient, System.Data.OleDb, System.Data.OracleClient, and System. Data.Odbc namespaces are known as data providers in ADO.NET. There are other data providers available; in this book, you concentrate on only the first two.
In this chapter, you will be accessing SQL Server databases using the SqlClient namespace. However, in ADO.NET, the different data providers work in a very similar way. So the techniques you use here can be easily transferred to the OleDb classes. Also, the techniques you learned in the previous chapter using OleDb apply to SqlClient classes. With ADO.NET, you use the data provider that best fits your data source — you do not need to learn a whole new interface, because all data providers work in a very similar way.
494

Database Programming with SQL Server and ADO.NET
As you start working with ADO.NET, you will soon learn how the pieces fit together, and this chapter will help you in that reaching that goal.
Since the space here is limited, you focus on the specific classes that are relevant to the example programs in this chapter. The following list contains the ADO.Net classes that you will be using:
SqlConnection
SqlDataAdapter
SqlCommand
SqlParameter
Remember that these are specifically SqlClient classes, but that the OleDb namespace has very close equivalents. Whenever you want to use these classes, you must add a reference to the System.Data namespace. You can use the Imports keyword, so you do not have to fully qualify members of the SqlClient namespace in your code, as shown in the following code fragment:
Imports System.Data.SqlClient
If you want to use the core ADO.NET classes, such as DataSet and DataView without typing the full name, you must import the System.Data namespace, as shown in the next code fragment:
Imports System.Data
You should already be familiar with importing different namespaces in your project. However, to be thorough, you will also cover this when you go through our hands-on exercises. Now let’s take a look at the main classes that exist in the System.Data.SqlClient namespace.
The SqlConnection Class
The SqlConnection class is at the heart of the classes that we will be discussing in this section, because it provides a connection to a SQL Server database. When you construct a SqlConnection object, you can choose to specify a connection string as a parameter. The connection string contains all the information required to open a connection to your database. If you don’t specify one in the constructor, you can set it using the SqlConnection.ConnectionString property. In the previous chapter, Visual Studio
.NET built a connection string for you from the details you specified in the Data Link Properties dialog box. However, it is often more useful or quicker to write a connection string manually — so let’s take a look at how connection strings work.
Working with the Connection String Parameters
The way that the connection string is constructed will depend on what data provider you are using. When accessing SQL Server, you will usually provide a Server and a Database parameter, as shown in the following table.
495