

Beginning Visual Basic 2005 (2006)
.pdfChapter 17
4.Add the following new files and folders.
Add a new Theme Folder under the root and name it Red. To do this, right-click the solution in Solution Explorer and choose Add Folder Theme Folder. This will create a main folder named App_Themes and a subfolder named Red. Under App_Themes, add another folder named Brown. Next, add a new text file (Brown.skin) to the Brown subfolder. Also, add a new style sheet to the Brown folder and name it Brown.css. To the Red subfolder, add three new text files. Name them Button.Skin, TextBox.Skin, and
Red.Skin.
Under the root directory for the site, add five new Web Forms: News.aspx, News Yesterday.aspx, NewsToday.aspx, Events.aspx, and Contact.aspx. Make sure you check the box to select a master page for each new Web Form and check the box. Place code in separate file. After you click Add, you will see a dialog box for choosing a master page with one option; MasterPage.master. Select MasterPage.master and continue for each new page.
Finally, add a new site map. Right-click the project in Server Explorer and add a new item. In the dialog box, select Site Map and click Add. You can leave the default name of Web.sitemap. When you finish, the Solution Explorer window will look like Figure 17-9.
Figure 17-9
5.Open the Web.sitemap file and update the code to match this code as highlighted:
<?xml version=”1.0” encoding=”utf-8” ?>
<siteMap xmlns=”http://schemas.microsoft.com/AspNet/SiteMap-File-1.0” >
<siteMapNode url=”Default.aspx” title=”Home” description=”Back to the main page” roles=”” >
566

Web Forms
<siteMapNode url=”News.aspx” title=”News” description=”Your front page news.” roles=””>
<siteMapNode url=”NewsToday.aspx” title=”Today’s News” description=”Today’s top stories” roles=”” />
<siteMapNode url=”NewsYesterday.aspx” title=”Yesterday’s News” description=”Yesterday’s top stories” roles=”” />
</siteMapNode>
<siteMapNode url=”Events.aspx” title=”Upcoming Events” description=”Today’s top stories” roles=”” /> <siteMapNode url=”Contact.aspx” title=”Contact Us” description=”Today’s top stories” roles=”” />
</siteMapNode>
</siteMap>
6.Double-click the Brown.css style sheet in Solution Explorer to open the file. By default, it has a blank definition for the BODY element in the file. To add a definition, you can hand-code it after you learn the syntax, but for now use the built-in designer. Right-click anywhere on the page and select Add Style Rule from the context menu. The Add Style Rule dialog opens as shown in Figure 17-10. Select the HR element and add it to the style rule hierarchy by clicking the right arrow button. When you click OK, an empty element with no style definitions is added to the page.
Figure 17-10
To add the style definitions you want to modify, you can use the Designer again or IntelliSense. To use the Designer, right click inside of the element definition start and end tags and select Build Style from the context menu. Go ahead and open the Designer. The designer looks like Figure 17-11. To use IntelliSense, start typing inside any element and you will see all styles for that element. Now, close the designer and add the following highlighted code to the HR definition by typing the code, and you will see the IntelliSense feature.
HR
{
color:#cc0000;
height:12px;
}
567

Chapter 17
Figure 17-11
7.Now, you define the master page layout. Double-click the MasterPage.master file in the root directory to open the file. While in Source view, update the HTML code for the master page as highlighted:
<%@ Master Language=”VB” CodeFile=”MasterPage.master.vb” Inherits=”MasterPage” %>
<!DOCTYPE html PUBLIC “-//W3C//DTD XHTML 1.1//EN” “http://www.w3.org/TR/xhtml11/DTD/xhtml11.dtd”>
<html xmlns=”http://www.w3.org/1999/xhtml” > <head runat=”server”>
<title>Untitled Page</title>
<Style>
.TableLayout {width: 700px; background-color:#ffcc66;}
.border{border-style:solid; border-color:black; border-width:thin;} </Style>
</head>
<body bgcolor=”#cc0000”>
<form id=”form1” runat=”server”> <div>
<table id=”tblMasterLayoutHeader” class=”TableLayout” cellpadding=”0” cellspacing=”0” align=”center” height=”450”>
<tr>
568

Web Forms
<td style=”width: 100px” rowspan=2 class=”border”> <!-- Add the menu to the page -->
<asp:Menu ID=”Menu1” Runat=”server” > <Items>
<asp:MenuItem Value=”Home” Text=”Home” NavigateUrl=”Default.aspx”></asp:MenuItem>
<asp:MenuItem Value=”News” Text=”News” NavigateUrl=”News.aspx”>
<asp:MenuItem Value=”Today” Text=”Today” NavigateUrl=”NewsToday.aspx”></asp:MenuItem>
<asp:MenuItem Value=”Yesterday” Text = “Yesterday” NavigateUrl= “NewsYesterday.aspx”></asp:MenuItem>
</asp:MenuItem>
<asp:MenuItem Value=”Events” Text=”Events” NavigateUrl=”Events.aspx”></asp:MenuItem>
<asp:MenuItem Value=”Contact Us” Text=”Contact Us” NavigateUrl=”Contact.aspx”></asp:MenuItem>
</Items>
</asp:Menu>
</td>
<td bgcolor=”#000000” class=”border” > <!-- Main title -->
<asp:Label ID=”Label1” Runat=”server” Text=”Beginning Visual Basic 2005” Font-Names=”Arial” Font-Bold=”true” ForeColor=”#ffcc33” Font-Size=”28pt” />
</td>
</tr>
<tr>
<td class=”border”>
<!-- Site map path under Title -->
<asp:SiteMapPath ID=”smpMain” Runat=”server”></asp:SiteMapPath> </td>
</tr>
<tr>
<td class=”border” colspan=”2” height=”100%” valign=”top” align=”center”>
<!-- All site content will go here --> <asp:contentplaceholder id=”cphPageContent” runat=”server”> </asp:contentplaceholder><br />
</td>
</tr>
<tr>
<td class=”border” align=”center” colspan=”2”> <!-- Footer -->
<asp:Label ID=”Label2” Runat=”server” Text=”(c)2004, All rights reserved.” Font-Names=”Arial” Font-Bold=”true” ForeColor=”black” Font-Size=”10pt” ></asp:Label>
</td>
</tr>
</table>
</div>
</form>
</body>
</html>
569

Chapter 17
8.Open the Default.aspx page. Make sure the Page declarations match these and add the following.
<%@ Page Language=”VB” MasterPageFile=”~/MasterPage.master” AutoEventWireup=”false” ClassName=”Default_aspx” title=”Untitled Page” Theme=”Red”%>
<asp:Content ContentPlaceHolderID=cphPageContent Runat=Server>
<asp:TextBox ID=”txtTest” Runat=”server”>Just some text</asp:TextBox> <hr /><br />
<asp:Button ID=”btnTest” Runat=”server” Text=”Button” /></asp:Content>
9.Next, change the News.aspx page to match the code here.
<%@ Page Language=”VB” MasterPageFile=”~/MasterPage.master” AutoEventWireup=”false” ClassName=”News_aspx” title=”Untitled Page” theme=”Brown”%>
<asp:Content ID=”Content1” ContentPlaceHolderID=cphPageContent Runat=Server> <asp:TextBox ID=”txtTest” Runat=”server”>Just some text</asp:TextBox> <asp:Button ID=”btnTest” Runat=”server” Text=”Button” /></asp:Content>
10.Here is the code listing for the Button.Skin page under the Red theme. Open this page and add the code listed here.
<asp:Button runat=”server” ForeColor=”Red” Font-Name=”Arial” Font-Size=”28px” Font-
Weight=”Bold” />
11.Open TextBox.Skin under the Red theme folder and add the code listed here.
<asp:TextBox runat=”server” ForeColor=”Red” Font-Name=”Arial” Font-Size=”28px”
Font-Weight=”Bold” />
12.Open Brown.Skin under the Brown theme folder and add the code listed here.
<asp:Button runat=”server” ForeColor=”Brown” Font-Name=”Arial” Font-Size=”28px” Font-Weight=”Bold” />
<asp:TextBox runat=”server” ForeColor=”Brown” Font-Name=”Arial” Font-Size=”28px” Font-Weight=”Bold” />
13.On the other Web forms, you must change the ContentPlaceHolderID to cphPageContent. This is because you changed the master page after adding these forms. So the second line of code for Contact.aspx, Events.aspx, NewToday.aspx, and NewsYesterday will be changed to the listing here:
<asp:Content ID=”Content1” ContentPlaceHolderID=”cphPageContent” Runat=”Server”>
14.Run the application and test the navigation and layout. Play around; the site has a lot of functionality. Pay close attention to the navigation controls. Your site will resemble Figure 17-12.
Server controls render HTML based on the calling browser. If you have Netscape 7.2, you can see this in action. If not, you can download Netscape at http://channels.netscape.com/ns/browsers/ default.jsp.
570

Web Forms
Figure 17-12
Open Netscape and browse to the Default.aspx page for your site. Look at the main menu. The mouse-over action for News is not supported by Netscape in the same format. The ASPX engine renders the markup for the Menu control specifically for Netscape 7.2. To see the News submenu, click the News menu item. You will see the News submenu with an option to move up one level to the root menu. Before server controls, you had to write logic for many browsers. That is not necessary in ASP.NET 2.0 when you use server controls.
How It Works
You were able to take advantage of some of the newest controls to ASP.NET 2.0 in this Try It Out. The combination of these controls allowed you to create a simple, yet powerful example of proper site design and layout. The master page maintains the same page layout across the entire site. You added the HTML used to lay out the look and feel of the site. All of the navigation for the entire site is located in this one page. If you ever need to change the menu or site map, you could change one page and that change would cascade across the entire site.
ContentPlaceHolder offers a mistake-free way to add logic to each additional page. If you work in a team, a designer would create the site layout and the master page.
571

Chapter 17
Another element you added was the reusable styles. You used styles to apply a class name to objects that you wanted to modify. Styles are very powerful and play a huge role in Web site design.
The final item used for the layout of the master page was the Menu control. You used XML format to build a hierarchy of parent/child menu items that rendered the site navigation main menu. Here is the full code listing for MasterPage.master.
<!DOCTYPE html PUBLIC “-//W3C//DTD XHTML 1.1//EN” “http://www.w3.org/TR/xhtml11/DTD/xhtml11.dtd”>
<html xmlns=”http://www.w3.org/1999/xhtml” > <head runat=”server”>
<title>Untitled Page</title> <Style>
.TableLayout {width: 700px; background-color:#ffcc66;}
.border{border-style:solid; border-color:black; border-width:thin;} </Style>
</head>
<body bgcolor=”#cc0000”>
<form id=”form1” runat=”server”> <div>
<table id=”tblMasterLayoutHeader” class=”TableLayout” cellpadding=”0” cellspacing=”0” align=”center” height=”450”>
<tr>
<td style=”width: 100px” rowspan=2 class=”border”> <!-- Add the menu to the page -->
<asp:Menu ID=”Menu1” Runat=”server” > <Items>
<asp:MenuItem Value=”Home” Text=”Home” NavigateUrl=”Default.aspx”></asp:MenuItem>
<asp:MenuItem Value=”News” Text=”News” NavigateUrl=”News.aspx”>
<asp:MenuItem Value=”Today” Text=”Today” NavigateUrl=”NewsToday.aspx”></asp:MenuItem>
<asp:MenuItem Value=”Yesterday” Text = “Yesterday” NavigateUrl= “NewsYesterday.aspx”></asp:MenuItem>
</asp:MenuItem>
<asp:MenuItem Value=”Events” Text=”Events” NavigateUrl=”Events.aspx”></asp:MenuItem>
<asp:MenuItem Value=”Contact Us” Text=”Contact Us” NavigateUrl=”Contact.aspx”></asp:MenuItem>
</Items>
</asp:Menu>
</td>
<td bgcolor=”#000000” class=”border” > <!-- Main title -->
<asp:Label ID=”Label1” Runat=”server” Text=”Beginning Visual Basic 2005” Font-Names=”Arial” Font-Bold=”true” ForeColor=”#ffcc33” Font-Size=”28pt” />
</td>
</tr>
<tr>
<td class=”border”>
572

Web Forms
<!-- Site map path under Title -->
<asp:SiteMapPath ID=”smpMain” Runat=”server”></asp:SiteMapPath> </td>
</tr>
<tr>
<td class=”border” colspan=”2” height=”100%” valign=”top” align=”center”>
<!-- All site content will go here --> <asp:contentplaceholder id=”cphPageContent” runat=”server”> </asp:contentplaceholder><br />
</td>
</tr>
<tr>
<td class=”border” align=”center” colspan=”2”> <!-- Footer -->
<asp:Label ID=”Label2” Runat=”server” Text=”(c)2004, All rights reserved.” Font-Names=”Arial” Font-Bold=”true” ForeColor=”black” Font-Size=”10pt” ></asp:Label>
</td>
</tr>
</table>
</div>
</form>
</body>
</html>
Although you kept it simple, the Menu control is very customizable. Instead of hard-coding the menu, you could bind the menu to a dataset. You could also change the orientation. The menu displayed vertically for the site, but you could use a horizontal format by changing the Orientation property. The other items you could have changed were the styles of the menu items. You could have changed the look of the menu using styles or themes.
You left the Red.Skin page blank. You will change this later in the chapter.
The Button.Skin page defined the styles for a Button control when the Red theme was applied.
<asp:Button runat=”server” ForeColor=”Red” Font-Name=”Arial” Font-Size=”28px” FontWeight=”Bold” />
This TextBox.skin page defined the styles for a TextBox control when the Red theme was applied.
<asp:TextBox runat=”server” ForeColor=”Red” Font-Name=”Arial” Font-Size=”28px” Font-Weight=”Bold” />
For the Default.aspx page, you added a reference to the master page and set the theme to Red in the Page directive. Then, inside the Content control, you added a text box, horizontal rule, line break, and button. When you saw the page, the text was red, bold, and large just as the theme defined. (See Figure 17-12.)
<%@ Page Language=”VB” MasterPageFile=”~/MasterPage.master” AutoEventWireup=”false” ClassName=”Default_aspx” title=”Untitled Page” Theme=”Red”%>
<asp:Content ContentPlaceHolderID=cphPageContent Runat=Server>
573
Chapter 17
<asp:TextBox ID=”txtTest” Runat=”server”>Just some text</asp:TextBox> <hr /><br />
<asp:Button ID=”btnTest” Runat=”server” Text=”Button” /> </asp:Content>
You applied the Brown.css style sheet to the theme. The only element you modified in the style sheet was the horizontal rule. You changed the color (red) and height. You can update any object using the style sheet. Your output should have displayed the updated styles as in Figure 17-13.
body {} HR
{
color:#cc0000;
height:12px;
}
The Brown.skin page defined the styles for Button and TextBox controls when the Brown theme was applied.
<asp:Button runat=”server” ForeColor=”Brown” Font-Name=”Arial” Font-Size=”28px” Font-Weight=”Bold” />
<asp:TextBox runat=”server” ForeColor=”Brown” Font-Name=”Arial” Font-Size=”28px” Font-Weight=”Bold” />
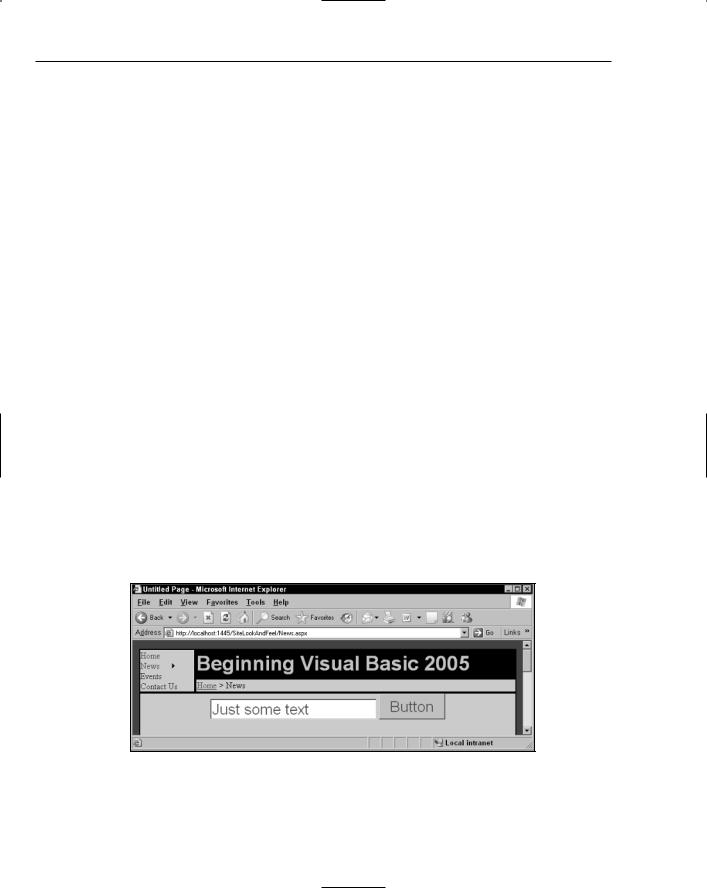
On News.aspx you added a reference to the master page and set the theme to Brown in the Page directive. Then, inside the Content control, you added a textbox, horizontal rule, line break, and button. When you saw the page, the text was red, bold, and large just as the theme defined. You should have seen a page like Figure 17-13 in your browser.
<%@ Page Language=”VB” MasterPageFile=”~/MasterPage.master” AutoEventWireup=”false” ClassName=”News_aspx” title=”Untitled Page” theme=”Brown”%>
<asp:Content ID=”Content1” ContentPlaceHolderID=cphPageContent Runat=Server> <asp:TextBox ID=”txtTest” Runat=”server”>Just some text</asp:TextBox> <hr /><br />
<asp:Button ID=”btnTest” Runat=”server” Text=”Button” /></asp:Content>
Figure 17-13
574

Web Forms
The sitemap file is used by the SiteMap control. This control allows you to see what level you are on at the site. You could easily navigate up one level at a time or all the way to the home page. The control gives you an easy interface for navigating through the site. The outer most level of the SiteMap control is displayed on the Today’s News page as shown in Figure 17-14.
Figure 17-14
Using the GridView to Build a Data-Driven Web Form
The new data controls in ASP.NET 2.0 add the ability to program declaratively. This new “no code” architecture allows you to look at the source of the Web Form and see your layout and design along with attributes that allow for data access and data manipulation. If you have any experience with HTML
or ASP.NET 1.1, you will find this new method of data access compact and astoundingly simple.
In this Try It Out, you will see two of the best controls in ASP.NET 2.0. The first is the SqlDataSource control, and the second is the GridView control. You will set properties and attributes of these controls and also the child elements of them. Without writing any server-side or client-side code, you will create a Web application to display data in the pubs database and update it.
Try It Out |
No-Code Data Viewing and Updating |
1.Create a new Web Site and name it DataGridView.
2.Use the Source view and add the changes highlighted here to the Default.aspx page. Make sure to change the values of the ConnectionString to your development environment.
<%@ Page Language=”VB” AutoEventWireup=”false” CodeFile=”Default.aspx.vb” Inherits=”_Default” %>
<!DOCTYPE html PUBLIC “-//W3C//DTD XHTML 1.1//EN” “http://www.w3.org/TR/xhtml11/DTD/xhtml11.dtd”>
<html xmlns=”http://www.w3.org/1999/xhtml” > <head runat=”server”>
<title>Grid View</title> </head>
<body>
575