

Beginning Visual Basic 2005 (2006)
.pdfChapter 20
3.Run the service. When Internet Explorer loads, click the GetPicturesInFolder link. When prompted, enter the name of the folder whose images you want to return, such as Beach.
4.When you click Invoke, you’ll get a list of files back. The Beach folder has nine images, for example, so the document that comes back is relative to this. Here is an abbreviated version of the document containing information regarding two of the files:
<?xml version=”1.0” encoding=”utf-8” ?>
<ArrayOfPictureInfo xmlns:xsi=”http://www.w3.org/2001/XMLSchema-instance” xmlns:xsd=”http://www.w3.org/2001/XMLSchema” xmlns=”http://tempuri.org/”> <PictureInfo>
<Name>BeachAddedBirds.jpg</Name>
<Url>http://localhost:11780/PictureService/Pictures/beach/BeachAddedBirds.jpg
</Url>
<FolderName>beach</FolderName>
<FileSize>472134</FileSize> <FileDate>2002-02-10T19:19:03.8437500-05:00</FileDate> <ImageFormat>JPG</ImageFormat>
</PictureInfo>
<PictureInfo>
<Name>DSC00042 copy.jpg</Name>
<Url> http://localhost:11780/PictureService/Pictures/beach/DSC00042 copy.jpg </Url>
<FolderName>beach</FolderName>
<FileSize>2073882</FileSize> <FileDate>2002-07-28T11:05:40.3437500-04:00</FileDate> <ImageFormat>JPG</ImageFormat>
</PictureInfo>
</ArrayOfPictureInfo>
How It Works
Once you have a folder name, you can get a DirectoryInfo object from it and use a method called GetFiles to return an array of System.IO.FileInfo objects that describe each file. However, you have to mate the folder name with the value returned by PictureFolderPath. This way, if you ask for Beach, you’ll get a folder name of c:\inetpub\wwwroot\PictureService\Pictures\Beach:
‘ GetPicturesInFolder - return an array of pictures from the folder...
<WebMethod(Description:=”Return an array of pictures from the folder”)> _ Public Function GetPicturesInFolder(ByVal folderName_As String)
As PictureInfo()
‘ get hold of the folder that we want...
Dim pictureSubFolder As DirectoryInfo
pictureSubFolder = New DirectoryInfo(PictureFolderPath & “\” & folderName)
When the user has used the service to learn what pictures are available on the server, you’ll expect the user to use a Web browser to download them. The user can use IIS later to share the folders and files without you having to do any extra configuration work.
However, the URL that you need on the client has to be an absolute name that includes the name of the server and the http:// part. If you ask the Web Service to return the name of its own .asmx file, you get a relative URL like this: /PictureService/Service.asmx.
666

Web Services and .NET Remoting
‘ we need to get the URL of the picture folder...
Dim pictureFolderUrl As String
pictureFolderUrl = My.Request.ServerVariables(“URL”)
Now you want to build the absolute URL to the Picture folder in the pictureFolderUrl variable. To do this, start by adding a text string of “http://” followed by the server name where the Web Service is running. Next, use the SubString method of the String class to extract just the virtual directory name of the Web Service and then append the text string of Pictures to end up finally with a string like
“http://localhost/PictureService/Pictures”:
‘ manipulate the URL to return an absolute URL to the Pictures folder pictureFolderUrl = “http://” & _
My.Request.ServerVariables(“SERVER_NAME”) & “:” & _ My.Request.ServerVariables(“SERVER_PORT”) & “/” & _ pictureFolderUrl.Substring(0, pictureFolderUrl.LastIndexOf(“/”) + 1) & _ “Pictures”
The next thing you need is a list of the files that the folder contains:
‘ get the list of files in the subfolder...
Dim pictureFiles() As FileInfo = pictureSubFolder.GetFiles
For each file in the folder, you’re going to create and populate a new PictureInfo structure. You’ll be returning these in an array, so next you create that array:
‘ create somewhere to put the picture infos...
Dim pictureList(pictureFiles.Length - 1) As PictureInfo
Now you can start looping through the files. For each one, you create a new PictureInfo and populate it. When you come to populate the ImageFormat member, you want to chop off the initial period (hence the need for Substring) and then convert the remaining characters to uppercase (hence ToUpper):
‘ loop through each picture...
Dim pictureFile As FileInfo, intIndex As Integer For Each pictureFile In pictureFiles
‘ create a new pictureinfo object...
Dim pictureInfo As New PictureInfo() pictureInfo.Name = pictureFile.Name pictureInfo.FolderName = folderName pictureInfo.Url = pictureFolderUrl & “/” & _ folderName & “/” & pictureFile.Name pictureInfo.FileSize = pictureFile.Length pictureInfo.FileDate = pictureFile.LastWriteTime pictureInfo.ImageFormat = _ pictureFile.Extension.Substring(1).ToUpper
Once you have the image information, you can put it into its position in the array:
‘ add it to the array...
pictureList(intIndex) = pictureInfo intIndex += 1
Next
667

Chapter 20
Finally, you return the results to the caller:
‘ return the list of pictures...
Return pictureList End Function
That’s it! Your service needs only those two methods. So now let’s look at how you can use this Web Service with your applications.
The Picture Ser ver Client
So far in this chapter you’ve seen how to create Web Services and how to manipulate them using the browser interface that the .NET Framework creates for you. This browser interface is actually a test interface — it’s not what you would expect people using your Web Service to use.
The principle behind Web Services is that they enable software to integrate; therefore, when you actually want to use a Web Service, you effectively build the functionality that the service offers into your own applications.
In this section, you’re going to build a desktop Windows application that can display a list of the picture subfolders on the remote server. The user can select one of these folders and see the list of files contained within. Clicking on one of the images will show the image in Internet Explorer.
(As a special treat, you’re going to host Internet Explorer inside your own application!)
Using a Web Service is often known as consuming the Web Service.
Web Services Description Language
To consume a Web Service, you can use something called a Web Services Description Language (WSDL) document. This is an XML document that contains a list of all of the methods available on the Web Service. It details the parameters for each method and what each method is expected to return.
Your WebService class automatically creates a WSDL document for you, but because WSDL is an accepted industry standard, it is good practice for each Web Service on any platform to expose a WSDL document. If you have the WSDL document for a Web Service running on .NET or on another platform, you’ll be able to build a Visual Basic 2005 application that can use the Web Service it belongs to.
Creating the Client
In the next Try It Out, you’ll create the client. Because you’re going to use Internet Explorer inside your application, you’ll also customize the Toolbox to include the Microsoft Web Browser control.
Try It Out |
Creating the Client |
1.In Visual Studio 2005, create a new Windows Application project called PictureClient.
2.On the Toolbox, expand the Windows Forms controls.
668
Web Services and .NET Remoting
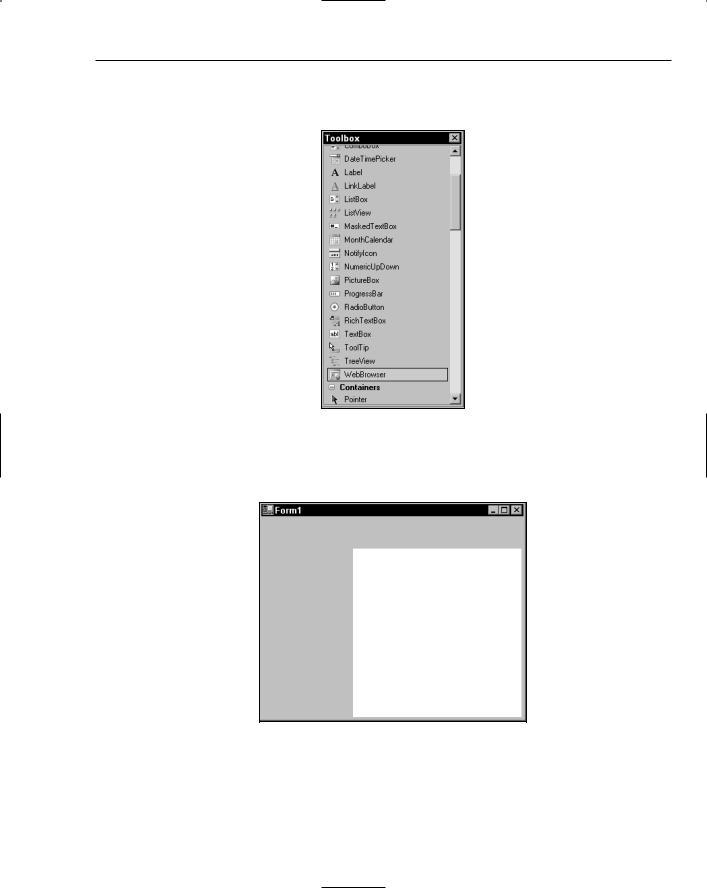
3.Near the bottom of the Toolbox, you’ll find a WebBrowser control, as shown in Figure 20-4. This control is a managed wrapper of the WebBrowser ActiveX control.
Figure 20-4
4.Select the WebBrowser control from the ToolBox and draw the control onto the form, as shown in Figure 20-5. You may need to change the Dock property to None.
Figure 20-5
5.Using the Properties window, change the name of the control to iePicture. Also, set its Anchor property to Top, Bottom, Left, Right.
669
Chapter 20
6.You’re going to use the browser to display the pictures, but it seems a shame not to verify that it actually works as a fully functioning Web browser. So add some code to show how the fullblown features of Internet Explorer can be utilized within Windows Forms in .Visual Studio 2005. Double-click on the background of the form and add this code to the Load event handler:
Private Sub Form1_Load(ByVal sender As System.Object, ByVal e As _ System.EventArgs) Handles MyBase.Load
‘ set the browser to a default page...
Me.iePicture.Navigate(“http://www.google.com/”) End Sub
7.Run the project and you should see Google’s home page. Try entering some search terms, and you’ll notice that this browser behaves in exactly the same way as the full Internet Explorer does.
If you try using the browser, you’ll notice you don’t have a toolbar, so if you want to go back a page, right-click the page and select Back.
Adding a Web Reference
To use a Web Service you need to add a Web reference to the project, which you do in the next Try It Out. This will prompt Visual Studio 2005 to go away and create some classes for you that will let you call methods on the Web Service. The two classes that are created are PictureInfo and Service.
Try It Out |
Adding a Web Reference |
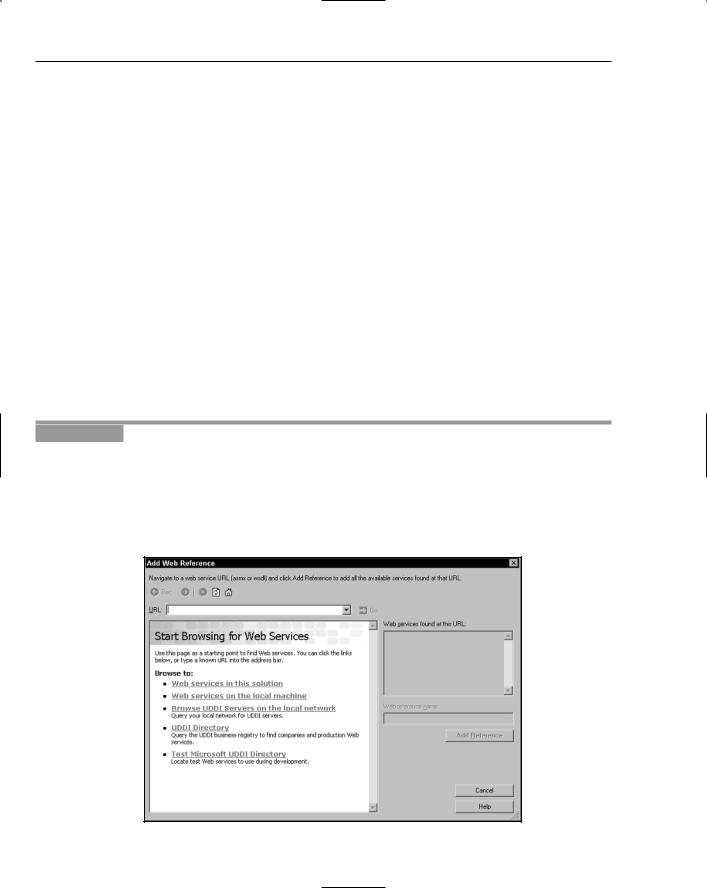
1.Right-click the PictureClient project in the Solution Explorer and select Add Web Reference. This will open the Add Web Reference dialog box shown in Figure 20-6. In the drop-down box indicated by the URL label, type the full name of your Web Service location, http://localhost/ PictureService/Service.asmx, where localhost is replaced with the name of your computer or Web server, and then click the Go button. You need to make sure your Visual Web Developer Web Server is running the Web Service if you are not using IIS.
Figure 20-6
670

Web Services and .NET Remoting
2.When it finds the service, you will see the Service page listing the available Web methods that you saw in your previous exercises. If you have typed the URL incorrectly, you will get a “The resource cannot be found” message. When you have located the correct URL, click the Add Reference button.
3.A new Web reference will be added to the Solution Explorer, and this will match the name of the server (your computer name). Right-click the new reference and select Rename. Change the name to PictureService, as shown in Figure 20-7.
Figure 20-7
How It Works
At this point, Visual Studio 2005 has successfully added a reference to the remote (or local) server. It has also created a new class for you called PictureService.Service. By creating instances of this object (as you’re about to see), you can call methods on the Web Service.
The name that you choose when you renamed the Web Service in Solution Explorer acts as the namespace for the new class.
In this case, you’ve used PictureService, but if you hadn’t renamed it from, say, localhost, the new class that exposes the Web Service methods would be called localhost.Service.
Displaying the Folder List
You can now call methods on the Web Service. In the next Try It Out, start by adding a drop-down list to the project that will display a list of the remote picture subfolders by calling the GetPictureFolders method.
Try It Out |
Displaying the Folder List |
1.Open the Designer for Form1. Draw on a ComboBox control at the top of the form, as shown in Figure 20-8.
2.Using the Properties window, change the Name property to cboFolders. Change the DropDownStyle to DropDownList and the Anchor property to Top, Left, Right.
671

Chapter 20
Figure 20-8
3.Double-click the form background to open the Load event handler for the form. When you start the application, you’ll want to run the remote GetPictureFolders method. Add the following highlighted code, replacing the previous code that you added:
Private Sub Form1_Load(ByVal sender As System.Object, _
ByVal e As System.EventArgs) Handles MyBase.Load
‘ get the pictures...
Try
‘create a connection to the service...
Dim service As New PictureService.Service()
‘get a list of the folders...
Dim arrFolderNames() As String arrFolderNames = service.GetPictureFolders ‘ go through the list and add each name...
Dim strFolderName As String
For Each strFolderName In arrFolderNames cboFolders.Items.Add(strFolderName)
Next
Catch ex As Exception HandleException(ex)
End Try End Sub
4.You’ll notice a blue wavy line appear under HandleException. This is to indicate an error: You haven’t built this method yet. Add it now:
‘HandleException - handle a Web service exception...
Private Sub HandleException(ByVal e As Exception)
‘loop through the inner exceptions...
Do While Not e.InnerException Is Nothing e = e.InnerException
Loop
‘report the problem...
MessageBox.Show(“An exception occurred.” & e.Message)
End Sub
672

Web Services and .NET Remoting
Remember, if you need a refresher on how exceptions work, take a look at Chapter 9.
5.Run the project. You’ll notice that the form takes a while to appear (the first connection to a Web Service is often slower than the rest because .NET takes a little time to get its “house in order” before establishing the connection), but when it does, the folder names will be available if you drop-down the list.
How It Works
That was not complicated! .NET abstracts away a lot of the complexity involved in consuming a Web Service.
You start with a Try . . . Catch block:
Private Sub Form1_Load(ByVal sender As System.Object,_ ByVal e As System.EventArgs) Handles MyBase.Load
‘ get the pictures...
Try
It is very important that, when consuming a Web Service, you use exception handling around any code that could cause an exception. A lot of things can go wrong in connecting to a Web Service and passing data between service and client, and if anything does go wrong, you’ll get an exception.
Next, you create an instance of the PictureService.Service class that Visual Studio created for you. At this point you have not connected to the Web Service — you have just prepared things for when you do:
‘ create a connection to the service...
Dim service As New PictureService.Service()
The beauty of Web Services in Visual Studio 2005 is that calling methods on a remote object is no different from calling methods on an object installed on your local machine. Here, you call GetPictureFolders and get back an array of strings:
‘ get a list of the folders...
Dim arrFolderNames() As String arrFolderNames = service.GetPictureFolders
Once you have the array, you loop through each of the strings and add the folder name to the ComboBox list:
‘ go through the list and add each name...
Dim strFolderName As String
For Each strFolderName In arrFolderNames cboFolders.Items.Add(strFolderName)
Next
If an exception is thrown, you call HandleException:
Catch ex As Exception
HandleException(ex)
End Try
End Sub
673

Chapter 20
That is all you have to do to call the Web Service. But, before you go on, look at HandleException.
The SOAP standard dictates that whenever the service detects a problem, it must use an exceptionhandling model to tell the client about the problem.
Notice the word model. Web Services can be deployed on any platform, and that platform may well not have the great exception-handling functionality that .NET has. But the principle is the same — shout about the problem and hope someone hears it.
When .NET detects that an exception has been thrown on the server, it will wrap that exception in its own “problem on the server” exception. The actual exception that occurred on the server will be buried within the InnerException property, so HandleException has the logic to keep stepping down through the buried exceptions until it gets the one that the server actually threw:
‘ HandleException - handle a Web service exception...
Private Function HandleException(ByVal e As Exception)
‘loop through the inner exceptions...
Do While Not e.InnerException Is Nothing e = e.InnerException
Loop
‘report the problem...
MessageBox.Show(“An exception occurred.” & e.Message)
End Function
You can test out the exception handling by stopping the Web server. To do this in IIS, click the Start button at the bottom of your screen, select Run, and enter this command:
net stop iisadmin
You’ll see a list of services that depend on the IIS Admin Service, and you’ll be prompted as to whether or not you want to continue with the process of stopping IIS. Enter Y and press Return. If you are using the developer Web server instead of IIS, right-click the icon in the task bar and select Stop. If you now run the project, you will see an exception like the one shown in Figure 20-9.
Figure 20-9
This exception can also occur if your URL cannot be located due to its nonexistence and/or network connection problems in general.
To start IIS once again, you type the following in the text box in the Start Run dialog:
net start iisadmin
674

Web Services and .NET Remoting
If you would like to restart IIS for any reason, though, the following command is more useful:
iisreset
Displaying the File List and Choosing Files
When you change the selected folder, you want to connect to the Web Service once more and get a list of the files in the folder you requested. You’ll do this in the next Try It Out by extracting the folder name from the ComboBox and calling the GetPicturesInFolder Web method. You’ll then take that list of pictures returned from the Web method and populate a list box.
Try It Out |
Displaying the File List |
1.To display the file list, you need to create a new class that encapsulates the PictureInfo structures you’re going to get back from the server. Create a new class using the Solution Explorer by right-clicking on the PictureClient project and selecting Add New Item and then select Class.
Call it PictureItem.
Add the following highlighted code to PictureItem:
Public Class PictureItem
Public PictureInfo As PictureService.PictureInfo ‘ Constructor...
Public Sub New(ByVal info As PictureService.PictureInfo) PictureInfo = info
End Sub
‘ ToString - provide a better representation of the object...
Public Overrides Function ToString() As String Return PictureInfo.Name
End Function End Class
2.Go back to the Designer for Form1. Add a ListBox control to the form. Change its Name property to lstFiles. Set its IntegralHeight property to False and its Anchor property to Top, Bottom, Left. Your form should look like Figure 20-10.
3.Double-click the cboFolders drop-down list. This will create a new SelectedIndexChanged handler. Add the following highlighted code:
Private Sub cboFolders_SelectedIndexChanged(ByVal sender As System.Object, _ ByVal e As System.EventArgs) Handles cboFolders.SelectedIndexChanged
‘ what folder did we select?
Dim folderName As String =_cboFolders.Items(cboFolders.SelectedIndex)
‘clear the files list...
lstFiles.Items.Clear()
‘connect to the service again and get the files back...
Try
‘connect...
Dim service As New PictureService.Service() ‘ get the files back...
Dim pictureList() As PictureService.PictureInfo
675