

Beginning Visual Basic 2005 (2006)
.pdfChapter 20
pictureList = service.GetPicturesInFolder(folderName) ‘ add the pictures to the list...
Dim pictureInfo As PictureService.PictureInfo For Each pictureInfo In pictureList
‘ just add the name...
lstFiles.Items.Add(New PictureItem(pictureInfo))
Next
Catch ex As Exception HandleException(ex)
End Try End Sub
Figure 20-10
4.After you’ve done that, go back to the Designer for Form1 and double-click the lstFiles list. Add the following highlighted code to the new event handler:
Private Sub lstFiles_SelectedIndexChanged(ByVal sender As System.Object, _ ByVal e As System.EventArgs) Handles lstFiles.SelectedIndexChanged
‘ get the pictureitem...
Dim item As PictureItem = lstFiles.Items(lstFiles.SelectedIndex) If Not item Is Nothing Then
‘ tell ie to show the picture...
iePicture.Navigate(item.PictureInfo.Url) End If
End Sub
5.Try running the project and selecting a picture from the list on the left. Internet Explorer should load the image.
How It Works
The ListBox control in Windows Forms works best if you can supply a custom-built object for each item. In this case, you build a separate object that contains an instance of a PictureInfo object and overload the ToString method available on all objects in .NET to return the Name property of PictureInfo:
676

Web Services and .NET Remoting
Public Class PictureItem
Public PictureInfo As PictureService.PictureInfo ‘ Constructor...
Public Sub New(ByVal info As PictureService.PictureInfo) PictureInfo = info
End Sub
‘ ToString - provide a better representation of the object...
Public Overrides Function ToString() As String Return PictureInfo.Name
End Function End Class
When the item gets added to the list, the ListBox will call ToString on the object to get the value that should be displayed in the list. If you wanted, rather than returning Name, you could return the URL, in which case the list would appear as a list of URLs rather than a list of names.
One thing that’s worth noting is that the PictureInfo you have on the client is not the same object that you had on the server. Visual Studio 2005 has also automatically created the PictureInfo class just as it did for the Service class. (This is why on the client PictureInfo is a class, whereas on the server it’s actually a structure.)
When the drop-down list selection changes, you find the currently selected item, which is the folder name, and clear the file list:
Private Sub cboFolders_SelectedIndexChanged(ByVal sender As System.Object, ByVal e As System.EventArgs) Handles cboFolders.SelectedIndexChanged
‘ what folder did we select?
Dim folderName As String = _cboFolders.Items(cboFolders.SelectedIndex) ‘ clear the files list...
lstFiles.Items.Clear()
You then open up a Try . . . Catch so that you can manage any problem that occurs:
‘ connect to the service again and get the files back...
Try
Connecting the service is just a matter of creating a Service object again:
‘ connect...
Dim service As New PictureService.Service()
Calling GetPicturesInFolder and providing the folder name retrieves the list of files contained in the folder as an array of PictureInfo objects. If the folder doesn’t exist on the server, the service itself will throw an exception, and this will find its way back and be perceived as an exception in your own code, where HandleException can deal with it:
‘ get the files back...
Dim pictureList() As PictureService.PictureInfo pictureList = service.GetPicturesInFolder(folderName)
677

Chapter 20
When you have the array, you create new PictureItem objects and add them to the file list:
‘ add the pictures to the list...
Dim pictureInfo As PictureService.PictureInfo For Each pictureInfo In pictureList
‘ just add the name...
lstFiles.Items.Add(New PictureItem(pictureInfo))
Next
Catch ex As Exception HandleException(ex)
End Try End Sub
When the selection on the file list itself changes, the currently selected item will be a PictureItem object. You can use the PictureInfo property of this object to get hold of the PictureInfo that was returned by the server, and then use the Url property of PictureInfo to find the URL that relates to the selected file and tell Internet Explorer to display that URL. You also check to make sure that item is not Nothing, because if it is, it would cause an exception if the user clicked on the lstFiles control when no files were displayed:
Private Sub lstFiles_SelectedIndexChanged(ByVal sender As System.Object, ByVal e As System.EventArgs) Handles lstFiles.SelectedIndexChanged
‘ get the pictureitem...
Dim item As PictureItem = lstFiles.Items(lstFiles.SelectedIndex) If Not item Is Nothing Then
‘ tell ie to show the picture...
iePicture.Navigate(item.PictureInfo.Url) End If
End Sub
.NET Remoting
As is Web Services, .NET Remoting is used to connect to a service located elsewhere (on the same or different computer). IIS can also expose an assembly for .NET Remoting as it can for XML Web Services.
.NET Remoting can also use SOAP, the standard protocol of Web Services. In these few aspects .NET Remoting is extremely similar to Web Services.
.NET Remoting is distinctive in that it can also communicate via the Transmission Control Protocol (TCP) Channel and allows you to customize what is transported and how. The data that is transported can also be sent in binary form, which you cannot do with Web Services. .NET Remoting is lot more flexible, but does not replace the need for Web Services, which is regarded as the extensible, open standardsbased means of communicating between different programming environments and operating systems. Remoting is more specific to .NET but offers much more flexibility.
Since this is a beginner’s guide, we will not go deep into any .NET Remoting details, but you do need to know a few things.
One necessary concept is marshaling. In simple terms, an object or value is transported (marshaled) from one process to another. It can also be marshaled from a process on one machine to a process on another
678
Web Services and .NET Remoting
machine. Marshaling is such a vital part of .NET Remoting that anything that travels across boundaries (such as the process boundary) must inherit from MarshByRefObject (MBRO).
Another aspect to understand is the difference between a server and a client. A server is typically the application that registers a type on a channel and a port. The client, on the other hand, sends a request to a channel and a port. The request is to create a type. The server, having registered the type, creates an instance of it when the client requests it. The server passes the instance back to the client. You can see by this explanation that it is important that the server and client communicate on the same channel and the same port. The way in which .NET Remoting does this is by using a Uniform Resource Identifier (URI) in the form of:
<transport>://<machine>:<portnumber>/<name>
In your examples, you will see the following URI being used, where maincpu is the name of your computer.
tcp://maincpu:8000/MyPongEngine
If you chose to use HTTP as the transport, the URI could have been:
http://localhost:8000/MyPongEngine
The port number used here could be anything, as long as the server and client know the same number.
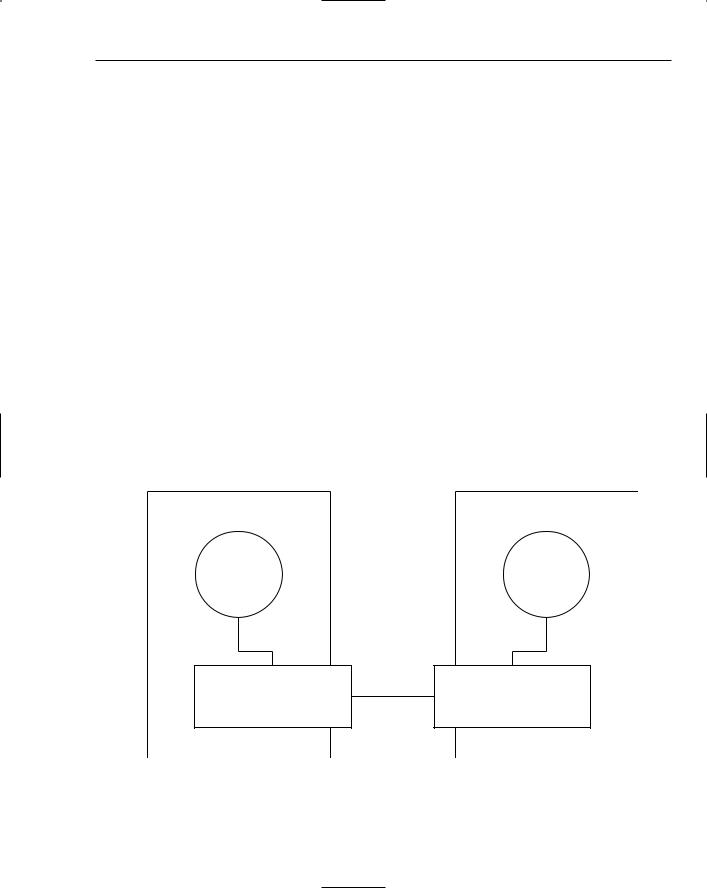
You will soon see this in action. Without further explanation for now, you will create your small .NET Remoting example in the next Try It Out. As the architecture described in Figure 20-11 suggests, .NET Remoting requires a server and a client. You will first create the server application.
Client |
Server |
Proxy
PongEngine,
Pinger
Transport Channel |
Port |
Transport Channel |
Figure 20-11
679
Chapter 20
Try It Out |
Creating the Pong Server and PongEngine project |
1.Create a new ClassLibrary project named PongEngine.
2.Rename the Class1.vb file created by default in the PongEngine project to Pinger.vb.
3.Save the solution and add a Console Application project to the solution, named PongServer.
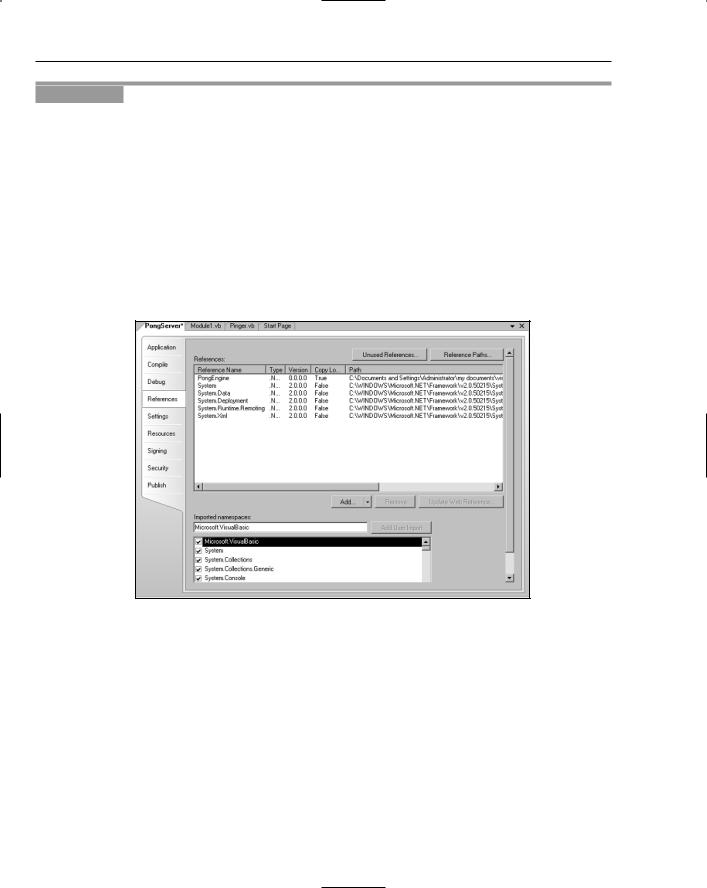
4.Next, add two references to the PongServer project. (See the diagram in Figure 20-12.) To add a reference, right-click the project in Solution Explorer and choose Add Reference.
Add a reference to the PongEngine project inside the solution.
Add a reference to System.Runtime.Remoting, found as one of the standard References in the References Dialog box.
5.Your references should look like Figure 20-12. To see yours, right-click PongServer in Soultion Explorer and select .Properties from the context menu. Now, choose References on the left tab.
Figure 20-12
6.Now open the class named Pinger.vb in the PongEngine ClassLibrary project and change the code as highlighted here:
Public Class Pinger
Inherits MarshalByRefObject
Public ReadOnly Property Name() As String
Get
Return My.Computer.Name
End Get
End Property
End Class
680

Web Services and .NET Remoting
7.Now add the following code to Module1.vb in the PongServer project:
Imports System.Runtime.Remoting
Imports System.Runtime.Remoting.Channels
Imports System.Runtime.Remoting.Channels.Tcp
Module Module1
Sub Main()
Dim channel As TcpChannel = New TcpChannel(8000)
ChannelServices.RegisterChannel(channel)
RemotingConfiguration.RegisterWellKnownServiceType(GetType(PongEngine.Pinger), _
“MyPongEngine”, WellKnownObjectMode.SingleCall)
Console.Write(“PongEngine Registered.” + Environment.NewLine)
Console.Write(“Server Active . . .”)
Console.Read()
End Sub
End Module
8.Now right-click the PongServer project and choose Set as Startup Project from the context menu.
9.Run the project, and you should see the console application as shown in Figure 20-13. If you have a firewall or any type of security software, it may block this kind of server. You should allow this if your software asks you to block it.
Figure 20-13
How It Works
At this point, all you have really done is create a Class Library and a Console application. The strange code using the Remoting namespace does not seem to do much. If you see the Console window as in Figure 20-13, it is working. But what has it done?
The server has created and registered a channel on port 8000. It uses this channel and port number for communications. You are specifying that you require a channel and a port. This port number could be any number as long as the server and client (which you will create next) use the same number.
Dim channel As TcpChannel = New TcpChannel(8000)
ChannelServices.RegisterChannel(channel)
681

Chapter 20
Next, the code registered your Pinger type on this port. This provides .NET Remoting with the schema or interfaces so that it knows what it should create when a client makes the request. This effectively exposes it to the outside world via TCP and, of course, through port 8000. Your code has also given it a friendly name MyPongEngine.
RemotingConfiguration.RegisterWellKnownServiceType(GetType(PongEngine.Pinger),_
“MyPongEngine”, WellKnownObjectMode.SingleCall)
The WellKnownObjectMode.SingleCall enumeration used in the previous code specifies that it will be destroyed after a call is made to the object. This means that a new object would be created for every call you make on it. A term often used for this kind of behavior is stateless.
Next, you will create a client to talk to PongServer. But before that, you need to create a proxy.
Generating the Proxy
A proxy is required for your client because you need to provide the client something that defines the PongEngine interface. You could use the actual PongEngine.dll and make a reference to it within your client application, but since the client will never create the PongEngine on the machine it is located on, you do not need all the code that is inside it. All you need is the interface. A proxy is the interfaces for a real assembly. It looks like the real assembly but it is not. It does not contain the code. It is made up of the interface definitions and the code to make it a proxy. A client references the proxy instead of the real assembly. The actual object is always created on the server (which is where the channel is registered). In the next Try It Out, you generate the proxy.
Try It Out |
Generating the Proxy |
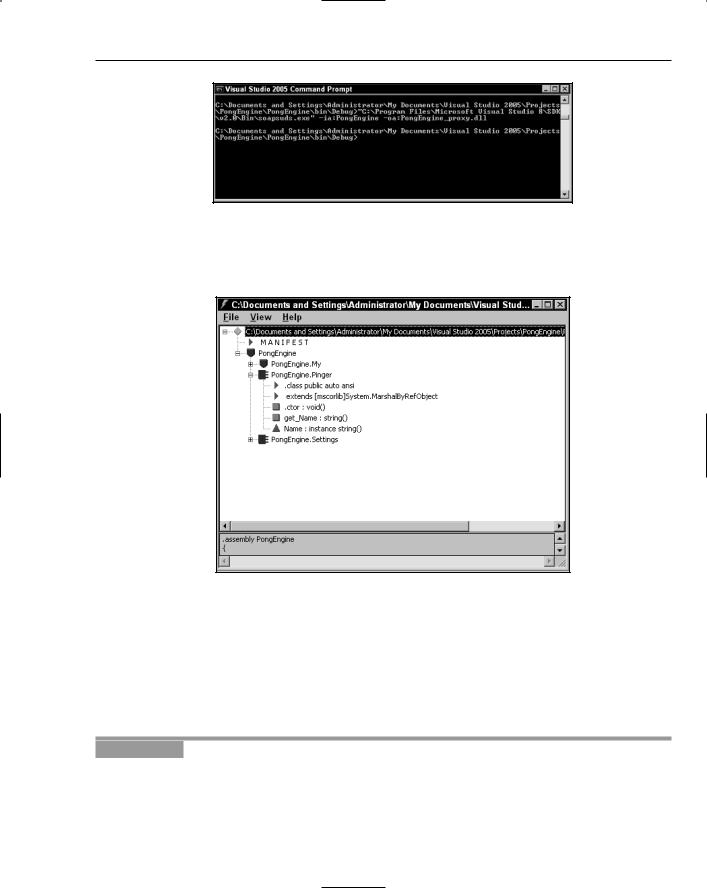
1.To generate a proxy for PongEngine.dll, open Visual Studio .NET command prompt. You do this by navigating to All Programs on the Start menu, finding where Visual Studio 2005 is installed, and then clicking Visual Studio Tools followed by clicking the Visual Studio 2005 Command Prompt icon. The Visual Studio .NET Command Prompt icon executes a batch file that sets up your environment to include the appropriate paths to execute the command line tools installed with Visual Studio 2005.
2.Next, change your current working directory to the path where the PongEngine.dll was compiled. An example is shown in Figure 20-14.
3.Then type the following command line:
soapsuds -ia:PongEngine -oa:PongEngine_proxy.dll
soapsuds.exe comes with the .NET Framework and can be found in the SDK directory:
<installdir>\Microsoft Visual Studio 8\SDK\<version>\Bin
Running the command creates a new Assembly named PongEngine_proxy.dll.
4.To see that there is indeed a difference between the new Assembly and the original, you can view the two assemblies in .NET’s Intermediate Language Disassembler (ILDASM). While still in the Visual Studio .NET command prompt, type ildasm. This will open the ILDASM application.
682
Web Services and .NET Remoting
Figure 20-14
5.Drag and drop the PongEngine_proxy.dll onto ILDASM. You will see the entries as shown in Figure 20-15.
Figure 20-15
You can open another instance by opening another ILDASM window and dragging the original Assembly onto the second copy. You should now have two instances open showing the two different assemblies. You will immediately realize that they are different.
You can think of the proxy as the “dumb” representative of the original Assembly. It deploys with the client so that it can reference the correct Object, but not the actual one. In the next Try It Out, you create the Remoting client.
Try It Out |
Creating a Remoting Client |
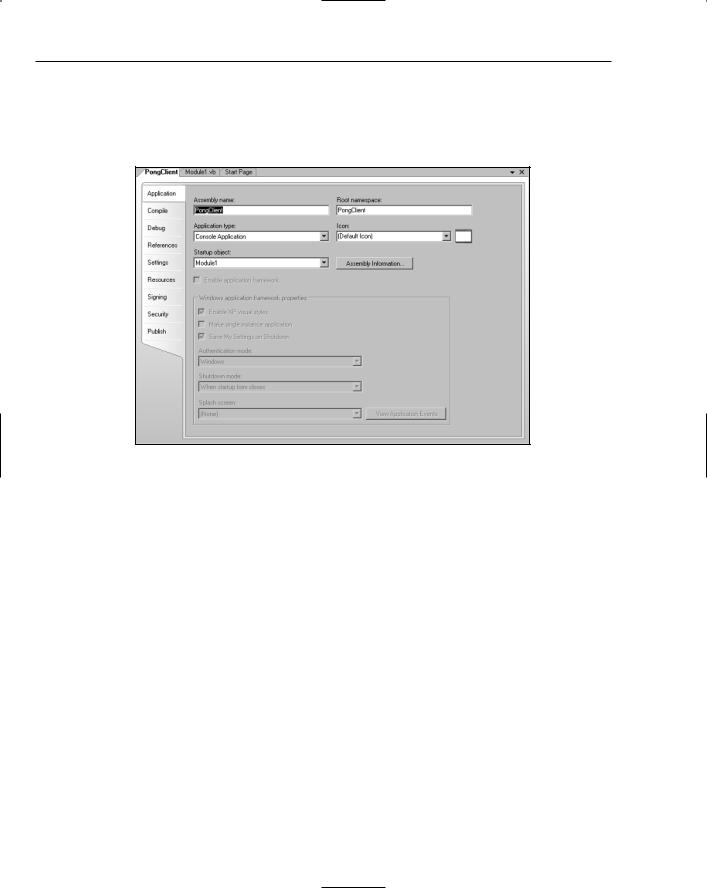
1.Create a new Console Application project named PongClient in a new solution.
2.Add a reference to System.Runtime.Remoting, found in the References dialog box by rightclicking the Project and selecting Add Reference.
683
Chapter 20
3.Next, you need to add a reference to the proxy of the PongEngine that you created previously. Open the Add References dialog box again and click the Browse tab. Locate and select the
PongEngine_proxy.dll file that you created.
4.Your project and its references should now look like the one shown in Figure 20-16.
Figure 20-16
5.Next, you need to add the code that creates the PongEngine.Pinger type. Add the following code to Module1.vb in the PongClient project. Don’t forget to change the machine name Maincpu to your machine name.
Imports System.Runtime.Remoting.Services.RemotingClientProxy
Module Module1
Sub Main()
Dim client As PongEngine.Pinger
Console.Write(“Trying to obtain Type from Server . . .” + _ Environment.NewLine)
client = CType(Activator.GetObject(GetType(PongEngine.Pinger), _ “tcp://Maincpu:8000/MyPongEngine”), PongEngine.Pinger) Console.Write(“Type Created and returned” + Environment.NewLine) Console.Write(“The object returned:” + client.Name + _ Environment.NewLine)
Console.Read() End Sub
End Module
6.You’ll need to start the PongServer application by navigating to the bin folder where the executable was compiled and double clicking on PongServer.exe. Your security software may try to block this type of program.
684
Web Services and .NET Remoting
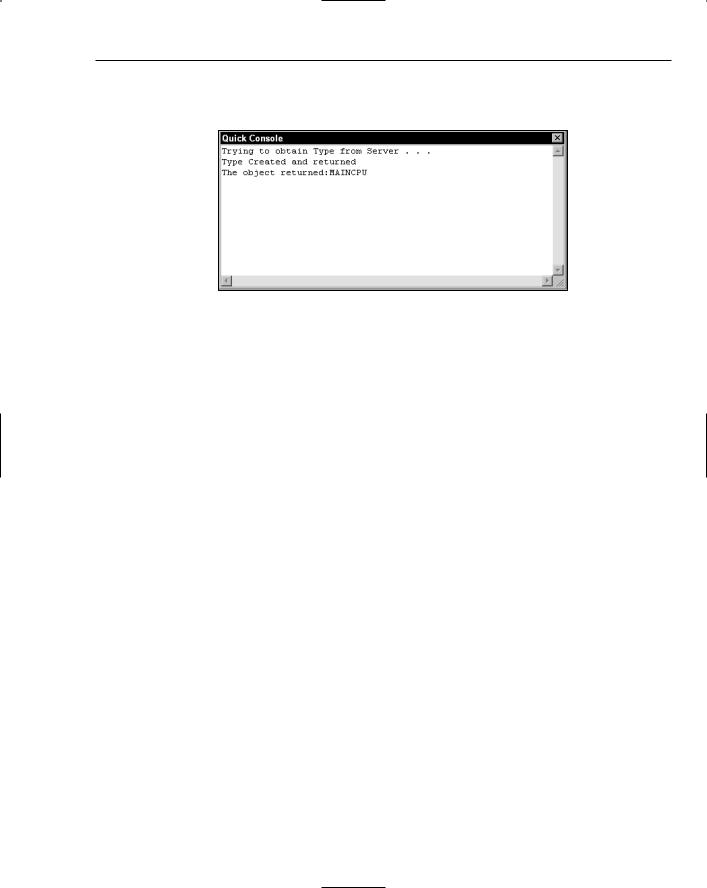
7.Next, run the PongClient project, and the client should connect to the server and provide the name of the server machine (see Figure 20-17).
Figure 20-17
How It Works
If you copy PongClient.exe and PongEngine_proxy.dll to another machine on the network that has the .NET Framework installed and run it from there, it will still return the name of the machine the server is running on. This is due to .NET Remoting, which marshals the object and its values through the network. Have a look at the code:
Dim client As PongEngine.Pinger
client = CType(Activator.GetObject(GetType(PongEngine.Pinger), “tcp://Maincpu:8000/MyPongEngine”), PongEngine.Pinger)
The code here first defines a variable of type PongEngine.Pinger and then creates the object by using the Activator class. There are two parameters used from Activator.GetObject call: the type that should be created and the URI pointing to where the object resides.
You will then see this wrapped by the CType function. This is because Activator.GetObject call returns a System.Object and you have to cast it to the type you want.
If you did not cast System.Object to your Pinger class, you would not see the ReadOnly Property Name, as it does not exist on System.Object. This is why you need the proxy: so that the client can know what the object looks like. You say that the client knows the interface.
Summar y
In this chapter, you were introduced to Web Services and .NET Remoting. Web Services work by allowing a developer to expose an object that is accessible through a Web server. Web Services are based on open standards such as SOAP and WSDL and are underpinned by tried and tested technologies such as HTTP and XML.
You started off this chapter by building a basic Web Service that could return some information and also do something useful — namely, return the square root of a number that you gave it. As a more practical
685