

Beginning Visual Basic 2005 (2006)
.pdfChapter 17
Try it out |
Server and Client-Side Processing |
1.Start this project by choosing File New Web Site. Make sure Visual Basic is the language, and select ASP.NET Web Site on the Templates pane. For the Location, change the drop-down box to File System and enter C:\WebSites\Client_ServerProcessing. You may need to change the drive letter based on your computer configuration. Click OK, and this will create a file system site that will use the built-in development Web server for testing. The New Web Site dialog will look like Figure 17-2.
Figure 17-2
2.Visual Studio will create the default folders and files for the Web site. Take a look at the Solution Explorer window. It will look like Figure 17-3. The Default.aspx page will be open in the IDE.
Figure 17-3
3.Now you will add the controls. Add the following standard controls to Default.aspx while in Design mode. (To get to Design mode, while viewing the .aspx page click the Design option on the lower left of the pane, or simply press Shift+F7.) Do not worry about the position of the controls for now, but make sure you use controls from the Standard and HTML tabs on the toolbox.
556
Web Forms
The area at the bottom of the Default.aspx page that has Design, Source, and other HTML tags to the right is known as the tag navigator.
First, add the controls to the form. You can arrange them in any order for now.
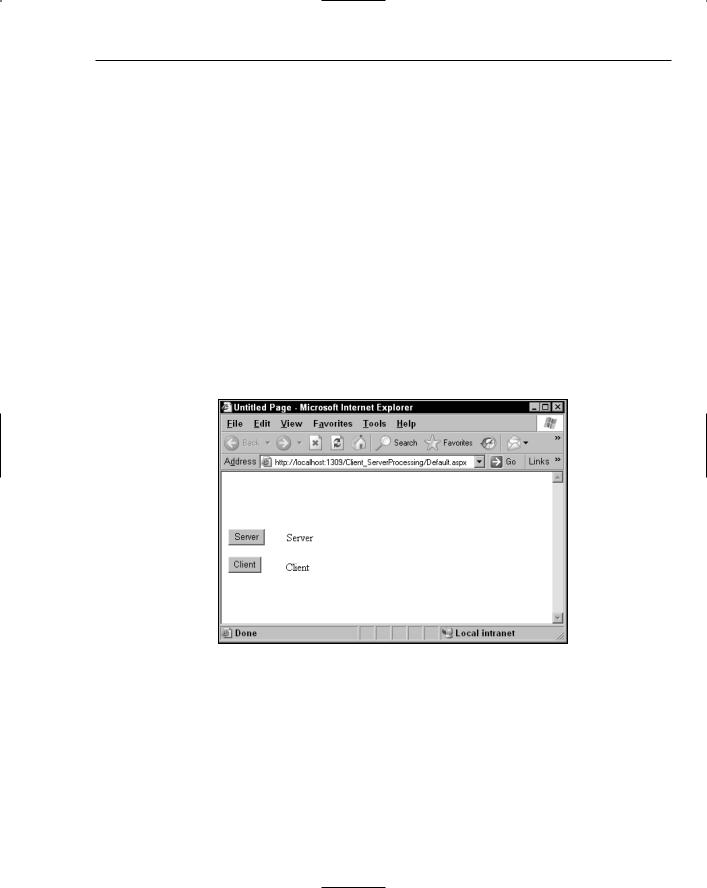
From the Standard controls tab, add one Button and two Label controls.
From the HTML controls tab, add one Input (Button) control.
4.Now, change the properties of the controls. Use Figure 17-4 as a guide.
Set the ID of the Standard:Button to btnServer and the Text to Server.
Set the ID of the HTML:Input (Button) to btnClient and the Value to Client.
Set the ID of the upper Standard:Label to lblServer and the Text to Server.
Set the ID of the lower Standard:Label to lblClient and the Text to Client.
5.Now, hold down the Ctrl key and select all four controls. Use the menus of VS 2005 and choose Layout Position Absolute. This will set the controls to function like the grid layout you are familiar with from Windows Forms development. You are able to move the controls anywhere on the form now. Arrange the control so they resemble Figure 17-4. When you finish, press Ctrl+F5 to run the project without debugging and see the page in the browser.
Figure 17-4
6.Close the browser and go back to VS 2005. Double-click the btnServer to jump to the btnServer_ Click event handler. Depending on your settings, you will be either on the code-behind page or working in the source of the .aspx page. Add the following highlighted code to the event.
Sub btnServer_Click(ByVal sender As Object, ByVal e As System.EventArgs)
lblServer.Text = “Changed” End Sub
557

Chapter 17
Run the program again by pressing Ctrl+F5 and test the button click event code. The label will display Changed after you click the Server button.
7.Now, you will create an event handler for the HTML Input (Button) and add a title to the page. (Make sure you have the Default.aspx page open in the IDE.) First, you need to change the default language to VBScript. To do this, view the Properties Explorer and select DOCUMENT from the combo box. Find the DefaultClientScript property and set it to VBScript. VBScript is very similar to all of the code you have learned so far in this book. To avoid confusion from new syntax, and because you can control the browser that you will use, you will write all client-side code using VBScript in this example. To add a title, find the Title property and set it to My First Page. On the tag navigator, click Source to change to HTML view. In the Client Object & Events combo box, choose btnClient. Next, select onclick in the event combo box and add this highlighted code to the event VS 2005 creates.
Sub btnClient_onclick
document.getElementById(“lblclient”).innerText = “Changed” document.getElementById(“lblServer”).innerText = “Server”
End Sub
8.Run the project again by pressing Ctrl+F5. Test both buttons.
How It Works
So, now you can see that Web Forms development is very similar to Windows Forms development. This is one of the benefits of .NET development and Visual Studio 2005. The ability for any developer to switch from device to Web to Windows development with a small learning curve is a goal of Microsoft, and they did it.
Let’s get start by looking at the HTML source. The first line of code is the Page directive:
<%@ Page Language=”VB” AutoEventWireup=”false” CodeFile=”Default.aspx.vb” Inherits=”_Default” %>
Depending on the mode you develop in, you will see different default attributes set by VS 2005. If you work with code in the .aspx page, only the Language attribute is set by VS 2005.
The Page directive has over 30 attributes that can be set. I will discuss only the default attributes. If you want to explore the rest, search for @Page in the help files for VS 2005 or on http://msdn2.microsoft.com/.
Take a look at the default attributes in the Default.aspx page. First, you see the Language attribute. This is set to the language that all server code will compile into. AutoEventWireup is the second attribute. VS 2005 sets this attribute to false. If you leave this attribute out of the Page directive, the default value is true, and certain events can be executed twice. Microsoft recommends always setting the AutoEventWireup attribute to false. Next, you have the CodeFile attribute. This is the page that contains the code when using a separate code file or the code-behind page. Finally, there is the Inherits attribute. This is simply the class name the page will inherit from.
558

Web Forms
The next line in the source code is the !DOCTYPE element. This tells IE 6 and later that the document conforms to the XHTML 1.1 Document Type Definition (DTD) specified by the W3C for English.
<!DOCTYPE html PUBLIC “-//W3C//DTD XHTML 1.1//EN” “http://www.w3.org/TR/xhtml11/DTD/xhtml11.dtd”>
The actual HTML root element is next. You will see this element with no attributes set in many instances. Here VS has specified that the namespace for custom tags will be http://www.w3.org/1999/xhtml. If you browse to this site, you will see that this is the XHTML namespace defined by the W3C.
<html xmlns=”http://www.w3.org/1999/xhtml” >
After the root HTML element is the HEAD element. Children of this element are items that are not rendered, but may affect how the page displays. You will place SCRIPT, META, TITLE, LINK, STYLE, and other elements here to define the page’s look and feel. LINK and STYLE elements are both used for Cascading Style Sheets (CSS). You will learn about CSS later in this chapter.
The first element is TITLE. This is the title the browser displays for the page. Next, there is a META object that defines the client scripting language as VBScript. After the META object is the client script you created.
The root script tags define the section of the page that is available to add procedures. The only event is the onclick event of the btnClient control. When you click the client button, this procedure executes. The first line of the subroutine uses the getElementById function to find the object in the document that has an ID of lblclient. Once it is found, the innerText is set to Changed. The same function is used to find the lblServer object on the next line. The innerText is then changed to Server. This is added to reset the Server button’s label.
<head runat=”server”>
<title>My First Page</title>
<meta http-equiv=”content-script-type” content=”text/VBScript” /> <script language=”vbscript” type=”text/vbscript”>
Sub btnClient_onclick document.getElementById(“lblclient”).innerText = “Changed” document.getElementById(“lblServer”).innerText = “Server”
End Sub
</script>
</head>
What you may not notice is the difference between the way the two buttons perform event handling. It is hard to notice running locally, but go back to the Web page and watch the status bar of the browser while you click each button. When you click the Server button, the page actually calls the Web server to process the event. The Client button did not call back to the server; the browser handled the event itself. Over a slow dial-up connection, you can see the difference right away. Keep this in mind as you develop with the runat=”server” model.
559

Chapter 17
Now, you are at the BODY tag. This is where Visual Studio adds the controls. All objects inside the FORM tag are sent back to the server for processing.
<body>
<form id=”form1” runat=”server”>
When you click the Server button, the form is actually submitted to the server. Here are two lines of HTML that are sent to the browser from the ASP.NET DLL.
<form method=”post” action=”Default.aspx” id=”form1”>
<input type=”submit” name=”btnServer” value=”Server” id=”btnServer” style=”z-index: 20; left: 40px; position: absolute; top: 72px” />
You can look at the HTML source set to the browser by choosing View Source from the IE menu.
So the browser knows that btnServer is a submit button. The function of a submit button is to pass form data back to a Web server. In this case, the action is set to Default.aspx. The form uses the post method to send data to Default.aspx. If you looked at the code IE uses for the page, you notice the style attribute on btnServer. This is how ASP.NET 2.0 handles positioning when you set a control’s position attribute to absolute. As you build more Web pages, you will realize that Visual Studio extracts the need to know HTML syntax to design Web applications. For most pages you will create, you can stay in design mode and never look at the HTML if you are not comfortable with it.
The final portion of the code displayed on the Default.aspx page was the markup for the controls. These are the controls you placed onto the design area of the form.
<div>
<asp:Button ID=”btnServer” Runat=”server” Text=”Server” style=”z-index: 20; left: 40px; position: absolute; top: 72px” OnClick=”btnServer_Click” />
<asp:Label ID=”lblServer” Style=”z-index: 19; left: 104px; position: absolute; top: 80px” Runat=”server” Text=”Server”></asp:Label> <asp:Label ID=”lblClient” Style=”z-index: 17; left: 104px; position:
absolute; top: 120px” Runat=”server” Text=”Client”></asp:Label> <input id=”btnClient” style=”z-index: 21; left: 40px; position:
absolute; top: 112px” type=”button” value=”Client” />
</div>
</form>
</body>
</html>
In the code for the OnClick event of the btnServer control, you set the text of the label to Changed.
Partial Class Default_aspx
Sub btnServer_Click(ByVal sender As Object, ByVal e As System.EventArgs)
lblServer.Text = “Changed”
End Sub
End Class
You have completed your first ASP.NET 2.0 page. In this exercise, you saw a few basic controls and learned that client and server code was handled differently. In the next section, you will learn data entry and validation skills.
560
Web Forms
Performing Data Entry and Validation
One of the basic functions of almost every Web site is to gather some kind of information from the user. You probably have seen screens to “contact us” or “create an account”. Any place you see a text box on a webpage, data entry and validation are probably taking place. In this Try It Out, you will learn the basics of using built in validation controls and accessing the data the user enters into the Web page.
Try It Out |
Data Entry and Validation |
1.Create a new Web site and name it DataEntry. Do this by choosing File New Web Site from the menu.
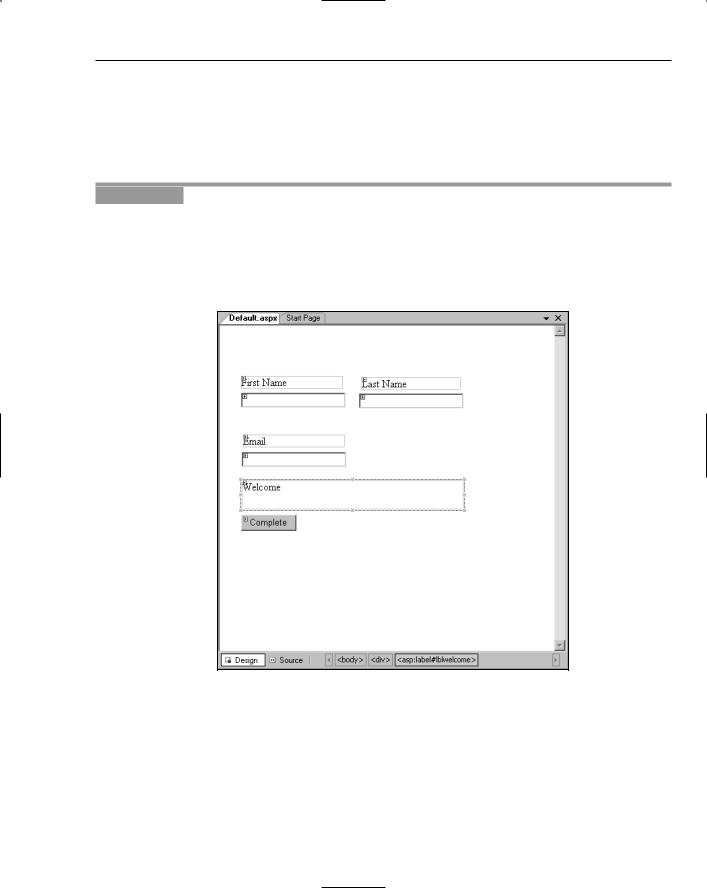
2.Add four labels, three text boxes, and one button to the Default.aspx page. Make sure you use server controls from the Standard tab of the Toolbox. Using the layout menu, set each control’s positioning to absolute. Finally, align the controls to resemble Figure 17-5.
Figure 17-5
3.Now, set the properties of the eight controls and the document.
Set the Title of the Document to Data Entry and Validation.
Set the ID of the Button to btnComplete and the Text to Complete.
Set the ID of the upper left TextBox to txtFirstName.
561

Chapter 17
Set the ID of the upper right TextBox to txtLastName.
Set the ID of the lower TextBox to txtEmail.
Set the ID of the upper left Label to lblFirstName and the Text to First Name.
Set the ID of the upper right Label to lblLastName and the Text to Last Name.
Set the ID of the middle Label to lblEmail and the Text to Email.
Set the ID of the lower Label to lblWelcome and Text to Welcome.
4.Test the page by pressing Ctrl+F5. When the page opens, you will test three items. First, enter your name and e-mail and then click the Complete button. The page will post back to the server, and the HTML returned will still have your data in the textboxes. This is default behavior known as view state. Second, type the text <SCRIPT>alert “Hi”</SCRIPT> into the First Name box and click Complete. You will see the error message shown in Figure 17-6. ASP.NET 2.0 has a feature called request validation that will check for any dangerous input from the user unless you explicitly turn it off. Finally, test the tab order. You can control the tab order by the order the controls appear in the HTML source or by the TabIndex property on each control. Change the tab order if it is not correct.
Figure 17-6
5.It is time to do something with the data the user enters. First, you need to open the code-behind page. The easiest way to do this is press F7. Next, add an event handler for page load. To do this, select Page Events from the Objects combo box on the left and Load from the Events combo box. Add the following highlighted code to update lblWelcome with the data input.
Private Sub Page_Load(ByVal sender As Object, ByVal e As System.EventArgs) _ Handles Me.Load
562

Web Forms
If Page.IsPostBack Then
‘If this is a postback and not the initial page load ‘Display the data to the user
Me.lblWelcome.Text = “Hello “ + Me.txtFirstName.Text + “ “ + _ Me.txtLastName.Text + “<BR>” + “Your email address is “ + _ Me.txtEmail.Text
End If End Sub
6.Now, you need to add validation to the input. Visual Studio has built in controls just for this. To see the controls, you will need to switch to Design mode by clicking the View Designer icon on the Solution Explorer. Go to the Toolbox and find the Validation tab, which includes prebuilt controls to assist with data validation. Add two RequiredFieldValidator controls and one Validation Summary control to the form. Use the layout menu to set each control’s positioning to absolute.
Set the following properties for RequiredFieldValidator:
Sert ID to rfvFirstName.
Set Display to None.
Set ControlToValidate to txtFirstName.
Set ErrorMessage to First name is required.
Set the following properties for RequiredFieldValidator:
Set ID to rfvEmail.
Set Display to None.
Set ControlToValidate to txtEmail.
Set ErrorMessage to Email is required.
Set ValidationSummary’s ID to ValidationSummary. Your page will look like Figure 17-7 when you finish.
7.Run your project and try to submit blank entries for first name and e-mail. You will see two error messages similar to Figure 17-8.
This quick example explains how easy data validation is in ASP 2.0. Other controls are available for enforcing data validation. The CompareValidator control tests a control to make sure it matches a value. This value can be a constant, another control, or even a value from a data store. RangeValidator tests that a value is within a specified range. For example, you can test to make sure a person is between 18 and 35 years old.
How It Works
Without writing any code, you were able to require that data entry fields were completed on a Web page. You took advantage of controls already created for quick and hearty data validation.
You use the RequiredFieldValidator control to make sure the user entered data. You set a couple of properties on the control, and it was done. You set the ErrorMessage to a string that displayed in the ValidationSummary control. Setting Display=”None” caused the error message not to be shown inside of the RequiredFieldValidator control. The required property, ControlToValidate, was set to the ID of the control that was required.
563

Chapter 17
Figure 17-7
Figure 17-8
564

Web Forms
<asp:RequiredFieldValidator ID=”rfvFirstName” Style=”z-index: 35; left: 168px; position: absolute; top: 288px” Runat=”server” ErrorMessage=”First name is required.” Display=”None” ControlToValidate=”txtFirstName”> </asp:RequiredFieldValidator>
You used the ValidationSummary control as a central location for displaying all error messages. If you decide not to use a summary object, you could set the display property of the individual validation controls to true. Then, the error messages is displayed within the validation control. No property changes are needed to use the ValidationSummary control. You just add it to the form at the location you wanted to display validation messages.
<asp:ValidationSummary ID=”ValidationSummary1” Style=”z-index: 37; left: 16px; position: absolute; top: 288px” Runat=”server” />
The only code you wrote was added to the Page_Load event. Here, you tested for a postback using the IsPostBack property of the Page object. If it was a postback, you displayed the name and e-mail entered by the user.
If Page.IsPostBack Then
‘If this is a post back and not the initial page load ‘Display the data to the user
Me.lblWelcome.Text = “Hello “ + Me.txtFirstName.Text + “ “ + _ Me.txtLastName.Text + “<BR>” + “Your email address is “ + Me.txtEmail.Text
End If
Designing the Site’s Look and Feel
In the past, a major drawback of Web development was maintaining a consistent look and feel across an entire site in a manageable way. Developers created user controls and inserted server-side includes in every page to try and accomplish this. For the most part, this worked. The hard part was making sure the opening tags that were in certain include files were closed in the pages that included them. Another cause of frustration for the designer was making sure all user controls or include files displayed in the same location. This took time, and with every page changed, someone had to make sure the entire site looked OK. Today, VS 2005 has the tools that can be used to maintain a consistent look and feel.
Themes, navigation controls, and master pages are the tools to accomplish a consistent look and feel. You will learn about all three in the next Try It Out.
Try It Out |
Building Your First Web Site |
1.Create a new site and name the project SiteLookAndFeel.
2.To start the project, you add many files and folders. First, add a master page by right-clicking the project name in Solution Explorer and selecting Add New Item from the context menu. In the dialog box that opens, choose Master Page and click Add.
3.Change the page directive on the Default.aspx page to reference the new master page:
<%@ Master Language=”VB” CodeFile=”MasterPage.master.vb” Inherits=”MasterPage” %>
565