Добавил:
Опубликованный материал нарушает ваши авторские права? Сообщите нам.
Вуз: Предмет: Файл:

Beginning Visual Basic 2005 (2006)

.pdf
Скачиваний:
220
Добавлен:
17.08.2013
Размер:
14.97 Mб
Скачать

Chapter 17

<form id=”form1” runat=”server”> <div>

<asp:SqlDataSource ID=”sdsAuthors” Runat=”server” ProviderName = “System.Data.SqlClient”

ConnectionString = “Server=bnewsome; User ID=sa; Password=!p@ssw0rd!;Database=pubs; “

SelectCommand = “SELECT au_id, au_lname, au_fname, phone, address, city, state, zip FROM authors”

UpdateCommand = “UPDATE authors SET au_lname = @au_lname, au_fname = @au_fname, phone = @phone, address = @address, city = @city, state = @state, zip = @zip

WHERE au_id = @original_au_id” > <UpdateParameters>

<asp:Parameter Type=”String” Name=”au_lname”></asp:Parameter> <asp:Parameter Type=”String” Name=”au_fname”></asp:Parameter> <asp:Parameter Type=”String” Name=”phone”></asp:Parameter> <asp:Parameter Type=”String” Name=”address”></asp:Parameter> <asp:Parameter Type=”String” Name=”city”></asp:Parameter> <asp:Parameter Type=”String” Name=”state”></asp:Parameter> <asp:Parameter Type=”String” Name=”zip”></asp:Parameter> <asp:Parameter Type=”String” Name=”au_id”></asp:Parameter>

</UpdateParameters>

</asp:SqlDataSource>

<asp:GridView ID=”gdvAuthors” Runat=”server” DataSourceID=”sdsAuthors” AllowPaging=”True” AllowSorting=”True” AutoGenerateColumns=False DataKeyNames=”au_id” >

<PagerStyle BackColor=”Gray” ForeColor=”White” HorizontalAlign=”Center” /> <HeaderStyle BackColor=”Black” ForeColor=”White” />

<AlternatingRowStyle BackColor=”LightGray” /> <Columns>

<asp:CommandField ButtonType=”Button” ShowEditButton=”true” /> <asp:BoundField Visible=”false” HeaderText=”au_id” DataField=”au_id”

SortExpression=”au_id”></asp:BoundField> <asp:BoundField HeaderText=”Last Name” DataField=”au_lname”

SortExpression=”au_lname”></asp:BoundField> <asp:BoundField HeaderText=”First Name” DataField=”au_fname” SortExpression=”au_fname”></asp:BoundField>

<asp:BoundField HeaderText=”Phone” DataField=”phone” SortExpression=”phone”></asp:BoundField>

<asp:BoundField HeaderText=”Address” DataField=”address” SortExpression=”address”></asp:BoundField>

<asp:BoundField HeaderText=”City” DataField=”city” SortExpression=”city”></asp:BoundField>

<asp:BoundField HeaderText=”State” DataField=”state” SortExpression=”state”></asp:BoundField>

<asp:BoundField HeaderText=”Zip Code” DataField=”zip” SortExpression=”zip”></asp:BoundField>

</Columns>

</asp:GridView>

</div>

</form>

</body>

</html>

576

Web Forms

3.Run the application without debugging by pressing Ctrl+F5. You will see the data grid display similar to Figure 17-15.

Figure 17-15

Test the functions of the grid. At the bottom, you can move to any page of the data. Also, sorting is available by clicking any of the column headers. After trying both of these, update a row. To edit an author’s data, click the Edit button on the left of the author’s row. The screen will refresh, and you will see a new grid that looks like Figure 17-16.

Figure 17-16

577

Chapter 17

Change any field and click the update button to make the change permanent. You can cancel a change by clicking any link or button other than the Update button.

How It Works

Now that was easy. By adding two controls, you created a fairly robust data access page. Let’s explain how this happened.

First, you created a SqlDataSource control. The following table will explain each attribute you added or changed for the SqlDataSource control. The code follows.

Attribute or Element

Description


ID

The control’s identifier.

Runat

Defined that the code for the control was run at the server before the


page was sent to the browser.

ProviderName

Used to set the provider to access the data store. In this case, it was


SQLClient, the managed provider for SQL Server.

ConnectionString

This string value was used to gain access to the database resource,


pubs, requested.


(In the exercises at the end of this chapter, you will investigate a more


secure and manageable method of storing the connection string in the


web.config file.)

SelectCommand

The SQL statement passed to the database to retrieve the data that was


displayed in the grid. This could have been a stored procedure name.

UpdateCommand

The SQL statement that was used to update the data. You could have


used a stored procedure name in place of the SQL statement in this


case.

UpdateParameters

The update parameters object is a collection of parameters the

and Parameter objects

application used to fill in the blanks in the update statement. For


example, the parameter @city in the update statement passed a value


to the database so that the Author’s record would be updated. This


parameter, @city, was replaced with the actual value you entered into


the city text box.


In the future, when you use parameters, the database will determine


the syntax. Some databases will just use a question mark for each


parameter name. Also, in some cases the order of the parameter object


matters. For this application, the names are the only part that makes a


difference, not the order.


Another common property not used here is DefaultValue. The Default-


Value property would have replaced a null value with the value set in


the property itself.

578


Web Forms


Parameter: Type

This was string for every parameter. This value was determined based


on the data type on each column in the database.


Parameter: Name

The name property was the actual name used by the UpdateCommand


for each parameter.


<asp:SqlDataSource ID=”sdsAuthors” Runat=”server” ProviderName = “System.Data.SqlClient”

ConnectionString = “Server=bnewsome; User ID=sa; Password=!p@ssw0rd!;Database=pubs; “

SelectCommand = “SELECT au_id, au_lname, au_fname, phone, address, city, state, zip FROM authors”

UpdateCommand = “UPDATE authors SET au_lname = @au_lname, au_fname = @au_fname, phone = @phone, address = @address, city = @city, state = @state, zip = @zip

WHERE au_id = @original_au_id” > <UpdateParameters>

<asp:Parameter Type=”String” Name=”au_lname”></asp:Parameter> <asp:Parameter Type=”String” Name=”au_fname”></asp:Parameter> <asp:Parameter Type=”String” Name=”phone”></asp:Parameter> <asp:Parameter Type=”String” Name=”address”></asp:Parameter> <asp:Parameter Type=”String” Name=”city”></asp:Parameter> <asp:Parameter Type=”String” Name=”state”></asp:Parameter> <asp:Parameter Type=”String” Name=”zip”></asp:Parameter> <asp:Parameter Type=”String” Name=”au_id”></asp:Parameter>

</UpdateParameters>

</asp:SqlDataSource>

The second control you added to the form was the GridView. Its attributes are described in the following table.

Attribute or Element

Description


ID

The control’s identifier.

Runat

Defines that the code for the control was run at the server before the


page was sent to the browser.

DataSourceID

The ID of the SqlDataSource object was used here.

AllowPaging

Can be set to TRUE or FALSE. Turns on sorting features of the grid.

AllowSorting

Can be set to TRUE or FALSE. Turns on sorting features of the grid.

AutoGenerateColumns

Can be set to TRUE or FALSE. Turns on sorting features of the grid.

DataKeyNames

The primary key used by the database table.

PagerStyle

This element defines the style of the paging area of the grid.

HeaderStyle

This element defines the style of the header row area of the grid.

AlternatingRowStyle

This element defines the style of the every other row of the grid.

Columns

A collection of column objects.


579

Chapter 17

Attribute or Element

Description


CommandField

Two properties of this object were used. The first was ButtonType.


This was set to a type of button. You can insert a button, image, or


link as a value. If left blank, the default is link.

BoundField

This element allows for the binding of the data to the grid. For a bet-


ter user interface, you used the Visible property to hide the primary


key column. Also, you set the SortExpression of each column. This


converts every column header to a link. When clicked, the data is


sorted by that column. Next, you changed the column headers with


the HeaderText property. If this is blank, the column names are used


as headers. Finally, the field to bind to was set using the DataField


property.


<asp:GridView ID=”gdvAuthors” Runat=”server” DataSourceID=”sdsAuthors” AllowPaging=”True” AllowSorting=”True” AutoGenerateColumns=False DataKeyNames=”au_id” >

<PagerStyle BackColor=”Gray” ForeColor=”White” HorizontalAlign=”Center” /> <HeaderStyle BackColor=”Black” ForeColor=”White” />

<AlternatingRowStyle BackColor=”LightGray” /> <Columns>

<asp:CommandField ButtonType=”Button” ShowEditButton=”true” /> <asp:BoundField Visible=”false” HeaderText=”au_id” DataField=”au_id”

SortExpression=”au_id”></asp:BoundField> <asp:BoundField HeaderText=”Last Name” DataField=”au_lname”

SortExpression=”au_lname”></asp:BoundField> <asp:BoundField HeaderText=”First Name” DataField=”au_fname” SortExpression=”au_fname”></asp:BoundField>

<asp:BoundField HeaderText=”Phone” DataField=”phone” SortExpression=”phone”></asp:BoundField>

<asp:BoundField HeaderText=”Address” DataField=”address” SortExpression=”address”></asp:BoundField>

<asp:BoundField HeaderText=”City” DataField=”city” SortExpression=”city”></asp:BoundField>

<asp:BoundField HeaderText=”State” DataField=”state” SortExpression=”state”></asp:BoundField>

<asp:BoundField HeaderText=”Zip Code” DataField=”zip” SortExpression=”zip”></asp:BoundField>

</Columns>

</asp:GridView>

Web Site Locations with VS 2005

All of the examples in this chapter use the file system location for all of the Web sites as shown in Figure 17-17. One advantage of this location is that the Web server is not accessible to external users. Always make sure you test your site on the actual version of IIS running on the production server before going live.

580

Web Forms

Figure 17-17

There are three other ways to work with Web site projects. To see the other options, just click the Browse button on the New Web Site dialog box. The first is using local IIS. (See Figure 17-18.)

Figure 17-18

581

Chapter 17

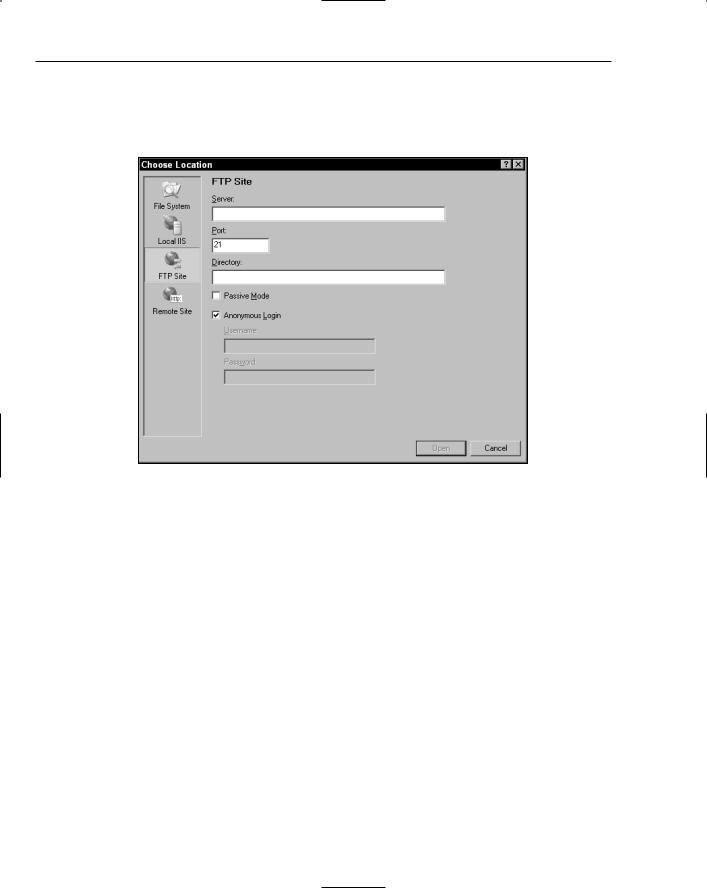
If you have a local Web server, you can host your application there. This allows others to see the site and test it. The second option is to use an FTP site. In this case, you are most likely using a hosting company. All you have to do is add the location and authentication information, and you can code your application on the production server. You can see the setup screen for an FTP site in Figure 17-19.

Figure 17-19

The final option is a Remote Site. Again, this also may be used when you use a hosting company. If your hosting company supports FrontPage Extensions, you can use this option as shown in Figure 17-20.

Summar y

In this chapter, you learned what thin-client development is. You saw the advantages of Web Forms and Windows Forms and why you would choose one type of application over the other. Maybe the low distribution cost of Web applications is a major factor in your decision to create a Web application over a Windows application. Also, you read about the basic pieces that constitute a typical Web application. From layout and formatting to database integration, you gained knowledge on the best features of ASP.NET 2.0 and how they were implemented. Finally, you designed a code-free page that updated data in a database.

If you like Web development, there is much more than can be explained in this chapter. To continue learning, I suggest you find a book that is entirely based on ASP.NET 2.0. You can learn much more that way. The best title from WROX to complete next would either be Beginning ASP.NET 2.0 or Professional ASP.NET 2.0. Either one would take you to the next level for Web development.

582

Web Forms

Figure 17-20

To summarize, you should know how to:

Choose between Web Forms versus Windows Forms applications

Use the toolbox for ASP.NET 2.0

Create a Web site project in Visual Studio 2005

Validate data for a Web application

Manage site layout using themes, navigation controls, and master pages

Use the GridView control to build a data driven ASP.NET Web Form

Choose between the possible locations for Web sites in VS 2005

Exercise

Open up your DataGridView project. A better way to store the connection string would be to store it in the web.config file. For the exercise, you should store the connection string in the web.config file and retrieve it when setting the property of the SqlDataSource control.

First, you will add a web.config file to the project. Then add this code as a child of the <appSettings> element.

<add key=”ConnectionString” value=”Server=bnewsome; User ID=sa; Password=!p@ssw0rd!;

Database=pubs;” />

583

Chapter 17

Make sure to change the values to match your development environment.

Next, remove the ConnectionString property from the sdsAuthors declaration.

Finally, you need to add a server event on the Default.aspx. Use the Objects and Events combo boxes to add a subroutine to fire for the sdsAuthors_Init event. Inside of this, set the ConnectionString property of sdsAuthors equal to the web.config value.

To get the value, this function returns the value from the config file:

ConfigurationManager.AppSettings(“ConnectionString”)

584

18

Forms Authentication

In Chapter 17, you learned how to implement many pieces of the puzzle that is Web development. Now, you will put it all together to build the foundation for a secure public Web site. You will create a skeleton Web site in this chapter, with security, that is ready for content. While writing no Visual Basic code, you will end up with a consistent look and feel and role-based forms authentication. You will be amazed at the ease of creation and the flexibility built into ASP.NET 2.0.

In this chapter, you will:

Have an overview of the two most popular methods of Web site security

Learn about the Web Site Administration Tool

Implement Web site security using forms authentication

Add rules and roles to a security scheme

Create a secure Web site with little or no code written

Web Site Authentication

As you design Web applications, you need to consider security at an early point in the project. Always understand who will need access to your site and who will not have access. In many cases, parts of the site will be open to the public and parts will be secure and for members only. This may require multiple methods of security. There are two standard types of Web authentication strategies: windows and forms authentication.

Windows Authentication

The simplest type of authentication is windows authentication. This type of authentication is perfect for intranet sites. It is actually implemented by IIS and keeps the authentication mechanisms