

Visual CSharp .NET Developer's Handbook (2002) [eng]
.pdf
|
|
|
public frmMain() |
|
|
{ |
|
// The XML declaration. |
XmlDeclaration XD; |
||
XmlElement |
Root; |
// The root note of the XML document. |
XmlNode |
Node; |
// A node in the XML document. |
//Required for Windows Form Designer support InitializeComponent();
//Open the XML document for use. The program will
//create a new copy of the file every time you start it. XMLDoc = new XmlDocument();
//Load some XML XMLDoc.LoadXml("<Performance></Performance>");
//Create the document declaration.
XD = XMLDoc.CreateXmlDeclaration("1.0", "utf-8", null);
Root = XMLDoc.DocumentElement;
XMLDoc.InsertBefore(XD, Root);
// Create the stylesheet declaration.
Node = XMLDoc.CreateNode(XmlNodeType.ProcessingInstruction, "xml-stylesheet",
"");
Node.Value = "type=\u0022text/xsl\u0022 href=\u0022PFormat.XSL\u0022"; XMLDoc.InsertAfter(Node, XD);
}
The basis of an XML message is the XmlDocument object. The code creates a root node for the document using the LoadXml() method. Actually, this method will accept as much XML as you want to provide, so it's possible to use this as your only document creation step. The point is that you need to load some amount of XML into the document before you perform any other steps in creating the XML document. Note that the application will ensure the code is well formed as it adds data to the XML document, so it's normally a good idea to place the code within a try...catch block (omitted here for clarity).
After the code creates the initial document and root node, it adds to other important pieces of XML information. The first is the XML declaration created using the CreateXmlDeclaration() method. The three inputs to this method are the XML version number, encoding method, and whether this is a stand-alone document. The declaration must appear as the first header item in the XML document, so the code uses the InsertBefore() method to place the declaration before the root node. Here's what the XML declaration looks like. Notice that since the standalone element is null in the CreateXmlDeclaration() call, it doesn't appear in the declaration.
<?xml version="1.0" encoding="utf-8"?>
The second important piece of XML information is a processing instruction. A processing instruction can perform any number of tasks. However, it's never considered part of the data of the XML message—a processing instruction always tells the interpreter how to react to the document. In this case, the processing instruction contains the xml-stylesheet declaration, which tells the interpreter which XML Stylesheet Language (XSL) file to use to interpret the

content of the XML message. Notice the use of the \u Unicode escape sequences to create double quotes within the declaration. The xml-stylesheet declaration must appear after the XML declaration, but before the root node in the message. Here's how the xml-stylesheet declaration appears within the XML message.
<?xml-stylesheet type="text/xsl" href="PFormat.XSL"?>
As you can see, the style sheet uses a combination of text and XSL script to format the document. The name of the style sheet document is PFormat.XSL and the interpreter will look for it in the same folder as the XML message document. The href attribute can include path information so that the style sheet can appear anywhere on the web server.
Now that we have an XML document and associated header information, it's time to create some content for the document. The example uses a performance counter dragged and dropped from Server Explorer. It also relies on a timer to check the counter content at regular intervals. The data entries consist of the time that the counter was checked and the percentage of user CPU time at that moment. Listing 16.2 shows how these various elements work together to create the XML document data.
Listing 16.2: Creating Data and Saving the Document
private void btnToggle_Click(object sender, System.EventArgs e)
{
// Set the timer on or off. if (btnToggle.Text == "Start")
{
btnToggle.Text = "Stop"; CounterTimer.Start();
}
else
{
btnToggle.Text = "Start"; CounterTimer.Stop();
}
}
private void frmMain_Closing(object sender, System.ComponentModel.CancelEventArgs e)
{
// Close the XML Document before the application exits. XMLDoc.Save(txtXMLFileLoc.Text);
}
private void CounterTimer_Tick(object sender, System.EventArgs e)
{
XmlNode |
Item; |
// The current XML item. |
XmlNode |
Time; |
// The Time element within the item. |
XmlNode |
Data; |
// The Data element within the item. |
XmlNode |
PerfNode; |
// The container for all item nodes. |
int |
EntryCount; |
// The number of item entries in the file. |
//Get the Performance node. PerfNode = XMLDoc.DocumentElement;
//Create the Item element.
Item = XMLDoc.CreateNode(XmlNodeType.Element, "Item", "");

// Create the time and data entries.
Time = XMLDoc.CreateNode(XmlNodeType.Element, "Time", ""); Time.InnerText = DateTime.Now.ToLongTimeString(); Item.AppendChild(Time);
Data = XMLDoc.CreateNode(XmlNodeType.Element, "Data", ""); Data.InnerText = UserTimeCounter.NextValue().ToString(); Item.AppendChild(Data);
//Add the Item element to the document. PerfNode.AppendChild(Item);
//Update the counter.
EntryCount = Int32.Parse(txtFileEntries.Text); EntryCount++;
txtFileEntries.Text = EntryCount.ToString();
}
The btnToggle_Click() handles the Stop/Start button click event. This event handler performs two tasks. First, it changes the button caption to reflect the current status of the timer. If the timer is stopped, then the button caption changes to Start so that the user can start the timer again. Second, the code stops or starts the timer. Starting the timer generates Tick() events that record performance data.
The frmMain_Closing() ensures the application saves the XML message to disk. The Save() method creates the XML message at whatever disk location appears in the txtXMLFileLoc textbox. Note that the Save() method is a requirement because the XML document exists only in memory until you save it to disk. This means that if the application exits suddenly, the XML document is lost. Considering the non-critical nature of the data the application produces, this is an acceptable risk.
The CounterTimer_Tick() is the most complex part of the application. The code begins by gaining access to the root node using the DocumentElement property of the XML document. The code then creates the three nodes that make up a single data entry: Item, Time, and Data.
The Item node is a wrapper for the two actual data entries. XML relies on a hierarchical structure, so using a container node is important. Otherwise, you'll have a hard time parsing the data later. The CreateNode() method creates a new node entry of a specific type. The code selects the proper type using the XmlNodeType enumeration. The second required entry is the node name. The code could also specify a namespace, but this entry is optional.
Both of the data nodes (Time and Data) rely on the InnerText property to hold their respective values. Because we're monitoring the time in seconds, it's important to use the DateTime.Now.ToLongTimeString() method to convert the current time to a string—the short format only includes the minutes. The UserTimeCounter.NextValue().ToString() method converts the current performance counter value to a string. Note that you want to use the calculated, not the raw data value, to create XML message entries.
All three of the nodes rely on the AppendChild() method to add their entries to the message. Note the order in which the AppendChild() calls appear in the code. You must complete the Item node before adding it to the root node, which means adding the Data and Time elements to it first.

The final step is to update the item counter. Because we add a new <Item> tag for every timer tick, all the code needs to do is increment the txtFileEntries textbox. The code could have used a number of methods to perform this task, but converting the text value to an integer using the Int32.Parse() method seemed like the fastest way. Of course, the code also needs to convert the integer back to a string before updating the txtFileEntries textbox.
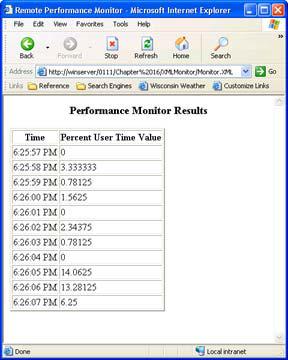
The actual XML data isn't very complex—at least not when compared with some XML data you'll find online. Figure 16.2 shows an example of the data created by the test application. Notice it follows the format anticipated by the code we discussed in this section. Of course, the data will be a lot easier to read once we have a style sheet in place to read it using a browser.
Figure 16.2: The XML output is somewhat readable, but most administrators will want something better.
Defining a Style Sheet
There are a number of ways to read XML data once you create it, but one of the most common scenarios today is creating the data with some type of desktop application and then reading it with a browser. The previous section showed how to create the data using a monitoring application. This section shows how to create the PFormat.XSL style sheet used to read the data. The style sheet code appears in Listing 16.3.
Listing 16.3: Formatting the XML Data Using a Style Sheet
<?xml version='1.0'?> <xsl:stylesheet version='1.0'
xmlns:xsl='http://www.w3.org/1999/XSL/Transform'> <xsl:output method="xml" indent="yes" /> <xsl:template match="/">
<!-- Create the HTML Code for this stylesheet. -->

<HTML>
<HEAD>
<TITLE>Remote Performance Monitor</TITLE> </HEAD>
<BODY>
<CENTER><H3>Performance Monitor Results</H3></CENTER>
<TABLE BORDER="2"> <TR>
<TH>Time</TH>
<TH>Percent User Time Value</TH> </TR>
<xsl:apply-templates select="//Item"/> </TABLE>
</BODY>
</HTML>
</xsl:template>
<!-- XSL template section that describes table content. -->
<xsl:template match="Item"> <TR>
<TD>
<xsl:value-of select="Time"/> </TD>
<TD>
<xsl:value-of select="Data"/> </TD>
</TR>
</xsl:template>
</xsl:stylesheet>
As you can see, the style sheet contains three main sections: header, HTML code, and XSL template. Not every XSL file contains these three sections—in fact, it's quite safe to assume otherwise, given the freeform nature of XML. However, it's safe to say that most browser style sheets will contain these three sections.
The XSL header begins with the XML declaration—a requirement for all XML-based documents. It also includes an XSL declaration that includes a namespace for the XSLspecific declarations. Again, this is a requirement for all XSL documents. The <xsl:output> tag determines the type of output the style sheet will create as well as output attributes, such as the use of indentation to make the resulting code easier to read. The <xsl:template> defines the beginning of the template used to interpret the input file, as well as the attributes the interpreter will use. In this case, we're telling the template to match everything in the source file, but this isn't a requirement.
The HTML code includes the usual sections. However, notice the special <xsl:applytemplates> tag. This tag creates a connection between the HTML code and the XSL template that follows. It tells the interpreter where to place the template output within the HTML data stream. The select attribute determines which of the templates the interpreter places in the HTML output stream.
The final section is the XSL template, which begins with the <xsl:template> tag. Notice that this tag contains a match attribute, which selects the data container nodes within the XML message document. The template will parse each <Item> tag within the XML message document until it runs out of tags to parse. The code that follows includes a combination of HTML tags and <xsl:value-of> tags. As you can see, each of the <xsl:value-of> tags selects one of the data items in the XML message and places it within the HTML table. Figure 16.3 shows the output from the XSL template.
Figure 16.3: The XSL output is easy to read using any browser that includes XSL support.
Creating Distributed Applications Using SOAP
SOAP represents one of the best technologies for moving data on the Internet because it defines a protocol for organizing the information and responding to it. In addition, SOAP defines a method for passing error information back to the message sender, so the sender knows if the data arrived safely.
However, like XML, the composition of the data payload will vary. This means that you still need to establish a schema with the recipient in order to exchange information. The organization of your data payload must match the organization the remote machine is expecting.
Another problem with SOAP is that it doesn't provide any security. The various SOAP supporters and standards organizations are currently working on a solution for this problem. In the meantime, you should plan on establishing a Virtual Private Network (VPN) with the remote location when using SOAP. Using data encryption doesn't hurt either, but it does detract from one of the benefits of using SOAP—the lack of binary data in the data stream.
The following sections will tell you more about SOAP, discuss the SOAP support you'll find in the .NET Framework, and provide a SOAP application demonstration. As you read these sections, remember that SOAP is a protocol—essentially a set of rules—for organized data
transfer across any type of network. The organization is in the data transfer technique employed by SOAP, as demonstrated by the example application.
Note SOAP is still a young technology, even by computer standards. The form of SOAP used by Visual Studio .NET relies on the Remote Procedure Call (RPC) model that other Microsoft technologies such as the Distributed Component Object Model (DCOM) use. RPC makes it appear that the source of a resource is the local client, rather than force the client to see remote resources as something on another computer. A few vendors such as IBM see RPC as outmoded and incapable of supporting distributed application in the future. Consequently, they've created new models such as Resource Description Framework (RDF) to handle the needs of distributed resource sharing. You can read about RDF at http://www-106.ibm.com/developerworks/library/ws-soaprdf/?n-ws-372. We won't discuss alternatives such as RDF in the book because you can't easily use them within Visual Studio .NET.
Dissecting the SOAP Message
You can divide SOAP messages into two basic categories: requests and responses. The client sends a request to the server. If the server can fulfill the request, then it sends a data message back to the client. Otherwise, the server sends an error message indicating why it couldn't send a response back to the client. In most cases, the problem is one of security, access, equipment failure, or an inability to find the requested object or data.
SOAP messages don't exist within a vacuum. If you send just a SOAP message, it will never reach its destination. SOAP is a wire protocol—it relies on another protocol such as HTTP or SMTP for transport. This is the same technique used by other wire protocols, so there's nothing strange about SOAP when it comes to data transfer needs. The most common transport protocol in use today is HTTP, so that's what we'll look at in this section. Keep in mind, however, that SOAP can theoretically use any of a number of transport protocols and probably will do so in the future.
SOAP messages look and act like XML messages. Therefore, in addition to the HTTP wrapper, a SOAP message requires an XML wrapper. All that the XML wrapper does, in this case, is tell the data receiver that this is an XML-formatted message. The SOAP part of the message contains all of the data; however, SOAP uses XML-like tags to format the data.
Figure 16.4 shows a common SOAP message configuration. Notice the SOAP message formatting. This isn't the only way to wrap a SOAP message in other protocols, but it's the most common method in use today.

Figure 16.4: An illustration of how a SOAP message is commonly encased within other protocols.
The next three sections tell you how a SOAP message appears during transmission. We'll use Figure 16.4 as an aid for discussion. It's the only time we'll explore a complete request or response in the book, since in most other cases you'll only need to worry about the SOAP message itself.
Tip Working with the new capabilities provided by technologies like XML and SOAP means dealing with dynamically created web pages. While it's nice that we can modify the content of a web page as needed for an individual user, it can also be a problem if you need to troubleshoot the web page. That's where a handy little script comes into play. Type javascript:'<xmp>'+document.all(0).outerHTML+'</xmp>' in the Address field of Internet Explorer for any dynamically created web page, and you'll see the actual HTML for that page. This includes the results of using scripts and other page construction techniques.
Viewing the HTTP Portion of SOAP
The HTTP portion of a SOAP message looks much the same as any other HTTP header you may have seen in the past. In fact, if you don't look carefully, you might pass it by without paying any attention. As with any HTTP transmission, there are two types of headers—one for requests and another for responses. Figure 16.4 shows examples of both types.
As with any request header, the HTTP portion of a SOAP message will contain an action (POST, in most cases), the HTTP version, a host name, and some content length information. The POST action portion of the header will contain the path for the SOAP listener, which is
either an ASP script or an ISAPI component. Also located within a request header is a Content-Type entry of text/xml and a charset entry of utf-8. The utf-8 entry is important right now because many SOAP toolkits don't support utf-16 and many other character sets. The SOAP specification also uses utf-8 for all of its examples.
You'll also find the unique SOAPAction entry in the HTTP request header. It contains the Uniform Resource Identifier (URI) of the ASP script or ISAPI component used to parse the SOAP request. If the SOAPAction entry is "", then the server will use the HTTP Request-URI entry to locate a listener instead. This is the only SOAP-specific entry in the HTTP header— everything else we've discussed could appear in any HTTP formatted message.
Tip UTF stands for Unicode Transformation Format. UTF represents one standard method for encoding characters. One of the better places to learn about UTF-8 is http://www.utf8.org/. You can find a good discussion of various encoding techniques at http://www.czyborra.com/utf/. This website presents the information in tutorial format. The fact remains that you need to use the utf-8 character set when working with SOAP.
The response header portion of the HTTP wrapper for a SOAP message contains all of the essentials as well. You'll find the HTTP version, status, and content length as usual. Like the request header, the response header has a Content-Type entry of text/xml and a charset entry of utf-8.
There are two common status indicators for a response header: 200 OK or 500 Internal Server Error. While the SOAP specification allows leeway in the positive response status number (any value in the 200 series), a server must return a status value of 500 for SOAP errors to indicate a server error.
Whenever a SOAP response header contains an error status, the SOAP message must include a SOAP fault section. We'll talk about SOAP faults later in this chapter. All you need to know now is that the HTTP header provides the first indication of a SOAP fault that will require additional processing.
A message can contain other applicable status errors codes in the response header. For example, if the client sends a standard HTTP header and the server wants to use the HTTP Extension Framework, it can respond with a status error value of 510 Not Extended. The 510 error isn't necessarily fatal; a client can make the request again using the mandatory HTTP Extension Framework declaration. In this case, an error message serves to alert the client to a special server requirement.
Viewing the XML Portion of SOAP
All SOAP messages are encoded using XML. SOAP follows the XML specification and can be considered a true superset of XML. In other words, it adds to the functionality already in place within XML. Anyone familiar with XML will feel comfortable with SOAP at the outset—all you really need to know is the SOAP nuances.
Although the examples in the SOAP specification don't show an XML connection (other than the formatting of the SOAP message), most real-world examples will contain at least one line of XML-specific information. Here's an example of an XML entry:
<?xml version="1.0" encoding="UTF-8" standalone="no"?>
As you can see, the tag is quite simple. The only bits of information that it includes are the XML version number, the character set (encoding), and whether the message is stand-alone. As with the HTTP header, the XML portion relies on the utf-8 character set for now. The version number will change as new versions of XML appear on the scene. The standalone attribute determines if external markup declarations could affect the manner in which this XML document is processed. A value of no means external documents could affect the processing of this document.
Tip We won't discuss all of the XML tag attributes (declarations) in this chapter. You can find a complete listing of these attributes at http://www.w3.org/TR/REC-xml. For those of you who don't read specifications very well (or prefer not to), look at Tim Bray's annotated XML specification website at http://www.xml.com/axml/testaxml.htm. Another good place to look is the XML.com website at http://www.xml.com/. Finally, if you want to see the tools and other resources available for XML, look at http://www.projectcool.com/developer/xmlz/xmlref/examples.html.
Some developers don't include all of the XML tag attributes in their SOAP messages. So far, I haven't seen any problems with leaving the encoding and standalone attributes out of the picture. You should, however, always include the XML version number—if for no other reason than the need to document your code and ensure there are no compatibility problems with future SOAP implementations.
Working with the SOAP Message
A simple SOAP message consists of an envelope that contains both a header and a body. The header can contain information that isn't associated with the data itself. For example, the header commonly contains a transaction ID when the application needs one to identify a particular SOAP message. The body contains the data in XML format. If an error occurs, the body will contain fault information, rather than data.
Now that you have a summary of the SOAP message content, let's look at some particulars you'll need when working with SOAP. The following sections will fill you in on some technical details needed to understand the SOAP message fully.
HTTP and the SOAP Transfer
SOAP is essentially a one-way data transfer protocol. While SOAP messages often follow a request/response pattern, the messages themselves are individual entities. They aren't linked in any way. This means that a SOAP message is stand-alone—it doesn't rely on the immediate presence of a server, nor is a response expected when a request message contains all of the required information. For example, some types of data entry may not require a response since the user is inputting information and may not care about a response.
The envelope in which a SOAP message travels, however, may provide more than just a oneway transfer path. For example, when a developer encases a SOAP message within an HTTP envelope, the request and response both use the same connection. The connection is created and maintained by HTTP, not by SOAP. Consequently, the connection follows the HTTP way