

Visual CSharp .NET Developer's Handbook (2002) [eng]
.pdf// Create a StringBuilder |
object and a value. |
|
StringBuilder |
MyString = |
new StringBuilder("Number Formats:\r\n"); |
float |
NewFloat = 1004.5F; |
|
int |
NewInt = 1005; |
|
// Append float values to the StringBuilder. MyString.Append("\r\nFrom Float:\r\n"); MyString.AppendFormat("Custom Format: {0:#,###.0000}\r\n",
NewFloat); MyString.AppendFormat("Currency Format: {0:C}\r\n", NewFloat); MyString.AppendFormat("Exponential Format 1: {0:E}<End>\r\n",
NewFloat); MyString.AppendFormat("Exponential Format 2: {0, 20:E}<End>\r\n",
NewFloat); MyString.AppendFormat("Exponential Format 3: {0, -20:E}<End>\r\n",
NewFloat);
MyString.AppendFormat("Fixed Point Format: {0:F}\r\n", NewFloat); MyString.AppendFormat("General Format: {0:G}\r\n", NewFloat); MyString.AppendFormat("Numeric Format: {0:N}\r\n", NewFloat); MyString.AppendFormat("Percentage Format: {0:P}\r\n", NewFloat);
//Append int values to the StringBuilder. MyString.Append("\r\nFrom Int:\r\n"); MyString.AppendFormat("Custom Format: {0:#,###.0000}\r\n", NewInt); MyString.AppendFormat("Decimal Format: {0:D}\r\n", NewInt); MyString.AppendFormat("Hexadecimal Format: {0:X}\r\n", NewInt);
//Display the result.
MessageBox.Show(MyString.ToString(), "AppendFormat() Output", MessageBoxButtons.OK, MessageBoxIcon.Information);
}
This is just a small sampling of the formatting methods you can use with StringBuilder. The custom format is especially useful and you can perform some tricks with the standard formatting methods. Figure 13.9 shows the output from this example. Notice how the various output values look.
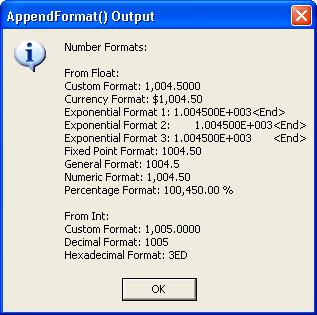
Figure 13.9: The StringBuilder object provides more than a few methods for formatting data output.
One of the more important techniques you can learn is defining the number of digits an entry will consume. Look at the three Exponential Format entries in Figure 13.9. The first entry shows what happens if you use the E format by itself. The second entry shows the effects of right justification—the entry will consume 20 digits worth of space, but the padding appears on the left side. Likewise, the third entry shows the effects of left justification. In this case, the padding appears on the right side of the number.
Where Do You Go From Here?
Database technology is an essential part of every business today. In fact, database technology is an essential part of many home installations too. Over the last three chapters, we've looked at the four essential database technologies that you'll use with .NET. More database technologies will likely appear on the horizon as technology changes, but for now, you've seen what Microsoft has to offer.
This chapter has helped tie up some loose ends with Visual Studio .NET database support. You've learned the difference between a Dataset and a DataReader and how each object can help you create applications. You've also learned about the DataView object and how it can make the job of displaying data easier. Obviously, we've only scratched the surface of this topic. You'll definitely want to visit the websites listed in various places in the chapter, as well as try some of the performance techniques in your own code. Make sure you spend plenty of time experimenting with the new database features that the .NET Framework has to offer before you begin your first project.
Chapter 14 begins a series of chapters that discuss remote communications, distributed application programming scenarios, and some of the difficult requirements for working with partners over an Internet connection. In this chapter, we'll discuss programming strategies for Internet Information Server (IIS). The chapter will show you how to create web applications (those that serve data to end users directly) and web services (mini-applications that provide services to other applications on the Internet). Both technologies are exciting because they
expand on what you as a developer can do when writing applications for use by those in your company, clients, and partners.
Part IV: Distributed Application
Development with C#
Chapter List
Chapter 14: Working with Internet Information Server
Chapter 15: ASP and ASP.NET Application Development
Chapter 16: XML and SOAP Application Development
Chapter 17: PDA Application Development
Chapter 14: Working with Internet Information Server
Overview
Internet Information Server (IIS) represents part of the Web portion of Microsoft's development strategy. Over the years, developers have used a myriad of technologies to work with Microsoft's web server. For example, Microsoft originally introduced the Internet Server Application Programming Interface (ISAPI) as a means for creating robust web applications. The only problem with these early attempts is that they required a knowledgeable developer. In addition, the complex technology was difficult to modify and debug, resulting in a high level of frustration for developers.
Microsoft finally hit on a popular idea when it introduced Active Server Pages (ASP), which is a technology that relies on scripting instead of native code. The use of interpreted text files does impose a performance penalty, but most developers find the ease of modification and troubleshooting well worth the price. This chapter will examine the role of various Microsoft technologies in making IIS a useful development platform. Of course, this is just the first look at web technology—we'll discuss both ASP and ASP.NET in greater detail in Chapter 15, and you'll learn about other web technologies in Chapter 16.
Note Due to differences in machine and web server configuration, some or all of the examples in this chapter may require configuration adjustments to run on your system. In some cases, you'll want to follow the instructions for creating the example and simply copy the source code from the existing projects on the CD. Each dual machine project will include folders for both the server side and the local code, in order to make it easier to determine where each type of code should appear on your system.
Working with Web Applications
Web applications are a first step in distributed application development for many programmers. A web application enables the developer to begin working in the distributed environment without creating a lot of code. In addition, web applications provide almost instant feedback, which helps a developer locate and fix errors quickly during the learning
process. Finally, many companies seek to support users on the road during their initial foray into distributed application development, so web applications form the basis of these initial efforts.
Whatever your reason for working with web applications, Visual Studio .NET provides a wealth of resources for creating them. The first ASP.NET example for the book actually appears in the "Active Server Pages" section of Chapter 2. This simple example showed some basics of web page creation. Of course, it's an extremely basic example, so this section builds on what we've discussed in the past.
Note The term web application is going to be new for many developers and somewhat confusing, as well, because many other web terms are so ill-defined. Consequently, it's important to differentiate between a web application and a web service. For the purposes of this book, a web application always provides a complete solution to a computing problem and includes some type of user interface. In short, a web application is simply an application that executes across the Internet. On the other hand, a web service is a component of a larger application. The component might be part of a service offered to another company, or it might fulfill some internal needs for your company. The bottom line is that a web service is only part of a computing solution. Obviously, my definition won't always match that of other developers or the media, so you need to consider what someone means when they use the terms web application or web service.
The following sections explore several types of web applications—applications that will do more than just say "Hello World" when you try them out. You'll learn about some of the capabilities that web applications have and how you can use them to support both in-house users and users on the road. Most importantly, you'll learn about the features that Visual Studio .NET provides for web application development.
Simple Empty Web Application Example
One of the first web projects that developers will try after the requisite "Hello World" example is the Empty Web Project, because it provides a blank canvas a developer can use to experiment. Yes, you have to add all of the files manually, but using this project also frees you from any preconceptions fostered by other project types. You can add and remove items as desired, just to see what effect they have on the project and final application. In addition, this project begins teaching you about dependencies between applications elements. (You'll find the source for this example in the \Chapter 14\EmptyWeb folder on the CD.)
Note Some of the projects in this chapter aren't available to users of the Standard Edition of Visual Studio .NET. This version doesn't include support for either the Empty Web Project or the Web Control Library. In short, you can use the Standard Edition to create standard ASP.NET projects, but you can't extend it in other ways.
As developers become more advanced, they also turn to this project because it enables them to configure the project in any way needed in order to meet specific application objectives. This is the use of the Empty Web Project that Microsoft concentrates on for the most part.
The Empty Web Project does help an advanced developer create complex projects, but don't limit yourself to this particular view of the project.
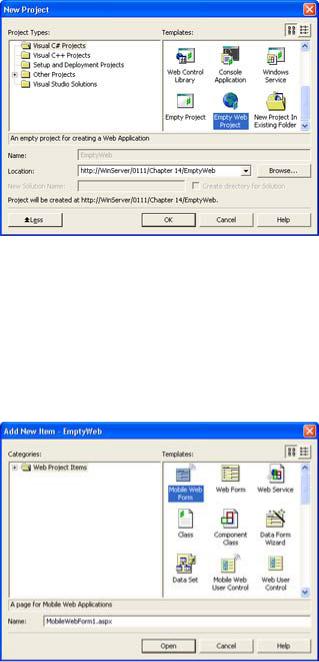
Like most of the web projects you'll create, the Empty Web Project resides on a web server. When you select the Empty Web Project entry in the New Project dialog box, the IDE will ask you to provide a URL for the new project, as shown in Figure 14.1. Enter a location and click OK to create the project. What you'll see is literally an empty project—one without any extras.
Figure 14.1: Most web projects begin by asking for a project location on the web server.
The first order of business is to add something to the project. To perform this task, right-click the project name (EmptyWeb) in Solution Explorer and choose Add → Add New Item from the context menu. You'll see an Add New Item dialog box similar to the one shown in Figure 14.2. This dialog contains a list of the major components of any web application—including those that don't rely on ASP.NET. For example, you can use this project to build a simple web page using the HTML Page item or add frame support using the Frameset item. The point is that you can build whatever you'd like using the Empty Web Project.
Figure 14.2: The Add New Item dialog box will contain a list of web items that Visual Studio .NET supports.
Because this is a simple project, the example includes an HTML Page item (if for no other reason than to show that Visual Studio .NET can support the mundane as easily as it can support the esoteric projects that Microsoft's marketing department keeps pushing). This is the only time you'll see old technology in the chapter. However, it's important to realize that old technology is still viable and quite useful for static information. Once you add the HTML
page, you'll see a Designer display similar to the one you'd see for any web form. Of course, the controls you'll see in the Toolbox are limited to those that a simple HTML page will support.
Tip You might wonder why we're wasting time with such a simple project. A project such as this one serves more than one purpose. You can use it to learn what Visual Studio provides in the way of application support. This is also a good project to test the server connection, because there's little that can go wrong. Adding an error to the code enables you to check the remote debugging connection with the server (a requirement for complex projects). Make sure you check the various IDE features as you debug the error using the remote connection. Try the Command Window and other application features. Make sure the application environment automatically detects the open Visual Studio
.NET session and offers to use it for debugging purposes. Simple projects offer an opportunity to test development options, the development environment, and your system setup.
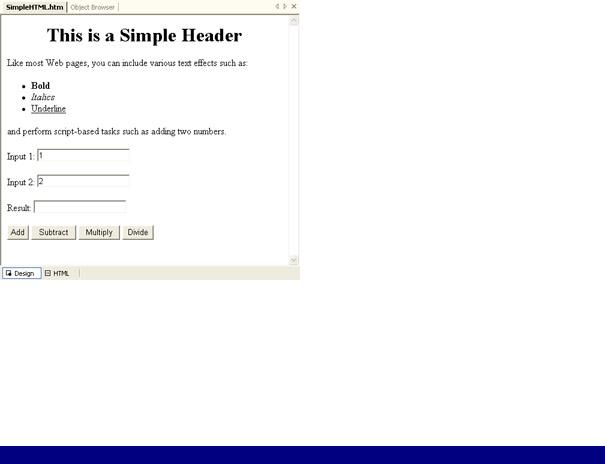
Now that we have a sample HTML page to use, it's time to do something with it. Figure 14.3 shows the simple layout for this example. Notice that it's just a simple calculator, but we'll need to add some script to make it functional.
Figure 14.3: You can even create simple web pages with Visual Studio .NET.
There are a number of ways to interact with the IDE, but you'll find that double-clicking a button creates an OnClick() event handler for it. Interestingly enough, the IDE does provide a list of events that the various objects will support, so you'll need to determine the level of support from the JScript reference contained in the help files. Listing 14.1 shows the simple source code for this example.
Listing 14.1: The Code for the Four-Function Calculator Web Page
function btnAdd_onclick() {
//Convert the inputs to numbers. Value1 = parseInt(Input1.value); Value2 = parseInt(Input2.value);
//Return a result.

Result.value = Value1 + Value2;
}
function btnSubtract_onclick() {
//Convert the inputs to numbers. Value1 = parseInt(Input1.value); Value2 = parseInt(Input2.value);
//Return a result.
Result.value = Value1 - Value2;
}
function btnMultiply_onclick() {
//Convert the inputs to numbers. Value1 = parseInt(Input1.value); Value2 = parseInt(Input2.value);
//Return a result.
Result.value = Value1 * Value2;
}
function btnDivide_onclick() {
//Convert the inputs to numbers. Value1 = parseInt(Input1.value); Value2 = parseInt(Input2.value);
//Return a result.
Result.value = Value1 / Value2;
}
As you can see, this is simple JScript code that performs the requested math function and returns it to the web page. The point is that you can create code easily using this technique. The IDE provides everything required to work on old projects as well as new.
Remote Access Database Example
Web applications don't commonly consist solely of a little text and a few controls that exercise simple JScript code. (Although, I do use such a website for converting between metric and English values—check the Unit Conversion Calculators site at http://www.graniterock.com/calculators/calcconv.htm for details.) This section looks at an application that most developers will work with, the database application. You'll find the source code for this example in the \Chapter 14\RemoteDB folder of the CD.
Configuring the Grid View
A great-looking database web project begins with the project configuration. The following steps show you how to configure a project based on the movie database we've used in previous chapters. You'll find the scripts and data required to create the database in the \Chapter 12\Data folder on the CD.
1.Create an ASP.NET Web Application project. The example uses a name of RemoteDB, but you can use any name you'd like.
2.Use Sever Explorer to locate the ExistingMovies table of the MovieGuide database on your database server. Right-drag the ExistingMovies table to the web form in order to generate a connection and data adapter. Name the two objects MovieConnect and MovieDA.
3.Generate a dataset for the database. Use MovieDS as the dataset name. You'll see the movieDS1 dataset object appear in the Web Form view. At this point, you have everything needed to create a connection to the database. We'll create a Grid view of the application to begin.
4.Add a Label and a DataGrid to the form. Rename the DataGrid as MovieDG. These two controls are all you'll need to display the data for now.
5.Type Welcome to the Movie Guide in the Text property of Label1. Type Arial, X- Large in the Font property for Label 1 (or make the appropriate selections in the property listing).
6.Set the AllowSorting property of MovieDG to True. Select movieDS1 in the DataSource property, ExistingMovies in the DataMember property, and Name in the DataKeyField property.
The view is essentially set up and ready for viewing. Remember from previous database examples, though, that you need to add some code to fill the dataset with information. Web applications also require that you bind MovieDG to the data it will display. Modify the Page_Load() method as shown below to activate the view.
private void Page_Load(object sender, System.EventArgs e)
{
//Fill the dataset. MovieDA.Fill(movieDS1);
//Update the data grid. MovieDG.DataBind();
}
What you'll see, at this point, is something that most website developers would want to avoid. For one thing, there's too much data to display in the typical browser window. In addition, the field names are directly copied from the database table and not particularly user friendly.
Finally, the IsIn field uses True and False to display the availability of movies—hardly useful for anyone looking for information. Fortunately, the vast majority of the required changes don't require any coding—you can configure them using dialog box entries.
The Columns property of MovieDG is a collection that you access by clicking the ellipsis button. You'll see a MovieDG Properties dialog box similar to the one shown in Figure 14.4. (The figure shows the properties dialog in a configured state.)
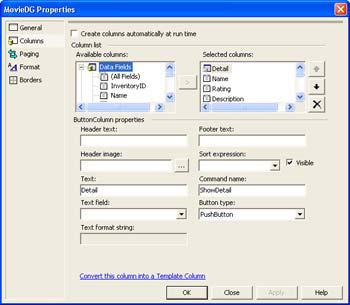
Figure 14.4: The MovieDG Properties dialog helps you configure the columns for the Grid view display.
You'll want to clear the Create Columns Automatically at Runtime option. Otherwise, the IDE assumes you want to use the columns as they appear in the database. Next, select each of the fields in turn and click the right arrow to move them into the Selected Columns list. Of course, you don't need to make all of the fields visible, so it's important to remove check boxes from fields that we'll use for the Detail view but won't need for the Grid view display. The example makes the Name, Rating, LeadActor, LeadActress, SupportingCast, Format, and IsIn data fields visible.
It's important to include a method for selecting a row. When a user selects a row, we want to create a Detail view so they can see all of the information for that row. Scroll down the list of Available Columns and you'll see a Button Column option. Select the Select suboption, then click the right arrow. You'll see the button added to the Select Columns list. Move the Select button to the top of the list using the up arrow.
The IsIn column presents special problems because it doesn't lend itself to friendly text output—at least not without extensive coding. However, if you click Convert this Column into a Template Column, you'll find that you can change the presentation into a perfectly acceptable check box. Make sure you select IsIn in the Sort Expression field or the user won't be able to sort by this column. At this point, the data grid is configured and you can click OK.
At this point, you're going to have to perform some coding to make the IsIn column work correctly. Click HTML so you can view the code for the form. Notice the two entries within the <asp:TemplateColumn> tag. You'll need to modify the <ItemTemplate> tag to use a check box. Since this example won't include editing capability, you can remove the <EditTemplate> tag. The new entry should look like this:
<asp:TemplateColumn SortExpression="IsIn" HeaderText="Is It In?"> <ItemTemplate>
<asp:CheckBox id=CheckBox1 runat="server"
Checked='<%# DataBinder.Eval(Container, "DataItem.IsIn") %>'> </asp:CheckBox>
</ItemTemplate>
</asp:TemplateColumn>
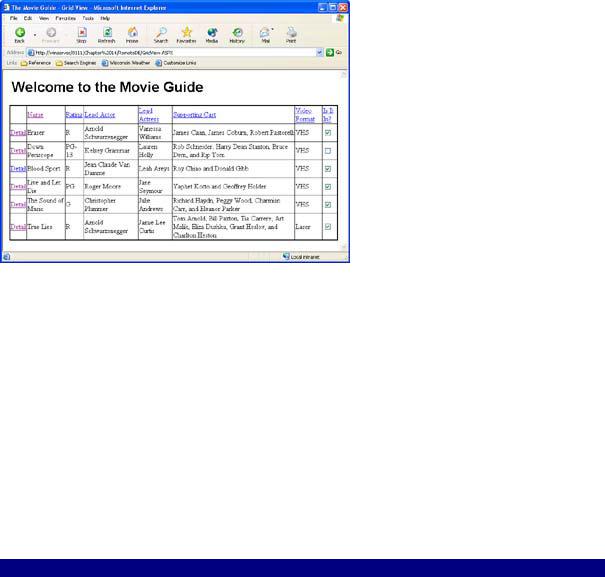
Notice that the Checked value isn't equal to True or False—it's equal to the output of the DataBinder.Eval() method, which returns True or False based on the content of the DataItem.IsIn field. This is the common method for creating a connection between a Template Column and the underlying database. Figure 14.5 shows the completed Grid view presentation. Of course, we still need to make the Detail buttons functional.
Figure 14.5: The completed Grid view presents an overview of the movie that will display well in most browsers.
Coding the Detail Button
The Detail button requires the application to transfer control from one web page to another. Unlike a form in a desktop application, transferring between pages on a website isn't always easy and there's always the matter of data to consider. However, ASP.NET does reduce the programming you'll need to do by performing some tasks in the background.
You'll need to add an event handler for the ItemCommand() event for MovieDG. This event fires whenever the user clicks a control on the grid. Because there's only one control to consider (the Detail link), coding is relatively easy. Listing 14.2 shows the code you'll need to transfer control to the detail view.
Listing 14.2: Grid View Detail Button Source Code
private void MovieDG_ItemCommand(object source, System.Web.UI.WebControls.DataGridCommandEventArgs e)
{
//Create cookies for each of the values stored in the DataGrid,
//even those values not currently displayed on screen. Response.SetCookie(
new HttpCookie("Name", e.Item.Cells[1].Text)); Response.SetCookie(
new HttpCookie("Rating", e.Item.Cells[2].Text)); Response.SetCookie(
new HttpCookie("Description", e.Item.Cells[3].Text)); Response.SetCookie(
new HttpCookie("LeadActor", e.Item.Cells[4].Text)); Response.SetCookie(