

Visual CSharp .NET Developer's Handbook (2002) [eng]
.pdf// Fire the DataChanged event. DataChanged();
}
private void GoPrevious(object sender, System.EventArgs e)
{
//Move to the next record. DoPrevious();
//Fill the AddrDataGrid variables. ExchangeFill();
//Fire the DataChanged event. DataChanged();
}
private void GoNext(object sender, System.EventArgs e)
{
//Move to the next record. DoNext();
//Fill the AddrDataGrid variables. ExchangeFill();
//Fire the DataChanged event. DataChanged();
}
private void GoLast(object sender, System.EventArgs e)
{
//Move to the next record. DoLast();
//Fill the AddrDataGrid variables. ExchangeFill();
//Fire the DataChanged event. DataChanged();
}
The code begins by creating the DataChangeDelegate delegate and the DataChanged event. Notice that both DataChangeDelegate and DataChanged are public so the DetailView class can access them. In addition, the DataChanged event is static, making it accessible directly from the GridView class.
Notice that each event handler performs three steps. First, it moves the record pointer. Second, it fills the static variables with data. Third, it fires the DataChanged event so the DetailView class knows that a data update occurred. This code brings up the question of which event it handles. You can make the events of the pushbuttons on the DetailView form public by changing their Modifiers property to Public. The AddrDataGrid_DoubleClick() method creates the connection to the DetailView class using the following code:
// Create event handlers for the record movement keys. DetailDlg.btnFirst.Click += new EventHandler(GoFirst); DetailDlg.btnPrevious.Click += new EventHandler(GoPrevious); DetailDlg.btnNext.Click += new EventHandler(GoNext); DetailDlg.btnLast.Click += new EventHandler(GoLast);
Whenever the user clicks a record movement button in the DetailView (DetailDlg), it actually passes control to the appropriate event in the GridView code, shown in Listing 11.7. The DataChanged() event fires and passes control to the ExchangeData() method in the DetailView class, which then updates the detail form.
There's one more synchronization item to consider. What happens if the user types a new value into the detail form? If that change doesn't appear in the Grid view, then the change is lost. By now, you should know that the first step in resolving this issue is to change the Modifiers property of all the data entry fields to Public. Once the fields are public, you can access their TextChanged event as shown here:
//Create event handlers for the data change events. DetailDlg.txtFirst.TextChanged +=
new EventHandler(FirstChanged);
//See the source code CD for additional code.
//
DetailDlg.txtNotes.TextChanged += new EventHandler(NotesChanged);
You'll add this code to the AddrDataGrid_DoubleClick() method so that the text change events occur as soon as the DetailDlg form appears on screen. Note that the TextChanged event distinguishes between changes the user makes and those made by application code. In other words, you won't need any special code to detect updates made by the ExchangeData() method.
This brings us to the final piece of synchronization code for this example. The changes in the Detail view must appear within the Grid view. We've already created connections to the event handlers in the GridView class for the Detail view. Here's an example of the most common method for handling the changes.
private void FirstChanged(object sender, System.EventArgs e)
{
AddrDataGrid[AddrDataGrid.CurrentCell.RowNumber, 0] = DetailDlg.txtFirst.Text;
}
As you can see, this technique works fine as long as you're working with text. It even works well with bool and int values. However, it won't work with date values. To transfer a date, you must validate the date value first as shown here:
private void ContactedChanged(object sender, System.EventArgs e)
{
//The user might not enter a valid date, so we need to
//verify the date.
DateTime TempDate; try
{
// Create a temporary date holder.
TempDate = DateTime.Parse(DetailDlg.txtContacted.Text);
}
catch
{
// If the date is invalid, return without making a change. return;

}
// Otherwise, make the appropriate change. AddrDataGrid[AddrDataGrid.CurrentCell.RowNumber, 14] = TempDate;
}
As you can see, if the Detail view sends an invalid date, the event handler will return rather than report an error. Notice the data conversion that occurs every time the Detail view sends a value. This conversion is important because the event handler receives a text value, when it really needs a date value. When the user does provide a valid date, the event handler stores the converted value in the data grid.
Writing an ODBC.NET Application
The actual mechanics of the ODBC.NET application are the same as the OLE-DB application we just discussed. For example, you'll experience the same synchronization issues between the Grid view and the Detail view. However, the ODBC.NET namespace doesn't provide the same level of automation as the OLE-DB namespace, so you'll need to perform additional configuration.
Note This section of the chapter discusses the additional configuration required for an ODBC.NET application. We won't discuss elements that are the same as the OLE-DB equivalent application. You'll find the full source code for this example in the \Chapter 11\ODBCNET folder on the CD.
Let's begin with the objects that you'll use. Like the previous example, you'll need a connection, data adapter, and data set. However, you'll use the ODBC versions of these objects, which means adding them to the toolbox. In addition, you'll need to configure all of these objects by hand. The data adapter requires four commands: delete, insert, select, and update. You'll need to configure all four commands by hand using the OdbcCommand object. The example uses the objects shown in Figure 11.15.
Figure 11.15: An ODBC.NET application relies heavily on manually configured components.
AddressConnect is the first object you need to configure. All you need to change, in this case, is the ConnectionString property. Type DSN=Address Database in the field, and you'll have everything needed to create the connection.
Create the four commands next. The easiest command to configure is SelectData. Select AddressConnect in the Connection property. Type Select * From Address in the CommandText property. This is a SQL statement that selects all of the data from the Address table in the database pointed to by AddressConnect. If you want to order the data in a certain way, you'd need to add the Order By clause and add the name of one or more fields that you want to use for sorting.
The InsertData command object is the next most difficult command to configure. In this case, we don't know what data the user will want to insert into the table in advance, so we need to create some parameters that the application will use to pass the data to the database. You
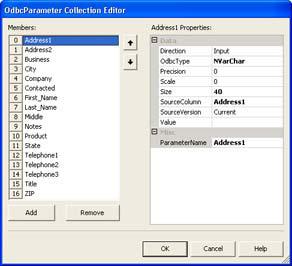
create parameters as a collection and they must appear in the order in which you plan to use them. The order is an absolute. You can't do anything later to change the order in the command, so the parameters must appear in the correct order. Figure 11.16 shows the parameters used for this example—there's one parameter for each field in the table.
Figure 11.16: Make certain that you place the parameters for your command in the proper order.
Note Make certain you select the proper connection in the Connection property for all four commands. Otherwise, the command will fail.
You'll need to know a few bits of information to make some of the entries work properly. ODBC.NET doesn't support a bool type, so you'll use the bit type for Boolean values instead. Memo fields use the standard character field type. However, you won't provide a Size property value. You must supply a SourceColumn property value for any value that you want to pass from the data grid. The Value property is always blank, unless you want to provide a calculated value as input.
The CommandText property value is a little longer this time. Type INSERT INTO
Address(Address1, Address2, Business, City, Company, Contacted, First_Name, Last_Name, Middle, Notes, Product, State, Telephone1, Telephone2, Telephone3, Title, ZIP) VALUES (?, ?, ?, ?, ?, ?, ?, ?, ?, ?, ?, ?, ?, ?, ?, ?, ?) to provide the complete command. This command tells the database to insert a new record with the following fields and the associated field values. The field names must follow the same order as the parameter list shown in Figure 11.16.
The DeleteData command is similar to the InsertData command in that you need to use input parameters. However, the properties are different this time. In most cases, you only need to provide the list of fields that make up the primary key, since the primary key is supposed to point to a unique value in the table. Some developers provide a full list of fields in order to ensure only one record is deleted. The example uses the first method, it relies on the unique value of the primary key to ensure that only one entry in the database is deleted. This means creating three parameter entries for the Last_Name, First_Name, and Company fields. Because you have fewer properties to consider, the CommandText property value is much shorter this time: DELETE FROM Address WHERE (Last_Name = ?) AND (First_Name = ?) AND (Company = ?). Make sure you use the parenthesis as noted to ensure the database interprets the delete command correctly.
The UpdateData command is unique in that it requires multiple versions of the same parameter. You need to know both the current and the original value of some fields in order to update the database correctly. If you don't identify the record correct, the database will attempt to change the value of every record to match the user's input, resulting in errors. Like the DeleteData command, you can generally identify a unique record for the UpdateData command using the primary key fields. You'll need to change the SourceVersion property for the original values to Original. Make sure you identify the original values by using a unique ParameterName property value such as Original_Last_Name. The CommandText property value for this command is UPDATE Address SET Address1 = ?, Address2 = ?, Business =
?, City = ?, Company = ?, Contacted = ?, First_Name = ?, Last_Name = ?, Middle = ?, Notes = ?, Product = ?, State = ?, Telephone1 = ?, Telephone2 = ?, Telephone3 = ?, Title = ?, ZIP = ? WHERE (Last_Name = ?) AND (First_Name = ?) AND (Company = ?).
We now have everything needed to create a data adapter. The AddressDA data adapter doesn't require much in the way of configuration. All you need to do is add the four commands to the
DeleteCommand, InsertCommand, SelectCommand, and UpdateCommand properties.
If you were wondering about automated dataset generation, it won't happen when using ODBC.NET. As with everything else, you need to manually configure a dataset for this application. Configuration isn't difficult. All you need to do is specify a name for the DataSetName property and create a Tables property collection. The example uses a
DataSetName value of AddressDataSet.
Setting up the Tables property does require a bit more work. The following steps lead you through the process of setting up a table.
1.Click the ellipses next to this property and you'll see a Tables Collection Editor.
2.Click Add. You'll see a new table added to the list. Type ADDRESS in the TableName property and Address in the (Name) property. This creates a table similar to the one used for the OLE-DB example. Now we have to define columns for the table.
3.Click the ellipses in the Columns property. You'll see a Columns Collection Editor dialog. Figure 11.17 shows the list of columns for this example and provides an example of how you need to fill out each column property. The six essential properties include Caption, ColumnName, DataType, DefaultValue, MaxLength, and (Name). You must also set the AllowDBNull property for every primary key or essential column to False. Otherwise, the user can enter a null value and cause an error.
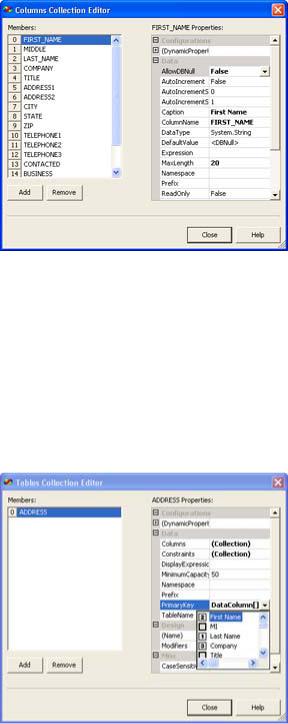
Figure 11.17: Define columns for each column in the table or query used for the dataset.
4.Click Close to close the Columns Collection Editor dialog. We can now define a primary key for the table. Defining a primary key helps display the data properly and can reduce the number of errors the user will experience by giving the ODBC provider cues about the database setup.
5.Click the PrimaryKey property drop-down list box. You'll see a list of columns defined for the table as shown in Figure 11.18. Click next to the gray square for each column you want to add to the primary key. The IDE will number each entry in order. The first key value is considered first when ordering the data.
Figure 11.18: The PrimaryKey property enables you to define the primary key for your table or query.
6.Click Close to close the Tables Collection Editor dialog. The connection, data adapter, and dataset are now configured for use.
As previously mentioned, the ODBC version of the address database application works very much like the OLE-DB version. There's only one small quirk that you need to consider. Because of the way we created the dataset, you need to change the Fill() and Update() methods as shown here to work with the table we've just set up in the dataset.

AddressDA.Fill(AddressData, "Address");
AddressDA.Update(AddressData, "Address");
Working with Crystal Reports
Previously, we looked at how you could create a simple report using drawing commands. Obviously, even a simple report isn't for the faint of heart, and the complex reports that management often requires may prove nigh on to impossible to create within a reasonable timeframe. Unfortunately, the reports your application outputs will form the basis of management's opinion of your application in many cases. That's why a product like Crystal Reports is so important. It enables you to create complex reports in a modicum of time in many cases. The tradeoff is application overhead, resource usage, and size. That's why there's also still a place for custom print routines.
Note The example in this section uses the OLE-DB example we created earlier as a starting point. You'll find the updated code in the \Chapter 11\CrystalReports folder on the CD.
Using Crystal Reports is relatively easy. Begin by right-clicking the Project entry in Solution Explorer and selecting the Add → Add New Item command to display the Add New Item dialog box. Select the Crystal Report icon, type a name for the report (the example uses MyReport) and click Open. (If this is your first time using Crystal Reports, the product will ask you to perform a registration—you can choose to perform the registration or not at this point.) If you use the Report Expert, the Crystal Report Gallery shown in Figure 11.19 enables you to select from several project types (the recommended choice for most reports). You can also choose to create a blank project or start a new report based on an existing report.
Figure 11.19: The Crystal Report Gallery is the starting point for report projects.
The example application will create a Standard Report using the Report Expert. (You'll also find a Mail Label report included on the companion CD.) The following steps tell how to use the Report Expert to create a Standard Report.
1.Select the Report Expert and Standard Report options in the Crystal Report Gallery, and then click OK. You'll see the Standard Report Expert shown in Figure 11.20. Note that the figure shows the dialog with the data source configured.
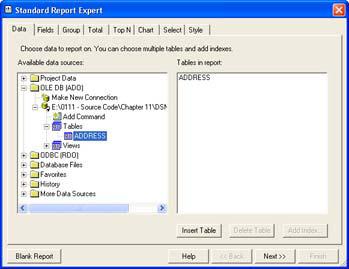
Figure 11.20: The first task is to choose a source of data for your report.
2.Create a new database connection using the Make New Connection option in the OLEDB folder if necessary. Otherwise, you'll see the needed connection as shown in Figure 11.20. Select the ADDRESS table entry and click Insert Table. The new table entry will appear in the Tables in Report pane.
3.Click Next. The Report Expert will ask which table fields you want to appear in the report. You can choose one or all of the fields. The fields will appear in the order shown in the Fields to Display pane when you create the report, so use the up and down arrows to position the fields as needed. The example uses all of the fields in the database except Company, which we'll use as a means for grouping information in the report.
Tip The Column Heading field on the Fields tab helps you to customize headings for each data item in the report. You can also add calculated data by clicking Formula.
4.Select the fields you want to use and ensure they appear in the order that you want them to appear in the report. The example report includes the user name first, title, address, telephone, and miscellaneous information in order. Click Next. The Report Expert will ask if you want to group report information.
5.Select one or more fields for grouping purposes. The example uses the Company field for grouping. At this point, there are a number of optional report entries you can make. The example doesn't include numeric information, so we don't need totals or graphs in the report. However, these features are available if you need them.
6.Click the Style tab. This tab contains a list of report styles. It also enables you to type a title for the report. Type Contact List Grouped by Company in the Title field. Select the Executive, Trailing Break style.
7.Click Finish. The Report Expert will create the report for you.
8.Rearrange the report elements as needed so each report element has enough space to print.
Of course, a report doesn't do much if you can't view it in some way. We'll add a new Windows form to the project. This form will contain a single component, the Crystal Report Viewer. You don't need to configure anything for the report, except to set the Dock property
to Fill. The constructor for the form accepts a single input string that the code assigns to the Crystal Report Viewer like this:
ReportView.ReportSource = ReportName;
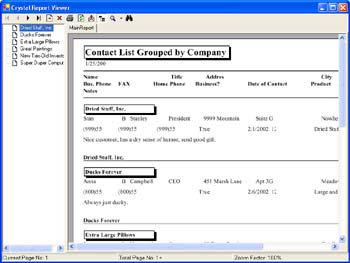
All you need to do now is create an instance of the dialog and pass it the name of the report you want to print as part of the constructor. The report must appear in the same directory as the application, or you'll need to provide a full path to the report. Figure 11.21 shows a typical Crystal Report.
Figure 11.21: Crystal Reports are easy and fast to create and the results speak for themselves.
Where Do You Go From Here?
This chapter has started you on your way to a better understanding of the database capabilities provided by C# and the .NET Framework. We've discussed both OLE-DB and ODBC applications for the Microsoft Access database. You've also learned about the power of both custom and Crystal Reports output.
Obviously, we haven't covered every aspect of database programming. More than a few authors have tried to discuss the topic in an entire book and failed. However, you do know enough to start creating database projects of your own. Try tables with other data formats and create applications that rely on more than one table. Using Access keeps everything local and helps you get around some of the problems that larger DBMSs can cause.
Chapter 12 will continue the database discussion using ADO. We'll begin using SQL Server 2000 for the examples in this chapter and you'll see examples of more complex database design.
Chapter 12: ADO Application Development
Overview
In Chapter 11, we looked at both OLE-DB and ODBC .NET application development for Microsoft Access databases. However, many developers don't use Access for their development projects and want something higher-level than OLE-DB, so they don't have to perform most of the work. ADO is one answer to this question. It enables you to perform data access tasks at a higher level. This chapter also uses SQL Server 2000 as the DBMS. SQL Server enables a developer to create enterprise-level database applications that will scale as needed.
This chapter shows you how to use more of the automation provided by Server Explorer to create applications quickly. The emphasis in this chapter is on development speed, reliability, and flexibility, rather than on supporting older applications, application size, or application speed, as was the focus in Chapter 11. Because processing cycles are so cheap today and developer time is so precious, many developers are looking for ways to improve productivity despite the loss of a little speed and increase in application size. This chapter has the answers you're seeking.
Using Server Explorer
Server Explorer replaces a lot of tools that you used to get as extras on the Visual Studio disk. It also creates new tools for exploring your network in ways that you might not have thought possible in the past. In fact, the name Server Explorer is a bit of a misnomer, because Server Explorer provides access to any resource on any machine to which you have access. This feature alone makes using the Visual Studio .NET IDE more useful than any previous IDE you might have used. The ability to explore and use resources without leaving the IDE makes application development a lot easier. We've already seen one way to use Server Explorer in the OLE-DB example in Chapter 10. This section provides an in-depth view of this essential tool.
Server Explorer shares the same area of your IDE as the Toolbox. Click on the upper icon and you'll see Server Explorer; click on the lower icon and the Toolbox appears. Figure 12.1 shows a typical example of the Server Explorer with connections to two machines. Because I have administrator privileges on both machines, all of the resources of both machines are at my disposal.