

Visual CSharp .NET Developer's Handbook (2002) [eng]
.pdfthe value of the Width and Height fields. This graphic method of changing window size reduces the number of times you have to recompile the help file to take care of aesthetic needs.
There are situations where you may not want to add all of the default buttons normally provided by Windows Help to your help file. For example, the Browser buttons aren't important if you don't define a browse (+ footnote) in one of your RTF files. The Buttons tab shown in Figure 10.6 permits you to define the buttons used with your help window. Note that Microsoft Help Workshop automatically disables and enables options as needed for specific window types.
Figure 10.6: Use the Buttons tab options to define which buttons appear on the help screen.
The Color tab contains two fields: Nonscrolling Area Color and Topic Area Color. Each has a Change button. Click Change to display a color palette. Selecting a different color from the palette changes the appearance of the help window.
The Macros tab displays the macros defined for your help file. The Main window always uses the macros in the CONFIG section of the project file. The macros you see in this section are self-executing—that's why Help Workshop adds the macros in the CONFIG section to the Main window. Adding a new macro to the Main window always adds it to the CONFIG section of the help project file. Adding macros to other windows changes the way those windows appear in comparison to the Main window. For example, if you add a browse to one of the ancillary windows, you might need to add macros to handle new conditions. Each ancillary window has a special CONFIG-<window name> section in the help project.
Mapping Help Topics
If you don't map the topic identifiers in your help file to a help context number, you can't attach context-sensitive help to the controls in your application. You'll see how this works in the section that follows on adding context-sensitive help to your application.
Adding a map is easy. Click Map to display the Map dialog. This is where you define the relationship between a topic identifier and a context number. The topic identifier is set equal to a help context number. It's followed by a comment that describes the entry.
There are many ways to keep the context numbers straight. I usually start at 1 and count up until I reach the last topic identifier for small help files. Large help files require something a bit more complex, or you'll find yourself reusing numbers. Use a threeor four-digit number in this case. The first two numbers are the position of the control or menu item described by the help context within the application. For example, the File menu is normally 01 and the Edit menu is 02. A description of the File → New command would receive a help context number of 0101, since the New option is usually the first entry on the File menu. I assign a value of 0001 to the first non-application topic. (For example, the glossary would fall into this category.) The first two numbers for a control on the form of an application would be one greater than the last menu item. I use the tab order for the last two numbers since it's unlikely that a label or other non-active component would ever appear in the help file.
Add a new map entry by clicking Add. You'll see the Add Map Entry dialog. This dialog contains three fields: topic identifier, mapped numeric value (help context number), and a comment. Fill out the three fields and click OK to add a new map to the project.
You'll want to include an HM file with your help file to reduce the amount of work you do and to provide a quick and easy method for checking your work. Nothing is more frustrating than to release a help file that you thought was complete at the time of testing but turns out to be missing one or more crucial entries after you release it. Click Include to include a file. You'll see an Include File dialog. This dialog provides a Browse button so you can search for your include file on the hard drive. The Browse button opens a standard Open dialog, just like the ones you've used with other applications.
Compiling Your Help File
Once you get a help project file put together, it's time to try to compile it. Click Save and Compile at the bottom of the Main window. The Help Workshop window will minimize while it compiles the help file. This allows you to work on something else (compiling a large help file can take a long time). Once the compilation is complete, you'll see a window similar to the one shown in Figure 10.7.
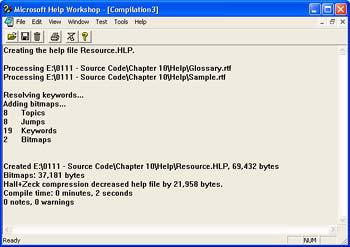
Figure 10.7: This compilation screen shows the current status of the help file and any error messages.
Figure 10.7 shows what happens when your help file compiles correctly. You'll see which files Microsoft Help Workshop processed, some statistics about the help file, the effects of compression, and the compile time. You'll also see notes if the help compiler found errors in the help files or associated project. (For example, you might see an error message for missing file maps or missing jumps.)
Working with Assemblies
The .NET way of development applications presents several new challenges when you want to distribute your application. For one thing, as we discussed previously, .NET avoids DLL hell by tying the application you create to a specific version of the .NET Framework. The same policy holds true for any public assemblies (those registered in the GAC) that you create for distribution with the application. The only problem is that the user might not have a copy of your version of the .NET Framework and public assemblies installed on their drive. We'll see in the "Creating a Distribution File" section that this change in development strategy means that your distribution disks will consume more space. The application package must include the common as well as the unique files in order to run.
Private assemblies require special handling as well. The installation program must install any private assemblies in the same directory as the application. Unlike previous development products, .NET looks for assemblies in specific locations. If it doesn't find the assembly, it won't load it and the application will fail. This means you can't place a private assembly in a central location and allow more than one application to use it. Each application must have its own copy of the private assembly.
Installation programs commonly use compressed files to save space on the distribution media. Windows must decompress any assemblies that appear in compressed form (such as a CAB file) into a temporary directory. The next step is to move the assembly to its final location. In the case of a public assembly, this means using a utility such as GACUtil to register the assembly in the GAC.
Another consideration is the use of strong names for public assemblies. (We discussed this issue in several places in Chapter 6.) Creating a strong name means signing it with a private key. Of course, you want to keep the private key in a safe place to ensure that no one else uses
it. This means the key might not always be in a convenient location for development. As a result, some developers will delay signing their assemblies—using a temporary key in place of a permanent one. When you distribute the application, you must ensure that all assemblies are signed using the private key.
Developing a Distribution Strategy
You have to consider many issues when creating an application package. The most important consideration for developers is the application environment. An in-house developer won't have the same concerns as someone who plans to deliver an application for use by someone else. For one thing, the in-house developer probably won't have much time to get an installation program together—time becomes a factor in most in-house situations.
This section looks at the three most common types of installation environments: corporate, shareware, and shrink-wrap. You'll likely fall into one of the three categories, but you may want to look at the other categories since they contain a lot of helpful tips and hints.
Corporate
Corporate programmers have the least to do to beautify their packaging and the most to do to customize it. Let's face it, the corporate programmer doesn't have to impress anyone with fancy graphics or impressive sound effects. A user-friendly and functional interface is enough.
The corporate programmer is often engaged in creating a custom application. It's common for custom applications, especially database applications, to require specialized files. You'll likely need custom settings as well. Creating a custom installation program that works on all the workstations in a corporate environment with little help from the programmer is quite an undertaking. Plan to spend a lot of time hand-tuning the installation program you create.
Media is another category where most corporate installation programs differ from the other two categories. Unless the company you're working for is living in the dark ages, you'll probably use a LAN for distribution purposes. Use this feature to your benefit to create the application package; select the most efficient storage method possible—a large LAN-based file.
Once you've packaged your application on the LAN, add an instruction to the main logon batch file for your server to install the program. The next time the user logs on, your logon batch file will check for the installed application. If it doesn't find the application, the batch file will call the installation program that you've placed on the LAN.
Tip The corporate setting is one place where using Universal Naming Convention (UNC) paths in place of standard drive identifiers comes in handy. Using a UNC path for the source directory ensures that everyone can access the required source files for your application without too much effort.
The following list has some other packaging issue suggestions to consider. Just select those that fit your programming style and organizational needs.
Absolute Preferences A shareware or shrink-wrap application author can't assume anything about the application environment. You don't have that problem. All you need to worry about is the differences between the machines on your network. If you set all the machines up the same way, you can assume a default destination. Using UNC paths means you can assume an absolute source since the server path name won't change. You can assume a certain amount about the workstation if your network is small and all the machines have similar capabilities. In sum, this means that you don't have to present the user with as many installation choices and you can substantially reduce the complexity of the installation program.
No Configuration Choices Needed Just about every shrink-wrap program offers you a choice between three installation configurations: Custom, Typical, and Compact. The Custom choice allows you to choose specific program elements; the Typical configuration is designed for desktop users; the Compact configuration is intended for people who own laptops. In most cases, you can limit your configuration options to two choices: Laptop (Compact) and Desktop (Typical). In fact, you may want to use those terms to keep user confusion to a minimum.
Shareware
Shareware programmers probably have the most challenging job when it comes to packaging their application. One of the main problems is installation size. Unlike the developer who has a high-speed network connection to use or who can distribute an application on CD, the shareware developer usually has to make do with a low-speed modem connection to a BBS, online service, or the Internet. It's hard to convince someone to download a huge file.
Note The file sizes in this section are guidelines only. The disk space or time that a potential user will invest in your product depends on many factors including perceived value and the current level of product exposure. For example, my favorite shareware graphics package takes up a whopping 7MB of hard disk space and is well over 1MB in size when compressed. I still download it because this program is well worth the investment.
Okay, so you're a little limited on space. How do you get around this problem? The key is in how you market your product. Most of the successful shareware products use the same graphics and sounds repeatedly. Instead of using one graphic for the installation program and a totally different graphic for the application itself, the shareware programmer is content to use the same graphic for both the installation program and the application. Using subtle programming techniques could allow you to use the application's icon in several places.
Can a shareware developer create installation programs without graphics or sound? Not likely. If you want someone to pay for the application you've created, you'll need to add a little polish. No one will pay for a drab application, even if it provides good functionality. Obviously, trying to weigh the amount of pizzazz a feature provides against the space it takes up is difficult.
Another problem that a shareware developer runs into is resources. Many shareware developers start out as one-person shops. The developer takes on consulting jobs and other ventures. Time isn't on your side, and it's unlikely you'll have an artist or sound person at your disposal to create the multimedia presentations provided by companies who create shrinkwrap applications. Most people are satisfied if they see a shareware product that's well
designed, space-conscious (consumes 10MB or less of hard disk space), and provides at least a modicum of polish.
We haven't yet discussed the biggest problem for shareware developers—compatibility. The installation program is the first place you'll have to deal with compatibility problems such as the level of installation support provided by various versions of Windows. For example, newer versions of Windows include support for MSI (Microsoft Installation) files and vendor information, while older versions of Windows still require the use of InstallShield in many situations. Differences in machine configurations come in place, with some installation programs performing a compatibility check before they do anything else. Corporate developers can get by with a minimum of machine checks and configuration options. Shrinkwrap developers come next—they can print a set of requirements on the box to ensure that no one will use their application without sufficient hardware. The shareware developer has no such guarantees. A user of your program could have just about any kind of machine ever made—including an old 8088 PC.
What does this lack of control mean? First, you'll have to build extra detection routines in your installation program to ensure that the client meets minimum hardware requirements. Users will rarely read the README file you provide (the one stating the minimum requirements for using the application) and are unlikely to pay attention to them if they do. When the installation fails, users are going to blame you, not their lack of attention. Therefore, you have to build in some type of hardware detection. You'll also need to include application configuration flexibility. For example, you may decide to let the user configure the application for text mode only and forgo those fancy graphics or sounds on an oldertechnology machine.
The shareware developer does have a few tricks for making the installation program easier to use. While the following list isn't inclusive of everything you could try, it does provide some ideas on what might work. You'll need to try a variety of packaging techniques with your application before you come up with something that works all the time.
Granular Packaging One way to get around hard disk-space and download-time problems is to package the application in several pieces. For example, you could place the main program in one package, the graphics in another, and the sounds in a third package. The users can choose what level of support they're willing to pay for in download time and hard disk space. This concept doesn't come without a price, though. You have to write your application to work without graphics and sounds—or whatever elements you decide to place in a separate package. Your installation program has to provide similar flexibility. It has to know what do to if a user decides to download one packaging element but not another.
Amplified Help We discussed the idea of creating separate packages for help files earlier in this chapter. One of the ways you can do this is to make a main and an amplifying help file. The main help file would contain explanations for basic commands, while the amplifying help file could contain user tutorials, macro language descriptions, and detailed command descriptions. Again, the user could decide what level of help to pay for in the form of download time and disk space.
Shrink-Wrap
This section concentrates on what you can learn from shrink-wrap vendors. One of the factors that set a shrink-wrap product apart from shareware is the size of the company producing the application. Larger software companies usually concentrate on one or more products and they have a large professional group of people to help put the packaging together. However, the average programmer can learn a few things by looking at these shrink-wrap packages.
I've taken notes whenever I installed a shrink-wrap or shareware product over the last few years. Recently, I decided to look over those notes. The results were surprising. For example, the previous section mentions using the installation program as a means to sell your product if you're a shareware vendor, since you have a captive audience and fewer sales resources at your disposal. It may surprise you to find that shrink-wrap software commonly uses the installation program for this purpose, but in a different way than a shareware vendor would use it. The user has already purchased the product they're installing, but how about add-on products? Shrink-wrap vendors commonly use the installation program to sell add-on products that relate to the application the user is installing.
Tip In many cases, large companies will supply demonstration versions of other products on the same CD as the product the user is currently installing. The installation program will often ask if the user would like to install these demonstration programs. This technique enables the vendor to use CD space more efficiently and advertise other products. The end user gains by having a better understanding of the vendor's product line.
Shrink-wrap software commonly tells the user what's new about the program during the installation process. They figured out long ago that most users don't read the README file, and the installation program is usually the last part of the product to get finished. The shrinkwrap vendor has a captive audience, so it uses the installation program to give users an overview of what they would learn if they'd actually read the README file.
Vendors pack shrink-wrap installation programs with lots of multimedia presentation materials. Even if you don't have the resources to duplicate the presentation provided by a shrink-wrap vendor, you can make notes to determine what works and what doesn't. Providing a smaller version of the same type of presentation in your installation program is one way to make it look more polished. Creating a nice-looking installation program won't make your application work better, but it will affect the user's perception of your application, which is a very important part of getting the user up and running with a minimum of support.
There are some negative lessons you can learn from shrink-wrap vendors as well. For example, you can make your installation program too complex to test thoroughly. I recently tried installing one product and found that the help screens for the program were for the previous version. The vendor had forgotten to update the screens as needed for the new version of its product. The result? Since the product didn't come with any printed documentation, I didn't have a clue as to whether I should install certain product features. If the vendor had tested the program fully, I would have had the information needed to make an informed feature installation decision.

Creating a Distribution File
Visual Studio .NET includes several projects for distributing your application. The easiest project is the Setup Wizard. This project leads you through the process of creating a simple distribution package that will work for most simple applications and a few of the complex application types. The following steps show how to use the Setup Wizard.
1.Start the Setup Wizard by selecting the Setup Wizard project in the Setup and Deployment Projects dialog box shown in Figure 10.8. Type a name for the project, then click OK. Note that the example uses a name of ResourceSetup1 and you'll find this project in the \Chapter 10\ResourceSetup1 folder on the CD. You'll see the Setup Wizard (Step 1 of 4) dialog box.
Figure 10.8: Visual Studio .NET provides several methods for creating an application package.
2.Click Next. The Setup Wizard will ask you to select a project type. The first set of radio buttons enables you to choose between a Windows (desktop) and a Web installation. Select between these two options if you want to create an installation file for a complete application. The second set of radio buttons lets you select between a MSI (Microsoft Installer) or a CAB file. The CAB file tends to be smaller, but doesn't offer the features and flexibility of an MSI file. Select between these two options to create an installation file for an application component, such as optional application features or common files used in more than one application. The example uses the Windows option.
Tip If you decide to use MSI file distribution for most of your projects, you'll want to install the Windows Installer SDK (http://msdn.microsoft.com/downloads/sample.asp?url=msdnfiles/027/001/530/msdncompositedoc.xml). The SDK includes several tools not found in Visual Studio .NET, including the ORCA tool used to modify the MSI database. In addition, the SDK contains a wealth of documentation about MSI files and presents a few concepts not found in the Visual Studio .NET documentation.
3.Select a project option, and then click Next. The Setup Wizard will ask which files you want to include in your project. You must select all of the files used for the application. This includes all private assemblies but no public assemblies. The
example uses the Resource.EXE file from Chapter 5 and the Resource.HLP file we created earlier in that chapter.
4.Select the files required for the project by clicking Add. Use the Remove button to remove any unneeded files. Click Next. The Setup Wizard will display a summary of your project. Make sure the summary includes all of the project files you'll need.
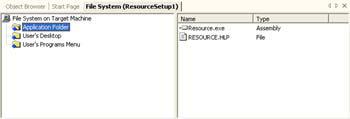
5.Click Finish. You'll see a File System window similar to the one shown in Figure 10.9. Notice that the Setup Wizard automatically creates three folders for application files. You can create other folders, rearrange the files, and otherwise set up the application as needed.
Figure 10.9: Even a simple installation program requires that you check the location of each installed file.
6.Arrange the files as required, and then compile the application.
If you compile the application at this point, you'll notice an error message stating that the package is missing support for the DOTNETFX.EXE file. This file contains the .NET Framework version required for your application. If you're designing a package for corporate use and know that everyone already has the .NET Framework installed, you can safely ignore this message. A shareware distributor will probably want to make the .NET Framework a separate download and definitely include it as a separate install. The elimination of the .NET Framework reduces the size of the installation package considerably. (In fact, a shareware developer will likely want to provide the MSI file alone and tell the user how to install by right-clicking the file.) Of course, a shrink-wrap developer will want to include the .NET Framework as part of the distribution disk and as part of the standard application installation.
You can compare a package that includes the .NET Framework to one that doesn't by looking at the \Chapter 10\ResourceSetup2 folder on the CD. This project does include support for the
.NET Framework. Adding this support is easy; just right-click dotnetfxredist_x86_enu.msm entry under the Detected Dependencies folder in Solution Explorer and clear the Exclude entry on the context menu. As an alternative, you can also create a custom merge module containing only the .NET Framework elements your application needs. Exercise care if you use this option, because assemblies are often interdependent.
Where Do You Go From Here?
This chapter has taught you about help files, packaging strategies, and the packaging methods provided by Visual Studio .NET. The art of packaging an application is one that many developers never learn. However, as you can see from this chapter, creating a good application package is important to ultimate user acceptance of your application.
Unfortunately, the art of creating an application package is highly subjective. A technique that works well for one application might not work particularly well for another. As a result, you need to perform actual user testing with the entire application package, including the help file.
This is one task you'll need to perform with each application you develop. It's also one of the areas where you'll constantly learn as you develop new applications.
Chapter 11 moves from working with individual applications and components to the larger world of the database. The database application is the most common application created by developers today, and there is no sign that another application type will take its place in the future. Databases come in all shapes and sizes; they store data in many ways and in many formats.
Part III: Database Application Development with C#
Chapter List
Chapter 11: Using Databases
Chapter 12: ADO Application Development
Chapter 13: ADO.NET Application Development
Chapter 11: Using Databases
Overview
Database applications represent the single largest application category that developers create today. In fact, database management has been a major category of application development almost from the time that the computer first appeared on the scene. Companies have huge quantities of data to manage, and computers provide the best way to perform that task efficiently.
Because databases represent such an important area of application development, they've also undergone the most significant amount of change. Every day someone comes out with a new database technology that promises better data protection, faster data transfer, and more efficient storage. Microsoft is no exception to the rule, which is why we'll look at so many database technologies in this chapter.
Of course, simply managing the data isn't enough. There are many people who will never use your database application, yet the impact of your application on their daily work is profound. Most of these people will judge the quality of your application by the reports that it outputs to the printer. This chapter will also discuss the issue of reports by showing how to work with Crystal Reports.
ODBC, ODBC.NET, OLE-DB, ADO, and ADO.NET Essentials
Microsoft has produced so many database technologies over the years that many of them have faded into obscurity—used by a few hardy souls who have to maintain existing applications. For example, those of you who rely on Data Access Objects (DAO) technology will need to move to something new if you want to work with .NET.