

Visual CSharp .NET Developer's Handbook (2002) [eng]
.pdfAs you can see, it's a simple read-only property. The property returns the type of the test. In this case, it's the MathCheckTest class. The example actually includes two classes, so you can see how the classes appear in the test engine. If you don't include this property, the test engine will claim that there aren't any tests—even if you've defined everything else correctly.
The test can be as complex or simple as you need in order to verify the functionality of the application. The simpler you can make the test, the better. You don't want errors in the test suite to hide errors in your code (or worse yet, tell you there are errors when its obvious the code is working as anticipated). Here's an example of a simple test method.
// Test the add function using a simple example. public void TestAdd()
{
string |
Expected |
= "5"; |
string |
Result = |
MathCheck.DoAdd("2", "3"); |
Assert(Expected.Equals(Result));
}
Sometimes you need two or more test methods to fully examine a method. For example, the DoDivide() method requires two tests as a minimum. First, you must examine the code for proper operation. Second, you must verify that the code can handle divide-by-zero scenarios. It's never a good idea to include both tests in one test method—use a single method for each test as shown in the example code.
Now that you know what the code looks like, let's see the code in action. When you first start the NUnitGUI application, you'll see a dialog containing fields for the Assembly File and the Test Fixture. Select an assembly file using the Browse button and you'll see the test suites the assembly contains in the Test Fixture field. Each test suite is a separate class and the name of the class appears in the field, as shown in Figure 13.3.
Figure 13.3: An application can contain more than one test suite, but each suite must appear in a separate class.
If you select a test suite and click Run, NUnitGUI will run all of the tests in that suite. However, you might only want to run one test in the suite. In this case, use the NUnit → Show Test Browser command to display the Show Tests dialog box shown in Figure 13.4. Highlight the individual test you want to run and click Run. The results of the individual test will appear in the main window as usual.
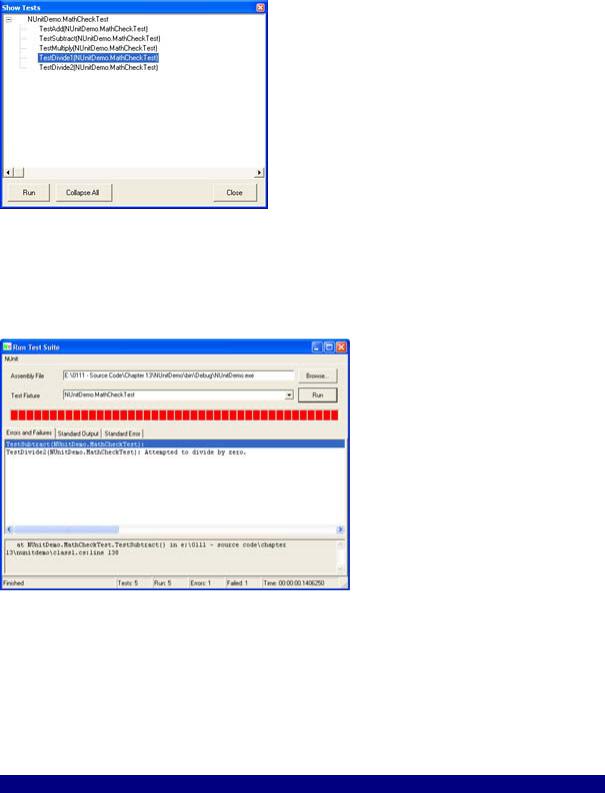
Figure 13.4: Use the Show Tests dialog box to select individual tests from a suite.
So, what happens when you run the tests? As the tests run, a bar will move across the window to show the test progress. If the tests run without error, you'll see a green bar on the main window; a red bar appears when the application has errors. Figure 13.5 shows a typical example of an application with errors.
Figure 13.5: This application contains two errors that the test suite found with ease using simple tests.
As you can see, the test found two errors. The first is the subtraction error that I mentioned earlier in the section. Notice that the lower pane of the main window provides you with enough information to locate the error in the source code. The second error is one of omission. The DoDivide() method lacks any means for detecting a divide-by-zero error. This second error points out that NUnit can help you find errors of commission, as well as errors of omission, given a good test suite.
Other Development Tools to Consider
Visual Studio .NET, like versions of Visual Studio before it, will rely heavily on third-party tools to enable the developer to perform certain tasks. For example, some developers find the profiling support in Visual Studio .NET lacking. Fortunately, DevPartner Profiler from Compuware Corporation enables you to perform a line-by-line analysis of your code. The best news is that this product is fully integrated with the Visual Studio .NET IDE, and you can
download it free. You'll find DevPartner Profiler at the Compuware website (http://www.compuware.com/products/numega/dps/profiler/).
Another developer of performance testing tools is Mercury Interactive. LoadRunner (http://www-svca.mercuryinteractive.com/products/loadrunner/) enables the developer to place various types of loads on a system. For example, you could simulate 1,000 network users and 200 Internet users to create a mixed execution environment. You receive feedback about the effects of the load on the system as a whole through performance monitors. Astra LoadTest (http://astratryandbuy.mercuryinteractive.com/cgi-bin/portal/trynbuy/index.jsp) is one of a suite of tools you can use to perform website testing. Other tools in the suite include Astra QuickTest (automated web testing), Astra FastTrack (defect management), and Astra SiteManager (an application management tool). You can download demonstration versions of all four of these tools.
If the four database technologies we've studied so far have left you with more questions than answers, you might consider looking at Dataphor from Alphora (http://www.alphora.com/tiern.asp?ID=DATAPHOR). Dataphor is a data access alternative to the solutions that come with .NET. You'd use this technology in place of a technology such as OLE-DB or ADO.NET. The website currently includes a series of white papers explaining the product and a sign-up for the beta (the product will likely be released by the time you read this). Dataphor solves problems we've discussed in the various chapters including: nonupdateable queries, lack of navigational access, join information loss, static data types, schema duplication, and three-valued logic.
Finding information in a large application can be difficult, to say the least. For example, you might remember that you defined a variable, but finding the definition can prove challenging. FMS provides a series of .NET–related tools, such as Total .NET XRef (http://www.fmsinc.com/dotnet/default.asp) that make it easier to manage your applications. The Total .NET series includes XRef (cross-reference variables and objects in your code), SourceBook (an extensive collection of source code examples), Analyzer (automated error and performance problem detection), and Renamer (a smart alternative to find and replace). Only the XRef product was available for preview at the time of writing.
Writing a Dataset Application
The Dataset object enables you to store data from a variety of sources, including DataAdapters and DataTables. The point is that it doesn't really care where the data comes from, as long as it can store the data in a DataTable. Every Dataset contains zero or more DataTables. We've discussed how you can create relations between the various tables in previous chapters. However, one of the points of the example in this chapter is that the source of the data is unimportant.
Tip Many developers want to incorporate controls other than the standard string or check box into their DataGrid. The only problem is that Microsoft doesn't provide any additional controls as part of Visual Studio .NET. If you want to create other input forms, such as a drop-down list box, then you need to create a custom class that implements the DataGridColumnStyle. Fortunately, some third-party developers are already working on this problem. For example, Axxias.ColumnStyles (http://www.columnstyles.com/) provides several types of controls you can incorporate into your DataGrid without a lot of additional programming.
This example relies on a database similar in design to the one found in Chapter 11 for the OLE-DB example. In fact, I simply exported the Access database in Chapter 11 to a SQL Server database on my Windows 2000 server and then made a few small changes to accommodate the additional functionality that SQL Server 2000 provides. One of the big differences between the two examples is that this example relies on SQL Server. You'll find the scripts for creating the database and adding data to it in the \Chapter 13\Data folder on the CD.
When you run the example, you'll find that it bears a striking similarity to the example in Chapter 11 (except for changes made to accommodate the new data source). While the Grid view code required some changes to make it run under the SqlConnection and SqlDataAdapter, I was able to move the Detail view code from the OLE-DB example directly to this example without a single change. Even though the source of the data changed drastically, the code required to access the data remained essentially the same—a real difference from coding in the past. (We'll discuss the Grid view code changes in the "Coding the Grid View" section.)
This example will also add new capabilities to the example found in Chapter 11. For example, you'll be able to add records to the Address table from the Detail view and also print from the Detail view. This chapter won't discuss some setup elements that are the same whether you use an Access database or a SQL Server database. For example, you still need to create the connection and data adapter objects (see the "Creating the Grid View" and "Creating the Detail View" sections of Chapter 11 for details). The following sections help you focus in on some new database application functionality, especially new functionality provided by the SQL Server 2000 provider.
Coding the Grid View
Because all of the data for this example goes through the Grid view, you'll need to make some minor changes to the code from Chapter 11. The first change is adding the proper using statements to the beginning of the FrmGridView.CS file. The example draws from the SQL Server provider, so we need to use namespaces for that provider. Unlike OLE-DB, you actually need two namespaces to gain full functionality to SQL Server 2000 features:
using System.Data.SqlClient; using System.Data.SqlTypes;
The SqlClient namespace takes the place of the System.Data.OleDb namespace used for the previous example. You'll find all of the same functionality that the OLE-DB provider included, plus some additional functionality unique for SQL Server (not to mention the enhanced performance you'll receive). The SqlTypes namespace contains special data types you can use when working with SQL Server 2000 (previous versions of the product might not support all of the types shown in the namespace).
You'll also need to change some of the object names. For example, instead of an OleDbException, you'll need to check for a SqlException. The actual functioning of the exception object is the same—it still produces the same error and for the same reason. You'll still receive the same information and you'll use it in the same way. The only thing that's changed is the exception object name.
At this point, you should have a duplicate of the example in Chapter 11. The only difference is that you're using SQL Server instead of Access as the database. Of course, this is an important change because many database applications start out small and eventually outgrow their original DBMS. It's important to know how to transition from one DBMS to another.
Now that we have the preliminaries completed, let's look at some ways to augment the Grid view in the following sections.
Tip It's interesting to note that you can't always create project names and namespaces that are conflict-free on the first try. For example, as an experiment for the example in this chapter, I tried naming the project "DataSet." The name should have worked given Microsoft's documentation, but it caused all kinds of odd conflicts, including a disappearing DataSet object problem. However, renaming the project files and changing the namespace entry to namespace MyDataSet didn't fix the problem. It seems the automatic code generation features of the Visual Studio IDE will continue to use the old namespace value until you change two values in the project Property Pages dialog. To view these properties, right-click the project name in Solution Explorer and choose Properties from the context menu. Open the \Common Properties\General folder and you'll see two properties: Assembly Name and Default Namespace. You must change both of these property values to the new namespace name in order to ensure that the automatic code generation features of the IDE work as intended.
Moving the Cursor on Screen
One of the first changes you'll see for the Grid view portion of this example is a new method for selecting rows. Some developers want something easier to see than the row pointer used for the first example. The most common way to make the row selection more visible is to highlight the entire row as shown here:
private void DoNext()
{
// Move to the next record.
if (AddrDataGrid.CurrentRowIndex != addressDataset1.Tables[0].Rows.Count - 1)
{
AddrDataGrid.UnSelect(AddrDataGrid.CurrentRowIndex);
AddrDataGrid.CurrentRowIndex++;
AddrDataGrid.Select(AddrDataGrid.CurrentRowIndex);
}
else
// Display an error message. MessageBox.Show("Already at last record!",
"Data Grid Pointer",
MessageBoxButtons.OK,
MessageBoxIcon.Exclamation);
}
Notice that this version of DoNext() relies heavily on the CurrentRowIndex property to ensure proper row selection. The UnSelect() method removes the highlight from the current row, the CurrentRowIndex value is incremented, and then the Select() method is called with the new CurrentRowIndex. (For comparison, see the DoNext() method in Chapter 11.) It's possible to expand this process to enable the user to select more than one row—simply leave the UnSelect() method call out and the DataGrid will continue highlighting rows as needed.
Of course, you might not want to select an entire row. Perhaps you just want to select the current cell. You can perform this task in a number of ways, but this code will provide you with some general ideas:
private void DoLast()
{
DataGridColumnStyle DGCS; // The column we want to view.
//Move to the last record. AddrDataGrid.UnSelect(AddrDataGrid.CurrentRowIndex); AddrDataGrid.CurrentRowIndex =
addressDataset1.Tables[0].Rows.Count - 1;
//Select the cell we want to highlight. AddrDataGrid.CurrentCell =
new DataGridCell(AddrDataGrid.CurrentRowIndex, 0); DGCS = AddrDataGrid.TableStyles[0].GridColumnStyles[0];
//Begin an edit to highlight the cell. AddrDataGrid.BeginEdit(DGCS, AddrDataGrid.CurrentRowIndex);
}
The first thing you should notice is that the code uses UnSelect() to remove the highlight from the current row, but doesn't rely on Select() to add a highlight to the next row. The code initially selects a new cell by creating a new value for the CurrentCell property using a DataGridCell object. The example assumes the user will want to select the first column in the DataGrid, but you can use the code to select any column, including the current column.
Simply selecting the cell won't highlight it. You could press Tab, at this point, and see the next cell highlighted, but it won't highlight the current cell, which is what we want the code to do. When the user clicks Tab, the DataGrid goes into edit mode, so that's what the example code will need to do as well. This means creating a DataGridColumnStyle object and then using it as input to the BeginEdit() method. Notice that the code doesn't call EndEdit() because the user hasn't made any changes to the data yet—the edit has only begun. At this point, you have two more ways to move the cursor around on the DataGrid.
Adding and Removing Records
The Grid view comes with the capability to add and remove records due to the connectivity between the DataGrid and the DataAdapter. However, the functionality is difficult to access outside of the DataGrid and assumes the user actually understands the results of pressing the control keys. For example, pressing Del will remove a record without one note of caution from the DataGrid, which opens the database to accidental data loss.
The example includes both menu entries and toolbar buttons for adding and removing records. One special note for the Record → Delete menu entry is that you also need to add the Del key as a shortcut to ensure the user can't delete a record without using the proper routine. As with many other parts of this example, the menu and toolbar event handlers merely reroute the call to a centralized routine we can use for multiple purposes (not the least of which is adding the same support to the Detail view). Listing 13.3 shows the code you'll need to add for adding and removing records.
Listing 13.3: Adding and Removing Records from the Grid View

private void mnuRecordAdd_Click(object sender, System.EventArgs e)
{
// Add a record. DoAddRecord();
}
private void mnuRecordDelete_Click(object sender, System.EventArgs e)
{
// Delete a record. DoDeleteRecord();
}
private void DoAddRecord()
{
//The column we want to view. DataGridColumnStyle DGCS;
//Create a new data row.
DataRow NewRow = addressDataset1.Tables[0].NewRow();
//Fill required fields with default information. NewRow["LAST_NAME"] = "";
NewRow["FIRST_NAME"] = ""; NewRow["COMPANY"] = ""; NewRow["BUSINESS"] = true;
NewRow["CONTACTED"] = DateTime.Today.ToString();
//Begin the editing process. NewRow.BeginEdit();
//Place the cursor in the data add row. addressDataset1.Tables[0].Rows.Add(NewRow);
//Select the new row and prepare to edit it. DoLast();
}
private void DoDeleteRecord()
{
DialogResult |
Result = DialogResult.No; |
DataRow |
RemoveRow; |
//Display a message asking the user if they really want to
//delete the record.
Result =
MessageBox.Show("Are you sure you want to remove the record?",
"Permanent Record Deletion Warning",
MessageBoxButtons.YesNo,
MessageBoxIcon.Warning);
// If the user is sure about the record deletion, remove it. if (Result == DialogResult.Yes)
{
//Get the current data row. RemoveRow =
addressDataset1.Tables[0].Rows[AddrDataGrid.CurrentRowIndex];
//Mark the row as deleted.
RemoveRow.Delete();

// Update the data adapter. AddressDA.Update(addressDataset1);
}
}
Adding a row to the database isn't a one step process—you need to modify the dataset first. To add a row to the dataset, you need to create a new DataRow object (NewRow in this case) based on the current table schema using the addressDataset1.Tables[0].NewRow() method. Note that you must select the proper table to ensure the schema of the new row is correct.
NewRow is blank when you create it, which means that even the primary key fields are empty. If you insert the new row into the dataset immediately, the application will raise an error. Consequently, the code assigns values to the new DataRow. In this case, it also assigns a value to the BUSINESS field because the database won't allow null values and the CONTACTED field for the convenience of the user. The Add() method completes the process of adding a new record to the dataset. The code calls DoLast() to position the cursor and open the first field of the DataGrid for editing.
Notice the call to BeginEdit(). The record addition will still work even without this call. However, the user won't see the familiar blinking cursor on the first entry in the new record if you don't provide this call. The call to DoLast() won't accomplish the same purpose in this case.
The code doesn't call AddressDA.Update() when adding a record. The act of creating the record automatically calls AddrDataGrid_CurrentCellChanged(). This method contains the required AddressDA.Update() call.
Deleting a record is a three-step process. The code still uses the dataset to perform the task. As with the record addition, the code creates a DataRow object that holds the record to delete. It marks the record for deletion using the Delete() method. The call to AddressDA.Update() completes the process. The code must call the AddressDA.Update() method, in this case, because the user isn't editing the record.
Notice that the DoDeleteRecord() method includes a MessageBox.Show() call that gives the user a chance to change their mind about deleting the record. This is an important addition, because it helps keeps the database intact by reducing the chance of an accidental deletion.
There's a potential problem with all of the modifications the code performs—it's possible that a change could occur and not get recorded. Even though this event is unlikely, it's important to consider it anyway. The following event handler reduces the likelihood that a databasedamaging event will occur when the application closes.
private void GridView_Closing(object sender, System.ComponentModel.CancelEventArgs e)
{
// Create a series of data check objects. DataSet DeletedData =
addressDataset1.GetChanges(DataRowState.Deleted); DataSet AddedData =
addressDataset1.GetChanges(DataRowState.Added);

DataSet ModifiedData =
addressDataset1.GetChanges(DataRowState.Modified);
// Check for pending updates and update the database as required. if (DeletedData != null ||
AddedData != null || ModifiedData != null) AddressDA.Update(addressDataset1);
}
The GridView_Closing() event occurs before the main application form closes and any of the data sources close. The code checks for DataSet conditions that could cause data loss, including the existence of modified, added, or deleted records. If the DataSet contains any records of this type, the code calls AddressDA.Update() to ensure the change is recorded.
Adding Copy, Cut, and Paste
The Copy, Cut, and Paste commands are somewhat tricky to add to a database application. The default setup for the DataGrid object enables you to cut, copy, or paste single cells. However, a row can only be copied. The reason you can't cut a row is that would delete the row and the DataGrid already provides a method for accomplishing that task. Likewise, pasting a row is akin to adding a new row to the database, which is handled by another method. Unfortunately, the only way to use Copy, Cut, and Paste in a DataGrid is to rely on the control key combinations of Ctrl+C, Ctrl+X, and Ctrl+V. If you want the convenience of using menus or toolbars, then you need to add the commands separately. Listing 13.4 adds this functionality to both the menus and toolbar.
Listing 13.4: Adding Copy, Cut, and Paste to the Example Program
private void mnuEditCut_Click(object sender, System.EventArgs e)
{
// Perform the cut function. DoCut();
}
private void mnuEditCopy_Click(object sender, System.EventArgs e)
{
// Perform the copy function. DoCopy();
}
private void mnuEditPaste_Click(object sender, System.EventArgs e)
{
// Perform the paste function. DoPaste();
}
private void DoCut() |
|
|
{ |
DGCS; |
// The column we want to view. |
DataGridColumnStyle |
||
int |
Column; |
// Data grid column. |
//Place the current data on the clipboard. Clipboard.SetDataObject(AddrDataGrid[AddrDataGrid.CurrentCell]);
//Place a blank value in the data grid. AddrDataGrid[AddrDataGrid.CurrentCell] = "";
// Begin the editing process.
Column = AddrDataGrid.CurrentCell.ColumnNumber;
DGCS = AddrDataGrid.TableStyles[0].GridColumnStyles[Column]; AddrDataGrid.BeginEdit(DGCS, AddrDataGrid.CurrentRowIndex);
}
private void DoCopy()
{ |
SelectedText = new StringBuilder(); |
StringBuilder |
|
int |
Row; |
int |
Column; |
// Get the current row.
Row = AddrDataGrid.CurrentCell.RowNumber;
// If true, copy the entire row. if (AddrDataGrid.IsSelected(Row))
{
//Set the column value to 0. Column = 0;
//Copy every entry in the row to the SelectedText
//string.
for(Column = 0;
Column < AddrDataGrid.TableStyles[0].GridColumnStyles.Count; Column++)
{
SelectedText.Append(AddrDataGrid[Row, Column].ToString());
// If this isn't the last entry, then add a tab. if (Column <
AddrDataGrid.TableStyles[0].GridColumnStyles.Count - 1) SelectedText.Append("\t");
}
// Copy the composite string to the clipboard. Clipboard.SetDataObject(SelectedText.ToString());
}
// If only a single cell is selected, copy just
//that cell.
else
{
//Set the column value to the current cell. Column = AddrDataGrid.CurrentCell.ColumnNumber;
//Place the data on the clipboard. Clipboard.SetDataObject(AddrDataGrid[Row, Column]);
}
} |
|
|
private void DoPaste() |
|
|
{ |
ClipboardData; // Contents of the clipboard. |
|
IDataObject |
||
string |
PasteData; |
// Data to paste. |
DataGridColumnStyle |
DGCS; |
// The column we want to view. |
int |
Column; |
// Data grid column. |
// Verify the data is text.
ClipboardData = Clipboard.GetDataObject();