

Visual CSharp .NET Developer's Handbook (2002) [eng]
.pdfOverview
The previous two chapters have taken you through Object Linking and Embedding-Database (OLE-DB), Open Database Connectivity (ODBC), and ActiveX Data Objects (ADO). Now it's time to look at the final piece of the database puzzle for .NET—ADO.NET. This is Microsoft's latest and greatest database access offering. However, unlike previous Microsoft database technologies, ADO.NET isn't designed to provide an all-inclusive solution to every database need; ADO.NET is designed with distributed application requirements exclusively in mind.
This chapter tells you about ADO.NET and shows you several ways to use this new technology. Of course, the big news for ADO.NET is the disconnected application scenario, where a user on the road downloads the data they need for a particular purpose, and then disconnects from the company Internet connection while continuing to work. However, ADO.NET makes just about every type of distributed application programming easier, because it supports the latest connection technologies. We'll also look at what passes for a live connection in ADO.NET. (Of course, you won't see any server-side cursor support with this technology.)
As part of the distributed and disconnected application scenarios, we'll also begin to look at technologies that might make your online communication events easier. Most notably, this chapter will look at techniques for working with XML data. XML is the current solution for distributed application program connectivity because it enables an application to communicate with a web server through a firewall. Future chapters will take remote connectivity further and show you how to use some of the latest communication technologies including the Simple Object Access Protocol (SOAP).
Tip Microsoft is making a concerted effort to XML-enable all of their products, which includes the XML support found in SQL Server 2000. A large part of this effort is directed toward making it easier to create web services using Microsoft products. In fact, Microsoft recently released a Web Services Toolkit (http://msdn.microsoft.com/downloads/sample.asp?url=/MSDNFILES/027/001/872/msdncompositedoc.xml) for SQL Server 2000 that makes it easier to create web service applications. The Web Services Toolkit site includes a link for the toolkit, white papers, webcasts, demonstrations, and the SQL Server–related newsgroups. Coupled with the SQL Server offering is an offering for BizTalk Server that links it with .NET. The Microsoft BizTalk Server 2002 Toolkit for Microsoft .NET includes a wealth of examples in addition to the required assemblies. You can find this toolkit at http://msdn.microsoft.com/downloads/default.asp?url=/downloads/sample.asp?url=%20/msdnfiles/027/001/870/msdncompositedoc.xml.
Comparing ADO to ADO.NET
ADO.NET has had a rough childhood in some respects. It began as ADO+; the new and improved form of ADO, but Microsoft quickly changed the name when it became obvious that ADO.NET was going to become something different. In fact, ADO and ADO.NET are very different technologies, despite the similarities in names. Of course, this begs the question of why Microsoft used the term at all if the technologies are so different. The answer lies in the few similarities between the two technologies and not in their differences.
Note This section of the chapter assumes you've read Chapter 12 and worked through the
example application. You should also have a good understanding of how ADO works. For example, you need to understand terms like recordset to understand the material in this section.
Both ADO and ADO.NET are high-level database access technologies. This means you do less work to accomplish any given task than you would with a low-level technology such as OLE-DB, but you also lose some flexibility and control. In addition, both of these technologies rely on OLE-DB as the low-level technology that performs most of the behind- the-scenes work. (We discussed OLE-DB in Chapter 11.) The final point of similarity between these two technologies is that they both rely on similar access techniques, such as the use of cursors and an in-memory data representation. This feature is hardly surprising considering both technologies come from the same company.
You learned in Chapter 12 that the basic in-memory representation for ADO is the Recordset object. This object contains a single table that can come from a query, individual table, stored procedure, or any other source of a single table of information. In some respects, this representation is limited, because you can only work with one set of information per Recordset object. However, nothing prevents you from creating more than one Recordset object, so in reality, the limit is more of perception than anything else. In fact, some developers state that using recordsets makes their code more readable than the ADO.NET alternative.
The ADO.NET alternative is to use a Dataset object. This is the same object that OLE-DB uses under .NET. A Dataset can contain multiple tables, which means you don't need exotic queries to gain access to precisely the information you need. The DataTable objects within the Dataset can have relations, just as they would within the database. The result is that you can create complex database setups within your application. Of course, this assumes you have so much data that you require such a complex setup for a single application. Some companies do have that much data, which is why this approach is so valuable. We'll see how to use the multiple table and relations feature of the DataSet object later in the chapter.
The simple, single-table Recordset object used by ADO means that it can also use simple commands to move between records. We saw in Chapter 12 that the Move(), MoveFirst(), MovePrevious(), MoveNext(), and MoveLast() functions do all the work required to move from one record to another. In addition, you can easily determine the EOF and BOF conditions using the associated Recordset property values. This means that moving to the beginning or end of a table is easy and you can always determine your current position within the table. The record pointer associated with all of this movement is called a cursor. ADO supports cursors that reside on both the server and the client, which means that an application can track the current record position wherever it makes sense within a LAN application environment.
ADO.NET makes use of collections within the dataset. Actually, there are groups of collections, and collections-within-collections. The advantage of this technique is that you can examine records using a foreach statement—the same technique you'd use to enumerate any other collection. Using collections also makes it easier to transfer data to display elements such as the DataGrid object. (Although, the Recordset object is actually easier to use with detail forms.) The use of collections means that it's easier to read a Dataset object from end- to-end than it is to address an individual record or to move backward within the collection.
For example, let's say you want to address a single record field within the dataset; you'd probably require code similar to the code shown here:
MyString = MyData.Tables[0].Rows[0].ItemArray.GetValue(1).ToString();
The equivalent code for ADO is simpler and easier to understand. Here's an example:
MyString = DBRecordset.get_Collect("Name").ToString()
As you can see, a Recordset object does have an advantage in requiring less code to access an individual value because it isn't buried in multiple layers. In addition, notice that you can access the field by name when using a Recordset object—the Dataset object offers you an integer value that you must derive from the field's position within the data result. Still, there are significant advantages to using ADO.NET, as we'll see in the sections that follow.
This brings us to the DataReader object, which uses a read-only, forward-only cursor. The main purpose of the DataReader object is to enable disconnected mode operation for applications. A user can download data from the company database while connecting using an Internet (or other) connection. The data is then available for viewing offline (but not for modification because the connection to the database is lost).
While both ADO and ADO.NET rely on OLE-DB as their connectivity technology, they each use different techniques to accomplish their goal. Both database technologies do rely on a connection. However, ADO provides little flexibility in the way data updates occur once the connection is established. As we saw in the ODBC.NET example in Chapter 11, you can create the individual update elements of the DataAdapter object or rely on automation, as we did for the OLE-DB example. The point is that ADO.NET also relies on a DataAdapter, which means it also provides you with this flexibility in performing updates.
The final point for consideration, now, is the issue of connectivity. ADO does provide remote connectivity features, but like all other COM-based technologies, it uses DCOM as the basis for data exchange across a remote network. This means the connection port number changes often and the data itself is in binary form. The benefit of this approach is that few crackers have the knowledge required to peer at your data. The disadvantage is firewall support—most firewalls are designed to keep ports closed and to restrict binary data.
ADO.NET gets around the firewall problems by using XML to transfer the data using HTTP or some other appropriate data transfer technology. The point is that the data is in pure ASCII and relies on a single port for data transfers. Unfortunately, many people criticize XML as a security risk and vendors have done little to make it more secure. Any attempt to encrypt the data would open the Pandora's box of binary data transfer again, making the use of XML questionable. In short, XML is a good, but not perfect, solution to the problem of remote connectivity.
Using OleDbDataAdapter for Data Transfer to ADO.NET
As previously mentioned, ADO.NET relies on OLE-DB to perform low-level database connectivity chores. You're already familiar with the two objects that ADO.NET uses for this task, the OleDbConnection and the OleDbDataAdapter. The OleDbConnection object creates the actual connection between the application and the database management system (DBMS).
The OleDbDataAdapter performs tasks like inserting new records, updating existing records, and deleting old records. We created a set of these commands for the ODBC.NET example in Chapter 11.
Note The OleDbDataAdapter comes in more than one flavor. Visual Studio .NET comes with a form of this object that's optimized for SQL Server—the SqlDataAdapter. The difference between the two objects is that the SQL Server version is optimized for use with SQL Server, which means your application gains a performance benefit. Microsoft anticipates that other vendors will eventually create specialized connection and dataadapter objects for .NET. In fact, the first add-on for this technology is the ODBC.NET technology we discussed in Chapter 11.The performance you receive from a custom object will normally be better than the performance you obtain from the standard objects. However, the only thing you gain, in some cases, is some additional flexibility in accessing the data.
Once the data appears within the data adapter, you can access it in a number of ways. For example, it's possible to fill a Dataset object with information from the data adapter using the Fill() or the FillSchema() command. A Dataset object can contain more than one table, so it's possible to create relations and perform other tasks normally performed by a DBMS.
The Dataset object contains the whole table found in the data adapter in a raw form that you can manipulate as needed. Sometimes you don't need the raw data; you need something that's sorted, filtered, or otherwise manipulated in some way. That's where the DataView object comes into play. The DataView object can present a particular view of the information found in the data adapter. For example, you can choose to ignore specific fields or rows with certain attributes (such as deleted rows). Two DataViews that use the same data adapter can contain vastly different information, which makes the DataView somewhat limiting but also adds a level of automation to the database application.
Writing a DataReader Application
Previous examples in the book have discussed the use of the Dataset object because it provides the type of connectivity that most developers are used to using in an application. You'll also find a new DataReader object with Visual Studio .NET that enables you to create a read-only, forward-only stream of data from a database. The main benefit of using a DataReader object is that the application saves memory (only a single record resides in memory) and the technique can help enhance application performance.
The DataReader object is useful for a number of purposes. For example, you can use it to create fast print routines and display lists. A DataReader also enables you to download data to a laptop or PDA for later use. Because the DataReader doesn't need a connection to the database once you complete the download, you can use it to create disconnected applications.
The following sections describe one use for the DataReader. We'll build a list view and a print routine based on the DataReader for the MovieGuide database discussed in Chapter 12. You'll also find a new type of construct in this section, the StringBuilder object. The "Using StringBuilder to Improve Performance" section describes when and where you'll use this object.
Creating the Application Shell
The application we'll create in this section uses a standard dialog box. You'll need to add a SqlConnection named MovieConnect and a SqlCommand named GetMovie. The easiest way to create the SqlConnection is to drag the ExistingMovies database from Server Explorer to the form.
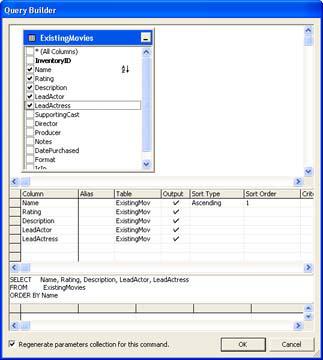
To configure GetMovie, you'll need to select MovieConnect in the Connection property. Click the ellipses in the CommandText property for the GetMovie command and you'll see a Query Builder dialog box. Figure 13.1 shows how to format the query for this example. The graphical display at the top of the dialog box enables you to create relations and choose fields. The next section contains options for sort order and criteria. You'll see the current query listed in the third section. The fourth section of the dialog box contains parameters for the command. You should end up with a CommandText property value of SELECT Name, Rating, Description, LeadActor, LeadActress FROM ExistingMovies ORDER BY Name.
Figure 13.1: Use the Query Builder to create text for the GetMovie command.
The application also includes three buttons: Quit, List Data, and Print Data. A textbox (txtOutput) will hold the data that the application produces when the user clicks List Data. Figure 13.2 shows typical application output.

Figure 13.2: The application will list or print data using a DataReader instead of a Dataset.
Adding Some Code
The DataReader application differs from other database applications covered in this book, because it concentrates on output rather than full database functionality. The use of a SqlCommand object enables the developer to add flexibility in the form of query support— changing the query will always create a different output. Consequently, you could easily use a configuration dialog to provide query input. For instance, one of the uses for this type of application is an informational kiosk. The application is actually safer than most, because it's impossible for the user to send new data or modify existing data—the DataReader limits interaction to requests for information only.
The first task is to create a list of the data in the database. Listing 13.1 shows the code for the btnListData control. Notice the use of a StringBuilder (MovieList) to improve performance and the special control requirements for this example, such as opening and closing the connection.
Listing 13.1: Use a DataReader When Application Security is Paramount
private void btnListData_Click(object sender, System.EventArgs e)
{
//Open the connection. MovieConnect.Open();
//Create and initialize the DataReader. SqlDataReader MovieGuide = GetMovie.ExecuteReader();
//Create and initialize the StringBuilder. StringBuilder MovieList = new StringBuilder();
//Build the display string. while (MovieGuide.Read())
{
MovieList.Append(MovieGuide.GetString(0)); MovieList.AppendFormat("\t{0}", MovieGuide.GetString(1)); MovieList.AppendFormat("\t{0}", MovieGuide.GetString(2)); MovieList.AppendFormat("\t{0}", MovieGuide.GetString(3)); MovieList.AppendFormat("\t{0}\r\n\r\n", MovieGuide.GetString(4));
}
//Display the data in the textbox.
txtOutput.Text = MovieList.ToString();
// Close the data objects.

MovieGuide.Close();
MovieConnect.Close();
}
The first task the code performs is creating the DataReader. The easiest and most flexible way to do this is to call upon the ExecuteReader() method of the command we created earlier.
As you can see, you use a DataReader in a loop. Each call to Read() brings in another row of data. Remember that MovieGuide will contain only one row of data at a time and that you can't go back to a previous record. Therefore, you must perform any data processing on the current row while the row is in MovieGuide or store the information for future use. The DataReader object uses a 0-based index for storing the data fields in the order they appear in the query string for the SqlCommand. After you process all of the rows of data the query can provide, Read() will return false, which ends the processing loop and displays the data on screen.
If you'll remember from previous chapters, print routines follow a specific pattern .NET. What you really need is a PrintPageEventHandler. The other basics of printing remain the same in all but a few instances. Consequently, Listing 13.2 shows the PrintPageEventHandler for the example. Notice that PD_PrintPage() follows a pattern very different from previous chapters.
Listing 13.2: The PrintPageEventHandler PD_PrintPage() Uses a StringBuilder for Output
void PD_PrintPage(Object sender, PrintPageEventArgs ev)
{
Font |
docFont; |
// Document Font |
Font |
headFont; |
// Heading Font |
float |
yPos = 20; |
// Position of text on page. |
StringFormat |
Format; |
// Drawing format for details. |
Rectangle |
PrintArea; |
// Printing area. |
// Create the font.
docFont = new Font("Courier New", 10, FontStyle.Bold); headFont = new Font("Arial", 15);
//Create the StringFormat. Format = new StringFormat();
Format.FormatFlags = StringFormatFlags.NoClip; Format.Trimming = StringTrimming.None;
//Determine a print area.
PrintArea = new Rectangle(0, (Int32)yPos,
(Int32)ev.Graphics.VisibleClipBounds.Width, (Int32)docFont.GetHeight() * 4);
// Print the heading. ev.Graphics.DrawString("Movie Guide Output",
headFont,
Brushes.Black,
0,
yPos);
yPos = yPos + headFont.GetHeight() + 20;

//Open the connection. MovieConnect.Open();
//Create and initialize the DataReader. SqlDataReader MovieGuide = GetMovie.ExecuteReader();
//Create and initialize the StringBuilder. StringBuilder MovieList = new StringBuilder();
//Continue printing as long as there is space on the page and
//we don't run out of things to write.
while (MovieGuide.Read())
{
// Build the display string.
MovieList.AppendFormat("{0, -51}", MovieGuide.GetString(0)); MovieList.AppendFormat("{0, -6}", MovieGuide.GetString(1)); MovieList.AppendFormat("{0, -1001}", MovieGuide.GetString(2)); MovieList.AppendFormat("{0, -41}", MovieGuide.GetString(3)); MovieList.AppendFormat("{0, -41}", MovieGuide.GetString(4));
//Set the Y position. PrintArea.Y = (Int32)yPos;
//Output the data. ev.Graphics.DrawString(MovieList.ToString(),
docFont,
Brushes.Black,
PrintArea,
Format);
// Determine the next print position.
yPos = yPos + (docFont.GetHeight() * 4) + 10;
// Clear the StringBuilder object. MovieList = new StringBuilder();
}
//Close the data objects. MovieGuide.Close(); MovieConnect.Close();
//Tell the application there are no more pages to print. ev.HasMorePages = false;
}
The process of creating various fonts and using DrawString() to create a header is the same as before. However, this is where the similarity to other print output routines we've studied ends. The first thing you should notice is that the detail lines rely on a rectangle, not a single point, as a means for determining the output range. The upper left corner is determined by the preferred x and y values (0 and yPos for the example). We have no way to determine the width of the page because each printer is different. Fortunately, you can retrieve this value at runtime using the ev.Graphics.VisibleClipBounds.Width property. It's also necessary to determine a print height based on the font used by the print routine. The example allocates 4 lines of text for each database entry, so the rectangle height is docFont.GetHeight() * 4.
Because each entry in the report can contain multiple lines of data, it's also important to create a StringFormat object. This object determines the formatting characteristics of the output. The example tells the CLR not to clip the output text and not to use any string trimming. These two entries are essential or the CLR will attempt to clean up your output in some cases—an undesirable trait if you want to preserve the formatting of your text.
The detail portion of the output routine looks very similar to the routine we used for the textbox on screen. However, notice the complete lack of formatting (escape) characters in the text. The example also uses the second parameter of the formatting string to force each string to occupy one more character than its maximum length, which ensures the printed entries will line up. The use of a StringBuilder object isn't only a performance enhancement, in this case; it's a necessary part of the print routine and we'd need a lot more code to duplicate what this object does automatically.
There are some additional pieces of code you need to consider. StringBuilder objects have no Clear() method, so you need to create a new object after each line of printed text. The StringBuilder object is still more efficient than using a string alternative, but not quite as efficient as the textbox portion of the example.
Note, also, that you need to change the Y property of PrintArea after each row of text, or the data won't print in the right area. The need to keep track of two row variables is a nuisance and could lead to errors in a complex print routines, but it's a necessity in this situation. In short, you must update both yPos and PrintArea to position the text on the printer.
Testing Using NUnit
As you create more application code and the code becomes more complex, it becomes important to have a good testing tool. Microsoft does provide some rudimentary testing tools with Visual Studio .NET, but most of these tools appear with the Enterprise Architect Edition and don't provide much in the way of automation. Consequently, third-party developers have filled in the gaps by creating automated tools for the developer. NUnit represents one of the tools that fill this gap. You'll find this product in the \NUnit folder of the CD.
NUnit provides two forms of testing application. The GUI version is accessible from the NUnit folder of the Start menu. The GUI version enables you to run the application test immediately after adding new code and provides a neater presentation of the logged errors. You'll also find a command-line version of the program called NUnitConsole in the \Program Files\NUnit\ folder of your hard drive. The console version lets you place several testing scenarios in a single batch file and perform automated testing on more than one application at a time. You can also schedule testing using the Task Scheduler.
The product works by examining test cases that you create for your application. A test case is essentially a script that compares the result from your code to an anticipated result (what you expected the code to do). The test case can also check the truth-value of a return value. The software author, Philip Craig, recommends creating a section of code, and then creating a test case for that code. For example, you'll want to create a minimum of one test case for each method within a class. In this way, you build layers of code and tests that help locate problems quickly and tell you when a piece of code that previously worked is broken by a new addition to the application.
NUnit provides the means to perform individual tests based on a single test case or to create a test suite based on multiple test cases. The use of a special function, Assert() or AssertEquals() enables NUnit to test for the required condition. When NUnit sees a failure condition, it logs the event so you can see it at the end of the test. The point is that you don't have to create test conditions yourself—each test is performed automatically. Of course, the test cases still need to address every failure condition to provide complete application testing.
Let's look at a simple example. (You'll find the source code for this example in the \Chapter 13\NUnitDemo folder of the CD.) The example code performs simple math operations, but the code could perform any task. The DoAdd() and DoMultiply() methods both work as written. However, there's an error in the DoSubtract() method as shown below.
public static string DoSubtract(string Input1, string Input2)
{
int Value1; int Value2; int Result;
//Convert the strings. Value1 = Int32.Parse(Input1); Value2 = Int32.Parse(Input2);
//Perform the addition. Result = Value2 - Value1;
//Output the result.
return Result.ToString();
}
Obviously, most developers would catch this error just by looking at the code, but it isn't always easy to find this type of error in complex code. That's why it's important to write a test routine as part of your application (or in a separate DLL). Creating the test routine consists of five steps:
1.Include the NUnitCore.DLL (located in the \Program Files\NUnit\bin folder) as a reference to your application.
2.Create a class that relies on the NUnit.Framework.TestCase class as a base class.
3.Add a constructor that includes a string input and passes the string to the base class such as: public MathCheckTest(String name) : base(name).
4.Add a test suite property to your code formatted as: public static ITest Suite.
5.Create one or more public test scenarios.
There are a number of ways to create the test suite for your application. The two main methods are dynamic and static, with the dynamic method presenting the fewest problems for the developer. Here's an example of the dynamic test suite declaration:
// You must define a suite of tests to perform. public static ITest Suite
{
get
{
return new TestSuite(typeof (MathCheckTest));
}
}