

Visual CSharp .NET Developer's Handbook (2002) [eng]
.pdfnew HttpCookie("LeadActress", e.Item.Cells[5].Text)); Response.SetCookie(
new HttpCookie("SupportingCast", e.Item.Cells[6].Text)); Response.SetCookie(
new HttpCookie("Director", e.Item.Cells[7].Text)); Response.SetCookie(
new HttpCookie("Producer", e.Item.Cells[8].Text)); Response.SetCookie(
new HttpCookie("Notes", e.Item.Cells[9].Text)); Response.SetCookie(
new HttpCookie("PurchaseDate", e.Item.Cells[10].Text)); Response.SetCookie(
new HttpCookie("VideoFormat", e.Item.Cells[11].Text)); if (((CheckBox)e.Item.Cells[12].Controls[1]).Checked)
Response.SetCookie(new HttpCookie("IsItIn", "Yes")); else
Response.SetCookie(new HttpCookie("IsItIn", "No"));
// Display the values using the detail view. Response.Redirect("DetailView.ASPX");
}
As you can see, the code is relatively straightforward. The code uses the Response.SetCookie() method to build a cookie collection that the Detail view will receive. Once the cookies are stored, the Detail view has everything it needs to display data on screen. The final step in transferring control is to use the Response.Redirect() method to call on the DetailView.ASPX file.
Obtaining data from most of the MovieDG cells is easy—all you need to do is pass the content of that e.Item.Cells property to the cookie. However, remember that the IsIn field is a bool value and that we needed to convert it to a <asp:TemplateColumn>. This presents problems when transferring the data to the Detail view.
The code actually accesses the CheckBox control within the cell in order to determine its state. Determining the control status is exacerbated by the presence of three controls within the <asp:TemplateColumn>. (You might find more in situations where the control provides both viewing and editing capabilities.) Notice that you must perform an odd-looking cast in order to access the Checked property. Now that you know whether the control is checked, it's possible to create a text value for the Detail view.
The Detail view performs two tasks. First, it populates the form controls with the data passed in the cookies. Second, it provides a means for "closing" the form and transferring control back to the Grid view. The second task is interesting because the code isn't actually closing the form—it's reloading the Grid view. Listing 14.3 shows the code for the Detail view.
Listing 14.3: The Detail View Performs Two Tasks
private void Page_Load(object sender, System.EventArgs e)
{
// Load all of the data previously stored in cookies. txtName.Text = Request.Cookies["Name"].Value; txtRating.Text = Request.Cookies["Rating"].Value; txtDescription.Text = Request.Cookies["Description"].Value;

txtLeadActor.Text = Request.Cookies["LeadActor"].Value; txtLeadActress.Text = Request.Cookies["LeadActress"].Value; txtSupportingCast.Text = Request.Cookies["SupportingCast"].Value; txtDirector.Text = Request.Cookies["Director"].Value; txtProducer.Text = Request.Cookies["Producer"].Value; txtNotes.Text = Request.Cookies["Notes"].Value; txtPurchaseDate.Text = Request.Cookies["PurchaseDate"].Value; txtFormat.Text = Request.Cookies["VideoFormat"].Value; txtIsItIn.Text = Request.Cookies["IsItIn"].Value.ToString();
}
private void btnClose_Click(object sender, System.EventArgs e)
{
// Go back to the Grid View form. Response.Redirect("GridView.ASPX");
}
The Page_Load() method is where the code populates the on-screen controls with data from the Grid view. Because all of the data is in string format, all the code needs to do is access the cookie of interest using the Request.Cookies collection. Note that you can use a string, as shown in Listing 14.3, or a number. In this case, it's easier to access the value using a string because you can't be sure about the order of the cookies in the collection.
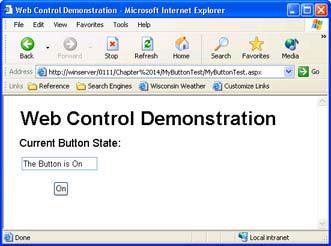
The Detail view relies on the Response.Redirect() method to close the form. As previously noted, the code actually opens a copy of the GridView.ASPX file. Notice that the code doesn't pass any data back to the Grid view. If this application allowed data editing, you'd need to pass cookies both ways. Figure 14.6 shows the output from the Detail view. As you can see, the data from a single record fits nicely within an average browser window. Note the inclusion of scrollbars for properties such as Supporting Cast. You can obtain this effect by changing the TextMode property to MultiLine.
Figure 14.6: The Detail view shows a complete record in a typical browser window.
Adding Sort Support
When you create a DataGrid for a Windows Form, the ability to sort the columns is included by default. Unfortunately, sorting isn't part of the DataGrid for Web Forms—you must
include it as a separate feature. However, you also need to remember that sorting takes place as a post back operation, which means that the web page instantly forgets anything it knew in the past. After a lot of trial and error, it appears that using cookies is the best way to get the sort information from the current iteration of the Grid view to the next iteration.
There are three steps required to add sorting to the current example. First, you must create a SortCommand() event handler. Second, you'll need to add some filtering to the MovieDG_ItemCommand() method. Otherwise, the method will continue to generate cookies every time a user clicks a button on MovieDG, even for changes in sort order. Third, you need to modify the Page_Load() method to accommodate the new sort functionality. Here's the code you'll need for the SortCommand() event handler.
private void MovieDG_SortCommand(object source, System.Web.UI.WebControls.DataGridSortCommandEventArgs e)
{
// Save the sort order in a cookie.
Response.SetCookie(new HttpCookie("SortOrder", e.SortExpression));
}
As you can see, the only thing we need to do is save the user-selected sort order in a cookie. The application passes the string value that corresponds to the Sort Expression field in the MovieDG Properties dialog. This string tells which database field to use for sorting— theoretically you could allow the user to select multiple sort fields, but this would become cumbersome to code.
Filtering the MovieDG_ItemCommand() method is as easy as adding an if statement to surround the existing code. The filter criteria is e.CommandName.ToString() == "Select", where Select is the name of the command that we want to process. The method will now ignore the Sort command orders.
The final modification would be a little difficult to understand at first if you tried to follow the Microsoft documentation. It turns out that the example won't sort properly no matter how often you create a separate view and modify the Sort property. However, the following code works well and you'll find it quite effective for almost any type of database that relies on a data adapter.
private void Page_Load(object sender, System.EventArgs e)
{
string SortOrder = ""; // Holds the sorting information.
//Determine if there is a request for sorting the data. try
{
SortOrder = Request.Cookies["SortOrder"].Value;
}
catch
{
}
//Change the sort order if necessary.
if (SortOrder != "")
{
MovieDA.SelectCommand.CommandText = MovieDA.SelectCommand.CommandText + " ORDER BY " +
SortOrder;
}
//Fill the dataset. MovieDA.Fill(movieDS1);
//Update the data grid. MovieDG.DataBind();
}
There are two main areas of interest in this code. First, the code uses a try block to obtain a sort order from the cookie that we saved previously. The only problem with this technique is that the cookie doesn't exist until the user selects a sort order. That's why you have to encase the code in a try block. Second, notice how the code modifies the CommandText property of the MovieDA.SelectCommand. This is the easiest way to change the sort order. However, you must ensure the ComandText property doesn't have an ORDER BY clause if you want to use this technique. The method ends as usual by filling the dataset with information and binding it to the data grid.
Web Control Example
A web control is the Internet equivalent of a Windows control. You use a web control in the same way that you would a Windows control. Web controls include the same categories of controls that Windows controls include, such as buttons, text boxes, and labels. In short, a web control is similar enough in concept to a Windows control that many developers don't consciously think about the differences.
Tip You'll find a wealth of web service–oriented sites on the Internet. One of the more interesting sites for developers enables anyone with Internet Explorer 6 to create ASP.NET web pages visually, using online development techniques. FormBuilder.NET (http://www.xmlforasp.net/content.aspx?content=formBuilder.NET) accepts a number of forms of input, including SQL Server databases, and outputs code in either Visual Basic
.NET or C#. The best part of FormBuild.NET is that it's free (at least for now). The same site offers links for books and a variety of training options.
This example will show you a simple way to create a button that alternates between states such as On and Off. You begin this example by creating a Web Control Library project. The example uses a name of MyControls, but any name will work. This is a local project, which means that you can access it from your hard drive, even if you're using a two-machine setup. The control will appear as part of a static application in most cases, and not reside on the server as a web service. (You'll find the source code for this example in the \Chapter 14\MyControls folder on the CD.)
The IDE will suggest that you subclass your control from System.Web.UI.WebControls.WebControl, which is a good choice if you plan on creating a generic control. However, you can gain quite a bit by using a different base class. For example, the example application uses System.Web.UI.WebControls.Button as its base class.
Starting with a pre-built class has other advantages. For example, the default project assumes that you'll need to render (draw) the control on screen. If you comment out the Render() method code, you'll find that the compiled button draws itself on screen without any problem.
The example does use properties that we must set as part of creating the control within the web page. The only way to perform this task is to change the [ToolboxData] attribute that normally resides with the [Default] attribute immediately before the class declaration. Here's the modified version we use for this example. Notice that the arguments don't include any double quotes—the IDE automatically adds them for you.
[DefaultProperty("Text"),
ToolboxData("<{0}:MyButton Text=On FirstText=On " + "SecondText=Off runat=server></{0}:MyButton>")]
The example includes three properties not found in a normal button: FirstText, SecondText, and IsSecond. The FirstText and SecondText properties track the two values the button will display. The button will always begin with the FirstText property value and use the SecondText property value as the alternate. The IsSecond property tracks which of the two values currently appears on screen, and the client can use this value to perform one of two tasks, depending on the current setting.
The piece of code that performs all of the work for this control is the OnClick() override. The OnClick() method fires the Click() event. The default button merely fires the event without doing much else. The modified form for this example alternates the text and then fires the Click() event. Here's the code you'll need to perform a task of this nature.
protected override void OnClick(EventArgs e)
{
//Obtain the current view state. try
{
_IsSecond = (bool)ViewState["IsSecondValue"];
}
catch
{
}
//Determine which caption to use. Alternate
//between the two text values.
if (_IsSecond)
{
_IsSecond = false; Text = _FirstText;
}
else
{
_IsSecond = true; Text = _SecondText;
}
//Save the current state. ViewState["IsSecondValue"] = _IsSecond;
//Perform the standard action. base.OnClick(e);
}
You might wonder what the call to the ViewState property accomplishes. This property is a collection of values that must remain intact between calls to a particular control. It's akin to the property bag used by COM controls. Because web pages have no state information, we
must save the value of the IsSecond property between component calls. Otherwise, the control will always stay in one state. Of course, the first time the user clicks the button, there's no ViewState["IsSecondValue"] property value to retrieve, which is why the code appears within a try block.
The actual mechanism for switching between captions is relatively simple. The value changes based on the current value of _IsSecond. Note that the last step is to call base.OnClick(). If you don't call the base.OnClick() method, the Click() event won't occur because we haven't added code for it.
The text application appears within the same project as the control. Figure 14.7 shows the layout for the test application. As you can see, it's browser-based and includes a textbox for displaying the current button state.
Figure 14.7: The test application shows the current button state.
The client also requires some simple code to handle the Click() event. Here's the code you'll need to use.
private void MyButton1_Click(object sender, System.EventArgs e)
{
// Set the button state indicator. if (MyButton1.IsSecond)
txtState.Text = "The Button is Off"; else
txtState.Text = "The Button is On";
}
As you can see, the code relies on the value of the IsSecond property to determine which message to display. Of course, the code could easily perform other tasks, such as turning a printer or other device on or off based on the button state.
Understanding the Advantages of Data Caching in Web Applications
One of the most popular techniques for improving the performance of ASP applications is data caching. For example, if the contents of a database are fairly static, an application can improve its performance by caching the data locally, rather than incurring the cost of requesting a fresh copy of the database for each user request. In addition to saving the time
required to make the call to the database, using data caching techniques can save resources on the back-end server. You can find out more about the basic process at http://www.aspfaqs.com/aspfaqs/ShowFAQ.asp?FAQID=142. In addition, you might want to review the features for third-party products such as XCache (http://www.xcache.com/home/) that make the process of storing data locally even easier.
Tip One of the major problems that developers cite when working with IIS is security. Over the past few years, IIS has received constant cracker attention, which means it's constantly failed to work as bugs and viruses conspire to take web servers offline. Microsoft has become a little more serious about security recently and even started to consider following the advice of third parties regarding IIS configuration. One major about-face is the automatic configuration of IIS features. This latest version of IIS begins with all of its features locked down and isn't even installed by default—you must install it manually. Of course, now an equally boisterous group of detractors claim that IIS isn't user friendly. You can read more about these new security features as part of an article entitled, "Trustworthy IIS" on the WebTrends site (http://www.iisadministrator.com/Articles/Index.cfm?ArticleID=23838).
Of course, one of the problems with data caching is that the information can change between the time the data is cached and the time the user requests it. Consequently, most caching techniques also include some type of time-out mechanism that invalidates the stored information after a specific interval. For example, an application developer could assume that a database query is valid for one day, which means the DBMS receives a request just once a day, rather than one for each user request.
While caching data locally was a chore in ASP, Microsoft has provided several cache-related classes for ASP.NET that make things relatively easy for the developer. In fact, ASP.NET supports three levels of data caching, so you can choose the type of caching that works best in a particular situation, as described in the following list.
Page Level (Output) This level of caching stores the dynamic output of an HTML page. In short, the page is only generated once for each caching interval and future requests rely on the stored HTML page. You should use this type of caching for static content where the information is unlikely to change quickly and there's little or no customization to consider. Implementing this form is caching is easy—simply add the <%@OutputCache Duration="60"%> to your ASP.NET page. The Duration argument tells how long to store the page in the cache in seconds. You can also add other attributes such as VaryByParam that vary the output from the cached page using the GET query string or POST parameters. The server will cache multiple versions of each page type requested. Other attributes include VaryByHeader (caches versions of the page based on header content), VaryByControl (caches versions of the page based on a particular control's settings), and VaryByCustom (caches versions of the page based on custom settings, such as browser type). An optional Location attribute determines where the ASP.NET page is cached: anywhere, client, downstream, or server. You can see a live demonstration of this form of caching at http://aspnet.4guysfromrolla.com/demos/OutputCaching.aspx.
Page Fragment (Partial-Page Output) In most cases, you can't cache an entire page because it contains some amount of customization that's unique for each viewer. You can still cache partial pages—the static content of a page that's the same for every viewer. ASP.NET uses control-based caching to implement the page-fragment technique. One of the easiest ways to
tell ASP.NET that you want to cache a particular control is to add the <%@OutputCache> directive to the top of the control. You can also use the [PartialCaching] attribute found in the System.Web.UI namespace. The advantage of using the attribute is that you can use reflection to read the attribute settings and using the attribute appears to give you better control over the caching mechanism. The <%@OutputCache> directive is easier to use and read for many developers.
Programmatic or Data Fragment In rare instances, you can't define a specific control to cache, but you can define the data you need to cache. In this case, you can use programmatic or data-level caching. The biggest problem with data caching is that the cache continues to exist for the life of the application. This limitation means you must actually stop and then restart the application to clear the cache—a problem for modern websites. In addition, you must limit the data cache to items that definitely won't change or use up resources on other servers. For example, you wouldn't want to cache a database connection because caching the database connection would needlessly tie up resources on another machine and not garner much in the way of performance benefit. You add an item to the cache using the Cache[Variable Name] call. The Cache class, found in the System.Web.Caching.Cache namespace, includes methods for getting, adding, inserting, and removing cache members. Code accesses the various members using the variable name as a string, since the cache stores items in an array.
As you can see, ASP.NET provides a number of ways to improve application performance using caching. The method you choose depends on the level of caching your application can support, with the page fragment technique being the most common and the page level technique being the easiest to implement. No matter which level of caching you use, it's important to balance the caching requirements of your application with the resources it needs to perform useful work. If your application is resource-starved because the cache consumes too many memory or processor resources, the performance gain you'll see is going to be small or even non-existent. In short, caching isn't actually a cure for anything—it's simply a tool that can provide a performance gain when used properly.
Working with Web Services
A web service is an application fragment—part of an application that some other application will use to create a complete solution. For some people, web service is just another name for component, but it's really not the same thing. Web services are more functional than components, in most cases, and use a different form of communication than components do. One of the best ways to look at a web service is as a super-charged component designed for distributed application use; it enables you to garner the benefits of code written by someone else.
The sample application in this section is going to rely on the four-function calculator we've used in the past. The web service will provide the math functions while a browserbased application creates a connection and uses the functions to perform calculations. The following sections create the web service and then test it using the browser-based application. You'll find the source code for this example in the \Chapter 14\WebServe folder of the CD.
Creating the Web Service
You'll begin the web service by creating an ASP.NET Web Service project. The example uses a project name of WebServe and a class name of MathStuff. Remember that there's no user interface in this example; although, Visual Studio certainly provides the functionality required to add user interface elements to your web service. (The inclusion of user interface elements is one of the reasons that a web service doesn't really fall into the component category.)
The code for this example begins with an attribute you should include as part of the class declaration for every web service. The [WebService] attribute defines the namespace and provides a description of your web service. Here's the code used for the example.
[WebService(Namespace="http://winserver",
Description="This is a simple Web Service that performs " + "four math functions.")]
Notice the Namespace argument is a URL. ASP.NET provides a default URL if you don't supply one. The default URL works fine for local applications, but will very likely cause problems in a distributed application, especially one that you share with corporate partners or with the public. The Description argument isn't required, but it does help identify the purpose of the web service to others who might not be familiar with it. You can make the description as long or short as you like.
The four methods for this example are relatively straightforward. However, they do point out a few items that you need to consider. Here's one of the four functions (they're all pretty much the same—see the source code on the CD for differences).
[WebMethod (Description = "This is a simple method for " + "adding two numbers")]
public string DoAdd(string Input1, string Input2)
{
//Convert the two input values. int Value1 = Int32.Parse(Input1); int Value2 = Int32.Parse(Input2);
//Calculate the sum.
int Result = Value1 + Value2;
// Return the result. return Result.ToString();
}
Any web service method you create must begin with a [WebMethod] attribute. In most cases, you can use this attribute by itself, but it's best if you add the Description argument as shown. The point of the Description argument is to make the method
relatively self-documenting. The [WebMethod] attribute also accepts other optional arguments, such as BufferResponse, that affect the performance or functionality of the method. Generally, you'll only add these other arguments in special circumstances. For example, you might want to track session information, so you'd need to provide the EnableSession argument. At this point, you can compile the web service.
Tip |
Even though you can transfer most value types from point-to-point using |
|
technologies such as SOAP, you'll find that using strings is advantageous |
|
because it's least likely to cause data-translation problems. An integer on |
|
one platform isn't necessarily an integer on another platform, but a string is |
|
always a string (at least, in the pure ASCII format used by SOAP). String |
|
values are also easier to debug. Consequently, the conversion cost from a |
|
numeric (or other) data format is small compared to the gains you'll receive |
|
from using string data. |
Taking a Test Drive with a Browser
Now that you have a web service, it's time to see how it works. The files that your web service project creates don't just sit in the dark and wait until someone stumbles upon them. You can access the web service directly with a browser. In fact, that's the method you should use for an initial web service test, because it's the most direct and the most likely to work.
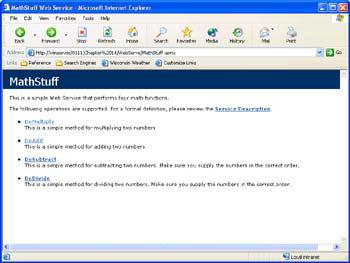
The WebServe application created two "discovery" files on the web server. The first has a DISCO file extension and is used by applications for automated discovery. We won't use that file in this example. The second file is MathStuff.ASMX, and we can access it directly using a browser. When you access this file through a web connection through a web server, you'll see a display similar to the one shown in Figure 14.8.
Figure 14.8: Accessing the ASMX file is the first step in testing your web service.