

Basic for PIC Microcontrollers (M. Nebojsa, 2001)
.PDFBasic for PIC Microcontrollers |
161 |
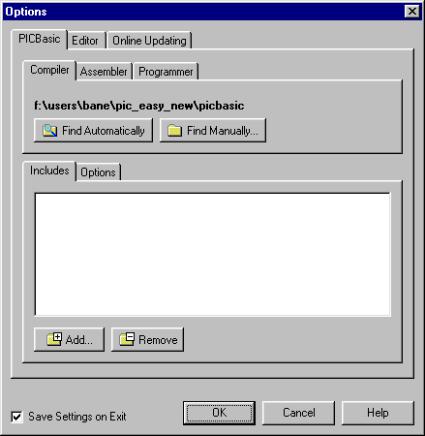
To connect MicroCode Studio and PBP compiler a new window is to be opened. It’s done by clicking on the Options from the View menu. If the compiler is already copied into a hard disk directory clicking on the Find Automatically button whereupon will the program itself search for the directory with compiler through the hard disk. When the program finds the compiler, above the button the path “C:\PBP” will appear above the button
Find Automatically.
Basic for PIC Microcontrollers |
162 |
Connecting MicroCode studio and PBP compiler. If the PBP compiler is already copied into a directory on a hard disk, it is enough to click on the Find Automatically button and the program will find it on its own
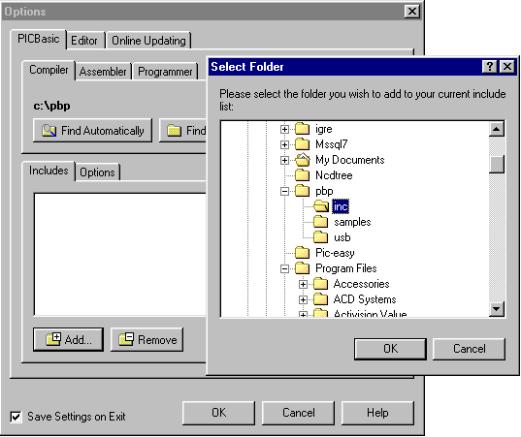
Beside the path to the compiler, it is still necessary to define the path to the include data file. By clicking on Add the paths C:/PBP and C:/PBP/inc are added within Includes.
Basic for PIC Microcontrollers |
163 |
Include data files are necessary for successful compilation of the program. Clicking the Add, the new window appears with theinc directory into which the PBP compiler is copied

Basic for PIC Microcontrollers |
164 |
Options window after setting the path to the compiler andinclude data files. Notice that there areinclude data files in the very C: \PBP directory so that their path should be specified as well
This step finishes the setting part referring to the compiler. MicroCode studio is now ready for program reading and compiling.
B.4 Connecting MicroCODE Studio and the programmer
The installation of the programmer that MicroCode will call upon successfully accomplished program compilation is to be undertaken only if the user possesses some development environment or some of the programmers that will read in the comp iled program into the microcontroller. In lack of any of these tools this part of MicroCode studio setting is to be omitted.
The setting of the programmer starts by clicking on Programmers whereupon two distinct options appear, one for adding of programmer into the list and another for their removal. The programmer that is to be used here

Basic for PIC Microcontrollers |
165 |
ranks as the simplest economic programmers of PIC microcontrollers that are available at the moment. The name of this programmer is ICprog and it uses the serial pin of the computers port in order to communicate with the microcontroller (more details can be found in the special appendix contained in this book).
By clicking Programmers the part for setting the programmer appears
Before installing the programmer, it has to be copied in a directory on the hard disc, e.g. “C:\Programmer”. Clicking the “Add new Programmer…”, the brief procedure of selecting the path to programmer begins.
The first step is writing the name of the programmer or any abbreviation that could bear resemblance to it. As Icprog programmer is used it is logical to name it “ICprog”.

Basic for PIC Microcontrollers |
166 |
In this option the name of the programmer is to be written. It can well be any of the names bearing resemblance to the programmer we wish to install
The next step is the writing of the exact name of the programmer. It is very important not to make any mistake; otherwise the program will not be able to locate it on a hard disk.
In this option, the exact name of the executive data file of the programmer is to be indicated. In this case it’s icprog.exe
Finally, by clicking on Find Automatically, the program then finds on its own the path towards the programmer.

Basic for PIC Microcontrollers |
167 |
By clicking on Find Automatically the program finds the path to the programmer on its own
Option to define additional parameters is next. Nevertheless, it is to be omitted due to the fact that it will be used in a later phase of the operation when the longer programs are written and the program name is not changed very often. Clicking on Finished overrides this option.
The option to define the additional parameters of the programmer is not to be used here; therefore it is to be omitted by clicking on Finished
The window Option out of the View menu with the set parameters for the compiler and the programmer now looks like exactly as on the image bellow. Thereby all relevant settings of the MicroCode Studio are finished.

Basic for PIC Microcontrollers |
168 |
Window Option with all the parameters for the compiler and the programmer set
Besides the setting of the compiler and the programmer, there are somewhat less important settings as that of an editor. Since those parameters are already well set we will not take them into consideration now.
B.5 Code writing and compilation in MicroCODE studio
The MicroCode studio looks like most of the Windows programs. Above the working area there are menu lines, toolbars and the line connected to the compilation and reading of a program into the microcontroller.

Basic for PIC Microcontrollers |
169 |
The menu line contains all standard submenus as File, Edit, Search, View and Help.
The toolbar contains but a few basic icons and their purpose we will not explain in details.
What separates the MicroCode studio from the other development environments is its simplicity and legibility. Its most important part is located in the left part by the name Code Explorer. When necessary, that part of the window can be shut down by clicking on View – Code Explorer… although it is recommended to leave it as it is for it contributes to the better legibility and organization of the program. The code writing is done in the right part of the window. The process of code writing itself is largely facilitated by thickening of the commands, and by the excellent solution for the complicated commands with the greater number of parameters as “button”
Basic for PIC Microcontrollers |
170 |
command is. Namely, after writing of this command and the first empty (blank) character, the yellow frame with all parameters of the respective command appear.
Upon having written the code, by clicking on icon Compile Only (in triangular shape on the right side) the compilation of program starts. If an error occurs, it’s reported in a special part at the bottom of the window. By clocking on Error, the cursor is positioned exactly at the row in which the error occurred. After correction, the program is compiled as long as the compilation process becomes successful.
If the programmer is already configured, then the icon right next to the Compile Only can be used instead, which will, upon a successfully accomplished compilation, call the programmer.