

Basic for PIC Microcontrollers (M. Nebojsa, 2001)
.PDFBasic for PIC Microcontrollers |
131 |
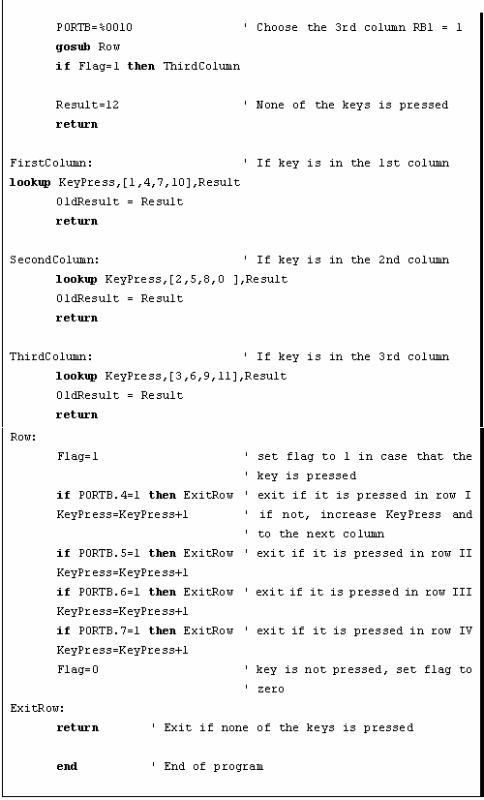
The program sets value of the last read key on port D. If none of the keys is pressed all diodes of port D are on. "*" and "#" are represented with values 10 and 11.
The greatest task is on the subroutine ScanKey. It sets logical one on keyboard columns and then calls the subroutine Row which checks if any of the 4 keys in that columns is pressed (which is signalized by variable Flag).
In case that one of the keys from the column is pressed, variable KeyPress takes value from 0 to 3 (zero for the first row of that column, one for the second row of that column, etc. ). By calling the appropriate Lookup table, real value of the key is stored into variable Result and then to variable OldResult where from it is displayed on port D. In case that no key is pressed value of variable is 12.

Basic for PIC Microcontrollers |
132 |
Basic for PIC Microcontrollers |
133 |
Basic for PIC Microcontrollers |
134 |
7.2 Driver for seven-segment displays - MAX7912
If a PIC16F84 or some similar microcontroller is programmed only to work with seven-segment displays (in multiplex mode) then it could be called "driver". If we supply it with option to communicate, we have a complete driver. If all that is realized directly in silicon while creating the "driver", we get full-fledge drivers that can be sold as independent electronic components.
Question "why use drivers and not multiplexing the digits" is easy to answer with another question "what in case that we need 6 groups of 4 digits display ?". It would require programmer to take care of multiplexing 4x6=24 digits. If the program in question is complicated, time necessary to write and adjust such a program might be more expensive solution than buying a separate driver.
There is a great variety of drivers and we will use MAX7912 in this sample. It can refresh 8 displays with option of configuring light intensity, while data transfer is serial, requiring small number of microcontroller pins. Anyhow, using the driver minimizes the work with seven-segment displays.
Working with driver is simple. There are certain registers which get necessary values via SPI communication. Address value is stored into variable TxAddr and data is stored into TxData. Subroutine Send_Data transfers address and data to driver. Before the first
transfer, driver should be initialized by subroutine Init_MAX which is called only at the beginning of the program. The picture below shows the connection scheme and the sample program for printing the numbers 12345678 on displays follows.

Basic for PIC Microcontrollers |
135 |

Basic for PIC Microcontrollers |
136 |
Basic for PIC Microcontrollers |
137 |

Basic for PIC Microcontrollers |
138 |
Appendix A
PIC BASIC AND MPLAB
Introduction
A.1 Installation of the program / MPLAB
A.2 Connection of PIC BASIC and MPLAB
A.3 Toolbar
Introduction
MPLAB is a Windows programming package that facilitates writing and the development of the program. The easiest way to describe it would be to characterize it as a development environment for some standard programming language intended for PC programming. Using MPLAB technically facilitates some of the operations which all the way up to the appearance of the IDE environment, were operating out of the command line with very big number of parameters. Nevertheless, out of different tastes, some programmers even today prefer standard editors and compilers operating out of the command line. In any case the written code is very manifest and provided with a relatively well-provided HELP menu (the abbreviation IDE was born out of the initials Integrated Development Environment).
A.1 Installation of the program / MPLAB
Basic for PIC Microcontrollers |
139 |
MPLAB is composed out of several different entities
-The grouping of the files belonging to the same project (Project Manager)
-The creationof the program and its elaboration (Text Editor)
-Simulator of the code whereby its work on the microcontroller is simulated.
Besides there exist support for Microchips products such as PICStart Plus i ICD (In Circuit Debugger). As this book doesn’t rely upon them, they'll be mentioned as options only.
The minimal requirements in order to start up MPLAB on your computer are:
-Compatible PC of 486 class or higher
-Microsoft Windows 3.1x or Windows 95 and more recent Windo ws OS versions
-VGA graphic card
-8MB of memory space (32 MB recommended)
-20MB space on hard disk
-The mouse
To start MPLAB it is necessary to install it first, which is understood as a process of copying of MPLAB files from CD onto the hard disk of the PC. On each newly opened window there is button for going back to the previous window so mistakes should not represent any problem. The installation itself flows similarly as those of almost all Windows programs. The welcome screen pops up first and then you have the option choice and the installation menu in order to finally get the message that your installed program is ready to be started.
Steps in the installation:

Basic for PIC Microcontrollers |
140 |
1.The starting of the Microsoft Windows
2.Put the Microchip CD disk into the CD ROM
3.Click onto the START in the lower left corner of the screen and choose the RUN option
4.Click onto the BROWSE and select CD ROM drive for your PC
5.On the CD ROM find the directory under the name of MPLAB
6.Click onto the SETUP.EXE and then on the OK button
7.Click once again on OK button in the RUN window
After these seven consecutive steps the installation will start. The following pictures explain the meaning of single steps in the installation process.
The WELCOME screen at the beginning of the installation
At the very beginning it is necessary to choose those components of MPLAB with which we are going to work. As it is supposed that there are no original Microchip’s hardware additions such as programming devices or emulators, only the MPLAB environment, Assembler, Simulator and the instructions for use will be installed.