&KDSWHU 7KH 5HVRXUFH (GLWRU
$GGLQJ D FDWHJRU\ RU DQ HQWU\ WR D UHVRXUFH ILOH
All possible categories and entries for all supported definition files are listed in a hidden template. Each resource file is built using categories and entries from this template. You can use this template to add a category or an entry which does not appear by default in the resource file. Template categories and entries are available from the Add Items command in the contextual menu of the root node of the tree or the category node.
If an entry does not appear in the resource file, the default value of this entry stored in the hidden template is used.
ϖ7R DGG D FDWHJRU\ RU DQ HQWU\ WR D UHVRXUFH ILOH
1Right-click the root node of the resource file or a category node and select Add Items.
A Selection dialog box appears listing available categories or entries.
2Select the check box for a category or an entry that you want to add to the resource file.
3Click OK.
The category or the entry is added to the resource file. You cannot modify its name as it depends on the hidden resource file template.
&UHDWLQJ D FDWHJRU\ LQ D UHVRXUFH ILOH
You can create a category in the resource file. Since this category does not come from the hidden template and is not managed by PowerDesigner, you cannot use the Add Items command to add entries to this category.
ϖ7R FUHDWH D FDWHJRU\ LQ WKH UHVRXUFH ILOH
1Right-click the root node of the resource file tree view, select New→Category.
The category is created in the tree view with a default name.
2Click on the new category node to modify its name, comment and value in the right pane of the dialog box.
5HQDPLQJ D FDWHJRU\ IURP WKH UHVRXUFH ILOH WUHH YLHZ
You can also rename a category directly from the resource file tree view by selecting the category and pressing the F2 key.
8VLQJ WKH UHVRXUFH HGLWRU
&UHDWLQJ DQ HQWU\ LQ D FDWHJRU\
You can also create new entries in the resource file. Since these entries do not come from the hidden template and are not managed by PowerDesigner, they are only used to describe or archive a specific query.
ϖ7R FUHDWH D HQWU\ LQ D FDWHJRU\
1Right-click a category, or sub-category in the resource file tree view, select New and select the type of the new entry.
The entry is created in the tree view with a default name.
2Click on the new entry node to modify its name, comment and value in the right pane of the dialog box.
5HQDPLQJ DQ HQWU\ IURP WKH UHVRXUFH ILOH WUHH YLHZ
You can also rename an entry directly from the resource file tree view by selecting the entry and pressing the F2 key.
0RGHO GLVSOD\ SUHIHUHQFHV
0RGHO GLVSOD\ SUHIHUHQFHV
Model display preferences apply to all diagrams in the entire model. However you always define display preferences for the current diagram first.
You can define:
♦General display preferences
♦Object view display preferences
♦Format display preferences
$SSO\LQJ GLVSOD\ SUHIHUHQFHV
Applying display preferences depends on the number of diagrams your are dealing with.
:KHQ GHDOLQJ ZLWK VHYHUDO H[LVWLQJ GLDJUDPV you will set display preferences for the current diagram then apply them to a selection of diagrams of the same type than the current diagram.
:KHQ GHDOLQJ ZLWK RQH GLDJUDP you will set default display preferences that apply to both the current diagram and to all new diagrams of the same type you will create afterwards.
In the Display Preferences dialog box you can:
♦Define preferences for the current diagram
♦Apply display preferences to a selection of diagrams
♦Restore default display preferences
♦Set new default display preferences
'HILQLQJ GLVSOD\ SUHIHUHQFHV IRU WKH FXUUHQW GLDJUDP
You can define display preferences that only apply to the current diagram.
&KDSWHU 0RGHO *UDSKLFV
ϖ7R GHILQH GLVSOD\ SUHIHUHQFHV IRU WKH FXUUHQW GLDJUDP
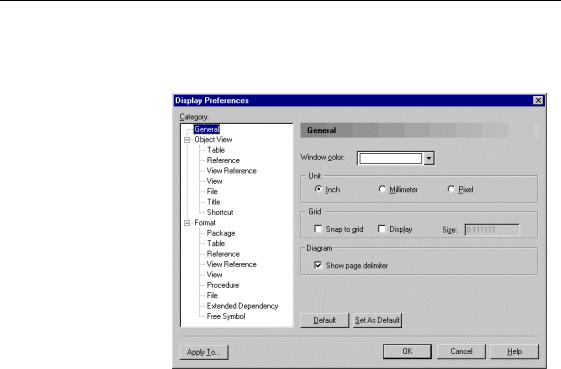
1Select Tools→Display Preferences to display the Display Preferences dialog box.
2Select a category and modify display preferences.
3Click OK.
The new display preferences are automatically applied to the current diagram in the model.
$SSO\LQJ GLVSOD\ SUHIHUHQFHV WR D VHOHFWLRQ RI GLDJUDPV
When you define display preferences for a diagram, you can use the Apply To button to select other diagrams in the current model or in other models opened in the workspace to apply the same display preferences.
Diagrams to which you apply the display preferences must be of the same type.
If you click the Apply To button, select diagrams and click OK, the display preferences you defined are automatically applied to the selected diagrams although they are not applied to the current diagram yet. You must click OK in the Display Preferences dialog box to commit the changes in the current diagram. If you click Cancel, the display preferences changes are not applied to the current diagram.
0RGHO GLVSOD\ SUHIHUHQFHV
Symbol format |
The preferences defined for symbols format are default values used for new |
display preferences |
symbols only. You can modify individually each existing symbol display |
|
preferences using the Format command in the symbol contextual menu. |
|
When you apply display preferences to a selection of diagrams, a |
|
confirmation dialog box prompts you to apply the default display preferences |
|
to all symbols in the selected diagrams. |
|
,I \RX FOLFN <HV The Format, General and Object View display |
|
preferences are applied to all symbols in the selected diagrams. |
|
,I \RX FOLFN 1R Only the General and Object View display preferences are |
|
applied to the symbols of the selected diagrams, the Format changes are |
|
canceled. |
ϖ7R DSSO\ GLVSOD\ SUHIHUHQFHV WR D VHOHFWLRQ RI GLDJUDPV
1Select Tools→Display Preferences to display the Display Preferences dialog.
2Select a category and modify display preferences.
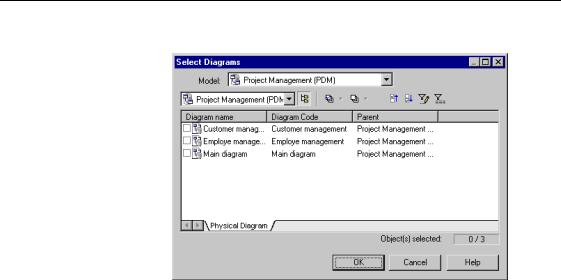
3Click the Apply To button to display the Select Diagrams dialog box.
4Select a model and a package.
&KDSWHU 0RGHO *UDSKLFV
5 Select the diagrams to which you want to apply the display preferences.
6Click OK.
A confirmation dialog box prompts you to apply the default formats to all symbols of the selected diagrams.
7Click OK in each of the dialog boxes.
5HVWRULQJ GHIDXOW GLVSOD\ SUHIHUHQFHV
You can restore the default display preferences in the current diagram. The default display preferences are stored in the registry.
0RGHO GLVSOD\ SUHIHUHQFHV
ϖ7R UHVWRUH GLVSOD\ SUHIHUHQFHV IRU WKH FXUUHQW GLDJUDP
1Select Tools→Display Preferences to display the Display Preferences dialog box.
2Click the Default button.
The default display preferences that are stored in the registry are reapplied to the current diagram.
3Click OK.
'HILQLQJ GHIDXOW GLVSOD\ SUHIHUHQFHV
You can modify the default display preferences that are saved in the registry. If you do so, you modify the display preferences for the current diagram and for all new diagrams of the same type.
&KDSWHU 0RGHO *UDSKLFV
ϖ7R GHILQH GHIDXOW GLVSOD\ SUHIHUHQFHV
1Select Tools→Display Preferences to display the Display Preferences dialog box.
2Modify display preferences.
3Click the Set As Default button.
The display preferences you have defined become the default preferences for the current diagram.
'HIDXOW EXWWRQ
If you want to return to the previously saved default display preferences, click the Default button.
4Click OK.
The display preferences are applied to the current diagram in the model, and to all new diagrams of the same type you will create afterwards. These parameters will be used the next time you click the Default button.
0RGHO GLVSOD\ SUHIHUHQFHV
6HOHFWLQJ JHQHUDO GLVSOD\ SUHIHUHQFHV
You can define the following general display preferences:
|
3UHIHUHQFH |
'HVFULSWLRQ |
|
Window color |
Sets the background color for the current diagram in the model |
|
Snap to grid |
Automatically aligns all new objects that you create in the |
|
|
|
diagram window to the anchor points of the grid. All existing |
|
|
objects are aligned automatically when you move them within |
|
|
the diagram |
|
Display |
Activates the grid within the diagram window |
|
|
Size |
Determines the number of anchor points in the grid per square |
|
|
|
inch |
|
Show page |
Shows limit of pages on the diagram background |
|
|
delimiter |
|
|
|
|
6HWWLQJ GHIDXOW GLVSOD\ SUHIHUHQFHV
You can set newly selected general display preferences as default selections by clicking the Set As Default button in the Display Preferences dialog box. If you want to see the current default display preferences, click the Default button.