СУБД Oracle / Литература / PowerDesigner 9 / GeneralFeatures
.pdf&KDSWHU 7KH 5HVRXUFH (GLWRU
ϖ7R VHOHFW UHVRXUFH ILOHV IRU FRPSDULVRQ
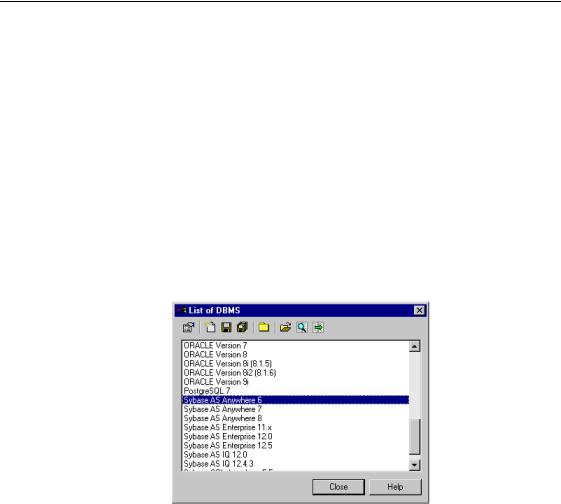
1Select Tools→Resources→5HVRXUFH )LOH. The list of resource files appears.
2Select a resource file in the list.
3Click the Compare tool.
The Select UHVRXUFH ILOH to Compare dialog box appears. The selected resource file appears in the lower part of the dialog box.
4Select a resource file from the first dropdown listbox.
If the resource file you want to compare is not in the list, click the Select a Path tool and browse to the directory containing the resource file you want. Click OK and select the resource file from the dropdown listbox.
5Click OK.
The Compare UHVRXUFH ILOHV dialog box appears and you can compare the selected UHVRXUFH ILOHV.
For more information on the comparison process, see chapter Comparing and Merging Models.
General Features Guide |
|
&KDSWHU 7KH 5HVRXUFH (GLWRU
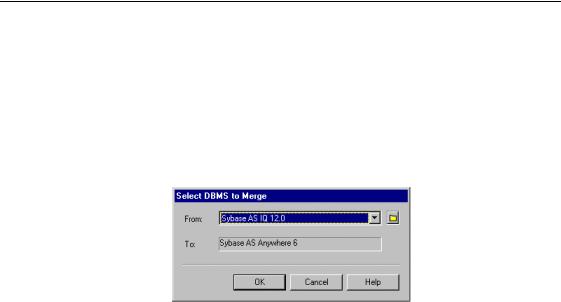
3Click the Merge tool.
The Select UHVRXUFH ILOH to Merge dialog box appears. The selected resource file appears in the To box.
4Select a resource file in the From dropdown listbox. This file that will appear in the left pane of the Merge dialog box.
If the resource file you want to merge is not in the list, click the Select a Path tool and browse to the directory containing the resource file you want. Click OK and select the resource file from the dropdown listbox.
5Click OK.
The Merge UHVRXUFH ILOHV dialog box appears and you can merge the selected UHVRXUFH ILOHV.
For more information on the merge process, see chapter Comparing and Merging Models.
General Features Guide |
|
8VLQJ WKH UHVRXUFH HGLWRU
8VLQJ WKH UHVRXUFH HGLWRU
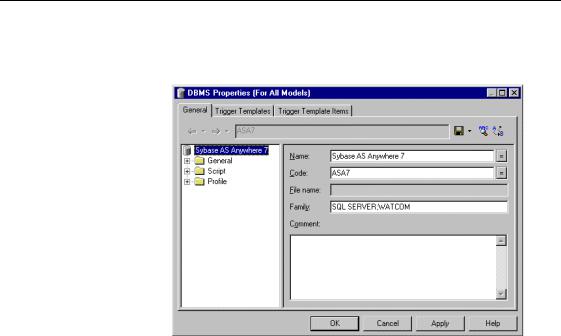
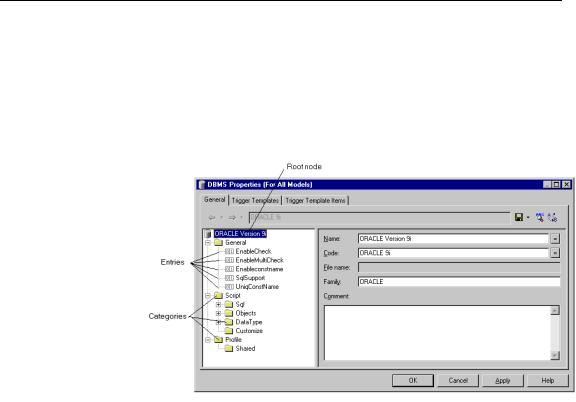
The General page of the resource file property sheet displays the definition of the resource file. It is made up of a tree view displayed on the left hand side and values displayed on the right hand side. You can navigate in the tree view. Depending on the selected item in the resource file tree view, the right side of the dialog box changes accordingly.
Concepts |
The resource editor lets you navigate through the categories and entries of the |
|
resource file. |
|
A FDWHJRU\ is a set of entries corresponding to a logical group in the resource |
|
file. For example, the Script category gathers all entries concerning database |
|
generation and reverse engineering in a DBMS. |
|
Each category contains one or several HQWULHV. An entry is a piece of |
|
information that is part of the definition of a resource file. For example, you |
|
can define entries for a database command, an object language |
|
characteristics, a report item, and so on. Each entry is part of a category or |
|
sub-category. |
|
PowerDesigner |
&KDSWHU 7KH 5HVRXUFH (GLWRU
Toolbar |
You can perform the following navigation and saving tasks from the resource |
|||
|
editor toolbar: |
|
|
|
|
|
|
|
|
|
7RRO |
7DVN |
'HVFULSWLRQ |
$FFHOHUDWRU |
|
|
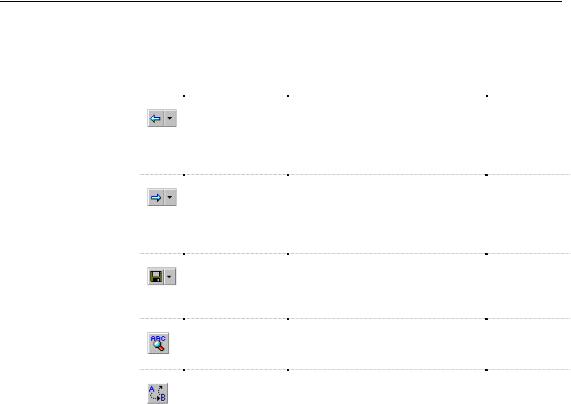
Back |
Go back to the previous visited entry |
ALT+LEFT |
|
|
|
or category. If you click the down |
|
|
|
|
arrowhead, you can directly select the |
|
|
|
|
previous visited entry or category to |
|
|
|
|
which you want to go back |
|
|
|
Forth |
Go forth to the next visited entry or |
ALT+RIGHT |
|
|
|||
|
|
|
category. If you click the down |
|
|
|
|
arrowhead, you can directly select the |
|
|
|
|
next visited entry or category to |
|
|
|
|
which you want to go forth |
|
|
|
Save/Save As |
Save the current resource file. If you |
CTRL+SHIFT+S |
|
|
|||
|
|
|
click the down arrowhead, you can |
|
|
|
|
save the current resource file under a |
|
|
|
|
new name |
|
|
|
Find In Items |
Search for text, command, template, |
CTRL+SHIFT+F |
|
|
|||
|
|
|
custom check, criterion and generated |
|
|
|
|
file entries |
|
|
|
Replace In Items |
Search for and replace text, |
CTRL+SHIFT+H |
|
|
|||
|
|
|
command, template, custom check, |
|
|
|
|
criterion and generated file entries |
|
|
|
|
|
|
General Features Guide |
|

|
|
|
|
|
&KDSWHU 7KH 5HVRXUFH (GLWRU |
|
|
|
|
|
|
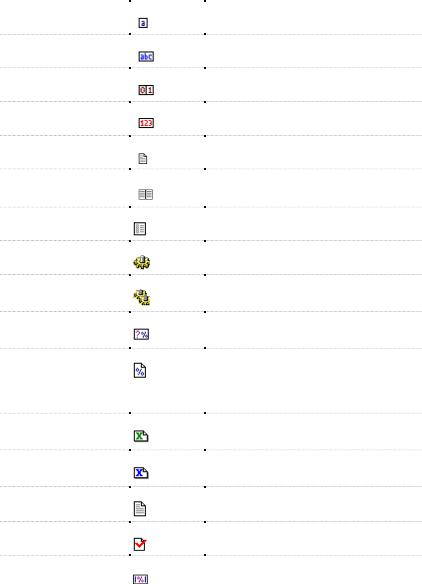
Entry types |
The following table helps you identify the various entry types available in the |
||||
|
resource editor when you select the New option in the contextual menu of a |
||||
|
category or entry. All these entry types are usable from all ressource files: |
||||
|
(QWU\ QDPH |
|
6\PERO |
|
'HVFULSWLRQ |
|
|
|
|||
|
Char |
|
|
|
Single character |
|
String |
|
|
|
Single line text |
|
|
|
|
||
|
Boolean |
|
|
|
Boolean |
|
|
|
|
||
|
Numeric |
|
|
|
Numeric |
|
|
|
|
||
|
Text |
|
|
|
Long text |
|
|
|
|
||
|
Map |
|
|
|
List of values |
|
|
|
|
||
|
List |
|
|
|
Values for dropdown listboxes |
|
|
|
|
||
|
Command |
|
|
|
Commands for generation |
|
|
|
|
||
|
Task |
|
|
|
List of commands to be executed after |
|
|
|
|
||
|
|
|
|
|
generation |
|
Option |
|
|
|
Generation option (boolean, list, or string |
|
|
|
|
||
|
|
|
|
|
type) |
|
Template |
|
|
|
Plain text, mixed with variables that |
|
|
|
|
||
|
|
|
|
|
consist in information coming from the |
|
|
|
|
|
model itself that allows you to customize |
|
|
|
|
|
generation |
|
Extended attribute type |
|
|
|
User-defined data type with a list of |
|
|
|
|
||
|
|
|
|
|
authorized values of extended attributes |
|
Extended attribute |
|
|
|
Complement to the definition of a |
|
|
|
|
||
|
|
|
|
|
metaclass and also controls generation |
|
Generated file |
|
|
|
Contains file types to generate |
|
|
|
|
||
|
Custom check |
|
|
|
Definition of a customized check |
|
|
|
|
||
|
Criterion |
|
|
|
Definition of criterion conditions for a |
|
|
|
|
||
|
|
|
|
|
selected metaclass |
General Features Guide |
|
|
|
|
|
|
|
|
|
||

&KDSWHU 7KH 5HVRXUFH (GLWRU
ϖ7R PRGLI\ D UHVRXUFH ILOH
1Select Tools→Resources→5HVRXUFH )LOH
The list of resource files appears.
2Select a resource file in the list.
0RGLI\LQJ D VKDUHG UHVRXUFH ILOH
If you are modifying a shared resource file (you selected the Shared radio button when you choose the resource file), you modify the resource file original resource file in the resource files library. This definition is shared by all models using the resource file Shared connection. To ensure that you keep the original resource file, you should only modify a new resource file created from an original resource file
3 Click the Properties tool.
General Features Guide |
|