

Cisco Secure VPN Exam Certification Guide - Cisco press
.pdf318 Chapter 7: Monitoring and Administering the VPN 3000 Series Concentrator
Figure 7-14 Administration | Access Rights | Administrators | Modify Properties
The pull-down menus for all of these options are the same. Shown in Figure 7-15, each of the pull-down menus has four options:
•None—The concentrator will not allow the user to access the section in any manner, including viewing and changing.
•Stats Only—This option restricts the user to those screens where statistics are displayed.
•View Config —This options allows the user to view, but not change, the current configuration.
•Modify Config—This option allows the user to change items within the section.
This system gives a great deal of flexibility with very little complexity. For example, imagine a user who has Modify Config access on Authentication, but None access on files. This user could change the configuration but would not be able to save that configuration. This would allow another administrator to review the changes made before committing those changes to the file system.
Access Control List
The Administration | Access Rights | Access Control List screen allows for adding, modifying, and prioritizing access lists. These access lists are used to determine those IP addresses that may access the concentrator for management functions. It is important to note that this access is not limited to HTTP and Telnet access. The access lists are also used to define those IP addresses that may be used for SNMP, FTP, and TFTP purposes. If the list is empty, as shown in Figure 7-16, then all stations will be allowed all access.


Administering the Cisco VPN 3000 Series Concentrator 321
Figure 7-18 Administration | Access Rights | AAA Servers
Authentication
The Administration | AAA Servers | Authentication screen is used to add, modify, and test TACACS+ servers. A sample screen is shown in Figure 7-19.
Figure 7-19 Administration | AAA Servers | Authentication

322 Chapter 7: Monitoring and Administering the VPN 3000 Series Concentrator
|
As with other screens of this type, choosing Add will allow you to add a new item, while Modify |
|
will allow changes to a chosen item. You may also move the order of the server entries and |
|
delete server entries, as well as test a connection to a TACACS+ server. |
|
|
NOTE |
Remember that the Cisco VPN 3000 Series Concentrators only use TACACS+ for administrator |
|
authentication. There are no provisions for these concentrators to use RADIUS or TACACS for |
|
the authentication. |
|
|
Adding a new TACACS+ server is accomplished by clicking the Add button. You are taken to the Administration | Access Rights | AAA Servers | Authentication | Add screen, as shown in Figure 7-20. On this screen, you first enter the IP address or host name of the TACACS+ server. This is followed by the port, timeout (in seconds), and number of retries. Leaving the port number set to zero will use the default port. Finally, enter and verify the server secret.
Figure 7-20 Administration | Access Rights | AAA Servers | Authentication | Add
File Management
The Administration | File Management screen is shown in Figure 7-21. This screen enables the submenu used to access the screens used for swapping the configuration file, TFTP transfers, file uploads using HTTP, and exporting the configuration to an XML file. You may also view, delete, or copy the configuration or log files.

Administering the Cisco VPN 3000 Series Concentrator 323
Figure 7-21 Administration | File Management
The VPN 3000 Series Concentrators merely need an IP address entered in order to transfer the files. Because multiple copies of the configuration file are available, you are able to move quickly between different configurations for testing purposes.
Certificate Manager
The Administration | Certificate Management screen allows you to see all of your current certificates and enroll or install new certificates. Under this screen, you have an Enrollment and Installation screen. These comprise the final screens under the Administration section. As shown in Figure 7-22, the Certificate Manager screen will list all of your certificates. Chapter 5, “Configuring Cisco VPN 3000 for Remote Access Using Digital Certificates,” provides a full explanation of working with certificates.

324 Chapter 7: Monitoring and Administering the VPN 3000 Series Concentrator
Figure 7-22 Administration | Certificate Management
Monitoring the Cisco VPN 3000 Series Concentrator
Assuming that you have logged into the concentrator, you will be presented with the main screen. For purposes of this section, you will be focusing on the Monitoring options. Click the Monitoring link to start monitoring the concentrator.
You should now be on the main monitoring screen, as shown in Figure 7-23. This screen will be used to navigate between all the monitoring options.
You are initially presented with six options, each of which brings you to an associated screen as described in Table 7-3. Any of these screens may have subscreens associated with them. Take a moment to study Table 7-3, which lists all of the menu and submenu options. Knowing how to navigate through the system will make administration easier. Knowing what options are controlled on individual screens will help you pass the exam. After studying the table, the next sections explore each individual item.
Next, you begin to explore some of the options available through the Monitoring menu system.


326 Chapter 7: Monitoring and Administering the VPN 3000 Series Concentrator
Table 7-3 |
Monitoring Menu System (Continued) |
||
|
|
|
|
|
Menu Option |
Level |
Usage |
|
|
|
|
|
Top Ten Lists |
3 |
Enables the submenu that allows you to see the statistics for the 10 |
|
|
|
most active sessions sorted by total bytes transmitted, total time |
|
|
|
connected, or average throughput. |
|
|
|
|
|
Statistics |
2 |
Enables the submenu for statistics. These statistics are divided into |
|
|
|
several submenus. |
|
|
|
|
|
MIB-II Stats |
3 |
Enables the submenu for those statistics that are reported through |
|
|
|
the MIB system. |
|
|
|
|
Routing Table
The Monitoring | Routing Table screen, shown in Figure 7-24, shows your current routes and allows you to clear routing entries. Note that, after clearing the routes, those routes that are learned by routing protocols will eventually be learned again by those protocols. Static routes are not affected by clearing routes. Be aware that clearing routes may disrupt user connectivity.
Figure 7-24 Monitoring | Routing Table
Event Log Screen
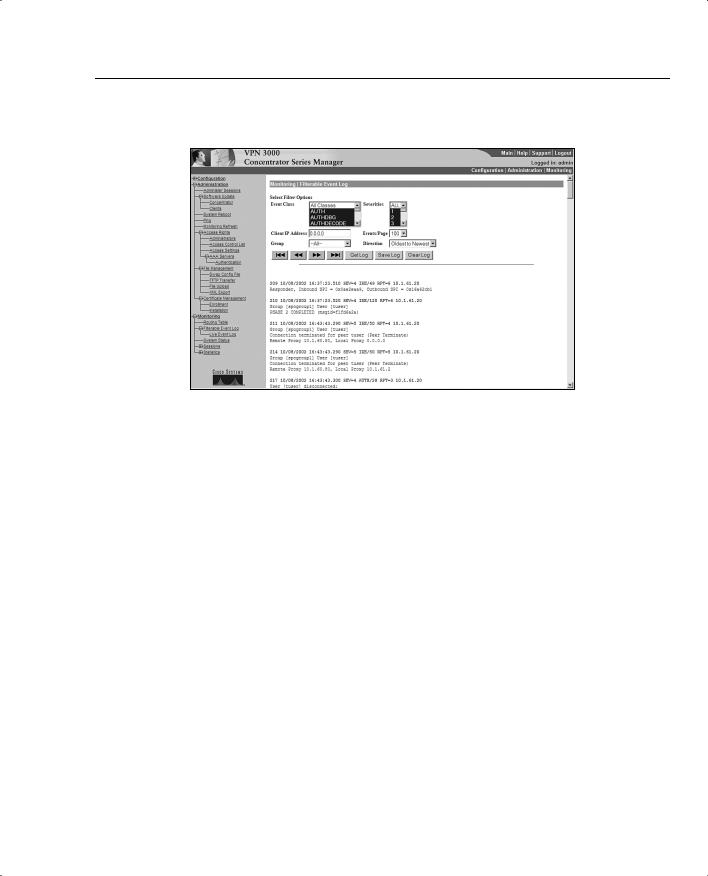
The Filterable Event Log screen is used to see any events that have previously been defined as an event that should be logged. This screen, shown in Figure 7-25, allows you to filter these events by class and severity. You may also filter based upon the client’s IP address. The output is shown in the bottom half of the screen. This screen is refreshed based on the values specified in the Administration | Monitoring Refresh screen.
Monitoring the Cisco VPN 3000 Series Concentrator 327
Figure 7-25 Monitoring | Filterable Event Log
The Live Event Screen log, which is accessed by the link on the left side of the screen, does not allow for filtering but does have an advantage and a disadvantage when compared to the Filterable Event Log. The advantage is that events are shown immediately. The disadvantage is that monitoring these events, as in any debugging, may cause excessive CPU cycle utilization.
System Status
The Monitoring | System Status screen is shown in Figure 7-26. This screen is the closest equivalent available on the concentrator to the show version command on a router. This screen shows the concentrator type, the serial number, and the software revisions being run. The time that the system has been active, the boot time, and the RAM size is also shown.
Similar to the graphical user interface (GUI) available for the Cisco switches, you may click on a module to find the details of the status for that module. The fan speeds, as well as the temperature for the interior of the concentrator, are shown. There are three graphs on the bottom of the screen, indicating the CPU utilization, the concentrator’s throughput, and the number of active sessions.