

Cisco Secure VPN Exam Certification Guide - Cisco press
.pdf228 Chapter 5: Configuring Cisco VPN 3000 for Remote Access Using Digital Certificates
Simple Certificate Enrollment Process Authentication Methods
For Cisco VPN 3000 Concentrators to work with CAs, the CAs must support Cisco’s Public Key Infrastructure (PKI) Protocol and the Simple Certificate Enrollment Process (SCEP). VPN concentrators support the use of SCEP to automate the exchange of certificates with a CA server.
Cisco sponsored SCEP as an Internet Engineering Task Force (IETF) draft as a way of managing the certificate life cycle. SCEP uses the PKCS #7 standard from RSA Security Inc. to encrypt and sign certificate enrollment messages. SCEP further uses PKCS #10 for standardizing certificate requests. PKCS #10 certificate requests were described in the section, “The CA Architecture.”
SCEP is the mechanism that permits a CA to trust a host, such as the VPN concentrator, and that permits the host to trust the CA. Because the entire concept of CAs is built on this trust, it helps to be able to build this trust efficiently. SCEP provides the tool to do just that, enabling the CA and requesting host to authenticate one another.
You must first install the CA’s root certificate onto the concentrator before you can request an identity certificate from that CA. SCEP provides the following two authentication methods to facilitate this certificate installation process:
•
•
Manual authentication
Authentication based on a preshared secret
The following sections describe both authentication methods in greater detail.
Manual SCEP Authentication
In the manual mode, you, as the VPN administrator, submit a request to the CA using the Internet, e-mail, or a floppy disk. The CA operator then verifies your identity through some reliable out-of-band method. Upon verification, the CA returns a CA root certificate to you, which you then copy to your VPN Manager workstation. From there, you begin the process of installing the certificate on the concentrator using the Administration | Certificate Management option of the VPN Manager. Figure 5-5 shows the screen that is displayed by this option the first time you bring up this screen.
The Click here to install a CA certificate option only appears on this screen before you have installed any CA certificates. Clicking that option brings up the screen shown in Figure 5-6.

Digital Certificates and Certificate Authorities 229
Figure 5-5 Administration | Certificate Management
Figure 5-6 Administration | Certificate Management | Install | CA Certificate
For the manual SCEP option, you have the following two choices: You can cut and paste the certificate from text, or you can upload the file from your management workstation. To install the file using the cut-and-paste method, open the CA certificate file in a text editor such as Notepad or WordPad and select and copy the contents of the file. Click the option Cut & Paste Text from the menu shown in Figure 5-6, and the VPN Manager displays the screen shown in Figure 5-7.

230 Chapter 5: Configuring Cisco VPN 3000 for Remote Access Using Digital Certificates
Figure 5-7 Administration | Certificate Management | Install | CA Certificate | Cut & Paste Text
Paste the copied file into the Certificate Text area, and click Install to install the CA certificate.
You could also choose the Upload File from Workstation option, shown in Figure 5-6. When you do that, the screen shown in Figure 5-8 is displayed.
Figure 5-8 Administration | Certificate Management | Install | CA Certificate | Upload File from Workstation
Certificate files usually have the cer extension. Insert the full path and name of the file in the Filename field using DOS notation; for example, c:\Certs\cacert.cer. Click Install to continue with the installation of the CA certificate.
Preshared Key SCEP Authentication
The alternative to using manual SCEP authentication is to authenticate using preshared keys. When using preshared keys, the server distributes a shared key to the end entity that can uniquely associate the enrollment request with the given end entity. The distribution of the key must be private; only the end entity should know this key. When creating the enrollment request, the end entity is asked to provide a challenge password. When using preshared keys, the end entity must type in the preshared key as the password.
Choosing the SCEP option from the screen shown in Figure 5-6 allows you to install the CA certificate onto the VPN concentrator using the preshared key SCEP method. When you select this method, the screen shown in Figure 5-9 is displayed.
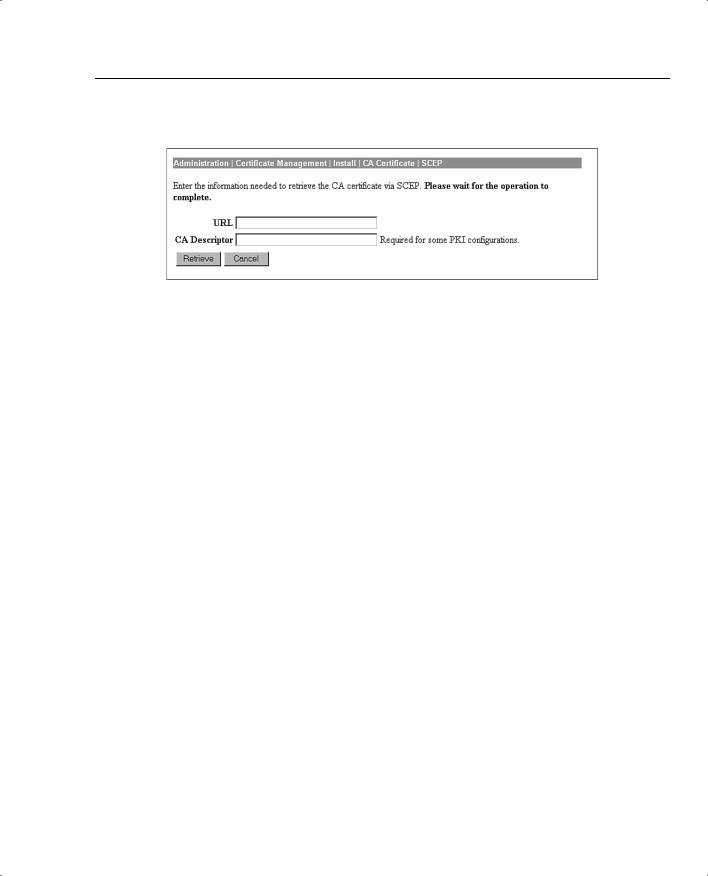
Digital Certificates and Certificate Authorities 231
Figure 5-9 Administration | Certificate Management | Install | CA Certificate | SCEP
Enter the complete URL to the SCEP area of your CA’s server. If you had your own Microsoft CA server whose IP address is 192.168.1.34, for example, you would enter the following URL:
http://192.168.1.34/certsrv/mscep/mscep.dll
The CA Descriptor is just a single word used to describe the certificate.
At this point, the preshared key has not been used. The key is used during the enrollment with SCEP process, which is discussed in the upcoming section, “Enrolling Via SCEP.”
CA Vendors and Products that Support Cisco VPN Products
The Cisco VPN 3000 Concentrator Series works with the following Internet-based CAs:
•
•
•
Entrust Technologies (www.entrust.com)
VeriSign, Inc. (www.verisign.com)
Baltimore Technologies (www.baltimoretechnologies.com)
These vendors provide digital certificates and all the associated management and maintenance support, for a fee. Well-established and reliable, these services can fill the needs of smallto mid-sized businesses without the need to set up internal CA support.
As your business grows, you will want to install your on CA server or servers. The following three products are available and are certified to work with the Cisco VPN Concentrator series:
•Microsoft Certificate Services for Windows 2000
•RSA Keon Certificate Authority for Solaris, Windows 2000, and Windows NT
•Netscape Certificate Management System for Solaris, Windows 2000, and Windows NT

232 Chapter 5: Configuring Cisco VPN 3000 for Remote Access Using Digital Certificates
Digital Certificate Support Through the VPN 3000
Concentrator Series Manager
16Certificate generation
17Validating certificates
18Configuring the Cisco VPN 3000 Concentrator Series for CA support
The previous sections of this chapter have covered some of the VPN 3000 Concentrator Manager processes that support digital certificates. This section discusses the basic functions that you need to perform to support digital certificate authentication for IPSec VPNs on the Cisco VPN 3000 Concentrator Series, including the following:
•
•
•
•
Generating and enrolling a certificate
Validating a certificate
Revoking certificates
Configuring IKE
Certificate Generation and Enrollment
CAs do not create public/private key pairs for hosts. CAs only provide a means to share public keys (digital certificate) and attest to the authenticity of the keys. The responsibility for generating the key pairs resides with the host, so the host software must be capable of generating the key pairs and storing the private key, root certificate, and identity certificate. Cisco VPN Concentrators and the Cisco VPN Client have that capability.
Normally, the process of generating the keys and then enrolling the public key with a CA are two separate functions. On VPN concentrators, that two-step process has been condensed into the single enrollment process. To begin the process, select Administration | Certificate Management | Enroll from the VPN Manager’s table of contents. When you do that, the screen shown in Figure 5-10 is displayed.
You can enroll either an Identity certificate or an SSL certificate from this screen. SSL certificates are required when you want to establish secure communications between your browser and the VPN concentrator. The processes related to the identity and SSL certificates are similar. The following portions of this section of the chapter go through the processes that are related to the identity certificate and note any differences that can be required for SSL certificates.

Digital Certificate Support Through the VPN 3000 Concentrator Series Manager 233
Figure 5-10 Administration | Certificate Management | Enroll
Notice the caveat in Figure 5-10 that states that the CA’s certificate must be installed before installing any other certificates from that CA. To begin the process of enrolling an Identity certificate, click the Identity certificate option, which brings up the screen shown in Figure 5-11.
Figure 5-11 Administration | Certificate Management | Enroll | Identity Certificate
Enroll via SCEP. . . options are only available on this screen if you installed the CA certificate using SCEP. In this case, two CA certificates were installed using SCEP.
Enrolling Via PKCS #10
Selecting Enroll via PKCS10 Request (Manual) from the Identity Certificate screen displays the screen shown in Figure 5-12. This is the same information that was shown in Table 5-2. Again, notice the caveat at the top of the screen, warning that the CA certificate must be installed first.
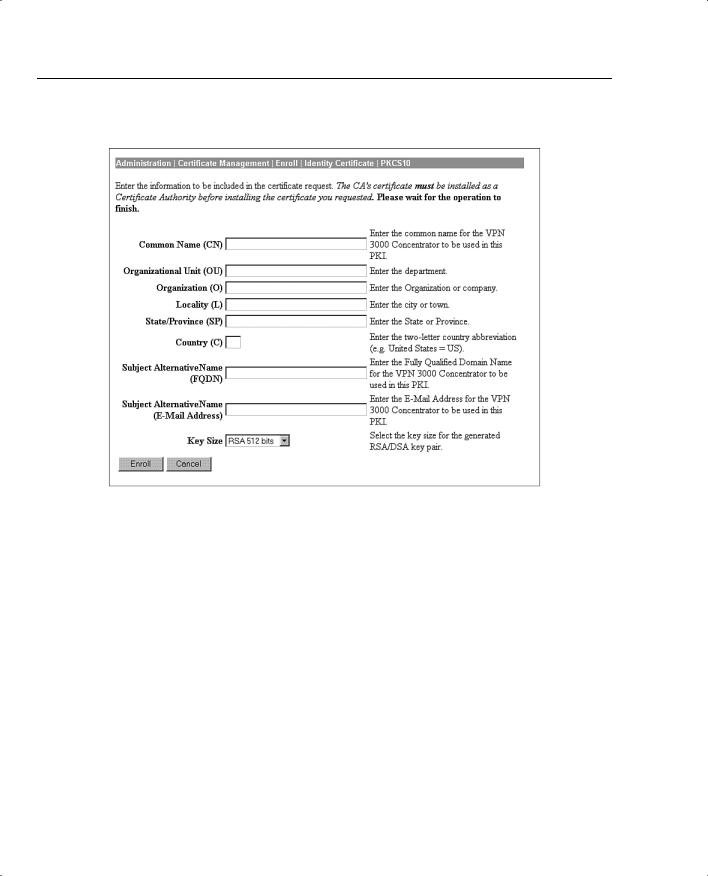
234 Chapter 5: Configuring Cisco VPN 3000 for Remote Access Using Digital Certificates
Figure 5-12 Administration | Certificate Management | Enroll | Identity Certificate | PKCS10
After you fill in the information on this screen, click Enroll and the concentrator performs the following steps:
Step 1 Generates a public/private key pair and attaches the public key to the PKCS
|
|
#10 request |
|
Step 2 |
Converts the PKCS #10 request to Privacy Enhanced Mail (PEM) format |
|
Step 3 |
Opens a browser window |
|
Step 4 |
Places the PEM-formatted request in the browser window |
|
Step 5 |
Presents the screen shown in Figure 5-13 to show the successful generation |
|
|
of the enrollment request |
|
|
|
NOTE |
PEM was an early standard for securing e-mail. Although never widely adopted as an Internet |
|
|
mail standard, it is used for CA correspondence. PEM takes the object (PKCS #10, PKCS #7, |
|
|
certificate, and so on), performs base64 encoding on it, and places the output in US-ASCII |
|
|
format between a standard PEM header and trailer. |
|
|
|
|

Digital Certificate Support Through the VPN 3000 Concentrator Series Manager 235
Figure 5-13 Administration | Certificate Management | Enrollment | Request Generated
While the browser window shown in Figure 5-14 is opening to display the PEM-formatted certificate request, you can choose one of the following options from the Request Generated screen:
•If you feel you made a mistake in the PKCS #10 request, select Go to Certificate Management to view and manage the request.
•To enroll another certificate, select Go to Certificate Enrollment.
•To begin the manual process of installing the certificate, select Go to Certificate Installation.
Figure 5-14 PEM-Formatted Certificate Request
With the PEM version of the certificate request in hand, you now contact your CA operator and transmit the request. You could do that via HTTP, FTP, or e-mail, or by copying the request to a portable medium and physically transporting the request to the CA operator. Once the CA operator has accepted your request and enrolled it in the CA system, the CA operator returns

236 Chapter 5: Configuring Cisco VPN 3000 for Remote Access Using Digital Certificates
the completed identity certificate to you in PEM format. Installation of the certificate is then completed in the same manner in which the CA certificate was handled in the previous section, “Manual SCEP Authentication” (see Figures 5-6, 5-7, and 5-8).
Enrolling Via SCEP
The SCEP process of enrolling with the CA follows the same process as the PKCS #10 process, except that the concentrator contacts the CA, sends the request, receives the certificate, and installs the certificate automatically. The process starts by selecting one of the Enroll via SCEP. . .
options shown in Figure 5-11. The screen shown in Figure 5-15 opens. Notice that this screen is similar to the PKCS #10 screen shown in Figure 5-12. The difference is that this screen asks for the challenge (preshared key) password to be used with the SCEP-capable CA.
Figure 5-15 Administration | Certificate Management | Enroll | Identity Certificate | SCEP
The process of contacting the CA, submitting the request, receiving the certificate, validating the certificate, and installing the certificate is completed for you when you complete the form and click Enroll. The VPN Manager returns the Request Generated screen shown in Figure 5-13. From there, you can go to the Certificate Management screen to verify the status of your identity certificate.

Digital Certificate Support Through the VPN 3000 Concentrator Series Manager 237
Certificate Validation
Once the CA returns the identity certificate to the concentrator, the certificate must be validated before it can be installed. The concentrator does this for you by performing the authentication steps shown in Figure 5-3. To restate those steps, the concentrator calculates a hash of the certificate while decrypting the signature using the CA’s public key to discover the hash created by the CA. If the two hash values match, the certificate has been authenticated as to origin.
Before performing the authentication process on the certificate, the concentrator must verify that a trusted CA signed the certificate, and that the current date and time fall within the validity window of the certificate. Additionally, the concentrator checks to see if the serial number of the certificate is listed on a CRL. Once the certificate passes these tests and has been authenticated, it can be used for further processing.
Certificate Revocation Lists
The Administration | Certificate Management screen, shown in Figure 5-16, is a starting point for many certificate functions. As you study the screen, you can see that it is separated into four different sections, one for each of the three certificate types and one for pending certificates in the enrollment process. This screen provides a quick overview of the certificates, including the certificate expiration date.
The Certificate Management screen is the starting point for configuring CRL operability on a CA. Clicking the Configure hotlink in the Actions column for one of the CA certificates brings up the screen shown in Figure 5-17.
VPN concentrators use No CRL Checking as the default setting. This means that, by default, the VPN concentrator does not retrieve or check certificate revocation lists.
When you enable CRL checking for a certificate, every time the VPN concentrator uses the certificate for authentication during IKE Phase 1 negotiation, it also checks the CRL to ensure that the certificate being verified has not been revoked. If the certificate has been revoked, the tunnel is not established.
CRLs are stored at distribution points on external servers maintained by CAs. When verifying the revocation status of a certificate, a VPN concentrator retrieves the CRL from one of the distribution points and checks the serial number of the certificate against the list of serial numbers in the CRL. If there is a match, the certificate has been revoked and is invalidated by the concentrator. The VPN concentrator can be configured to retrieve the CRL from the distribution points specified in the certificate being checked, from a static list of CRL distribution points, or from a combination of these.