308 Chapter 7: Monitoring and Administering the VPN 3000 Series Concentrator
You should now be on the main administration screen, as shown in Figure 7-4. You will use this screen to navigate between all the administration options. From this point forward, with one general exception, in order to access a specific screen, you may choose to either click the link on the main part of the screen or to click one of the links shown in the menu system on the left. The general exception to this is when a parameter is being added or modified. For example, you cannot go directly to modifying an access list without first choosing the access list to modify. Therefore, there are no Modify submenus on the left side of the screen. The submenus shown on the left may be expanded by clicking on the + sign. Choosing the option from the left side of the screen or from the link on the main screen makes no difference because, either way, you will be brought to the same screen.
Figure 7-4 Administration Screen
You are initially presented with eight options, each of which brings you to an associated screen as described in Table 7-2. Any of these screens may have subscreens associated with them. Take a moment to study Table 7-2, which lists all the menu and submenu options. Knowing how to navigate through the system will make administration easier. Knowing what options are controlled on individual screens will help you to pass the exam. After studying the table, continue to the next sections, which explore each individual item.

310 Chapter 7: Monitoring and Administering the VPN 3000 Series Concentrator
Table 7-2 |
Administration Menu System (Continued) |
|
|
|
|
|
Menu Option |
Level |
Usage |
|
|
|
|
|
Certificate Manager |
2 |
Enables the submenu, allowing enrollment and installation of |
|
|
|
certificates. |
|
|
|
|
|
Enrollment |
3 |
Enrolls certificates. |
|
|
|
|
|
Installation |
3 |
Installs certificates. |
|
|
|
|
Administer Sessions
The Administration | Administer Sessions screen, shown in Figure 7-5, shows the session statistics for all connected sessions. You are able to filter the sessions by group using the Group pull-down menu. In this case, only those sessions belonging to the group chosen are shown.
Figure 7-5 Administration | Administer Sessions
The Administer Session screen shows the peak connections by connection type as well as the limits on that connection type and the total number of sessions completed since the system was started. You are also able to log out sessions based on the session type. Clicking on a session’s name will give more information regarding that session.
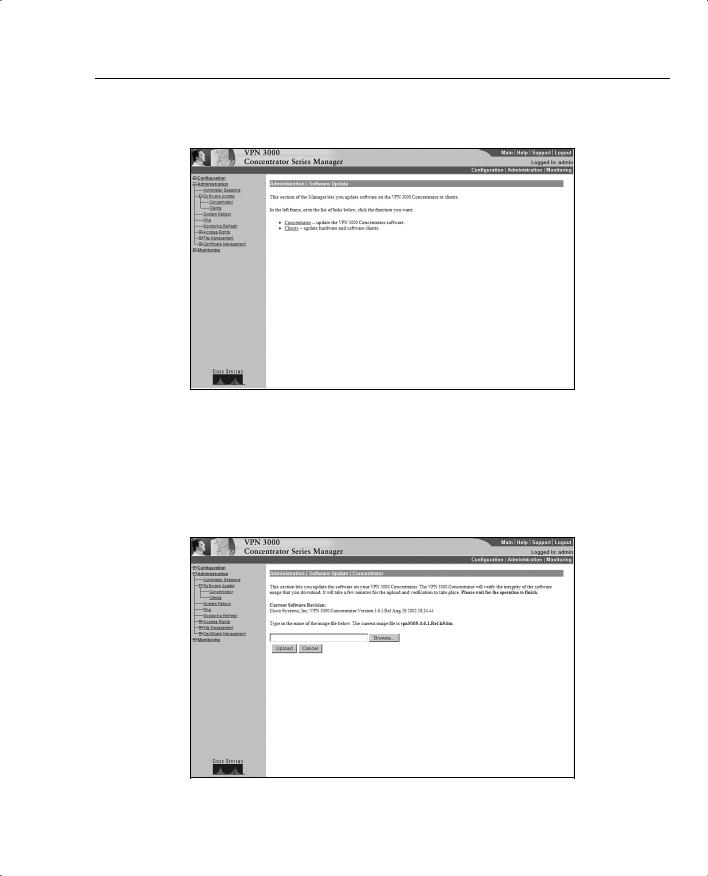
Software Update
The Administration | Software Update screen consists of two submenu options. This is an intermediate screen that is used to navigate to the software update screens for the concentrator and clients. This screen is shown in Figure 7-6.
Administering the Cisco VPN 3000 Series Concentrator 311
Figure 7-6 Administration | Software Update
Concentrator
The Administration | Software Update | Concentrator screen is shown in Figure 7-7. This screen shows the current version of the software and allows you to upload a new version to the concentrator.
Figure 7-7 Administration | Software Update | Concentrator
312 Chapter 7: Monitoring and Administering the VPN 3000 Series Concentrator
The Browse button is used to find the file you wish to upload on the workstation being used for configuration or from the network. After uploading the file, you will be prompted to move to the Administration | System Reboot screen shown later in Figure 7-9. The new software will not be activated until the system is rebooted.
During the download process, it is possible to corrupt the memory by failing to wait for the file transfer to complete. Therefore, you are advised to wait until the transfer is completed before doing any operations that can cause changes to the flash memory, such as listing, viewing, copying, deleting, or writing files.
Updating the software will not cause any disruption in current sessions, although rebooting the system will drop all sessions. Make sure that the current configuration is saved before rebooting, or it will be lost.
NOTE Before loading any new software, it is wise to check for caveats and bugs related to the new software. This will help eliminate surprises caused by subtle differences between software versions. If you are loading new software in order to solve an existing problem, checking the notes on the new software lets you know in advance if the new software will fix your problem. Additionally, you are also cautioned to test any new software versions before deploying them throughout the enterprise. Features such as automatically downloading software to all clients may have disastrous effects if that software has not been tested within your organization.
After the new software is loaded, Cisco strongly urges that you clear the browser’s cache, temporary files, and history files. This will ensure that the next update of software does not use an old copy. The authors prefer to clear these items both before and after updating software to ensure that there is absolutely no possibility that an old file is chosen, even if one of the clearings is forgotten.
Clients
The Administration | Software Update | Clients screen is used to update hardware and software clients when they become connected to the concentrator. This screen is shown in Figure 7-8. The Group pull-down menu allows you to update all groups or any one group.
The process for updating the client is the same as on the concentrator. You choose a file using a Browse function. The requirement to update the client is controlled through the Configuration | User Management | Groups screen. This is discussed in Chapter 9, “Configuring Scalability Features of the Cisco VPN 3002 Hardware Client.”
Administering the Cisco VPN 3000 Series Concentrator 313
Figure 7-8 Administration | Software Update | Clients
System Reboot
The Administration | System Reboot screen allows you to reboot the system in a controlled manner. As shown in Figure 7-9, there are a number of rebooting options available, which are broken down into three sections:
Action
Configuration
When to Reboot/Shutdown
Each of these is discussed in the following sections.
Action
In the Action section, there are three straightforward choices:
Reboot—Reboots the concentrator
Shutdown —Shuts down without automatically rebooting
Cancel—Cancels a pending shutdown or reboot
314 Chapter 7: Monitoring and Administering the VPN 3000 Series Concentrator
Figure 7-9 Administration | System Reboot
Configuration
The configuration section allows you to control what happens during the shutdown and startup processes with the following three options:
•Save the active configuration at time of reboot—Is the most widely used because it saves the current configuration when the system is shut down
•Reboot without saving the active configuration—Usually used when you wish to revert to a previously saved configuration after attempting some unsuccessful configuration changes
•Reboot ignoring the configuration file—Allows you to bypass the configuration file upon rebooting, which is useful when you wish to change a very large amount of the configuration
When to Reboot/Shutdown
The third section schedules a reboot or shutdown. You have four options:
•Now—Causes the concentrator to take the previously chosen action immediately with no considerations given for anyone who is presently connected to the concentrator
•Delayed by minutes—Allows the action to be delayed for a specific amount of time
Administering the Cisco VPN 3000 Series Concentrator 315
•At time—Allows the action to be delayed until a specific time
•Wait for session to terminate—Takes the previously chosen action when the last connection becomes inactive, with no new connections allowed until the action has been taken, which allows for all users to disconnect in a normal manner before the action is taken
Clicking the Apply button enables the choices you have made.
Ping
The Administration | Ping screen, shown in Figure 7-10, is used to test connectivity. You may enter the IP address of the remote device, or you may use the host name if you are using a DNS server. This device sends Internet Control Message Protocol (ICMP) echo requests to the remote device and shows the results of those requests.
Figure 7-10 Administration | Ping
Monitoring Refresh
The Administration | Monitoring Refresh screen is shown in Figure 7-11. There are only two options available on this screen. The first option, the Enable check box, sets whether the
statistics screens should be refreshed. If this box is not checked, the statistics shown on a screen will remain the same despite the fact that the statistics are actually changing. Should the Enable check box be checked, the statistics screens will be refreshed at the time (in seconds) specified by the refresh period. The default for the refresh period is 30 seconds.
316 Chapter 7: Monitoring and Administering the VPN 3000 Series Concentrator
Figure 7-11 Administration | Monitoring Refresh
Access Rights
The Administration | Access Rights screen is shown in Figure 7-12. This screen enables the submenu used for setting username, password, and rights combinations; configuring the concentrator with access control lists; and setting session timeouts. This screen also enables the submenu for AAA servers.
Figure 7-12 Administration | Access Rights

Administering the Cisco VPN 3000 Series Concentrator 317
Administrators
The Administration | Access Rights | Administrators screen, shown in Figure 7-13, is used to add those users who are allowed to access the concentrator’s Configuration, Administration, and Monitoring functions. Up to five users may be allowed this type of access. To add a user, click the Modify button next to a username that is blank. Modifying a user is accomplished by clicking the Modify button next to a username that is not blank. Enabling the Administrator option gives the user full rights to the system. If the Enabled check box is not checked, the user will not be able to log on to the concentrator.
Figure 7-13 Administration | Access Rights | Administrators
Once the Modify button is chosen, the Administration | Access Rights | Administrators | Modify Properties screen is shown, as shown in Figure 7-14. The username is entered, followed by the password. The password is also verified.
The Access Rights section of the Modify Properties screen contains four pull-down menus. These menus set the permissions for their associated titles as follows:
Authentication—Sets the rights for the user regarding authentication
General—Sets rights for most of the concentrator
SNMP—Deals with SNMP-related issues
Files—Sets rights regarding reading and writing of files