

Introduction to 3D Game Programming with DirectX.9.0 - F. D. Luna
.pdf364 Appendix
// parameters. if(!InitWindowsApp(hInstance, nShowCmd))
{
::MessageBox(0, "Init - Failed", "Error", MB_OK); return 0;
}
// Once our application has been created and
// initialized we enter the message loop. We |
||||
// stay in the message loop until a WM_QUIT |
||||
// message is received, indicating the application |
||||
// should be terminated. |
Y |
|||
|
||||
return Run(); // enter message loop |
||||
} |
|
|
F |
|
|
|
|
||
bool InitWindowsApp(HINSTANCE instanceHandle, int show) |
||||
{ |
|
|
M |
|
|
|
|
|
|
// The first task to creating a window is to describe |
||||
// its characteristics by fillingLout a WNDCLASS |
||||
// structure. |
A |
|
||
|
|
|
||
WNDCLASS wc; |
|
|
|
|
wc.style |
E |
|
||
|
= CS HREDR W | CS_VREDRAW; |
|||
T |
|
|
||
wc.lpfnWndProc |
= WndProc; |
|
||
wc.cbClsExtra |
= 0; |
|
||
wc.cbWndExtra |
= 0; |
|
||
wc.hInstance |
= instanceHandle; |
|||
wc.hIcon |
|
= ::LoadIcon(0, IDI_APPLICATION); |
||
wc.hCursor |
|
= ::LoadCursor(0, IDC_ARROW); |
||
wc.hbrBackground = |
|
|
||
static_cast<HBRUSH>(::GetStockObject(WHITE_BRUSH)); |
||||
wc.lpszMenuName |
= 0; |
|
||
wc.lpszClassName = "Hello";
//Then we register this window class description
//with Windows so that we can create a window based
//on that description.
if(!::RegisterClass(&wc))
{
::MessageBox(0, "RegisterClass - Failed", 0, 0); return false;
}
//With our window class description registered, we
//can create a window with the CreateWindow function.
//Note, this function returns a HWND to the created
//window, which we save in MainWindowHandle. Through
//MainWindowHandle we can reference this particular
//window we are creating.
MainWindowHandle = ::CreateWindow( "Hello", "Hello",
WS_OVERLAPPEDWINDOW, CW_USEDEFAULT, CW_USEDEFAULT, CW_USEDEFAULT, CW_USEDEFAULT,
Team-Fly®

An Introduction to Windows Programming
0,
0,
instanceHandle,
0);
if(MainWindowHandle == 0)
{
::MessageBox(0, "CreateWindow - Failed", 0, 0); return false;
}
//Finally we show and update the window we just created.
//Observe we pass MainWindowHandle to these functions so
//that these functions know what particular window to
//show and update.
::ShowWindow(MainWindowHandle, show); ::UpdateWindow(MainWindowHandle);
return true;
}
int Run()
{
MSG msg;
::ZeroMemory(&msg, sizeof(MSG));
//Loop until we get a WM_QUIT message. The
//function GetMessage will only return 0 (false)
//when a WM_QUIT message is received, which
//effectively exits the loop. while(::GetMessage(&msg, 0, 0, 0) )
{
//Translate the message, and then dispatch it
//to the appropriate window procedure.
::TranslateMessage(&msg);
::DispatchMessage(&msg);
}
return msg.wParam;
} |
|
LRESULT CALLBACK WndProc(HWND |
windowHandle, |
UINT |
msg, |
WPARAM wParam,
LPARAM lParam)
{
// Handle some specific messages: switch( msg )
{
//In the case the left mouse button was pressed,
//then display a message box.
case WM_LBUTTONDOWN:
::MessageBox(0, "Hello, World", "Hello", MB_OK); return 0;
365
A p p e n d i x
// In the case the escape key was pressed, then
366 Appendix
//destroy the main application window, which is
//identified by MainWindowHandle.
case WM_KEYDOWN:
if( wParam == VK_ESCAPE ) ::DestroyWindow(MainWindowHandle);
return 0;
//In the case of a destroy message, then
//send a quit message, which will terminate
//the message loop.
case WM_DESTROY:
::PostQuitMessage(0); return 0;
}
//Forward any other messages we didn't handle
//above to the default window procedure. return ::DefWindowProc(windowHandle,
msg,
wParam,
lParam);
}
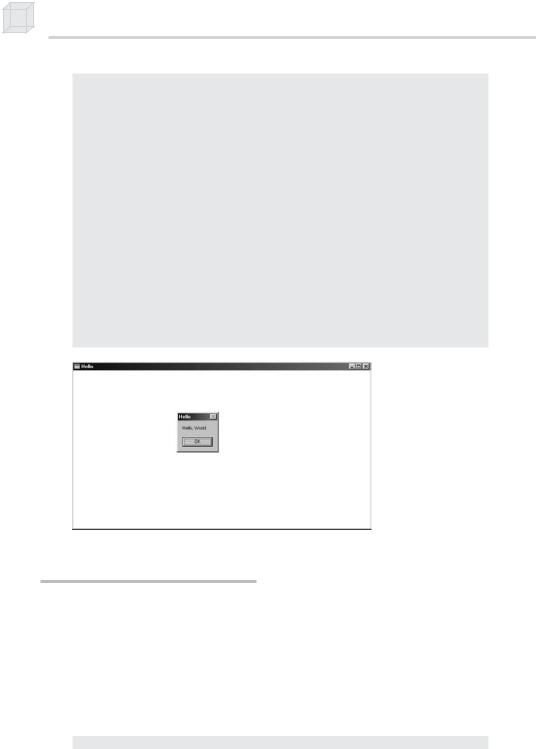
Figure 3: A screen shot of the above program. Note that the message box appears when you press the left mouse button in the window’s client area.
Explaining Hello World
Let’s examine the code from top to bottom, stepping into any function that gets called along the way. Refer back to the Hello World code listing throughout these subsections.
Includes, Global Variables, and Prototypes
The first thing we do is include the windows.h header file. By including the windows.h file, we obtain the structures, types, and function declarations needed for using the basic elements of the Win32 API.
#include <windows.h>
An Introduction to Windows Programming
The second statement is an instantiation of a global variable of type HWND. This stands for “handle to a window.” In Windows programming, we often use handles to refer to objects maintained internally by Windows. In this sample, we use an HWND to refer to our main application window maintained by Windows. We need to hold onto the handles of our windows because many calls to the API require that we pass in the handle of the window that we want the API call to act on. For example, the call UpdateWindow takes one argument that is of type HWND that is used to specify the window to update. If we didn’t pass in a handle to it, the function wouldn’t know what window to update.
HWND MainWindowHandle = 0;
The next three lines are function declarations. Briefly, InitWindowsApp creates and initializes our main application window, Run encapsulates the message loop for our application, and WndProc is our main window’s window procedure. We examine these functions in more detail when we come to the point where they are called.
bool InitWindowsApp(HINSTANCE instanceHandle, int show); int Run();
LRESULT CALLBACK WndProc(HWND, UINT, WPARAM, LPARAM);
367
A p p e n d i x
WinMain
WinMain is the Windows equivalent to the main function in normal C++ programming. WinMain is prototyped as follows:
int WINAPI WinMain( HINSTANCE hInstance,
HINSTANCE hPrevInstance,
LPSTR lpCmdLine, int nCmdShow
);
hInstance—Handle to the current application instance. It serves as a way of identifying and referring to this application. Remember that there may be several Windows applications running concurrently, so it is useful to be able to refer to each one.
hPrevInstance—Not used in 32-bit Win32 programming and is 0
lpCmdLine—The command line argument string used to run the program
nCmdShow—Specifies how the application window should be displayed. Some common commands that show the window in its current size and position, maximized, and minimized, respectively, are
SW_SHOW, SW_SHOWMAXIMIZED, and SW_SHOWMINIMIZED. See the MSDN library for a complete list of show commands.

368 Appendix
If WinMain succeeds, it should return the wParam member of the WM_QUIT message. If the function exits without entering the message loop, it should return 0. The WINAPI identifier is defined as:
#define WINAPI __stdcall
This specifies the calling convention of the function, which means how the function arguments get placed on the stack.
Note: In the signature of WinMain in the Hello World sample, we use the type PSTR as the third argument instead of LPSTR. This is because with 32-bit Windows there are no longer “long pointers.” PSTR is simply a char pointer (e.g., char*).
WNDCLASS and Registration
Inside WinMain, we call the function InitWindowsApp. As you can guess, this function does all the initialization of our program. Let’s jump into this function and examine it. InitWindowsApp returns either true or false—true if the initialization was a success, false if something went wrong. In the WinMain definition, we pass a copy of our application instance to InitWindowsApp as well as the show command variable. Both are obtained from the WinMain parameter list.
if(!InitWindowsApp(hInstance, nShowCmd))
The first task at hand in initialization of a window is to describe our window and register it with Windows. We describe our window with the WNDCLASS data structure. Its definition:
typedef struct _WNDCLASS {
UINT |
style; |
WNDPROC |
lpfnWndProc; |
int |
cbClsExtra; |
int |
cbWndExtra; |
HANDLE |
hInstance; |
HICON |
hIcon; |
HCURSOR |
hCursor; |
HBRUSH |
hbrBackground; |
LPCTSTR |
lpszMenuName; |
LPCTSTR lpszClassName; } WNDCLASS;
style—Specifies the class style. In our example, we use CS_HREDRAW combined with CS_VREDRAW. These two bit flags indicate that the window is to be repainted when either the horizontal or vertical window size is changed. For the complete list of the various styles with description, see the MSDN library.
wc.style = CS_HREDRAW | CS_VREDRAW;
An Introduction to Windows Programming
lpfnWndProc—Pointer to the window procedure function. This is how you associate your window procedure function with a window. Thus, the windows that are created based on the same WNDCLASS instance share the same window procedure. The window procedure function is explained in the section titled “The Window Procedure.”
wc.lpfnWndProc = WndProc;
cbClsExtra and cbWndExtra—These are extra memory slots that you can use for your own purpose. Our Hello World program does not require any extra space and therefore sets both of these to 0.
wc.cbClsExtra = 0;
wc.cbWndExtra = 0;
hInstance—This field is a handle to our application instance. Recall that the application instance handle is originally passed in through WinMain.
wc.hInstance = instanceHandle;
hIcon—Here you specify a handle to an icon to use for the windows created using this window class. There are several built-in icons to choose from. See the MSDN library for details.
wc.hIcon = ::LoadIcon(0, IDI_APPLICATION);
hCursor—Similar to hIcon, here you specify a handle to a cursor to use when the cursor is over the window’s client area. Again, there are several built-in cursors. See the MSDN library for details.
wc.hCursor = ::LoadCursor(0, IDC_ARROW);
hbrBackground—This field is used to specify the background color of the client area of the window. In our sample code we call the function GetStockObject, which returns a handle to a brush of the color that we specified. See the MSDN library for other types of built-in brushes.
wc.hbrBackground =
static_cast<HBRUSH>(::GetStockObject(WHITE_BRUSH));
lpszMenuName—Specifies the window’s menu. We have no menu in our application, so we set this to 0.
wc.lpszMenuName = 0;
lpszClassName—Specifies the name of the window class structure that we are creating. This can be anything you want. In our application, we named it “Hello.” The name is simply used to identify the class structure so that we can reference it later.
369
A p p e n d i x
370 Appendix
wc.lpszClassName = "Hello";
Once we have described our window, we need to register it with Windows. This is done with the RegisterClass function that takes a pointer to a WNDCLASS structure. This function returns 0 upon failure.
if(!::RegisterClass(&wc))
Creating and Displaying the Window
After we have registered a WNDCLASS variable with Windows, we can create a window based on that class description. We can refer to the WNDCLASS structure that describes the window that we want to create by the class name we gave it—lpszClassName. The function we use to create a window is the CreateWindow function, which is declared as follows:
HWND CreateWindow( LPCTSTR lpClassName,
LPCTSTR lpWindowName, DWORD dwStyle,
int x, int y,
int nWidth, int nHeight,
HWND hWndParent, HMENU hMenu, HANDLE hInstance, LPVOID lpParam
);
lpClassName—The name (C string) of the registered WNDCLASS structure that describes the window that we want to create. Pass in the class name of the WNDCLASS we want to use for the creation of this window.
lpWindowName—The name (C string) that we want to give our window; this is also the name that appears in the window’s caption bar.
dwStyle—Defines the style of the window. WS_OVERLAPPEDWINDOW, which we use in the Hello World sample, is a combination of several flags: WS_OVERLAPPED, WS_CAPTION, WS_SYSMENU,
WS_THICKFRAME, WS_MINIMIZEBOX, and WS_MAXIMIZEBOX. The names of these flags describe the characteristics of the window that they produce. See the MSDN library for the complete list of styles.
x—The x position at the top-left corner of the window relative to the screen

An Introduction to Windows Programming
y—The y position at the top-left corner of the window relative to the screen
nWidth—The width of the window in pixels
nHeight—The height of the window in pixels
hWndParent—Handle to a window that is to be the parent of this window. Our window has no relationship with any other windows; therefore we set this value to 0.
hMenu—A handle to a menu. Hello World has no menu and specifies 0 for this argument.
hInstance—Handle to the application with which the window will be associated.
lpParam—A pointer to user-defined data
371
A p p e n d i x
Note: When we specify the (x, y) coordinates of the window’s position, they are relative to the upper-left corner of the screen. Also, the positive x-axis runs to the right as usual, but the positive y-axis runs downward. Figure 4 shows this coordinate system, which is called screen coordinates or screen space.
Figure 4: Screen space
CreateWindow returns a handle to the window that it creates (an HWND). If the creation failed, the handle will have the value of 0. Remember that the handle is a way to refer to the window, which is managed by Windows. Many of the API calls require an HWND so that they know what window to act on.
The last two function calls in the InitWindowsApp function have to do with displaying the window. First we call ShowWindow and pass in the handle of our newly created window so that Windows knows what window to show. We also pass in an integer value that defines how the window is to be initially shown (minimized, maximized, etc.). This value should be nShowCmd, which is an argument of WinMain. You can hardcode this value in, but it is not recommended. After showing the window, we should refresh it. UpdateWindow does this; it takes one argument that is a handle to the window we wish to update.
::ShowWindow(MainWindowHandle, show);
::UpdateWindow(MainWindowHandle);

372 Appendix
If we made it this far in InitWindowsApp, then the initialization is complete; we return true to indicate everything went successfully.
The Message Loop
Having successfully completed initialization, we can begin the heart of the program, the message loop. In Hello World, we have wrapped the message loop in a function called Run.
int Run()
{
MSG msg;
::ZeroMemory(&msg, sizeof(MSG));
while(::GetMessage(&msg, 0, 0, 0) )
{
::TranslateMessage(&msg);
::DispatchMessage(&msg);
}
return msg.wParam;
}
The first thing done in Run is an instantiation of a variable called msg of type MSG, which is the message structure that represents a Windows message. Its definition is as follows:
typedef struct tagMSG { HWND hwnd;
UINT message; WPARAM wParam;
LPARAM lParam; DWORD time; POINT pt;
} MSG;
hwnd—Identifies the window the message is for
message—A predefined constant value identifying the message (e.g., WM_QUIT)
wParam—Extra information about the message. This is dependent upon the specific message.
lParam—Extra information about the message. This is dependent upon the specific message.
time—The time the message was posted
pt—The (x, y) coordinates of the mouse cursor in screen coordinates when the message was posted
Next we enter the message loop. GetMessage will always return true unless a WM_QUIT message is posted; therefore, the loop continues until a WM_QUIT message is received. The GetMessage function
An Introduction to Windows Programming
retrieves a message from the message queue and fills in the members of our MSG structure. If GetMessage returns true, then two more functions get called: TranslateMessage and DispatchMessage.
TranslateMessage has Windows perform some keyboard translations, specifically virtual key messages to character messages. DispatchMessage finally dispatches the message to the appropriate window procedure.
373
A p p e n d i x
The Window Procedure
We mentioned previously that the window procedure is where we write the code we want to execute in response to a message that our window receives. In Hello World, we name the window procedure WndProc. It is prototyped as:
LRESULT CALLBACK WndProc(
HWND hwnd,
UINT uMsg,
WPARAM wParam,
LPARAM lParam
);
This function returns an integer of type LRESULT (which is a long) identifying the success or failure of the function. The CALLBACK identifier specifies that the function is a callback function, which means that Windows will be calling this function externally. As you can see from the Hello World source code, we never explicitly call the window procedure ourselves—Windows calls it for us when the window needs to process a message.
The window procedure has four parameters in its signature:
hwnd—Identifies the window the message is for
uMsg—A predefined value that identifies the particular message. For example, a quit message is defined as WM_QUIT. The prefix WM stands for “Window Message.” There are over a hundred predefined window messages. See the MSDN library for details.
wParam—Extra information about the message, which is dependent upon the specific message
lParam—Extra information about the message, which is dependent upon the specific message
Our window procedure handles three messages: the WM_LBUTTONDOWN, WM_KEYDOWN, and WM_DESTROY messages. A WM_LBUTTONDOWN message is sent when the user clicks the left mouse button on the window’s client area. A WM_KEYDOWN message is sent when a key is pressed. A WM_DESTROY message is sent when the window is being