9 Nozzle leveling process
A
i
m
m
fter exchange mold and re-calibrate the machine, please level the nozzle at sprue port.Moving seat original points return: Confirm original points and execute moving seat retire
original points.
Level the nozzle: By using slow speed to moves the moving seat for leveling the nozzle at srr.
port.
Save position address: At “Injector seat setting” screen save the position address.
10 Mold exchange process:
Fitting lower mold: Moves the lower mold to lower heating plate and push to the end pc
Through the upper mold and tighten slightly lower mold by fixing sere
Close mold fitting upper mold: By using manual mode to action the clamping mold. Put the
middle plate on mold and fixing the upper mold.
Open mold fitting lower mold: Open mold tighten the lower mold screw.
1 1 Confirm mold thickness method
i
Confirm mold thickness: It means during the upper mold and lower mold contact the middle plate position ° This function is confirmed each mold thickness °
Confirm mold thickness process: :t j
W
1)
2)
3)
a
hen confirms mold thickness, mold station operation is setting at manual position °Press down auto adjust mold button °
Safety door down, close mold and auto adjust mold button flash until complete auto adjust mold and the button light disappear ° <:i
Note '• Confirm the operation manner is at manual mode °
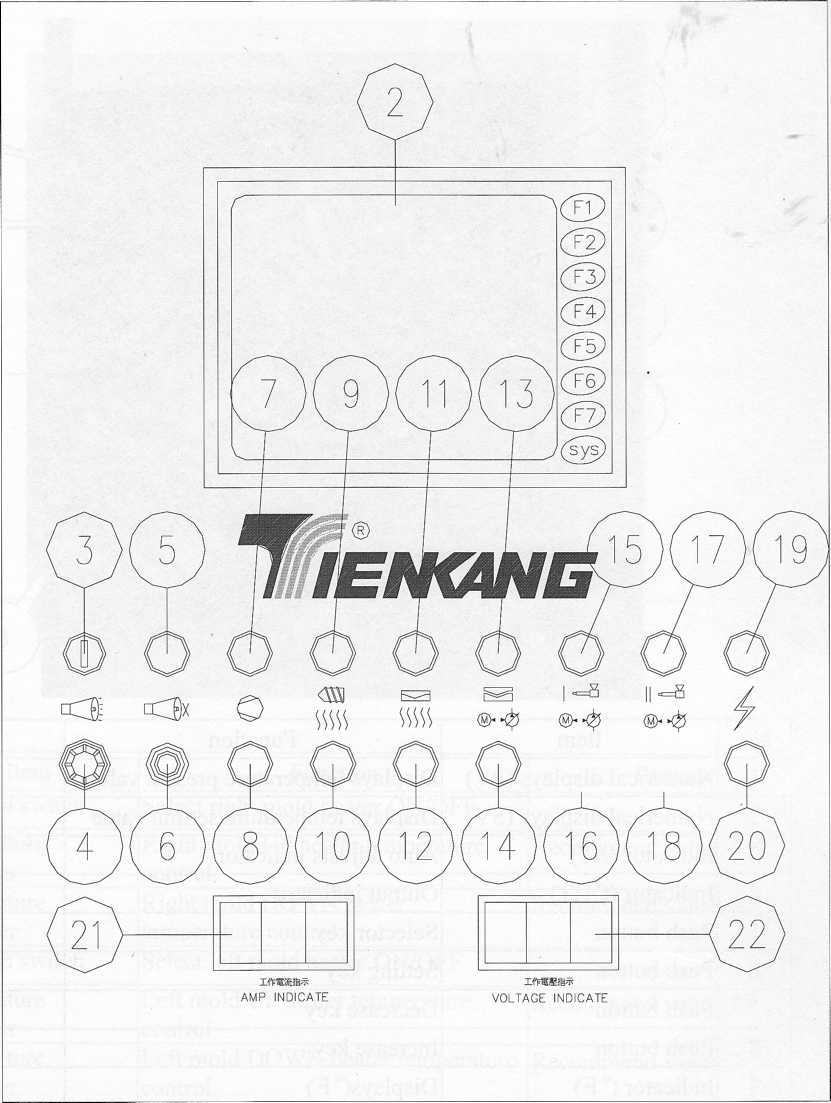
i4. Each parts function description
1 Open/close mold operation panel (1)No. |
Item |
Function |
Remark |
1 |
Push button |
Emergency open mold |
Yellow |
2 |
Push button |
Auto adjusts mold button |
Lamp disappear complete manner, lamp twinkles means adjust mold |
3 |
Selection switch |
Control manual ' automatic |
Lamp (Green) |
4 |
Selection switch Selection switch + auxiliary button |
|
|
5 |
Selection switch |
Manual adjusts mold |
Adjusts mold thickness |
6 |
Selection switch |
Control injector 2 feed/injection |
|
7 |
Push button |
Stop injector 2 injection |
1. |
8 |
Selection switch |
Control injector 2 FWD./BWD. |
|
9 |
Selection switch |
Control injector 1 feed/injection |
|
10 |
Push button |
Stop injector 1 injection |
|
11 |
Selection switch |
Control injector 1 FWD./BWD. |
|
12 |
Push button |
Open mold |
Co-operate with auxiliary button close mold slow down |
13 |
Push button |
Close mold |
Co-operate with auxiliary button injector moves slowdown |
14 |
Push button |
Moves seat |
Co-operate with auxiliary button auto-cycle |
15 |
Push button |
Safety door UP/DOWN and auto cycle start |
At 0.8 sec press 2 times safety door UP (Match with auxiliary function button press one time is auto cycle start) |
16 |
Push button |
Auxiliary function button |
|
(
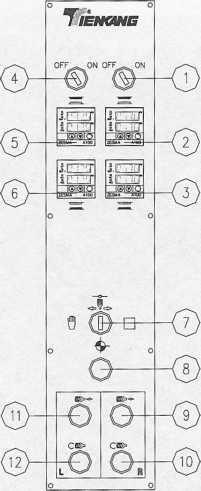
4-2 Open/close mold operation panel (2)
u)No. |
Item |
Function |
Remark |
1 |
Selection switch |
Select right mold heater ON/OFF |
|
2 |
Temperature control module |
Right mold up heater temp, control |
Recommend value: 17 5 °C |
3 |
Temperature control module |
Right mold down heater temp, control |
Recommend value: 175 °C |
4 |
Selection switch |
Select left mold heater ON/OFF |
|
5 |
Temperature control module |
Left mold up heater temp, control |
Recommend value: 175°C |
6 |
Temperature control module |
Left mold down heater temp, control |
Recommend value: 175°C |
7 |
Push button |
Injector manual/automatic |
|
8 |
Push button |
Injector reset |
Lamp light complete confirm, lamp twinkles mean not confirm(with auxiliary function button) |
9 |
Indicator |
Indicates injector 2 injection |
|
10 |
Indicator |
Indicates injector 2 feed |
|
11 |
Indicator |
Indicates injector 1 injection |
|
12 |
Indicator |
Indicates injector 1 feed |
|
13 |
Push button |
Auxiliary function button |
|
14 |
Vacuum pressure gauge |
Setting and displays vacuum value |
|
4-3 Open/close mold control panel (3)
No. |
Item |
Function |
Remark |
1 |
Selection switch |
Select right mold heater ON/OFF |
|
2 |
Temperature controller |
Right mold UP heater temperature control |
Recommend value: 175 C |
3 |
Temperature controller |
Right mold DOWN heater temperature control |
Recommend value: 175XI |
4 |
Selection switch |
Select left mold heater ON/OFF |
|
5 |
Temperature controller |
Left mold UP heater temperature control |
Recommend value: 175 C |
6 |
Temperature controller |
Left mold DOWN heater temperature control |
Recommend value: 175'C |
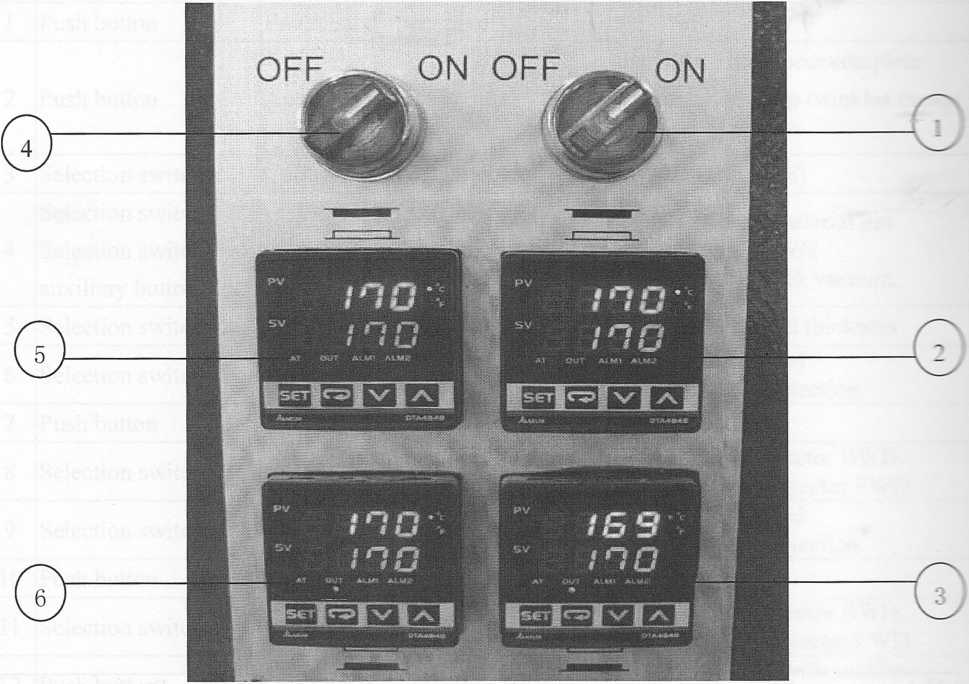
4-3-1 The description of operating temperature controller
No. |
Item |
Function |
Remark |
1 |
Numerical displays (PV) |
Displays temperature present value |
|
2 |
Numerical displays (SY) |
Displays temperature setting value |
|
3 |
Indicator (AT) |
Auto adjusts indicator |
|
4 |
Indicator (OUT) |
Output indicator |
|
5 |
Push button |
Selector key |
|
6 |
Push button |
Setting key |
|
7 |
Push button |
Decrease key |
|
8 |
Push button |
Increase key |
|
9 |
Indicator (° F) |
Displays(° F) |
|
10 |
Indicator (° C) |
Displays (° C) |
|
![]()