

Professional Java.JDK.5.Edition (Wrox)
.pdfChapter 5
license.file
Timeserver
1. Read license.file
Internet
2. Query Time Server for Date
3. If server date is after the date in license.file, start the application
Figure 5-5
The next step in the design is to model the license file. Since you are using Java Serialization, all that needs to be done is to produce a class that implements Serializable and contains the necessary fields to do license validation against the timeserver. The License class will look like Figure 5-6.
License
-expirationDate : Calendar
-timeServerHost : URL
+isValid() : boolean
Figure 5-6
Implementing the License
The license file for the application will consist of a serialized instance of the License class. The two data attributes it contains are: expirationDate, which is the date when the license expires (stored in a java.util.Calendar instance), and timeServerHost, which is the java.net.URL representing the Internet address of your timeserver. This address, as well as the expiration date, has been saved to prevent tampering with the URL. The isValid() method gets the current date from the timeserver and checks to see if the expiration date is before the date returned from the timeserver. If it is, the license is valid. Actually implementing the License yields the following code listing:
package book;
import java.io.IOException; import java.io.ObjectInputStream; import java.io.Serializable;
236

Persisting Your Application Using Files
import java.net.URL; import java.util.Calendar;
public class License implements Serializable { private Calendar expirationDate;
private URL timeServerHost;
public boolean isValid() throws IOException, ClassNotFoundException { ObjectInputStream in = new ObjectInputStream(timeServerHost.openStream());
Calendar serverDate = (Calendar) in.readObject();
in.close();
return serverDate.before(expirationDate);
}
public Calendar getExpirationDate() { return expirationDate;
}
public void setExpirationDate(Calendar expirationDate) { this.expirationDate = expirationDate;
}
public URL getTimeserverHost() { return timeServerHost;
}
public void setTimeServerHost(URL timeServerHost) { this.timeServerHost = timeServerHost;
}
}
Look into the implementation for isValid(). One detail of the design that has not yet been discussed is the protocol you need to define between the timeserver and the License. How does the isValid() method get the current date from the timeserver? A normal HTTP GET request is sent to the URL in timeServerHost, which resides on the timeserver, and instead of it returning an HTML page, it will return an instance of java.util.Calendar. Using this timeServerHost URL object, the connection to the timeserver via an HTTP request over the network is established and an ObjectInputStream is constructed to read a serialized Calendar instance:
ObjectInputStream in = new ObjectInputStream(timeServerHost.openStream());
Now a Calendar object is read just like any other object in Java serialization. After the object is read in, the expirationDate can be compared with the date returned from the timeserver to see whether the license is valid:
Calendar serverDate = (Calendar) in.readObject();
in.close();
return serverDate.before(expirationDate);
237

Chapter 5
Serialization can make complex tasks very straightforward. Java programmers can serialize and deserialize information without ever really leaving the Java environment in the sense that actual class instances can be serialized. Rather than creating your own date format on the server, an instance of Calendar was returned. All the low-level details of marshalling information over the network and finding a format you can use for date information were all taken care of by Java Serialization and the URL class.
Implementing the Timeserver
So now that you know what the timeserver is supposed to do, you must actually implement it. The timeserver will run as a Java Web Application (see Chapters 7 and 8 for much more detailed information on Web applications). A simple servlet is all that is necessary to implement the timeserver. The servlet will take care of the HTTP request and response, and allow you to write a Calendar object out to the client. Here is the servlet code that runs on the timeserver:
package book;
import java.io.IOException; import java.io.ObjectOutputStream; import java.util.Calendar;
import java.util.GregorianCalendar; import java.util.logging.Logger;
import javax.servlet.ServletConfig; import javax.servlet.ServletException; import javax.servlet.http.HttpServlet;
import javax.servlet.http.HttpServletRequest; import javax.servlet.http.HttpServletResponse;
public class ServerDate extends HttpServlet {
private Logger logger;
public void init(ServletConfig config) throws ServletException { logger = Logger.getLogger(ServerDate.class.getName());
}
public void doGet(HttpServletRequest req, HttpServletResponse resp) throws IOException, ServletException {
logger.info(“Received date request”);
ObjectOutputStream out = new ObjectOutputStream(resp.getOutputStream()); Calendar calendar = new GregorianCalendar();
out.writeObject(calendar);
out.close();
logger.info(“Wrote the date: “ + calendar.getTime());
}
}
238

Persisting Your Application Using Files
By implementing the doGet() method, your servlet handles HTTP GET requests (which is expected from your License clients). The method is straightforward. All you do is wrap an
ObjectOutputStream around the normal ServletOutputStream:
ObjectOutputStream out = new ObjectOutputStream(resp.getOutputStream());
Now that the output stream back to the client has been wrapped in an ObjectOutputStream, a new Calendar instance (which corresponds to the current date and time on the server) can be written back to the client:
Calendar calendar = new GregorianCalendar();
out.writeObject(calendar);
out.close();
The License class and ServerDate servlet take care of the actual license file and the means to validate the date it stores, respectively. In the next section, you will see how to integrate the components in this example, with your configuration data model and Swing actions, into the actual Swing implementation of the Imager Application.
Tying Your Serialization Components into the Application
You have developed Swing actions that load and save your configuration data model. You wrote a licensing system that uses serialization to specify both the license file format, as well as specifying the date and time format of your simple timeserver. Actually tying these pieces into the Imager Application is not very difficult, but helps to paint the larger picture of how serialization can fit into a real application design.
The first task your application does at startup is to load the license file and verify that the date contained therein is before the date returned on the timeserver. The license.file is read in from the application’s Java Archive file (JAR) and then the validity of the license is verified against the timeserver found at the URL in the serialized license:
try {
ObjectInputStream in = new ObjectInputStream( Application.class.getResourceAsStream(“license.file”));
License license = (License) in.readObject();
in.close();
if (!license.isValid()) {
JOptionPane.showMessageDialog(this, “Your license has expired”, “License”, JOptionPane.ERROR_MESSAGE);
System.exit(1);
}
}catch (Exception ex) {
JOptionPane.showMessageDialog(this, ex.getMessage(), “License”,
JOptionPane.ERROR_MESSAGE);
System.exit(1);
}
239

Chapter 5
Notice how the license file, license.file, is loaded as a resource. Your application assumes that the license was packaged into the same JAR file as the application. This means that there must be some sort of license managing utility to create and put a valid license.file into the same JAR file as the application — it will not be discussed though, as it is irrelevant to this example. Getting the license.file from the JAR file reduces the risk of a user attempting to tamper with its contents to gain a longer license. The Java Serialization API is a binary format that is not human-readable, but could potentially be recognized by another Java developer. If you really cared an awful lot about anyone tampering with your license.file, it could always be encrypted using the Java Cryptography Extension (JCE) (included in the JDK). JCE allows one to encrypt any OutputStream and hence you could encrypt (and later decrypt) an ObjectOutputStream.
Adding your Swing actions to the File menu looks like the following:
fileMenu.add(new JMenuItem(new LoadConfigurationAction(this)));
fileMenu.add(new JMenuItem(new SaveConfigurationAction(this)));
Now you have tied in all of your components based on serialization. Below is a stripped-down code listing for the basic application, showing your serialization code in the context of the application. Look at the setConfiguration(), loadConfiguration(), and getConfiguration() methods as these are what your Swing actions manipulate:
package book;
import java.awt.Color; import java.awt.GridLayout;
import java.awt.event.ActionEvent; import java.awt.event.ActionListener; import java.io.IOException;
import java.io.ObjectInputStream;
import javax.swing.*;
public class Application extends JFrame {
private Configuration configuration = new Configuration();
private JButton hdButton;
private JButton bcButton; private JButton fgButton; private Color defaultColor;
private JCheckBox showTabsCheckBox;
...
public Application() { this.setDefaultCloseOperation(JFrame.EXIT_ON_CLOSE); this.setTitle(“The Imager”);
try {
ObjectInputStream in = new ObjectInputStream( Application.class.getResourceAsStream(“license.file”));
240

Persisting Your Application Using Files
License license = (License) in.readObject();
in.close();
if (!license.isValid()) {
JOptionPane.showMessageDialog(this, “Your license has expired”, “License”, JOptionPane.ERROR_MESSAGE);
System.exit(1);
}
}catch (Exception ex) {
JOptionPane.showMessageDialog(this, ex.getMessage(), “License”,
JOptionPane.ERROR_MESSAGE);
System.exit(1);
}
...
JMenuBar menu = new JMenuBar(); JMenu fileMenu = new JMenu(“File”);
fileMenu.add(new JMenuItem(new LoadConfigurationAction(this))); fileMenu.add(new JMenuItem(new SaveConfigurationAction(this))); fileMenu.addSeparator();
...
this.pack();
this.setVisible(true);
}
private JPanel createConfigDisplayPanel() {
...
return panel;
}
private void loadConfiguration() { hdButton.setText(this.configuration.getUserHomeDirectory());
Color bcColor = this.configuration.getBackgroundColor(); if (bcColor != null) {
bcButton.setBackground(bcColor);
bcButton.setText(null);
}else {
bcButton.setText(“<No color set>”); bcButton.setBackground(this.defaultColor);
}
Color fgColor = this.configuration.getForegroundColor(); if (fgColor != null) {
fgButton.setBackground(fgColor);
fgButton.setText(null); } else {
fgButton.setText(“<No color set>”); fgButton.setBackground(this.defaultColor);
}
showTabsCheckBox.setSelected(this.configuration.isShowTabs());
}
241
Chapter 5
public Configuration getConfiguration() { return configuration;
}
public void setConfiguration(Configuration configuration) { this.configuration = configuration;
this.loadConfiguration();
}
public static void main(String[] args) { Application app = new Application();
}
}
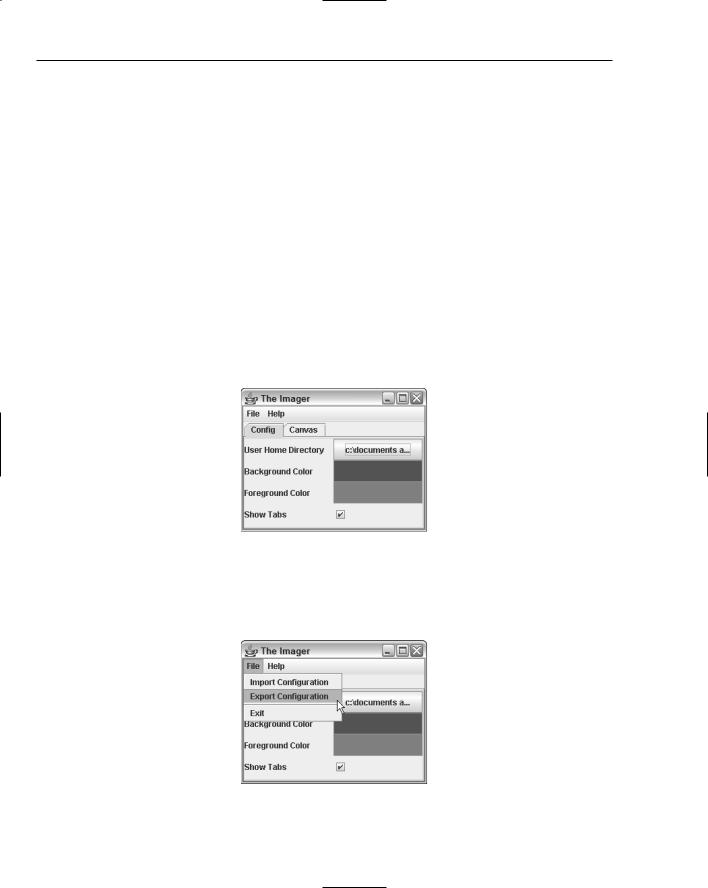
In Figure 5-7 that follows, your application is editing part of your configuration data model. To get to this screen means that the application was able to verify the license (since the license is verified before the main application window is even fully loaded). Notice in the loadConfiguration() method in the preceding code listing how the color buttons are set, the checkbox is checked, and the user’s home directory is placed on the first button when a configuration is loaded. The user can then change these options, which modifies the application’s Configuration object.
Figure 5-7
Once the data in the Configuration object is changed, it can be saved back to disk. Since the whole configuration data model is rooted in the Configuration object, all you need to do is export it to disk using your action, as shown in the screen shot in Figure 5-8.
Figure 5-8
242

Persisting Your Application Using Files
Extending and Customizing Serialization
Though most of the time, the Java Serialization API provides plenty enough functionality out of the box, there are some times when a greater level of control is necessary for the developer. Sometimes a developer will not want every field of a class serialized to disk. Other times, the developer may want to append additional information not included in class fields into the stream — or maybe modify the class’s data structure before serialization occurs. When a class definition is modified (in other words, the code is changed and the class recompiled — that is, fields are renamed, or other fields are added and still others removed), classes serialized previously to these changes will have errors upon deserialization. In this section, some of the commonly used mechanisms for customizing and extending Java Serialization will be discussed.
The Transient Keyword
The transient keyword in the Java language is used for Java Serialization. Any field marked transient will not be saved to disk. This is useful when a class contains a reference to another object that does not implement Serializable, but you still would like to persist a class instance to disk.
Sometimes certain fields are runtime-dependent and should not be persisted. Suppose in your Configuration object you wanted to additionally store a reference to your Application (for callbacks perhaps). When you saved your application to disk, you would certainly not want to persist the Application and every object associated with it on its object graph (even if all its objects implemented Serializable anyhow). To mark a field transient, simply put the keyword before the definition of the object or primitive:
private transient Application application;
The transient keyword is an easy way to quickly mark which fields of your class you would like the Serialization API to skip over and not save.
Note, though, that when a class is reconstructed after being serialized, these fields marked transient will be null (or if they are primitives, their default value), unless they are given a default value or set in the default constructor of the class.
Customizing the Serialization Format
Sometimes there is a need to perform additional operations either right before an object is serialized or right after it is deserialized. This need could arise if a class must retrieve data that is externally stored, such as on a server or in a cache, right before it is serialized. Objects may wish to verify some of their fields right after deserialization and fill in or create some of the fields marked transient. There are two methods you can add to a class to add additional behavior to the serialization and deserialization process. These methods are not part of any interface, and for them to be called, they must have the exact signature as shown. These are writeObject() and readObject(), as defined by the following:
private void writeObject(ObjectOutputStream out) throws IOException {
// can do things like validate values, get data from an external source, etc
out.defaultWriteObject(); // invokes normal serialization process on this object
}
private void readObject(ObjectInputStream in) throws IOException, ClassNotFoundException {
243

Chapter 5
in.defaultReadObject(); // invokes normal deserialization process on this object
// can do things like validate values, produce new values based on data, etc
}
The method writeObject() is called right before a class is serialized. The user can control when the class is actually serialized by calling defaultWriteObject() on the ObjectOutputStream as shown above. Doing so invokes the normal Java Serialization process on the current object. Before or after the object is written to the stream though, values to current data members could be changed or updated. Additional information can also be written to the ObjectOutputStream at this time. The ObjectOutputStream also implements the java.io.DataOutput interface, which includes methods for writing primitives (and Strings).
The readObject() method is called right before an object is deserialized. It is the natural counterpart to writeObject(). Similarly, the user can control when the object is deserialized by calling defaultReadObject() on the ObjectInputStream. After an object is deserialized, fields that did not have values could be assigned default values, or the values that were assigned could be checked. If any extra data was written to the ObjectOutputStream in writeObject() it must be read back in the readObject() method. For example, if the user wrote the java.util.Date object to the stream before writing the current object (to signify when the object was serialized), the Date object would have to be read in before defaultReadObject() was called.
Verification and Validation for Configuration
One example of how implementing writeObject() and readObject() could be useful to your Configuration object is data verification and validation. Your Configuration object stores the user’s home directory and a list of recently accessed files. Between the time when a Configuration instance is serialized and later deserialized, the files and directory may not exist (they could have been moved or deleted). When your Configuration instance is deserialized, you want to remove the references to the directory or files that no longer exist to where they originally were. To do this, the readObject() method is implemented as shown below. After defaultReadObject() is called to populate the current instance of your object, the userHomeDirectory field and the recentFiles field can be verified to check if the files (and directory) exist. Any file or directory that does not exist will simply be set to null:
private void writeObject(ObjectOutputStream out) throws IOException { out.defaultWriteObject();
}
private void readObject(ObjectInputStream in) throws IOException, ClassNotFoundException {
in.defaultReadObject();
if (this.userHomeDirectory != null) {
File f = new File(this.userHomeDirectory); if (!f.exists())
this.userHomeDirectory = null;
}
if (this.recentFiles != null) { List list = new LinkedList();
Collections.addAll(list, this.recentFiles);
244

Persisting Your Application Using Files
ListIterator it = list.listIterator(); while (it.hasNext()) {
String curr = (String) it.next(); File f = new File(curr);
if (!f.exists()) { it.remove();
}
}
this.recentFiles = new String[list.size()]; list.toArray(this.recentFiles);
}
}
The Externalizable Interface
Besides implementing readObject() and writeObject(), there is also an interface that extends Serializable that allows for greater customization of serialization and deserialization. This interface, java.io.Externalizable, allows more control of the serialization format than readObject() and writeObject(). It exists to allow developers to write their own custom formats for a class. With Externalizable, only the class identity is written to the stream by the Java Serialization API, the rest is left for the developer. The Externalizable interface looks like the following:
public interface java.io.Externalizable extends java.io.Serializable {
public void readExternal(java.io.ObjectInput in) throws java.io.IOException, java.lang.ClassNotFoundException { }
public void writeExternal(java.io.ObjectOutput out) throws java.io.IOException { }
}
The methods writeExternal() and readExternal() are public, instead of private like readObject() and writeObject(). Other classes can call these methods to read and write a class to disk without specifically invoking Java Serialization. Externalizable is not generally used very often, because when you normally want to save a class to disk, there is no need to completely customize the format. However, there may be times when Externalizable could come in handy. If you wanted to serialize a class that represented an image, and the in-memory representation was huge because it represented every pixel (like a bitmap), the Externalizable interface could be used to write the image in a different and compressed format (such as JPEG). The same could be done with readObject() and writeObject(), but these methods are not public, and in the case of your image-saving class, you may also want to save your image to disk outside of a serialization stream.
Versioning
The biggest stumbling block most developers run into with serialization is versioning. Many times classes will be serialized to disk, and then the definition of the class will change as source code is modified and the class recompiled. Maybe a field is added, or one is taken away. Design decisions could force the change of some internal data structures, say, from lists to maps or trees. Any change to a class, by default, results in the inability to restore any previously serialized instance — a version error results. Serialization versioning works by default by hashing a class based on its fields and class definition. Even if one of the field names is changed (but not its data type), previously serialized instances will not deserialize — the hash for the class has changed, and when the definition of a class is changed, there is
245