

Professional Java.JDK.5.Edition (Wrox)
.pdfChapter 4
Pattern |
Benefits |
Consequences |
|
|
|
Command |
Acts as a delivery mechanism that |
Creation of a lot of little classes |
|
carries behavior rather than data |
to accommodate component actions |
|
in an application |
|
|
Delivers encapsulated actions to a |
|
|
method or object for easier program |
|
|
control. |
|
|
|
|
The following code segment outlines the BorderLayoutPanel application how the model in Figure 4-1 is realized:
[BorderLayoutPanel.java]
// package name and import statements omitted
public class BorderLayoutPanel extends JPanel implements ActionListener {
The following section performs object declaration and initialization activities necessary for the Arithmetic Test application. Many of these actions are omitted from this example, as well as many of the layout manager programs, to provide better reading clarity. Note that the ButtonText variable uses HTML scripting text to allow for the spanning of text in the JButton Swing component to which it will be applied. The Command pattern interface is implemented so that the application can polymorphically derive proper event actions during run time based on the user’s navigation operations:
private static Logger logger = Logger.getLogger(“FlowLayout”);
// some declarations omitted for the sake of brevity [Please check download code] private final static String[] ButtonText =
{ “<html><center><font size=’+2’>Basic Arithmetic</font><br><br>( click for question )</center></html>” };
private static String[] questions =
{“1, 2, What is 1 + 1 ?, 0, 1, 2, 3”, “2, 0, What is 1 - 1 ?, 0, 1, 2, 3”, “3, 2, What is 5 - 3 ?, 0, 1, 2, 3”, “4, 3, What is 4 - 1 ?, 0, 1, 2, 3” };
private Hashtable hashtableQuestions = new Hashtable();
public interface Command { public void execute();
}
public BorderLayoutPanel(String FrameTitle) { initComponents();
}
The initComponents() method is created to separate relevant initialization tasks so that it can be invoked by the constructor during inception and when the user has finished the test and wants to reset the application. Here, all of the panels are derived that will be deployed by the BorderLayout manager:
146

Developing Effective User Interfaces with JFC
public void initComponents() { try {
removeAll();
northPanel = new JPanel(); answerPanel = new JPanel(); centerPanel = new JPanel(); eastPanel = new JPanel();
msgText = new JLabel(“Click button to start!”); InfoScreenButton = new RulesButton(“Rules”); optGroup = new ButtonGroup();
progressBar = new JProgressBar();
questionCount = 1; correctAnswerCount = 0; numberQuestionsAnswered = 0;
String[] strLine;
for (int x = 0; x < questions.length; x++) { strLine = questions[x].split(“,”); hashtableQuestions.put(strLine[0], strLine);
}
buttons = new JQuestionButton[numberButtons]; for (int i = 0; i < numberButtons; i++) {
buttons[i] = new JQuestionButton(“Question”); buttons[i].setText(ButtonText[i]); centerPanel.add(buttons[i]); buttons[i].addActionListener(this);
}
InfoScreenButton.addActionListener(this);
At this point in the application, the layout of the Swing components are established and the answers for the quiz are saved to the ButtonGroup component for visual rendering. It is important to note how layout managers are intermingled to get the desired visual effect. The answerPanel uses the GridLayout class to enforce 0 rows and 1 column so that the answers available to the user are lined up in a single column prior to being added to the eastPanel component below the progress bar and above the rules button:
centerPanel.setLayout(new GridLayout(0, 1));
answerPanel.setLayout(new GridLayout(0, 1));
Answer = new JRadioButtonAnswer[numberAnswers]; for (int i = 0; i < numberAnswers; i++) {
Answer[i] = new JRadioButtonAnswer(A[i]);
answerPanel.add(Answer[i]);
Answer[i].addActionListener(this);
optGroup.add(Answer[i]);
}
BlankRadioButton = new JRadioButton(); optGroup.add(BlankRadioButton);
147

Chapter 4
northPanel.setBackground(new Color(255, 255, 220)); northPanel.add(msgText);
eastPanel.setLayout(new GridLayout(0, 1)); eastPanel.add(progressBar); eastPanel.add(answerPanel); eastPanel.add(InfoScreenButton);
setLayout(new BorderLayout()); add(eastPanel, “East”); add(northPanel, “North”); add(centerPanel, “Center”);
setSize(600, 600); questionAnswered = true; answerPanel.setVisible(false);
progressBar.setMaximum(numberQuestions);
progressBar.setValue(0);
progressBar.setIndeterminate(false);
resetButton = new JResetButton(“Reset Game”); resetButton.addActionListener(this);
}catch (Exception e) { logger.info(“Exception: “ + e.toString());
}
}
The JQuestionButton class implements the Command interface so that user invocations on that button will dynamically determine — through the ActionListener implementation — that the execute() method associated with this button should be invoked. Once invoked, the application will use a key based on the question count to search the hashtableQuestions collection class for the proper question to render on the display:
private class JQuestionButton extends JButton implements Command {
public JQuestionButton(String caption) { super(caption); } public void execute() {
try {
if (numberQuestionsAnswered < numberQuestions) { answerPanel.setVisible(true); northPanel.setBackground(new Color(255, 255, 220)); if (questionAnswered) {
optGroup.setSelected(BlankRadioButton.getModel(), true); questionAnswered = false;
try {
String key = Integer.toString(questionCount); if (hashtableQuestions.containsKey(key)) {
Question = (String[]) hashtableQuestions.get(key); questionCount++;
} else {
logger.info(“key NOT found” + key);
148

Developing Effective User Interfaces with JFC
}
} catch (Exception e) { throw e; }
msgText.setText(Question[2]);
for (int i = 0, x = 3; i < numberAnswers; i++) { Answer[i].setText(Question[x + i]);
}
}
}
} catch (Exception e) { logger.info(“Exception: “ + e.toString());
}
}
}
The JRadioButtonAnswer class also implements the Command interface to polymorphically determine behavior needed when a user clicks on the radio button answer to the question posed by the test application. If the user response is correct, the background color of the northPanel will be turned green, indicating a positive response to the question, and if another question is available, the JButton setText() method will be used to display the user’s score and the progressBar component will exhibit the percentage of the test that the user has covered:
private class JRadioButtonAnswer extends JRadioButton implements Command { public JRadioButtonAnswer(String caption) {}
public void execute() { try {
if (!questionAnswered) {
if (Question[1].trim().equals(getText().trim())) { msgText.setText(“Correct!!!”); northPanel.setBackground(Color.green); correctAnswerCount++;
}else { msgText.setText(
“Wrong!!! The correct answer is: “ + Question[1]); northPanel.setBackground(Color.red);
}
questionAnswered = true; numberQuestionsAnswered++;
buttons[0].setText(
(“<html><center><font size=’+2’>( click for question )</font>”
+“<br><br>”
+“ Score= “
+correctAnswerCount
+“/”
+numberQuestionsAnswered).toString()
+“</center></html>”);
progressBar.setValue(numberQuestionsAnswered);
progressBar.setStringPainted(true);
progressBar.setString( Double.toString(Math.round(progressBar.getPercentComplete() * 100))+
“%”);
if (numberQuestionsAnswered >= numberQuestions) {
149

Chapter 4
buttons[0].setBackground(new Color(255, 255, 220)); buttons[0].setText(“Finished. Score= “ + String.valueOf(
(float) correctAnswerCount / (float) numberQuestionsAnswered * 100) + “%”); // setup reset button
answerPanel.removeAll();
answerPanel.add(resetButton);
}
}else { msgText.setText(
“You have answered this question, please select a new Question”);
}
} catch (Exception e) {
logger.info(“Exception occured: “ + e.toString());
}
}
}
The actionPerformed method is an implementation of the ActionListener interface, which is invoked when an event is created by user operations. The Command pattern implementation determines which button was selected by the user and the proper execute() method to invoke based on that event:
public void actionPerformed(ActionEvent e) { Command obj = (Command) e.getSource();
obj.execute();
}
The RulesButton class also implements the Command interface so that a new frame will be kicked off when a user selects the Rules button in the test application. The JResetButton button is used to supplant the answers in the answerPanel when all five questions have been answered by the test taker.
This allows the user to retake the test by resetting the answers in the test. Ideally, you would want to randomize those answers to make the test more difficult, but this application was developed to demonstrate, in a simple fashion, how the BorderLayout class can be used with other layout managers to develop relevant GUI applications:
class RulesButton extends JButton implements Command {
public RulesButton(String Title) { super(Title); } public void execute() {
JLabel InfoLabel = new JLabel(
“<html> How To Play:<br> Click on button to generate questions “
+“on the right side of the user display. A progress bar will “
+“indicate where the tester is with respect to the entire test.”); JFrame InfoFrame = new JFrame(“How To Play”); InfoFrame.getContentPane().add(InfoLabel);
InfoFrame.setSize(400, 150); InfoFrame.show();
}
}
private class JResetButton extends JButton implements Command {
public JResetButton(String caption) {
150
Developing Effective User Interfaces with JFC
super(caption);
}
public void execute() { initComponents();
}
}
// main method omitted for the sake of brevity
}
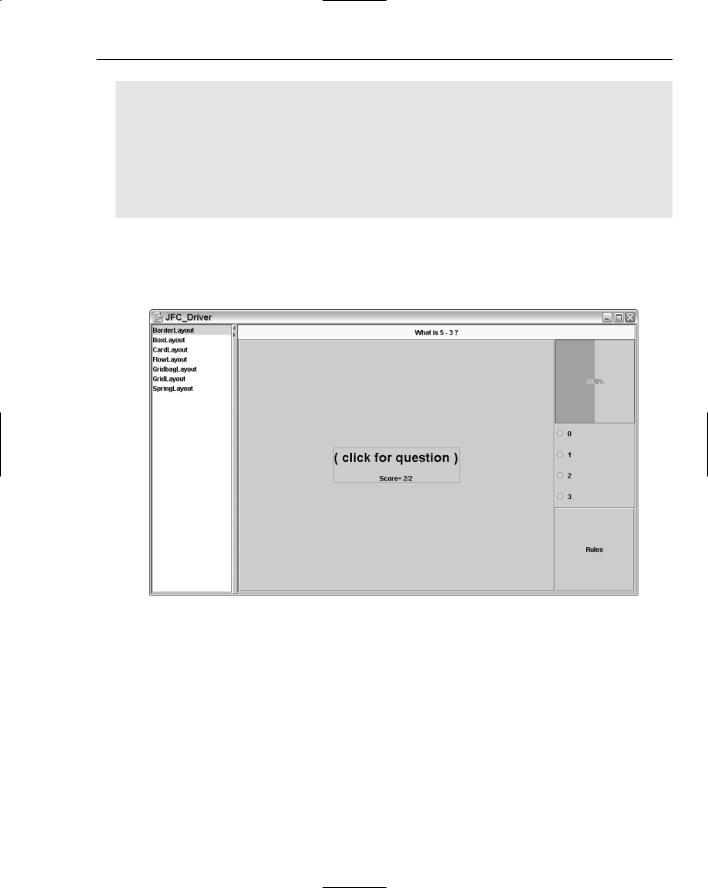
Figure 4-2 represents the finished product of the BorderLayoutPanel application. Test questions are rendered in the NORTH section of the BorderLayout, while test progress statistics, answers, and a Rules component reside on the EAST. Users navigate through the test by clicking on the questionPanel in the BoderLayout.CENTER, which will retrieve and display the questions for the user to answer.
Figure 4-2
BoxLayout
The BoxLayout manager arranges components horizontally from left to right, or vertically from top to bottom, without the wraparound capability in the FlowLayout manager. The implementation of the BoxLayout manager warrants the instantiation of the BoxLayout class with two parameters, the first being the Container panel that will be displayed, followed by an integer axis value that indicates the placement of the components on the panel. An axis value of Boxlayout.X_AXIS indicates left to right layout management, while a value of BoxLayout.Y_AXIS signifies a top to bottom layout.
151

Chapter 4
The constructor methods for the BoxLayout manager are shown in the following method summary table.
Method |
Description |
public BoxLayout(Container panel, int axis)
The panel parameter signifies the container that will be mapped out, while the axis parameter indicates where the components will be placed. An axis value of BoxLayout.Y_AXIS indicates left to right placement and an axis value of BoxLayout.Y_AXIS indicates a top to bottom placement.
The following BoxLayout example will apply the Decorator pattern in its implementation so that users can add behavior dynamically through drag and drop operations. Figure 4-3 provides a model of the application and how the different image components occupy the BoxLayout panel real estate.
BoxLayout |
CondimentPanel |
Decorator pattern: Adds behavior |
dynamically to the FoodItems |
Cheese Image |
Drag and Drop |
Hamburger Image |
Hotdog Image |
Pizza Image |
Figure 4-3 |
152

Developing Effective User Interfaces with JFC
Dynamic behavior transfer occurs when a user drags the Cheese condiment image onto one of the three food item images on the left panel. Some of the benefits of the Decorator pattern are defined in the table below.
Pattern |
Benefits |
Consequences |
|
|
|
Decorator |
Can add or remove responsibilities of |
Generates a lot of similar objects |
|
individual objects dynamically without |
|
|
affecting other objects during run time |
|
|
A class can be wrapped in another |
|
|
object to provide added functionalities |
|
|
|
|
The FoodCourt interface allows the BoxLayout application to dynamically add behaviors to the three different food items (Hamburger, Hotdog, and Pizza) during run time when the Cheese object is dragged and dropped on the food items. Additionally, get methods are modeled so that relevant data can be retrieved from objects. The FoodCourt interface class allows behaviors to be defined across the class hierarchy of the BorderLayout sample application with private implementations to address individual needs:
[FoodCourt.java]
// package name omitted public interface FoodCourt {
public String getName(); public float getCost();
public FoodGraphic getGraphic();
public void addBehavior(String b); public String getDescription();
public void setGraphicHandler(FoodCourt h);
public void handleClick();
}
The FoodGraphic class controls the user events associated with the three different food images. The FoodImage class is implemented to handle image files affiliated with the different food items in the BoxLayout demonstration. The paintComponent(Graphics g) method ensures that image files are drawn properly throughout the lifetime of the JPanel component FoodImage:
[FoodGraphic.java]
// package name and import statements omitted
public class FoodGraphic extends JPanel implements DropTargetListener, MouseListener {
// declarations omitted for the sake of brevity [Please check download code]
private class FoodImage extends JPanel { private Image image = null;
public FoodImage(String imageFile) { super();
URL url = FoodImage.class.getResource(imageFile); image = Toolkit.getDefaultToolkit().getImage(url);
}
153

Chapter 4
public void paintComponent(Graphics g) { super.paintComponent(g); g.drawImage(image, 0, 0, this);
}
}
public FoodGraphic(FoodCourt hand, String imageFile, int w, int h, boolean tipsFlag) {
this(hand, imageFile, w, h); updateTips = tipsFlag;
}
The FoodGraphic method receives a handler object from the Food class, which is instantiated in the FoodItems class when the three different food items are created. A new dropTarget object reference is created with the DropTarget class to tell the application that the Food object is willing to accept drops during drag and drop operations.
The DropTargetListener interface performs callback notifications on registered subjects to signal event changes on the target being dropped on:
public FoodGraphic(FoodCourt hand, String imageFile, int w, int h) { super();
handler = hand; imageFileName = imageFile;
imagew = w; imageh = h;
dropTarget = new DropTarget(this, DnDConstants.ACTION_COPY_OR_MOVE, this); setBackground(Color.white);
name = handler.getName();
image = new FoodImage(imageFile); image.setPreferredSize(new Dimension(imagew,imageh)); image.setMaximumSize(new Dimension(imagew,imageh)); image.setMinimumSize(new Dimension(imagew,imageh)); image.setAlignmentX(CENTER_ALIGNMENT);
label = new JLabel(name,SwingConstants.CENTER); label.setPreferredSize(new Dimension(imagew,25)); label.setMaximumSize(new Dimension(imagew,25)); label.setMinimumSize(new Dimension(imagew,25)); label.setAlignmentX(CENTER_ALIGNMENT);
setLayout(new BoxLayout(this, BoxLayout.Y_AXIS)); setBorder(BorderFactory.createLineBorder(Color.blue, 2));
add(image);
add(label);
setToolTipText(name);
addMouseListener(this);
}
154

Developing Effective User Interfaces with JFC
A method summary of the DropTargetListener interface class and its methods is illustrated in the following table.
Method |
Description |
|
|
void dragEnter(DropTargetDragEvent d) |
Method called when the mouse |
|
pointer enters the operable part of |
|
the drop site for the target regis- |
|
tered with a listener |
void dragExit(DropTargetEvent d) |
Method called when the mouse |
|
pointer has exited the operable part |
|
of the drop site for the target regis- |
|
tered with a listener |
void dragOver(DropTargetDragEvent d) |
Method called when the mouse |
|
pointer is still over the operable |
|
part of the drop site for the target |
|
registered with a listener |
void drop(DropTargetDropEvent d) |
Method called when the drag oper- |
|
ation has terminated with a drop on |
|
the operable part of the drop site for |
|
the target registered with a listener |
void dropActionChanged(DropTargetDragEvent d) |
Method called if the user has modi- |
|
fied the current drop gesture |
|
|
The drop(DropTargetDropEvent e) method in the following code implements the DataFlavor class, which represents a format style that can be conveyed across an application. If the flavor being dragged and dropped across the GUI display is supported and verified by the isDataFlavorSupported method, then the drag and drop operation of the cheese condiment onto one of the three food items will be allowed to occur and the behavior affiliated with that operation will be added to the object handler so that a description of that action can be obtained through the getDescription() method.
The dragEnter and dragExit methods are used to visually color the borders of the items being dragged and dropped in the GUI presentation:
public void drop(DropTargetDropEvent e) { try {
DataFlavor stringFlavor = DataFlavor.stringFlavor; Transferable tr = e.getTransferable();
if (e.isDataFlavorSupported(stringFlavor)) {
String behavior = (String)tr.getTransferData(stringFlavor); e.acceptDrop(DnDConstants.ACTION_COPY_OR_MOVE); e.dropComplete(true);
handler.addBehavior(behavior);
if (handler != null && updateTips) { setToolTipText(handler.getDescription());
}
} else {
155