

Professional Java.JDK.5.Edition (Wrox)
.pdfChapter 2
User
user s t o r i e
s
w
o r
k i n
g s
y
s t e
m
Planning |
|
|
Phase |
pl |
|
|
a |
|
|
n |
|
|
n |
|
|
e |
|
|
d |
u |
|
|
s |
|
|
e |
|
|
r |
|
|
s |
|
|
t |
|
|
o |
|
|
r |
|
|
i |
|
|
e |
|
|
s |
a |
Iteration |
|
u |
||
c |
|
|
t |
|
|
a |
|
|
l |
|
|
u |
|
|
s |
|
|
e |
|
|
r |
|
|
s |
|
|
|
t |
|
|
o |
|
|
r |
|
|
i |
|
|
e |
|
|
s |
|
Write Unit Tests
Code
Integrate
Coding Phase
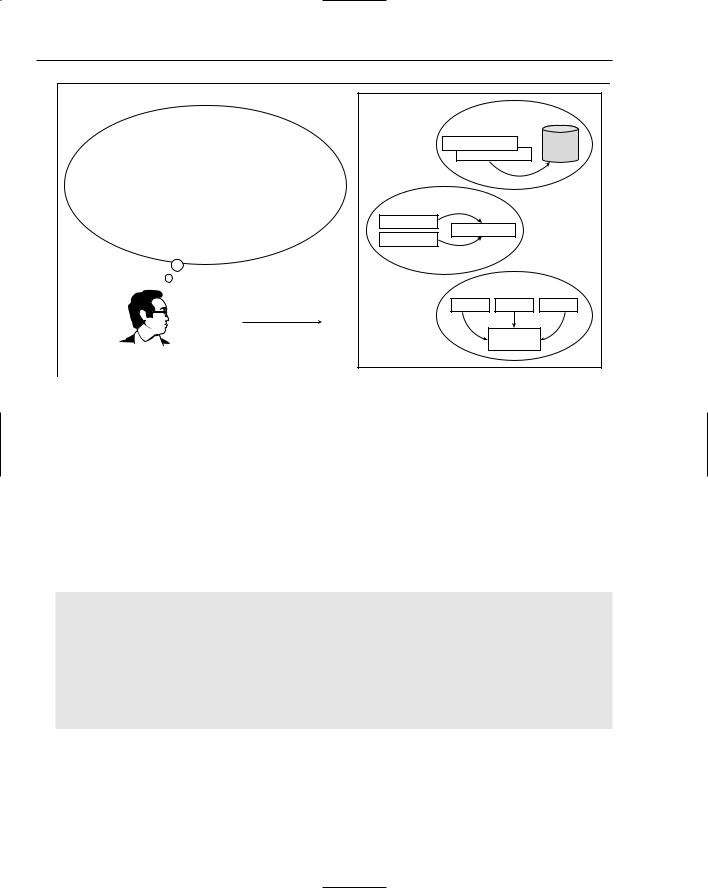
Figure 2-4
Observations on Methodology
There are several critical points that you can take away from reviewing these three divergent methodologies:
Ultimately, you are doing the same task in each methodology. It is about how much scope you attempt to address in each activity that defines the real difference.
The agile methodologies, like UP and XP, seek to be reactive rather than proscriptive. That is, they attempt to assess the success and adjust direction of the effort continuously rather than relying on the pass/fail nature of waterfall control gates.
The methodologies vary in how much importance they grant to the design phase and the accoutrements that surround them (UML modeling tools and so forth). The Waterfall process finds
86

Tools and Techniques for Developing Java Solutions
this phase incredibly important, and UP recognizes that for the part of the system you are addressing in your iteration. XP believes that coding is design, and all of the additional work is built around considering scenarios that are not actually addressed in the functionality of the system. After all, you are coding the actual user stories.
All of the methodologies recognize the importance of use cases; though, they address them in different forms. The Waterfall methodology sees use cases as a tool for generating the explicit requirements of the system, providing background information. UP finds them important as an inventory of scope. The survey report contains a simplified explanation of each use case and then relies upon them to build its design models in each of its iterations. XP is based directly on developing to satisfy what it calls user stories, which are more informal in format but still essentially the same thing.
There is no one-size-fits-all methodology. As mentioned in Habits of Effective Software Development, it is important that you and your team determine the process by which you will accomplish addressing the need for which your software is being built. This section was meant to provide you with a background on some of the most common methodologies in software today, and the next section will discuss some of the common tools used in software development in the context of practical development scenarios.
Practical Development Scenarios
Distributing J2EE applications across tiers is a challenging task to tackle because of all of the underlying implications of mixing and matching components with connectors across a system. The J2EE architecture consists of four tiers: the client, Web, business, and Enterprise Information System (EIS). The client tier is comprised of applets, HTML, and Java components. The Web tier is made up of servlets and Java Server Pages that operate in a Web container. The business tier manages all of the data transactions and persistence mechanisms of a system as well as resource allocations. The EIS tier is accountable for all of the back-end database systems that application components must integrate with.
With all of these components and connectors, consideration must be given to the construction of processes that manage and test these entities to ensure that consistencies are attained during development and deployment. Many open source tools have been developed to facilitate technological timing issues so that business challenges can be met. The remaining sections of this chapter will discuss some of these tools so that you can apply them in your operations to realize those consistencies, which should facilitate your development activities and help you become more successful with your integrations and deployments.
This chapter will investigate some scenarios on how to apply scripting tools like Ant, Maven, and XDoclet to manage your component builds and packaging, along with JUnit and JMeter to test your applications in an automated fashion to ensure that your development operations can behave in a harmonious manner.
Ant
All software projects need consistent builds from a common repository to ensure applications are deployed properly. For many software projects (both commercial and open source), Ant has been used to compile, test, and package components for distribution (see Figure 2-5).
87
Chapter 2
I’ve got three issues I need to address ASAP. I have to rebuild some database tables and populate them for testing, and since I bothered the DBA last week, I’m a little reluctant to do so again so soon. How can I get this done in a painless fashion? I also want to automate my TIF file markup operations on a daily basis to ensure I don’t miss any files or corrupt them by doing it by hand. How can I get this done? Lastly, I need to create an executable JAR file for my GUI application and I forgot the command to do so. How can I generate and package this JAR on a consistent basis?
Developer
ANT |
Scenario 1 |
|
|
|
|
SQL script - CREATE |
Database |
|
SQL script - INSERT |
|
|
Scenario 2 |
|
|
TIF file |
|
|
TIF file + Markup |
|
|
Markup |
|
|
|
Scenario 3 |
|
*.java |
*.jpg |
*.xml |
|
Executable |
|
|
JAR |
|
Figure 2-5
With Ant, a series of targets are implemented to construct processes to build your system components. This section will take you through three different scenarios that you might encounter in your development activities that can be tackled with Ant.
Scenario 1
In general, most Ant scripts start with property settings that are used to establish proper directory structures for file creation and transfer during your build activities. Similarly, parameters that are needed for processing can be defined like they are for database operations used in all three target entries in the following Ant script. Users can also send these parameters to the Ant script from the command line using the -D operation:
<project name=”Database creation” default=”createTables_MySQL” basedir=”.”> <!-- could use a property file, we opted for property settings in script <property file=”${basedir}/build.properties”/> -->
<property name=”sql.driver” value=”org.gjt.mm.mysql.Driver”/>
<property name=”sql.url” value=”jdbc:mysql://localhost/sample_project”/>
<property name=”sql.user” value=””/> <property name=”sql.pass” value=””/>
The createTables_MySQL target executes three SQL scripts for employees, project, and timetable table creation. The idea here is to be able to generate your tables on the fly just in case you need to deploy your database tables on a new platform for testing and/or deployment:
88

Tools and Techniques for Developing Java Solutions
<target name=”createTables_MySQL”>
<sql driver=”${sql.driver}” url=”${sql.url}” userid=”${sql.user}” password=”${sql.pass}” >
<classpath>
<pathelement location=”mysql-connector-java-3.0.9-stable-bin.jar”/> </classpath>
use sample_project;
<transaction src=”employees.sql”/> <transaction src=”project.sql”/> <transaction src=”timetable.sql”/>
</sql>
</target>
The createDB_MySQL script works in conjunction with the sample_project.sql file to create a database in MySQL so that tables can be added to it. The following code snippet outlines how this is done, first by dropping any preexisting tables for employees, project, and timetable. After that has been performed, then the database will be created for table aggregations:
BEGIN;
DROP TABLE IF EXISTS employees;
DROP TABLE IF EXISTS project;
DROP TABLE IF EXISTS timetable;
DROP DATABASE IF EXISTS sample_project;
COMMIT;
CREATE DATABASE sample_project;
<target name=”createDB_MySQL”> <sql driver=”${sql.driver}”
url=”${sql.url}” userid=”${sql.user}” password=”${sql.pass}”
classpath=”mysql-connector-java-3.0.9-stable-bin.jar” src=”sample_project.sql”/>
</target>
The last target, dropDB_MySQL, is used to drop the database, sample_project, just in case something has gone wrong and a user wants to start over from scratch. Prior to performing this operation, a user should probably provide a query asking the user if this operation is really desired, as shown below:
<target name=”dropDB_MySQL”>
<input message=”Do you really want to delete this table (y/n)?” validargs=”y,n” addproperty=”do.delete” />
<condition property=”do.abort”>
<equals arg1=”n” arg2=”${do.delete}”/> </condition>
<fail if=”do.abort”>Build aborted by user.</fail>
<sql driver=”${sql.driver}” url=”${sql.url}” userid=”${sql.user}” password=”${sql.pass}” >
<classpath>
<pathelement location=”mysql-connector-java-3.0.9-stable-bin.jar”/> </classpath>
drop database sample_project;
89

Chapter 2
|
</sql> |
|
|
|
</target> |
|
|
|
</project> |
|
|
|
|
|
|
|
Sequence |
Target |
Action |
|
|
|
|
|
2 |
createTables_MySQL |
Creates tables for operations/testing |
|
1 |
createDB_MySQL |
Creates database for table adds |
|
3 |
dropDB_MySQL |
Drops database |
|
|
|
|
Scenario 2
Scenario 2 addresses the image file markup that could be part of your workflow processes in your development operations. The following Ant script invokes the application necessary to aggregate your TIF files, depending on the date passed into your process. After all of the files have been collected, they will be sequentially run through a markup process that will tag the documents with the text provided:
<target name=”run” description=”Run the application.”>
<java classname=”book.WorkFlow” fork=”true” failonerror=”true”> <classpath>
<pathelement location=”${run.dir}”/> </classpath>
</java>
</target>
The WorkFlow application employs the Ant library DirectoryScanner to determine which files will be marked, and all files collected will be marked up using Sun’s Java Image I/O APIs:
package book;
import java.awt.Color; import java.awt.Font; import java.awt.Graphics;
import java.awt.image.BufferedImage; import java.io.File;
import java.io.FileInputStream; import java.io.IOException; import java.text.SimpleDateFormat; import java.util.ArrayList; import java.util.Date;
import java.util.Iterator; import java.util.List;
import javax.imageio.ImageIO;
import javax.imageio.stream.ImageOutputStream;
import org.apache.commons.logging.Log; import org.apache.commons.logging.LogFactory; import org.apache.tools.ant.DirectoryScanner; import org.apache.tools.ant.types.Parameter;
import org.apache.tools.ant.types.selectors.BaseSelector;
90

Tools and Techniques for Developing Java Solutions
import org.apache.tools.ant.types.selectors.DateSelector; import com.sun.media.imageio.plugins.tiff.TIFFImageWriteParam;
public class WorkFlow {
private static Log log = LogFactory.getLog(WorkFlow.class); private String workfilePath = “c://java_1.5_book/ant”;
public synchronized void processDocument(String s) {
// perform timing tests
long start = System.currentTimeMillis();
log.info(“[WorkFlow:processDocument()] “);
if (s.length() <= 0) {
String date = new Date().toString(); log.info(“date = “ + date);
SimpleDateFormat sdfLog = new SimpleDateFormat(“MM/dd/yyyy HH:mm aa”);
log.info(“formatted date = “ + sdfLog.format(new Date())); s = sdfLog.format(new Date());
}
log.info(“passing date: “ + s);
The string variable that is passed into the processDocument method represents the date that will be used to collect the image documents. If an empty value is passed, then the current date will be used. Now pass that date along to the createWorkFiles method, which returns a String array of all of the files to be processed.
The String array returned from createWorkFiles is propagated to the documentsToProcess method that might perform checks on the individual files to ensure that bad files are not passed along for marking:
List list = documentsToProcess(createWorkFiles(s));
Iterator it = list.iterator();
if (!list.isEmpty()) { while (it.hasNext()) {
log.info(“[WorkFlow:processDocument] processing item:” + it.next());
}
} else {
log.info(“[WorkFlow:processDocument] list is NULL.”);
}
// finalize timing tests
long elapsedTimeMillis = System.currentTimeMillis()-start; log.info(“Time (ms) :” + elapsedTimeMillis + “ ms”); log.info(“Time (secs):” + (elapsedTimeMillis/1000F) + “ secs”);
}
91

Chapter 2
The markImage method receives three parameters, which represent an input and output file as well as a String markup that will be pasted on the top and bottom of the document being processed:
public void markImage(String inFile, String outFile, String marking) {
try {
BufferedImage image = ImageIO.read(new File(inFile));
Graphics graphics = image.getGraphics(); graphics.setColor(Color.black);
graphics.setFont(new Font(“Arial”, Font.BOLD | Font.ITALIC, 60));
graphics.drawString(marking, (image.getWidth()*4/10) , (image.getHeight() – (image.getHeight()/20)));
graphics.drawString(marking, (image.getWidth()*4/10) , image.getHeight()/20); // save modified image
String format = “tiff”;
// Create Image
IIOImage iioImage = new javax.imageio.IIOImage(image, null, null);
// Get TIFF Writer
Iterator writers = ImageIO.getImageWritersByFormatName(“tiff”); ImageWriter writer = (ImageWriter)writers.next();
// Set WriteParam’s TIFFImageWriteParam writeParam =
(TIFFImageWriteParam)writer.getDefaultWriteParam(); writeParam.setCompressionMode(ImageWriteParam.MODE_EXPLICIT); writeParam.setCompressionType(“CCITT T.6”);
//Create File to save the image File f = new File(outFile);
if (!f.exists()) f.createNewFile(); ImageOutputStream ios = createImageOutputStream(f); writer.setOutput(ios);
//Save the image
writer.write(null, iioImage, writeParam); ios.close();
} catch (IOException e) { log.error(“FILE FAILED:” + inFile);
}
}
The createWorkFiles method receives a date value in string form to be used by the DateSelector object to collect files with *.TIF extensions that were created after the date specified for markup processing. Once the workfilePath directory has been scanned for those files adhering to the data constraints established and stored in a String array, that object will be passed back to the calling method in processDocument:
92

Tools and Techniques for Developing Java Solutions
public String[] createWorkFiles(String date) { log.info(“[WorkFlow:createWorkFiles()] “); DateSelector selector = new DateSelector();
Parameter param = new Parameter(); param.setName(DateSelector.WHEN_KEY); param.setValue(“after”);
// test date = “01/01/2004 23:15 PM”; selector.setParameters(new Parameter[]{param});
selector.setDatetime(date);
DirectoryScanner ds = new DirectoryScanner(); ds.setBasedir(workfilePath); ds.setIncludes(new String[]{“*.TIF”}); ds.setSelectors(new BaseSelector[]{selector}); ds.scan();
return ds.getIncludedFiles();
}
The documentsToProcess method can be omitted if the checks are not going to be performed on the artifacts collected. The method itself just parses through the String array of filenames collected using the Ant library DateSelector:
public List documentsToProcess(String[] s) { List docList = new ArrayList();
for (int i=0; i < s.length; i++) { log.info(“s[“ + i + “]= “ + s[i]);
//not shown, but could perform checks to ensure
//that improper files are not propagated forward docList.add(s[i]);
}
return docList;
}
// test
public static void main(String[] args) {
WorkFlow testWorkFlow = new WorkFlow(); String date = “”;
String[] s = testWorkFlow.createWorkFiles(date); if (s.length > 0) {
log.info(“s.length = “ + s.length); } else {
log.info(“Files NOT found.”);
}
testWorkFlow.processDocument(date);
String workfilePath = “c://java_1.5_book/ant”; testWorkFlow.markImage(workfilePath + File.separatorChar + “test.TIF”,
workfilePath + File.separatorChar + “tests.TIF”,
93

Chapter 2
“Test”);
}
}
Scenario 3
Scenario 3 addresses the creation of executable JAR files for a sample GUI application called BookAuthorSearch. Notice the following <manifest> tag that specifies the application’s main class name. This is provided so that the create JAR file can be clicked and the application will be run automatically:
<project name=”test” default=”all” >
<target name=”init” description=”initialize the properties.”> <tstamp/>
<property name=”build” value=”./build” /> </target>
<target name=”clean” depends=”init” description=”clean up the output directories.”>
<delete dir=”${build}” /> </target>
<target name=”prepare” depends=”init” description=”prepare the output directory.”>
<mkdir dir=”${build}” /> </target>
<target name=”compile” depends=”prepare” description=”compile the Java source.”>
<javac srcdir=”./src/book” destdir=”${build}”> </javac>
</target>
<target name=”package” depends=”compile” description=”package the Java classes into a jar.”>
<jar destfile=”${build}/BookAuthorSearch.jar” basedir=”${build}”> <manifest>
<attribute name=”Main-Class” value=”book.BookAuthorSearch” /> </manifest>
</jar>
</target>
The last target, run, is used to invoke the BookAuthorSearch JAR file for execution. The JAR file is an important feature that allows Java applications to be easily packaged for deployment:
<target name=”run” description=”Run the application.”> <classpath>
<pathelement location=” BookAuthorSearch.jar “/> </classpath>
</java>
</target>
94

Tools and Techniques for Developing Java Solutions
<target name=”all” depends=”clean,package” description=”Compile and package.”/>
</project>
With tightened schedules, smaller development teams, and remote development operations, it is paramount for projects to employ Ant so that important processes can be captured and implemented in an easy manner by anyone. Consistent process operations ensure that builds are not corrupted and development and deployment activities can go forward in a less painful way than those programs that operate in an ad hoc fashion.
Maven
Maven is a build tool that allows users to build a project using its Project Object Model (POM) and Ant build files to perform uniform build activities. Maven is integrated with Gump to help projects maintain backward compatibility, and it utilizes a project descriptor, project.xml, to dictate how your project will be built.
Some of the elements of a project descriptor can include the following.
Element |
Description |
|
|
Extend |
Specifies the location of the parent project if it exists |
PomVersion |
The current version of the project descriptor |
Id |
The short name of the project |
Name |
The full name of the project |
GroupId |
The short name of the project group |
CurrentVersion |
The current version of the project |
Organization |
The organization that owns the project |
InceptionYear |
The year of the project’s start (specified with four digits) |
Package |
The Java package name of the project |
Logo |
The URL to the project’s logo image |
GumpRepositoryId |
(Optional) The Id of the Gump repository |
Description |
(Optional) A detailed description of the project |
ShortDescription |
A brief description of a project |
url |
The homepage’s URL |
IssueTrackingUrl |
(Optional) URL of issue tracking system |
SiteAddress |
(Optional) Web server directory where project resides |
SiteDirectory |
(Optional) The public site directory |
DistributionSite |
(Optional) The site where public distributions reside |
|
|
|
Table continued on following page |
95