

C# ПІДРУЧНИКИ / c# / Hungry Minds - C# Bible
.pdf

Figure 37-5: Security policy levels are overlapped to determine a final security level.
If you change your machine policy to allow certain types of operations from code downloaded from the Internet, for example, your network administrator can apply an enterprise security policy to disallow the operations.
Understanding code groups
All of the security policy levels contain code groups, which in turn contain zones for each code group. This result is a very detailed adjustment of security settings across all of the policy levels, and allows different types of security at each policy level depending on the zone of the code in question.
Immediately under the code group is an All_Code node. As the name implies, these permissions sets apply to all code. In addition to this All_Code node, you can add more nodes to fit your needs. For example, you can create nodes for code that you receive from consultants or any source you'd like.
When evaluating security levels, keep in the mind the way in which that code policy is actually evaluated. For each level in the security policy, the permissions for an assembly are joined together. By joining all of these permissions, you wind up with one very large permission set. Each of these permissions sets are then overlapped so that a comparison can be performed, and the most restrictive value for each permission is then used for the final permission set.
Understanding named permission sets
A named permission set is a set of permissions that administrators or developers can associate with a code group. A named permission set consists of at least one permission and a name and description for that particular permission set. Administrators can use named permission sets to establish or modify the security policy for code groups, much like Windows NT groups are
used to manage groups of users. You can associate more than one code group with the same named permission set.
Table 37-2 describes the built-in named permission sets provided by the common language runtime.
|
Table 37-2: Built-in Named Permission Sets |
|
|
|
|
Permission Set |
|
Description |
|
|
|
Nothing |
|
No permissions (code cannot run) |
|
|
|
Execute |
|
Permission to run (execute), but no permissions to use protected |
|
|
resources |
|
|
|
Internet |
|
The default policy permission set suitable for content from |
|
|
unknown origin |
|
|
|
LocalIntranet |
|
The default policy permission set within an enterprise |
|
|
|
Everything |
|
All standard (built-in) permissions, except permission to skip |
|
|
verification |
|
|
|
FullTrust |
|
Full access to all resources |
|
|
|
Altering security policies
Before actually experimenting with coding techniques to demand and refuse security permissions, you should first familiarize yourself with the tools available for altering security settings. The security settings discussed so far are kept in XML files. The machine security policy is kept in the security.config file located in the \WINNT\Microsoft.NET\Framework\vx.x.xxxx\CONFIG directory. The user security settings can be found in security.config, located in the \Documents and Settings\<UserName>\Application Data\Microsoft\CLR Security Config\vx.x.xxxx directory. You can navigate to the Control Panel, select Administrative Tools, and then select Microsoft
.NET Framework Configuration for all of your configuration needs. This tool not only has several built-in wizards that ease the configuration process, it is much easier to use than an XML editor.
After you open the configuration tool, expand the Runtime Security Policy node, as shown in Figure 37-6.
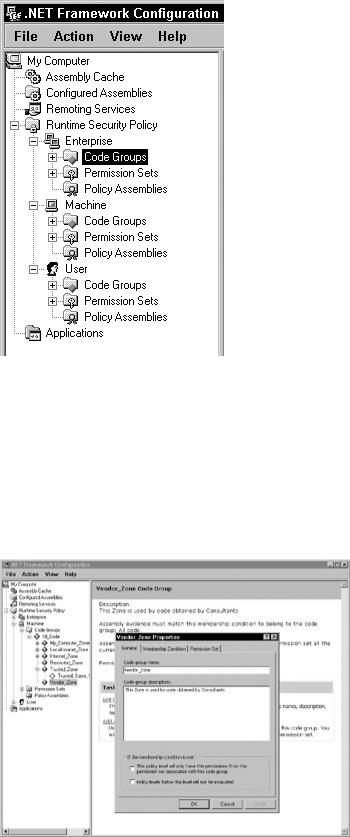
Figure 37-6: The Microsoft .NET Framework configuration tool
It is here that you can actually see the different security levels, code groups for each level, permissions sets, and policy assemblies.
Adding new codes groups is remarkably simple. Right-click within the left-hand pane and select New. A wizard opens, asking for the name of this new code group and whether it should be modeled after an existing group or have custom permissions (see Figure 37-7). This wizard walks you through all of the available permissions, and you even have the option to package the security policy to distribute to the enterprise.
Figure 37-7: A wizard aids you in creating custom security policies.
Summary
The .NET Framework sits atop a vast amount of security code that monitors every aspect of an application or user. This security framework enables the developer and enterprise administrator to control how much or how little an application can do. You learned about both user-identity security and code-access security. By using both of these in conjunction with the underlying operating system security, you can make applications more secure than ever before.
Appendix: XML Primer
Unless you have lived in a cave for the past few years, you've already heard about XML. Indeed, XML has received a lot of good press, most of which it deserves. However, in spite of what you may have read in some glossy marketing brochure, XML is unlikely to solve world hunger, bring world peace, or cure all known diseases. After reading this section, you will master the essentials of XML and its associated standards, such as schemas and namespaces.
Simply put, XML is a simplified SGML dialect designed for interoperability, and has been nominated as the ASCII of the future. For the last decade, ASCII has been the traditional standard for text-based data interchange, but it is rapidly being displaced by XML as the new standard. Throughout this section, you learn to appreciate the sheer elegance of XML: its unique combination of pure simplicity and raw power. You also learn what other standards complement XML. The XML family of complementing standard has grown tremendously over the last few years, so for brevity's sake only those standards that are relevant to this book are discussed.
XML's Design Goals
XML is a mark-up language that is extensible. Of course, this is not much of a revelation given what the abbreviation stands for (eXtensible Mark-up Language), but it is worth pointing out this obvious fact because it really captures the essence of XML. Extensible means that you can add new words to the language to suit your specific purpose. A mark-up language embeds special symbols in a document for some specific purpose. This purpose varies from one mark-up language to another. One of XML's strengths is that its purpose is broad: it serves as a universal text-based language for structured data.
HyperText Mark-up Language (HTML), Standard Generalized Mark-up Language (SGML), and Rich Text Format (RTF) are other examples of mark-up languages you may have heard of.
Note Because XML is a universal computer language, some have coined the term "Esperanto of the Computers" as a term to designate XML. This is a good simile, except that Esperanto is not generally considered a success story.
Before diving into the syntax and grammar of XML, it is worthwhile to examine the ten design goals of XML as set out by its creators. These goals are listed here and each one is explained in more detail below. Some of these goals are rather technical in nature and will not become entirely clear until later in this appendix, when some of the terms they mention (for example, document type definition) are explained. However, most goals immediately give valuable insight to the intent of XML.
1.XML shall be straightforwardly usable over the Internet.
2.XML shall support a wide variety of applications.
3.XML shall be compatible with SGML.
4.It shall be easy to write programs that process XML documents.
5.The number of optional features in XML is to be kept to the absolute minimum, ideally zero.
6.XML documents should be human-legible and reasonably clear.
7.The XML design should be prepared quickly.
8.The design of XML shall be formal and concise.
9.XML documents shall be easy to create.
10.Terseness in XML markup is of minimal importance.
Goal 1: XML shall be straightforwardly usable over the Internet
This goal does not mean that XML documents should be readable using the current breed of browsers. Instead, this goal refers to the bigger picture: taking into account the needs of distributed applications running in a large-scale networked environment, such as the Internet. Web Service makes this goal a reality. As for which browsers support XML, Internet Explorer 5.x and later as well as Netscape Navigator 6.x support XML.
Goal 2: XML shall support a wide variety of applications
This second goal can be seen as counter-balancing the first goal. XML is designed to work well on the Internet, but it is not limited to the Internet. Testimony that this goal has been reached is the large number of application domains outside the Net where XML is used, such as publishing, data interchange, and database applications. Moreover, rapid adoption of XML has been facilitated by a proliferation of tools: authoring tools, simple filters, display engines, formatting engines, and translators.
Goal 3: XML shall be compatible with SGML
This goal was established so that SGML tools could process (that is, parse) XML documents. This goal has 4 sub-goals:
1.Existing SGML tools will be able to read and write XML data.
2.XML instances are SGML documents as they are, without changes to the instance.
3.For any XML document, a document type definition (DTD) can be generated such that SGML will produce "the same parse" as would an XML processor.
4.XML should have essentially the same expressive power as SGML.
While this goal (and its sub-goals) ensures that an XML document is also an SGML document, the reverse is not true: an SGML document is NOT an XML document. This is because XML leaves out many of the complex features of SGML.
Goal 4: It shall be easy to write programs that process XML documents
This goal was originally quantified by the benchmark that someone with a computer science degree should be able to write a basic XML processor in a week or two. In hindsight, this quantitative goal may have been a bit too ambitious, but the large number of available (many of them freely) XML processors is a clear indication that this goal has been reached

A Brief Lesson in HTML
Because HTML bears a lot of resemblance to XML, a brief synopsis of this language follows. If you know HTML, this lessens the learning curve of XML. (If you don't know HTML, don't worry — we explain everything step by step.) To simplify the presentation, our coverage of HTML omits some details (for example, it may imply something is required when it is actually optional) and is limited to what is has in common with XML. Of course, you are already aware of the main distinction between the two languages: XML is extensible while HTML is not (more about this a little later).
HTML is the language used to describe Web pages. A Web page is a document that contains special markers, called tags, that define how the content is to be presented in a web browser. A starting marker and an ending marker (we'll go ahead and call them tags from now on) surrounds the content, for example: <tag>content</tag>.
The starting tag, content, and ending tag together are called an element. Angled brackets (< and >) surround both the starting tag and the ending tag. The end tag uses the same word contained in the starting tag preceded by a forward slash ( / ). So if the starting tag is <font>, the ending tag has to be </font>. In XML, tags are case-sensitive, so the words used in the starting and end tag have to match case. Therefore, in XML, you cannot use <font> (with a lowercase f) for the starting tag and </Font> (with a uppercase F) for the ending tag. In HTML, tags are not case-sensitive, so the tags with different capitalization would be accepted.
In HTML, the tags you may use are predefined. Examples of HTML tags are h1 (<h1> and </h1>) for Header 1 and b (<b> and </b>) for bold. Knowing HTML means knowing when to use each predefined tag. For example, to have the word "Abbreviation" show up in bold face in the browser, you would write <b>Abbreviation</b>. When the browser reads this combination of tag and content, it strips out the tags and display the content in bold face.
An arbitrary combination of HTML tags and content does not usually produce a valid HTML document. An HTML page must follow a certain structure. The content of the document must be enclosed between <html> and </html> and consists of a head and a body. Each of these sections is delimited by tags (not surprisingly called head and body) and contains content, optionally surrounded by presentation tags. Listing A-1 shows the structure of an HTML document. Incidentally, this listing also demonstrates how comments are embedded in an HTML page: <!-- COMMENT GOES HERE -->
Listing A-1: The Structure of an HTML Document
<html>
<head>
<!-- HEAD CONTENT GOES HERE --> </head>
<body>
<!-- BODY CONTENT GOES HERE --> </body>
</html>

Note Comments are ignored and have no effect on how the page is displayed in the browser. They are merely used to convey information to the human reader of the HTML source code. Some comments contain special codes that specific programs (for example the Web server) understand, but this is outside the scope of this brief discussion of HTML.
HTML also has a mechanism to add further information to a tag, called attributes. An attribute specifies a property that belongs to a tag, such as the size of a font. For example to have the word "Meaning" appear in a font with size 4, you would write
<font size="4">Meaning</font>
As you can see from the example above, attributes are written in the starting tag and a space separates the tag name from the attribute name. They take the form
attribute_name=value_string
or, showing the element in its entirety:
<tag attribute_name=value_string>content</tag>
In HTML, the attributes you can use with each tag are predefined, just like the tags. The font tag, for example, has a size attribute. Attribute values must be enclosed in a pair of double or single quotes (it does not matter which ones you use as long as the opening and closing quote are of the same type).
A tag may contain more than one attribute. Each attribute is separated by a space. For example, you may want to specify the border, width and height of a table, for example
<table border="1" width="359" height="110"></table>
Actually, HTML also accepts attribute values that are not enclosed in quotes. XML, on the other hand, requires the quotes. You may have recognized a trend here: XML has a stricter set of rules than HTML.
Listing A-2 shows a simple HTML document, mixing tags (some with one or more attributes) with content. Just in case you are trying to decipher the HTML tags in this document, here is how an HTML table is created (an HTML table looks like a table in a word processor). The table is enclosed in a <table> tag. Each row is enclosed in a <tr> (table row) tag. Within each row a cell is created using the <td> (table divisor) tag. The rest of the HTML document is pretty self-explanatory. (Don't worry if there is a detail you don't understand when reading this HTML document. This is a section about XML, so the HTML coverage is superficial.)
Listing A-2: A Simple HTML Document
<html>
<head>
<title>A Glossary in HTML</title> </head>
<body>