
C# ПІДРУЧНИКИ / c# / Hungry Minds - C# Bible
.pdfNext, add the SqlCommand control to the Web service. The SqlCommand control is used to specify commands that need to be executed on the data source. Follow these steps to add an SqlCommand control to your application:
1.Drag the SqlCommand control from the toolbox to the Component Designer.
2.Open the Properties window and select sqlConnection1 for the Connection property of the SqlCommand control.
Next, you need to generate a dataset for storing data that is retrieved by the data controls:
1.To generate the dataset, select the SqlCommand1 control that you added in the preceding steps, and select the Data → Generate Dataset menu option.
2.The Generate Dataset dialog box opens. In this dialog box, the Products table of the Sales database is already selected. Select the Add This Dataset to the Designer check box, and click OK to generate the dataset and add it to the Component Designer.
The four controls that you added to the Web service are now visible in the Component Designer. You now need to code the methods of the Web service, which you do in the next section.
Coding the Web service
After you add the data controls to the Web service, you need to code the methods of the Web service. This chapter demonstrates how you can code a method to add products to the Products database by using the Web service.
Before you code the methods of the Web service, add a description to and change the default namespace of the Web service. The description and the namespace of the Web service enable a Web service client developer to understand the usage of the Web service. To add a description and change the default namespace associated with the Web service, follow these steps:
1.Double-click the Component Designer to open the Code Editor.
2.In the Code Editor, locate the statement public class Service1.
3.Add the following code before the statement that you located in Step 2:
4.[WebService(Namespace="http://ServiceURL.com/products/",
5.Description="Use the Web service to add products to the
6.Sales
database.")]
After you enter the preceding line of code, the namespace of the Web service is http://ServiceURL.com/products/, and a description is added to the Web service.
Next, write the code for adding products to the Products table. This code needs to be written immediately below the declaration of the Web service. The code for the AddProduct method, which adds product details to the Products table, is as follows:
[WebMethod(Description="Specify the product ID, product name, unit price, and quantity to add it to the Sales catalog")] public string AddProduct(string PID, string ProductName, int Price, int Qty)
{
try
{
ProductName=ProductName.Trim(); if (Price<0)
return "Please specify a valid value for price"; if (Qty<0)
return "Please specify a valid value for quantity"; sqlConnection1.Open();
sqlCommand1.CommandText="INSERT INTO Products(ProductID, ProductName, UnitPrice, QtyAvailable) VALUES ('" +
PID +
"', '" + ProductName + "', '" + Price + "', '" + Qty
+
"')";
sqlCommand1.ExecuteNonQuery();
sqlConnection1.Close();
return "Record updated successfully";
}
catch(Exception e)
{
return e.Message;
}
}
The preceding code uses the sqlConnection1 control to add a record to the Products table. When you add records to the Web service, you use the values that are supplied to the AddProduct function as parameters.
As you code the AddProduct method of the Web service, you can code other methods to retrieve product details in the Products database or perform other custom actions. To test the Web service after you add the methods to it, follow these steps:
1.Select Build → Build Solution to build the Web service.
2.To start debugging the Web service, select the Debug → Start menu option.
The Web service opens in Internet Explorer. The first dialog box displays the methods that you coded for your Web service. To test the AddProduct method, follow these steps:
1.Click AddProduct on the Service1 Web Service dialog box.
2.The AddProduct dialog box opens, as shown in Figure 28-4. In this dialog box, you can invoke the AddProduct function after supplying the required parameters to test its output.
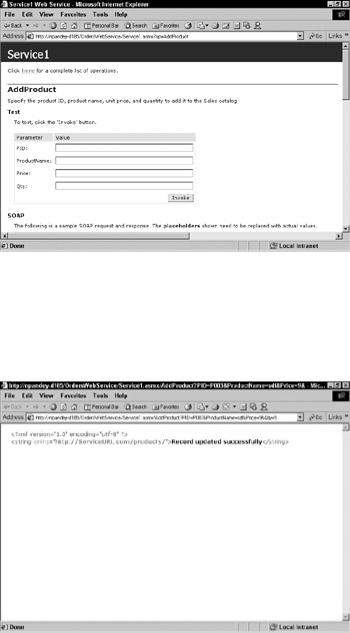
Figure 28-4: Specify the parameters for the AddProduct function in order to test it.
3.Type the parameters for PID, ProductName, Price, and Qty as P002, PDA, 100, 200, respectively, and click Invoke to test its output.
4.When the record is added successfully to the Web service, you see the output displayed in Figure 28-5.
Figure 28-5: Output such as this appears when a record is successfully added to the Web service.
After you successfully test your Web service, you can create a Web service client to access the Web service.
Creating a Web Service Client
A Web service client in ASP.NET is a Web application that comprises one or more WebForms. In this section, you create an ASP.NET Web application that accesses the Web service you created in the previous section.
Cross-Reference For more information on WebForms, see Chapter 22, "Creating Web Applications with WebForms."
To create a Web service client, you need to follow these steps:
1.Create a new ASP.NET Web Application project.
2.Add a Web reference to the Web application.
3.Implement the methods of the Web service in the Web application.
The following section examines each of these steps in detail.
Creating a new ASP.NET Web application project
To create a Web application project, follow these steps:
1.Select the File → New → Project menu option. The New Project dialog box opens.
2.In the New Project dialog box, select the ASP.NET Web Application project template from the Visual C# Projects list.
3.Enter OrdersWebApplication as the name of the project and click OK to create the Web application.
Adding a Web reference
After you create the Web service, you need to add a Web reference to the Web service that you created in the preceding section. When you add a Web reference, the Web service client downloads the description of the Web service and creates a proxy class for the Web service. A proxy class includes proxy functions for methods of the Web service. To add a Web reference to the Web service, follow these steps:
1.Select the WebForm1.aspx Web form and then Select the Project → Add Web Reference menu option. The Add Web Reference menu option opens.
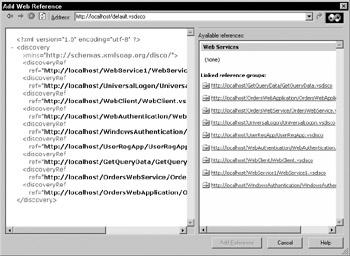
2.In the Add Web Reference dialog box, click the Web References on Local Web Server link. The Web services available on the local Web server appear in the Available references list, as shown in Figure 28-6.
Figure 28-6: Available Web services are displayed in the Add Web Reference dialog box.
3.In the Add Web Reference dialog box, select the link to the OrdersWebService Web service, and click Add Reference to add a reference to the Web service.
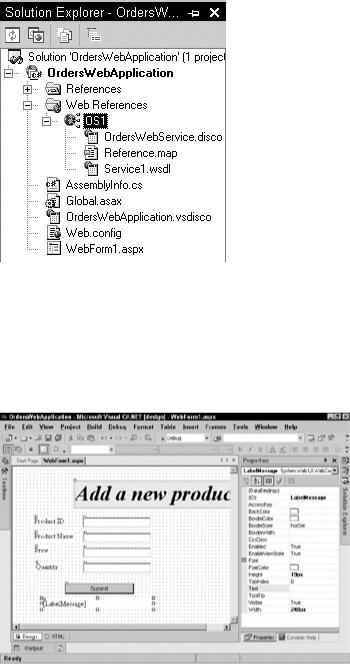
The reference to the Web service that you add appears in the Solution Explorer. By default, it is named localhost. You can change the name of the Web service to a name of your choice. In Figure 28-7, it is named OS1.
Figure 28-7: References to Web services appear in the Solution Explorer.
Implementing the methods of the Web service
To implement the methods of the Web service, you need to design a WebForm. The WebForm accepts information that needs to be added to the Sales database. The WebForm designed for the Web application is shown in Figure 28-8.
Figure 28-8: Design a WebForm to accept information from users.
To design the form, you can add the controls listed in Table 28-2.
|
|
Table 28-2: Web Form Controls |
|
|
|
Control Type |
|
Properties Changed |
|
|
|
|
|
Table 28-2: Web Form Controls |
|
|
|
Control Type |
|
Properties Changed |
|
|
|
Label |
|
Six labels were added: the main caption of the page, Product ID, |
|
|
Product Name, Price, Quantity, and Message, respectively. The ID of |
|
|
the last label was changed to LabelMessage and its text cleared. |
|
|
|
TextBox |
|
ID=PID |
|
|
|
TextBox |
|
ID=ProductName |
|
|
|
TextBox |
|
ID=Price |
|
|
|
TextBox |
|
ID=Quantity |
|
|
|
Button |
|
ID=Submit |
|
|
Text=Submit |
|
|
|
After you design the WebForm, write the code for the Click event of the Submit button. When the user clicks the Submit button, the code of the Click event should do the following:
1.Create an instance of the Web service.
2.Call the AddProduct method of the Web service, passing the values entered by the user on the WebForm as parameters.
3.Display the return value from the AddProduct method in the LabelMessage label.
Following is the code of the Click event of the Submit button that accomplishes the preceding tasks:
Tip To enter code for the Click event of the Submit button, double-click the Submit button in the design view.
private void Submit_Click(object sender, System.EventArgs e)
{
OS1.Service1 Web1=new OS1.Service1(); LabelMessage.Text=Web1.AddProduct(PID.Text, ProductName.Text,
Convert.ToInt32(Price.Text), Convert.ToInt32 (Quantity.Text));
}
4.Select Debug → Start to run the Web service. The output of the Web application is shown in Figure 28-9.
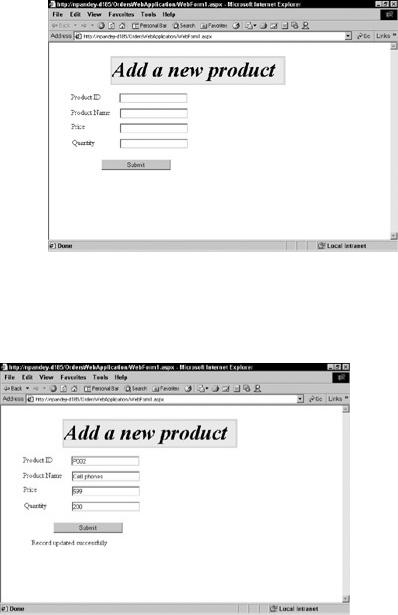
Figure 28-9: This WebForm represents the output of the Web application.
Specify values in the Product ID, Product Name, Price, and Quantity text boxes and click Submit. The Web application adds the required information to the Sales data-base, and a message appears in the LabelMessage label, as shown in Figure 28-10.
Figure 28-10: You can add a record to the Sales database through the Web application.
Deploying the Application
The last step in integrating various Visual Studio .NET applications is to deploy the application that you have built. To deploy your application, you can use one or more deployment projects provided by Visual Studio .NET. The following sections examine the deployment projects provided by Visual Studio .NET and then describe the steps you take to deploy an ASP.NET application.
Deployment projects in Visual Studio .NET
Visual Studio .NET provides four types of setup projects: Cab projects, Merge Module projects, Setup projects, and Web Setup projects. The following list describes these project types:
•Cab projects: You can create a cabinet (CAB) file for packaging ActiveX controls. When you package an ActiveX control in a CAB file, the control can be downloaded from the Internet.
•Merge Module projects: You can create a merge module for application components that you want to include in a number of applications. For example, a server control that you might have created can be packaged as a merge module project that you can include in Setup projects for your Windows applications.
•Setup projects: You can use a Setup project for packaging Windows applications. A Setup project creates a Microsoft Installer (MSI) file that can be used to install an application on the destination computer.
•Web Setup projects: For an ASP.NET Web application or Web service, you can use the Web Setup project template.
The next section describes how to create a deployment project for an ASP.NET Web application.
Using the deployment project to deploy an application
The steps for deploying an ASP.NET application are as follows:
1.In the Solution Explorer window, right-click the solution, OrdersWebApplication. From the shortcut menu that appears, select Add → New Project.
2.In the Add New Project dialog box that opens, select Setup and Deployment Projects from the Project Types pane.
3.In the Templates pane, select Web Setup Project. Type the name of the project as WebSetupDeploy, and click OK. The new project is added to the solution and is seen in the Solution Explorer window. By default, the File System Editor is open for the deployment project. The File System Editor helps you add files to the deployment project.
4.In the File System Editor (the left-most pane), select WebApplication Folder.
5.To add the output of the OrderWebApplication to the deployment project, select Action → Add → Project Output. The Add Project Output Group dialog box opens.
6.In the Add Project Output Group dialog box, select OrderWebApplication from the Projects drop-down list, if necessary.
7.Hold down the Ctrl key and select Primary Output and Content Files from the list of files. The selected options are shown in Figure 28-11.
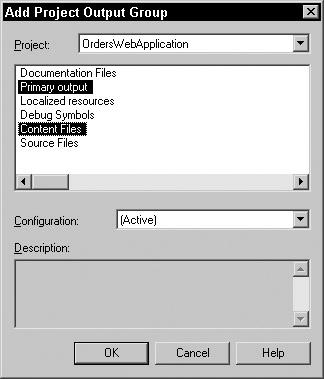
Figure 28-11: The Add Project Output Group dialog box shows the options you selected.
8.Click OK to close the Add Project Output Group dialog box.
9.In the File System Editor window, right-click Web Application Folder. From the shortcut menu, select Properties Window to open the Properties window.
10.Type OrderWebApplication as the name of the virtual directory in the VirtualDirectory property and close the Properties window.
11.Select the Build → Build Solution menu option.
A Microsoft Installer (MSI) file for your project is created. You can double-click the file to install your application on a computer.
Deploying a project by using the Copy Project option
If you do not want to take the trouble of creating a deployment project for your application and using the project to deploy your application, you can also use the Copy Project option in Visual Studio .NET to copy all files of your application to the destination folder.
The Copy Project option is useful when you need to deploy a project over a network. However, this option does not work when you need to deploy your application on a remote computer that is not accessible on a network.
To use the Copy Project option, follow these steps:
1.Open the project that you want to copy.
2.Select the Project → Copy Project menu option. The Copy Project dialog box opens.
3.Specify the destination path where you want to copy the project in the Destination project folder dialog box.
4.Select the files of the project that you want to copy, and click OK. Your project is copied to the destination that you specified in Step 3. After you copy the project, you can run the project from the new location.
Summary
The role of C# in ASP.NET pertains to Web services and Web applications. You can create a Web service by using the C# language syntax in ASP.NET. You can also create a Web application that accesses the Web service and builds upon its functionality.
When you create an application in ASP.NET, you first design the database that needs to be used in the application. Next, you create a new project in ASP.NET by using the ASP.NET Web Application or ASP.NET Web Service project templates.
After creating a project in ASP.NET, you use the data controls that are provided by Visual Studio .NET to connect to a data source and utilize it.
If you have created a Web service, you can also create a Web application to utilize the Web methods that are provided by the Web service.
Chapter 29: Building Custom Controls
In This Chapter
In this chapter you learn to build custom controls. These controls may take the form of a visible component that can be added to a form or may simply be a class object encapsulated within a DLL. In each instance, these controls build upon your knowledge of code reuse when you begin to package and distribute functionality as a control that can be used time and again.
Understanding the Windows Control Library
A Windows Control Library is a project that enables you to build components similar to those displayed within the toolbox of the Visual Studio IDE. In the past, these controls have always been COM objects or ActiveX controls. You can now add COM components to the toolbox, or you can create a control that presents itself in the form of a dynamic link library (DLL).
Previous versions of Visual Studio provided wizards to help with the creation of controls, and Visual Studio.NET is no different. The tasks associated with creating properties, methods, and fields are simplified because of the included wizards.
Properties
You use properties primarily for setting and retrieving control parameters. When properties are granted both Read and Read-Write access at design time, they consist of two functions called get and set. Since a property must call a method when values are assigned or retrieved from it, it can perform calculations or other useful functions at the drop of a hat. In this respect, they are much different from fields. An example of a property would be the
