

C# ПІДРУЧНИКИ / c# / Hungry Minds - C# Bible
.pdf//call DrawIcon passing the x and y coordinates g.DrawIcon(i, 150, 15);
//draw a Rectangle
Pen p2;
p2 = new Pen(Color.PapayaWhip, 7);
/* draw the Rectangle passing the x, y, * height and width */
g.DrawRectangle(p2, 50, 50, 100, 100);
}
If you call this method from a Windows Forms application, your results will look something like what is shown in Figure 26-1.
Alone, the Graphics class does nothing. To create lines, rectangles, images, and fonts, you use other objects along with the Graphics object. Listing 26-1 created a Pen object to use in conjunction with the Graphics object to draw a red line on the form. It also created an Icon object, which the Graphics object used to draw the desktop icon on the form. As mentioned earlier, you can perform numerous tasks with GDI+; draw shapes and lines, manipulate images, and work with fonts. The following sections delve more deeply into these topics, describing how you can use objects such as the Pen, Brush, and Image in conjunction with members of the Graphics class to take full advantage of the vast array of GDI+ capabilities in
.NET.
Working with Images in GDI+
If you need to render images that exist in the file system, the Image class gives you the capability to render images on surfaces created with the Graphics object. Contained in the System.Drawing namespace, the Image class is an abstract class that provides you with all of the functionality you need to use bitmaps, icons, and metafiles with a Graphics object to render predefined Image objects on a form. The rendered images can come directly from the file system, or they can come from a memory stream; either way, you are still dealing with some sort of image source. Images can be of type JPG, ICO, or BMP.
In Listing 26-2, you load a JPG file from the local drive to display on a form. This example is slightly different from what you have done earlier. Here, you are going to override the OnPaint event of the form so that the image will not be destroyed if another window happens to sit on top of your window. This example also shows you how to implement calling Dispose method in the Graphics object that is used to paint the JPG image when the form is destroyed.
Listing 26-2: Using Images with GDI+
namespace RenderJPG
{
public class Form1 : System.Windows.Forms.Form
{

private System.ComponentModel.Container components = null;
// declare image variable private Image img;
public Form1()
{
InitializeComponent();
// load the image
img = new Bitmap(@"C:\money.jpg");
//
}
protected override void Dispose( bool disposing )
{
if( disposing )
{
// Call DISPOSE on the Img object img.Dispose();
//
if (components != null)
{
components.Dispose();
}
}
base.Dispose( disposing );
}
static void Main()
{
Application.Run(new Form1());
}
// override the OnPaint event
protected override void OnPaint(PaintEventArgs p)
{
Graphics g = p.Graphics; g.DrawImage(img, 0,0);
}
}
}
Running this application should produce output similar to that shown in Figure 26-2.

Figure 26-2: Output from Listing 26-2 using a JPG with GDI+
The DrawImage method used to paint the image on the form has about 20 overloaded constructors. Basically, each one directs the method how to paint the image, such as coordinates or height and width. By making a simple change to the DrawImage method, you can fill the entire form with the bitmap. If you pass the constant ClientRectangle to DrawImage, as the next snippet demonstrates, your output will look like Figure 26-3, with the entire bitmap filling the screen:
Figure 26-3: Image filling the entire form
// override the OnPaint event
protected override void OnPaint(PaintEventArgs p)
{
Graphics g = p.Graphics; g.DrawImage(img, ClientRectangle);
}
You can also return properties on an image without displaying it. In the following Load event, you examine several of the available properties of the money.jpg image that you loaded earlier:
private void Form1_Load(object sender, System.EventArgs e)
{
MessageBox.Show (img.PhysicalDimension.ToString() );
MessageBox.Show (img.Height.ToString() );
MessageBox.Show (img.Width.ToString() );
MessageBox.Show (img.RawFormat.ToString() );
MessageBox.Show (img.Size.ToString() );
}
Table 26-3 describes each of the properties that are available for images through the Image class.
|
|
Table 26-3: Image Class Properties |
|
|
|
Property |
|
Description |
|
|
|
Flags |
|
Gets attribute flags for this Image object |
|
|
|
FrameDimensionsList |
|
Gets an array of GUIDs that represent the dimensions of frames |
|
|
within this Image object |
|
|
|
Height |
|
Gets the height of this Image object |
|
|
|
HorizontalResolution |
|
Gets the horizontal resolution, in pixels-per-inch, of this Image |
|
|
object |
|
|
|
Palette |
|
Gets or sets the color palette used for this Image object |
|
|
|
PhysicalDimension |
|
Gets the width and height of this Image object |
|
|
|
PixelFormat |
|
Gets the pixel format for this Image object |
|
|
|
PropertyIdList |
|
Gets an array of the property IDs stored in this Image object |
|
|
|
PropertyItems |
|
Gets an array of PropertyItem objects that describe this Image |
|
|
object |
|
|
|
RawFormat |
|
Gets the format of this Image object |
|
|
|
Size |
|
Gets the width and height of this Image object |
|
|
|
VerticalResolution |
|
Gets the vertical resolution, in pixels-per-inch, of this Image object |
|
|
|
Width |
|
Gets the width of this Image object |
|
|
|
You can also use several methods in the Image class, which enable you to manipulate your images in virtually unlimited ways. The following code flips the image 90 degrees:
img.RotateFlip(RotateFlipType.Rotate90FlipY);
The RotateFlipType enumeration enables you to specify how you want to flip or rotate an image on the graphics surface.
Table 26-4 lists the remaining methods in the Image class that you can use to manipulate an image.
|
Table 26-4: Image Class Methods |
||
|
|
|
|
Method |
|
|
Description |
|
|
|
|
Clone |
|
|
Creates an exact copy of this Image object |
|
|
|
|
FromFile |
|
|
Creates an Image object from the specified file |
|
|
|
|
FromHbitmap |
|
|
Creates a Bitmap object from a Windows handle |
|
|
|
|
|
Table 26-4: Image Class Methods |
||
Method |
|
|
Description |
|
|
|
|
FromStream |
|
|
Creates an Image object from the specified data stream |
|
|
|
|
GetBounds |
|
|
Gets a bounding rectangle in the specified units for this |
|
|
|
Image object |
|
|
|
|
GetEncoderParameterList |
|
|
Returns information about the parameters supported by the |
|
|
|
specified image encoder |
|
|
|
|
GetFrameCount |
|
|
Returns the number of frames of the specified dimension |
|
|
|
|
GetPixelFormatSize |
|
|
Returns the color depth (number of bits per pixel) of the |
|
|
|
specified pixel format |
|
|
|
|
GetPropertyItem |
|
|
Gets the specified property item from this Image object |
|
|
|
|
GetThumbnailImage |
|
|
Returns the thumbnail for this Image object |
|
|
|
|
IsAlphaPixelFormat |
|
|
Returns a value that indicates whether the pixel format for |
|
|
|
this Image object contains alpha information |
|
|
|
|
IsCanonicalPixelFormat |
|
|
Returns a value that indicates whether the pixel format is |
|
|
|
canonical |
|
|
|
|
IsExtendedPixelFormat |
|
|
Returns a value that indicates whether the pixel format is |
|
|
|
extended |
|
|
|
|
RemovePropertyItem |
|
|
Removes the specified property item from this Image object |
|
|
|
|
RotateFlip |
|
|
This method either rotates, flips, or rotates and flips the |
|
|
|
Image object |
|
|
|
|
Save |
|
|
Saves this Image object to the specified Stream object in the |
|
|
|
specified format |
SaveAdd
Adds the information in the specified Image object to this Image object. The specified EncoderParameters object determines how the new information is incorporated into the existing image
SelectActiveFrame |
|
Selects the frame specified by the dimension and index |
|
|
|
SetPropertyItem |
|
Sets the specified property item to the specified value |
As this section has demonstrated, the Image class offers very robust capabilities when used with a Graphics object. In the next section, you learn how to use pens and brushes to work with images and draw shapes and lines.
Working with Pens and Brushes
As you have seen with the Image class, the System.Drawing namespace gives you everything you need to work with images that come from a stream or the file system. The .NET Framework also offers built-in support for working with shapes, lines, and images through the Pen and Brush classes. This section describes how to work with the Pen and Brush classes to manipulate shapes, lines, and images to achieve the effects you want.
Using the Pen class
The Pen class enables you to draw lines and curves on a graphics surface. The namespace that contains the features used by the Pen and Brush classes is the System.Drawing.Drawing2D namespace, so be sure to add this with the using statement in your class files. By setting various properties on an instance of a Pen, you can alter the outcome of the pen display. By calling methods in the Graphics class, you can dictate the type of shape you want to output.
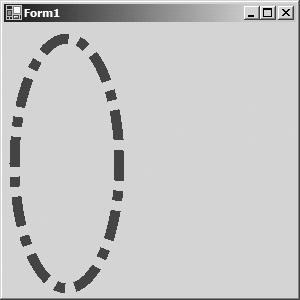
The following code sets the Color and DashStyle properties to create an ellipse resembling the one shown in Figure 26-4:
Figure 26-4: Drawing an ellipse using the Color and DashStyle properties private void Form1_Load(object sender,
System.EventArgs e)
{
Pen p = new Pen(Color.Blue, 10); p.DashStyle = DashStyle.DashDot ; Graphics g = this.CreateGraphics(); g.DrawEllipse(p, 10, 15, 105, 250);
}
Table 26-5 lists the possible values of the DashStyle enumeration used to set the style of the dashed line in the ellipse.
|
|
Table 26-5: DashStyle Enumeration |
|
|
|
Value |
|
Description |
|
|
|
Custom |
|
Specifies a user-defined custom dash style |
|
|
|
Dash |
|
Specifies a line consisting of dashes |
|
|
|
DashDot |
|
Specifies a line consisting of a repeating pattern of dash-dot |
|
|
|
DashDotDot |
|
Specifies a line consisting of a repeating pattern of dash-dot-dot |
|
|
|
Dot |
|
Specifies a line consisting of dots |
|
|
|
Solid |
|
Specifies a solid line |
|
|
|
You can also customize lines with the StartCap and EndCap properties using the LineCap enumeration, which is also located in the System.Drawing.Drawing2D namespace. Listing

26-3 illustrates several variations using the LineCap enumeration to draw different types of lines, which results you can see in Figure 26-5.
Figure 26-5: Using the LineCap enumeration
Listing 26-3: Using the LineCap Enumeration
protected override void OnPaint(PaintEventArgs e)
{
Graphics g = e.Graphics;
Pen p = new Pen(Color.Brown, 15);
// set the Arrow
p.StartCap = LineCap.ArrowAnchor ; p.EndCap = LineCap.ArrowAnchor ; g.DrawLine(p,30, 30, Width-50, 30);
// round ends
p.StartCap = LineCap.Round ; p.EndCap = LineCap.Round ; g.DrawLine(p,30, 80, Width-50, 80);
// round Anchor
p.StartCap = LineCap.RoundAnchor ; p.EndCap = LineCap.RoundAnchor ; g.DrawLine(p,30, 120, Width-50, 120);
// triangle
p.StartCap = LineCap.Triangle ; p.EndCap = LineCap.Triangle ; g.DrawLine(p,30, 150, Width-50, 150);
// square Anchor
p.StartCap = LineCap.SquareAnchor; p.EndCap = LineCap.SquareAnchor ; g.DrawLine(p,30, 190, Width-50, 190);
}
Figure 26-5 shows the results of running the preceding code using the LineCap enumeration.
Using the Brush class
Using the Brush class in conjunction with a Graphics object gives you the capability to render images and solid objects on a drawing surface. The following code demonstrates how to create a solid filled ellipse:
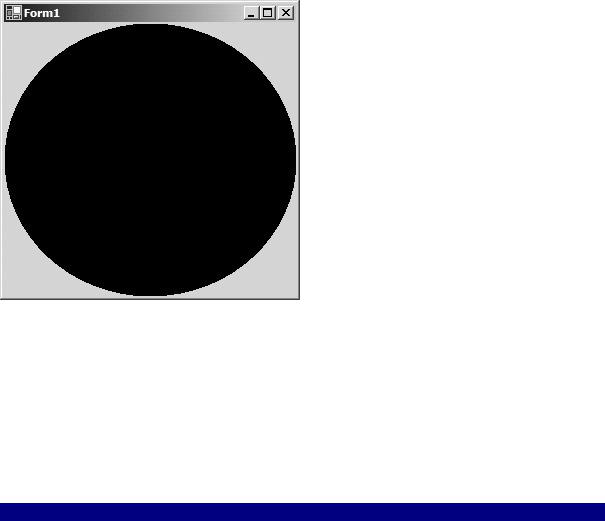
protected override void OnPaint(PaintEventArgs e)
{
Graphics g = e.Graphics;
SolidBrush sb = new SolidBrush(Color.Black); g.FillEllipse(sb, ClientRectangle);
}
Running the preceding code produces an image like the one shown in Figure 26-6.
Figure 26-6: A solid ellipse using a brush
The types of brush that you can create come in several flavors. A SolidBrush, which was used in the preceding example, fills a shape with a solid color. Using a HatchBrush enables you to get a little crazy with the way your graphics appear. The HatchBrush uses the HatchStyle enumeration and the HatchFill enumeration to display different pattern types. Listing 26-4 prints several of the HatchBrush variations using the HatchStyle enumeration. The HatchStyle enumeration has over 40 members, so it is worth looking up in the .NET Framework SDK. If you ever need to do any type of pattern drawing, you can find substantial support.
Listing 26-4: Using the HatchBrush Class with HatchStyles
protected override void OnPaint(PaintEventArgs e)
{
Graphics g = e.Graphics;
HatchBrush hb =
new HatchBrush (HatchStyle.Plaid, Color.AntiqueWhite ,Color.Black);
g.FillEllipse(hb,30, 30, Width-50, 30);
HatchBrush hb2 = new HatchBrush (HatchStyle.LargeCheckerBoard, Color.AntiqueWhite ,Color.Black);
g.FillEllipse(hb2, 30, 80, Width-50, 30);
HatchBrush hb3 =
new HatchBrush
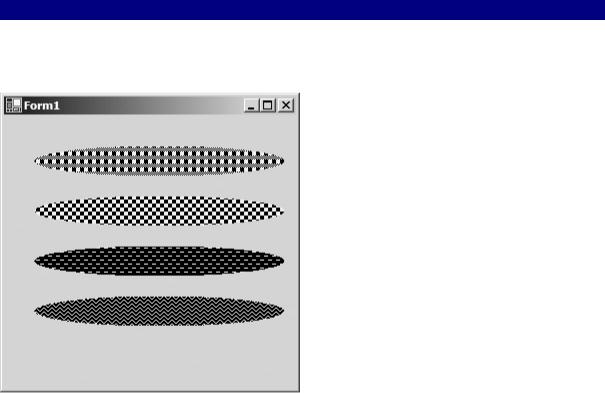
(HatchStyle.DashedHorizontal, Color.AntiqueWhite ,Color.Black);
g.FillEllipse(hb3, 30, 130, Width-50, 30);
HatchBrush hb4 = new HatchBrush
(HatchStyle.ZigZag, Color.AntiqueWhite ,Color.Black);
g.FillEllipse(hb4, 30, 180, Width-50, 30);
Running the preceding code produces something similar to what is shown in Figure 26-7.
Figure 26-7: HatchBrush with different HatchStyles
Table 26-6 describes each of the pen types available in the PenType enumeration that you can use with the Brush class, You have already seen HatchFill and SolidColor in action. Based on their descriptions, you can probably imagine the other brush types without seeing them in action.
|
Table 26-6: PenType Enumeration |
||
|
|
|
|
Member |
|
|
Description |
|
|
|
|
HatchFill |
|
|
Specifies a hatch fill |
|
|
|
|
LinearGradient |
|
|
Specifies a linear gradient fill |
|
|
|
|
PathGradient |
|
|
Specifies a path gradient fill |
|
|
|
|
SolidColor |
|
|
Specifies a solid fill |
|
|
|
|
TextureFill |
|
|
Specifies a bitmap texture fill |
|
|
|
|
Working with text and fonts also requires using a Brush object along with a Graphics object. To use text, you create an instance of the Font class, which resides in the System.Drawing namespace, and set the face, style, and text size properties, and then call the DrawString
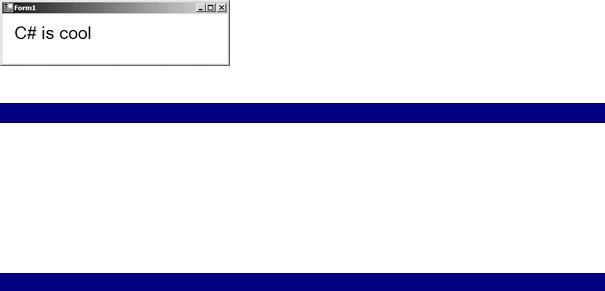
method from the Graphics object that will hold the brush. Listing 26-5 prints the phrase C# is cool onto the current form and outputs something similar to what is shown in Figure 26-8.
Figure 26-8: Using the DrawString method and the Font class to output text Listing 26-5: Using the DrawString Method
protected override void OnPaint(PaintEventArgs e)
{
Graphics g = e.Graphics; e.Graphics.FillRectangle(
new SolidBrush(Color.White), ClientRectangle);
g.DrawString("C# is cool", this.Font,
new SolidBrush(Color.Black), 15, 15);
}
Note In .NET, fonts used on a Form object are inherited from the form itself. In this example, the font property in the form is set to 24, so when the this.Font value is passed to the DrawString method, it uses the current font size of the form.
Table 26-7 lists the available properties of the Font class. By setting or retrieving these properties on Font objects that you create, you can completely control the output of the text on the screen.
|
|
Table 26-7: Font Class Properties |
|
|
|
Property |
|
Description |
|
|
|
Bold |
|
Gets a value that indicates whether this Font object is bold |
|
|
|
FontFamily |
|
Gets the FontFamily object associated with this Font object |
|
|
|
GdiCharSet |
|
Gets a byte value that specifies the GDI character set that this Font |
|
|
object uses |
|
|
|
GdiVerticalFont |
|
Gets a Boolean value that indicates whether this Font object is |
|
|
derived from a GDI vertical font |
|
|
|
Height |
|
Gets the height of this Font object |
|
|
|
Italic |
|
Gets a value that indicates whether this Font object is italic |
|
|
|
Name |
|
Gets the face name of this Font object |
|
|
|
Size |
|
Gets the em size of this Font object in design units |
|
|
|
SizeInPoints |
|
Gets the size, in points, of this Font object |
|
|
|
Strikeout |
|
Gets a value that indicates whether this Font object specifies a |
|
|
horizontal line through the font |
|
|
|
Style |
|
Gets style information for this Font object |
|
|
|
Underline |
|
Gets a value that indicates whether this Font object is underlined |
|
|
|