

C# ПІДРУЧНИКИ / c# / Hungry Minds - C# Bible
.pdf{
///<summary>
///Summary description for Class1.
///</summary>
public class Class1
{
public Class1()
{
//
// TODO: Add constructor logic here
//
}
}
}
Visual Studio has created a namespace, a class, and a class constructor. Both the class and class constructor are public. This isn't coincidental. Any application that uses this library needs access to both the class and specific members within the class.
1.To begin your sample, you remove the class and class constructor and replace it with the code shown in Listing 29-10.
Listing 29-10: The Calc Class and Constructor
public class Calc
{
public Calc()
{
}
}
2.The Calc class is where you place your windchill calculation method. This ensures that your windchill calculation is separated from the conversion methods that you will soon add. Paste the code shown in Listing 29-11 into the Calc class.
Listing 29-11: Calculate the Current Windchill
public double WindChill(double DegreesF, double WindSpeedMPH)
{
double WindRaised;
WindRaised = System.Math.Pow(WindSpeedMPH,.16);
return 35.74 + (.6215 * DegreesF) - (35.75 * WindRaised) + (.4275
*DegreesF
*WindRaised);
}
}

3.You will also be adding a few methods that aren't calculations, but rather conversions. Therefore, you need to add a new class. This new class will be called Conversion, as shown in Listing 29-12. Add the new class and class constructor to the project.
Listing 29-12: Add a Second Class to the Class Library
public class Conversion
{
public Conversion()
{
}
}
4.Begin your new class with a function that calculates the temperature in Fahrenheit, given the Celsius temperature. Both the return value and parameter are unlikely to be integer values, so it's important to make both double values. Listing 29-13 contains the function listing in its entirety. Add this code to the Conversion class.
Listing 29-13: Celsius to Fahrenheit Conversion
public double CelcToFahr(double Celsius)
{
return (9/5) * (Celsius + 32);
}
5.Because you have included a Celsius to Fahrenheit conversion function, it is only logical to include a conversion in the opposite direction. Add the method shown in Listing 29-14 to the Conversion class.
Listing 29-14: Fahrenheit to Celsius Conversion
public double FahrToCelc(double Fahrenheit)
{
return (5/9) * (Fahrenheit - 32);
}
That concludes the functionality you want to include in the Class Library object, so you can create the DLL by selecting Build Solution from the Build menu. Now that everything is in place, take a look at how to go about utilizing the public methods contained therein.
1.Create a new console application project and name it DLLTest. From the Project menu, choose Add Reference, and then click the Browse button. Locate the DLL that you just created and double-click it. You can then click OK to exit the Add Reference window.
2.After you add a reference, you can simply create a new variable of the appropriate type, and reference the method of your choice. Listing 29-15 contains the entire code listing for the DLLTest application.
Listing 29-15: DLLTest Application Source Code
using System;
namespace DLLTest
{
///<summary>
///Summary description for Class1.
///</summary>
class Class1
{
static void Main(string[] args)
{
Temperature.Calc WCMethod = new Temperature.Calc(); Temperature.Conversion ConvMethod = new
Temperature.Conversion();
Console.WriteLine("Wind chill at 50 degrees with 35 MPH : {0} Degrees",WCMethod.WindChill(50,35));
Console.WriteLine("32 Degrees Fahrenheit to Celsius : {0} Degrees",ConvMethod.FahrToCelc(32));
Console.WriteLine("0 Degrees Celsius to Fahrenheit : {0} Degrees",ConvMethod.CelcToFahr(0));
}
}
}
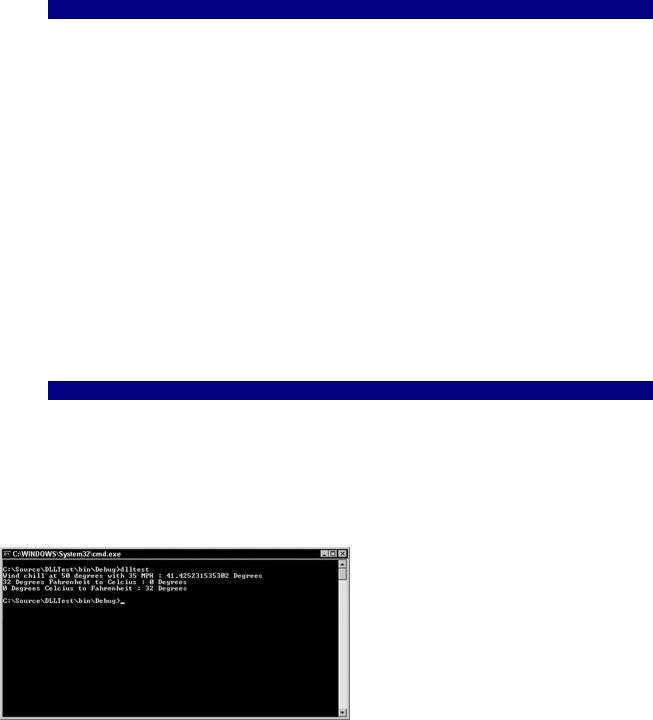
Accessing the methods is a very simple task: create new variables of type Temperature.Conversion and Temperature.Calc and then access their public methods. This sample application calculates the current windchill given a temperature of 50 degrees with a 35-mile-per-hour wind speed; and then it calculates temperatures in both Celsius and Fahrenheit. The output from this application is shown in Figure 29-8.
Figure 29-8: DLLTest shows you how to use a Class Library control.
Summary
.NET introduces some extremely important advances in the way that you build controls. As you build controls for your own projects or to deploy to the Web, advances in programming, such as the State object, poke their heads out and save you an enormous amount of time.
Chapter 30: Building Mobile Applications
In This Chapter
Mobile Web applications are a group of emerging technologies that enable you to deploy Web content to an even larger audience than the Internet currently provides. You can make corporate intranet applications available to employees who travel through company buildings or to employees a continent away as they travel on business. This chapter describes several areas of mobile Web applications.
Understanding the Wireless Web
The concept of accessing the Internet with mobile devices has been around for a while now but it has been slow to catch on. The proper tools for creating mobile Web content have been quite sparse. The .NET Framework, along with the Microsoft Mobile Internet Toolkit, enables you to create exciting Web applications for use on many different types of mobile devices.
These mobile devices can include Windows CE devices, Pocket PC-powered devices, and many mobile phones. Clearly, most mobile devices are extremely limited in comparison to the Web browsers we are accustomed to using. Not only do mobile devices provide less actual screen space for content, many of these devices are devoid of color, or otherwise lack the capability to display graphics.
This chapter begins by looking at the software you need, along with suitable emulators that you can use for testing purposes, in the event that you don't have access to an Internet-capable mobile device.
Introducing the Mobile Internet Toolkit
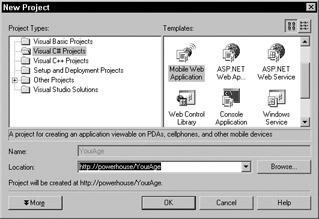
The Microsoft Mobile Internet Toolkit enables Visual Studio to create mobile Web applications by selecting it as a project from the New Project menu. This toolkit isn't currently packaged with Visual Studio .NET and thus must be downloaded separately from Microsoft's Web site.
The Mobile Internet Toolkit is currently in version 1.0 and can be download from http://msdn.microsoft.com/download. When you arrive on this page, you must select Software Development Kits in the left frame of your Web browser, and then select Microsoft Mobile Internet Toolkit.
The current Software Development Kit (SDK) is just over 4MB and contains many ASP.NET controls for generating Wireless Markup Language (WML) and several flavors of HTML, as well as the actual Visual Studio .NET add-in, documentation, and sample applications. Ensure that when you install the SDK, any instances of Visual Studio are shut down.
This example application accepts the year in which you were born and then calculates what your current age is (or will be).
1.Name the project YourAge, and when Visual Studio creates your skeleton application, you see a blank Mobile Web form titled Form1.
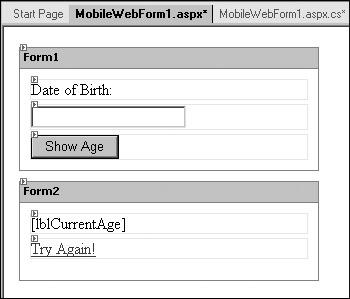
2.Right-click this form and select Copy. Now right-click below the form and select Paste. This application requires two forms: one for acquiring the information from the user and one for displaying the results.
3.Now that you have both forms, place a Button, a Label, and a TextBox control on Form1. Place a Label and a Link Label control on Form2. Arrange these controls as shown in Figure 30-2.
Figure 30-2: These forms are needed for your YourAge application.
Now that the controls have been arranged, you need to assign all their appropriate properties. Table 30-1 contains the properties for each control. Set them accordingly before moving on.
|
|
Table 30-1: YourAge Control Properties |
|
|||
|
|
|
|
|
|
|
Form |
|
Control |
|
Name Property |
|
Text Property |
|
|
|
|
|
|
|
Form1 |
|
Label |
|
Label1 |
|
Year of Birth |
|
|
|
|
|
|
|
Form1 |
|
Text Box |
|
txtDOB |
|
<Empty> |
|
|
|
|
|
|
|
Form1 |
|
Button |
|
Command1 |
|
Show Age |
|
|
|
|
|
|
|
Form2 |
|
Label |
|
lblCurrentAge |
|
<Empty> |
|
|
|
|
|
|
|
Form2 |
|
Link Label |
|
Link1 |
|
Try Again |
|
|
|
|
|
|
|
You need to set one other property before you can begin coding. Select the Link Label control and set the NavigateUrl property to Form1. This ensures that when the link is clicked, the user is returned to Form1 of the project.
Before you begin with the code necessary to power your program, examine the code behind these Mobile Web Forms. At the bottom of the Form Designer are two buttons labeled Design

and HTML. Click the HTML button to display the HTML code behind these forms, which should be similar to the code in Listing 30-1.
Listing 30-1: HTML Code Behind the YourAge Web Forms
<%@ Register TagPrefix="mobile" Namespace="System.Web.UI.MobileControls" Assembly="System.Web.Mobile, Version=1.0.3300.0, Culture=neutral, PublicKeyToken=b03f5f7f11d50a3a" %>
<%@ Page language="c#" Codebehind="MobileWebForm1.aspx.cs" Inherits="YourAge.MobileWebForm1" AutoEventWireup="false" %> <meta name="GENERATOR" content="Microsoft Visual Studio 7.0"> <meta name="CODE_LANGUAGE" content="C#">
<meta name="vs_targetSchema" content="http://schemas.microsoft.com/Mobile/Page">
<body Xmlns:mobile="http://schemas.microsoft.com/Mobile/WebForm"> <mobile:Form id="Form1" runat="server">
<mobile:Label id="Label1" runat="server">Year of Birth:</mobile:Label>
<mobile:TextBox id="txtDOB" runat="server"></mobile:TextBox> <mobile:Command id="Command1" runat="server">Show
Age</mobile:Command>
</mobile:Form>
<mobile:Form id="Form2" runat="server">
<mobile:Label id="lblCurrentAge" runat="server"></mobile:Label> <mobile:Link id="Link1" runat="server" NavigateUrl="#Form1">Try
Again!</mobile:Link>
</mobile:Form>
</body>
This code is standard HTML combined with some elements that are defined by the MobileControls namespace. This linking of the HTML page and the .NET MobileControls class can be seen in the line following Namespace. When you begin coding, note that several namespaces will have already been added to the project for just this reason.
You are now ready to begin coding your mobile Web application. This project requires code in one place. Double-click the button you previously placed on Form1. Listing 30-2 contains the code you should place behind the click event of this button.
Listing 30-2: Calculating the Age in the Click Event
private void Command1_Click(object sender, System.EventArgs e)
{
int iDOB = System.Convert.ToInt16(txtDOB.Text); int YearsOld;
if (iDOB > 1000) YearsOld = 2002 - iDOB;
else
YearsOld = 100 - iDOB + 2;
lblCurrentAge.Text = YearsOld.ToString() + " years old.";
ActiveForm = Form2;
}

In this section of code, you need to accomplish only a few tasks. First, you convert the year that is entered into an Integer value using the Convert class. Then, depending on the size of that year (either two-digit or four-digit), you calculate the age accordingly, using a current year of 2002.
After the age has been calculated you assign the age and a string to your current age label. Your application is now functional, but although you have assigned your output to the appropriate label, you still haven't shown the page that contains the information. In the last line of Listing 30-2, you set the ActiveForm to Form2. This loads Form2 into the user's browser to display the results.
You can run this application by pressing F5; and if all the coding was done correctly, your default Web browser opens. To view this application on a mobile device, run your favorite emulator and enter the URL accordingly. Figure 30-3 shows the application running in a Pocket PC emulator.
Figure 30-3: Running YourAge on a Pocket PC emulator
After you enter your birth year, click the Show Age button and you are presented with Form2, as shown in Figure 30-4.
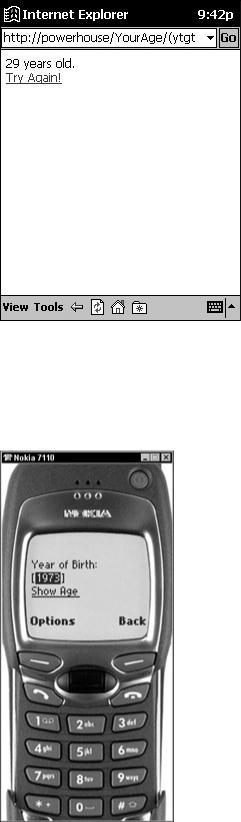
Figure 30-4: YourAge results on the Pocket PC
Congratulations on your first mobile Web application. For those of you who used either Internet Explorer or the Pocket PC emulator for testing purposes, you may be wondering just how the Web application presents itself on a mobile phone. Figure 30-5 shows the same application running in the Nokia cellular phone emulator.
Figure 30-5: The Nokia 7110 with the YourAge application running
As you can see, the page looks much the same as with the previous emulator with the exception of some navigation details. Because Pocket PCs are point-and-click devices, the navigation is handled much more smoothly. The cellular phone, on the other hand, handles all navigation using the 20 or so buttons it contains. Therefore, you can't simply click a button or
